The API Trigger block enables external systems to trigger your blueprint via HTTP API calls. Use it to integrate your agent with webhooks, external services, or other applications that need to programmatically execute your workflows.
Unlike the UI Trigger block that responds to user interactions in the interface, the API Trigger block accepts HTTP POST requests to trigger blueprint execution.
You must deploy your agent before you can trigger a blueprint via API.
Overview
When you add an API Trigger block to your blueprint, it creates a public HTTP endpoint that external systems can use to trigger your blueprint execution. This enables:
- Webhook integration: Receive notifications from external services like GitHub, Slack, or payment processors
- API-first workflows: Build workflows that can be triggered programmatically by other applications
- Scheduled automation: Use external schedulers like task schedulers or cloud functions to trigger workflows
- Cross-service communication: Enable microservices to trigger agent workflows
- Third-party integrations: Allow external tools and platforms to execute your agent’s capabilities
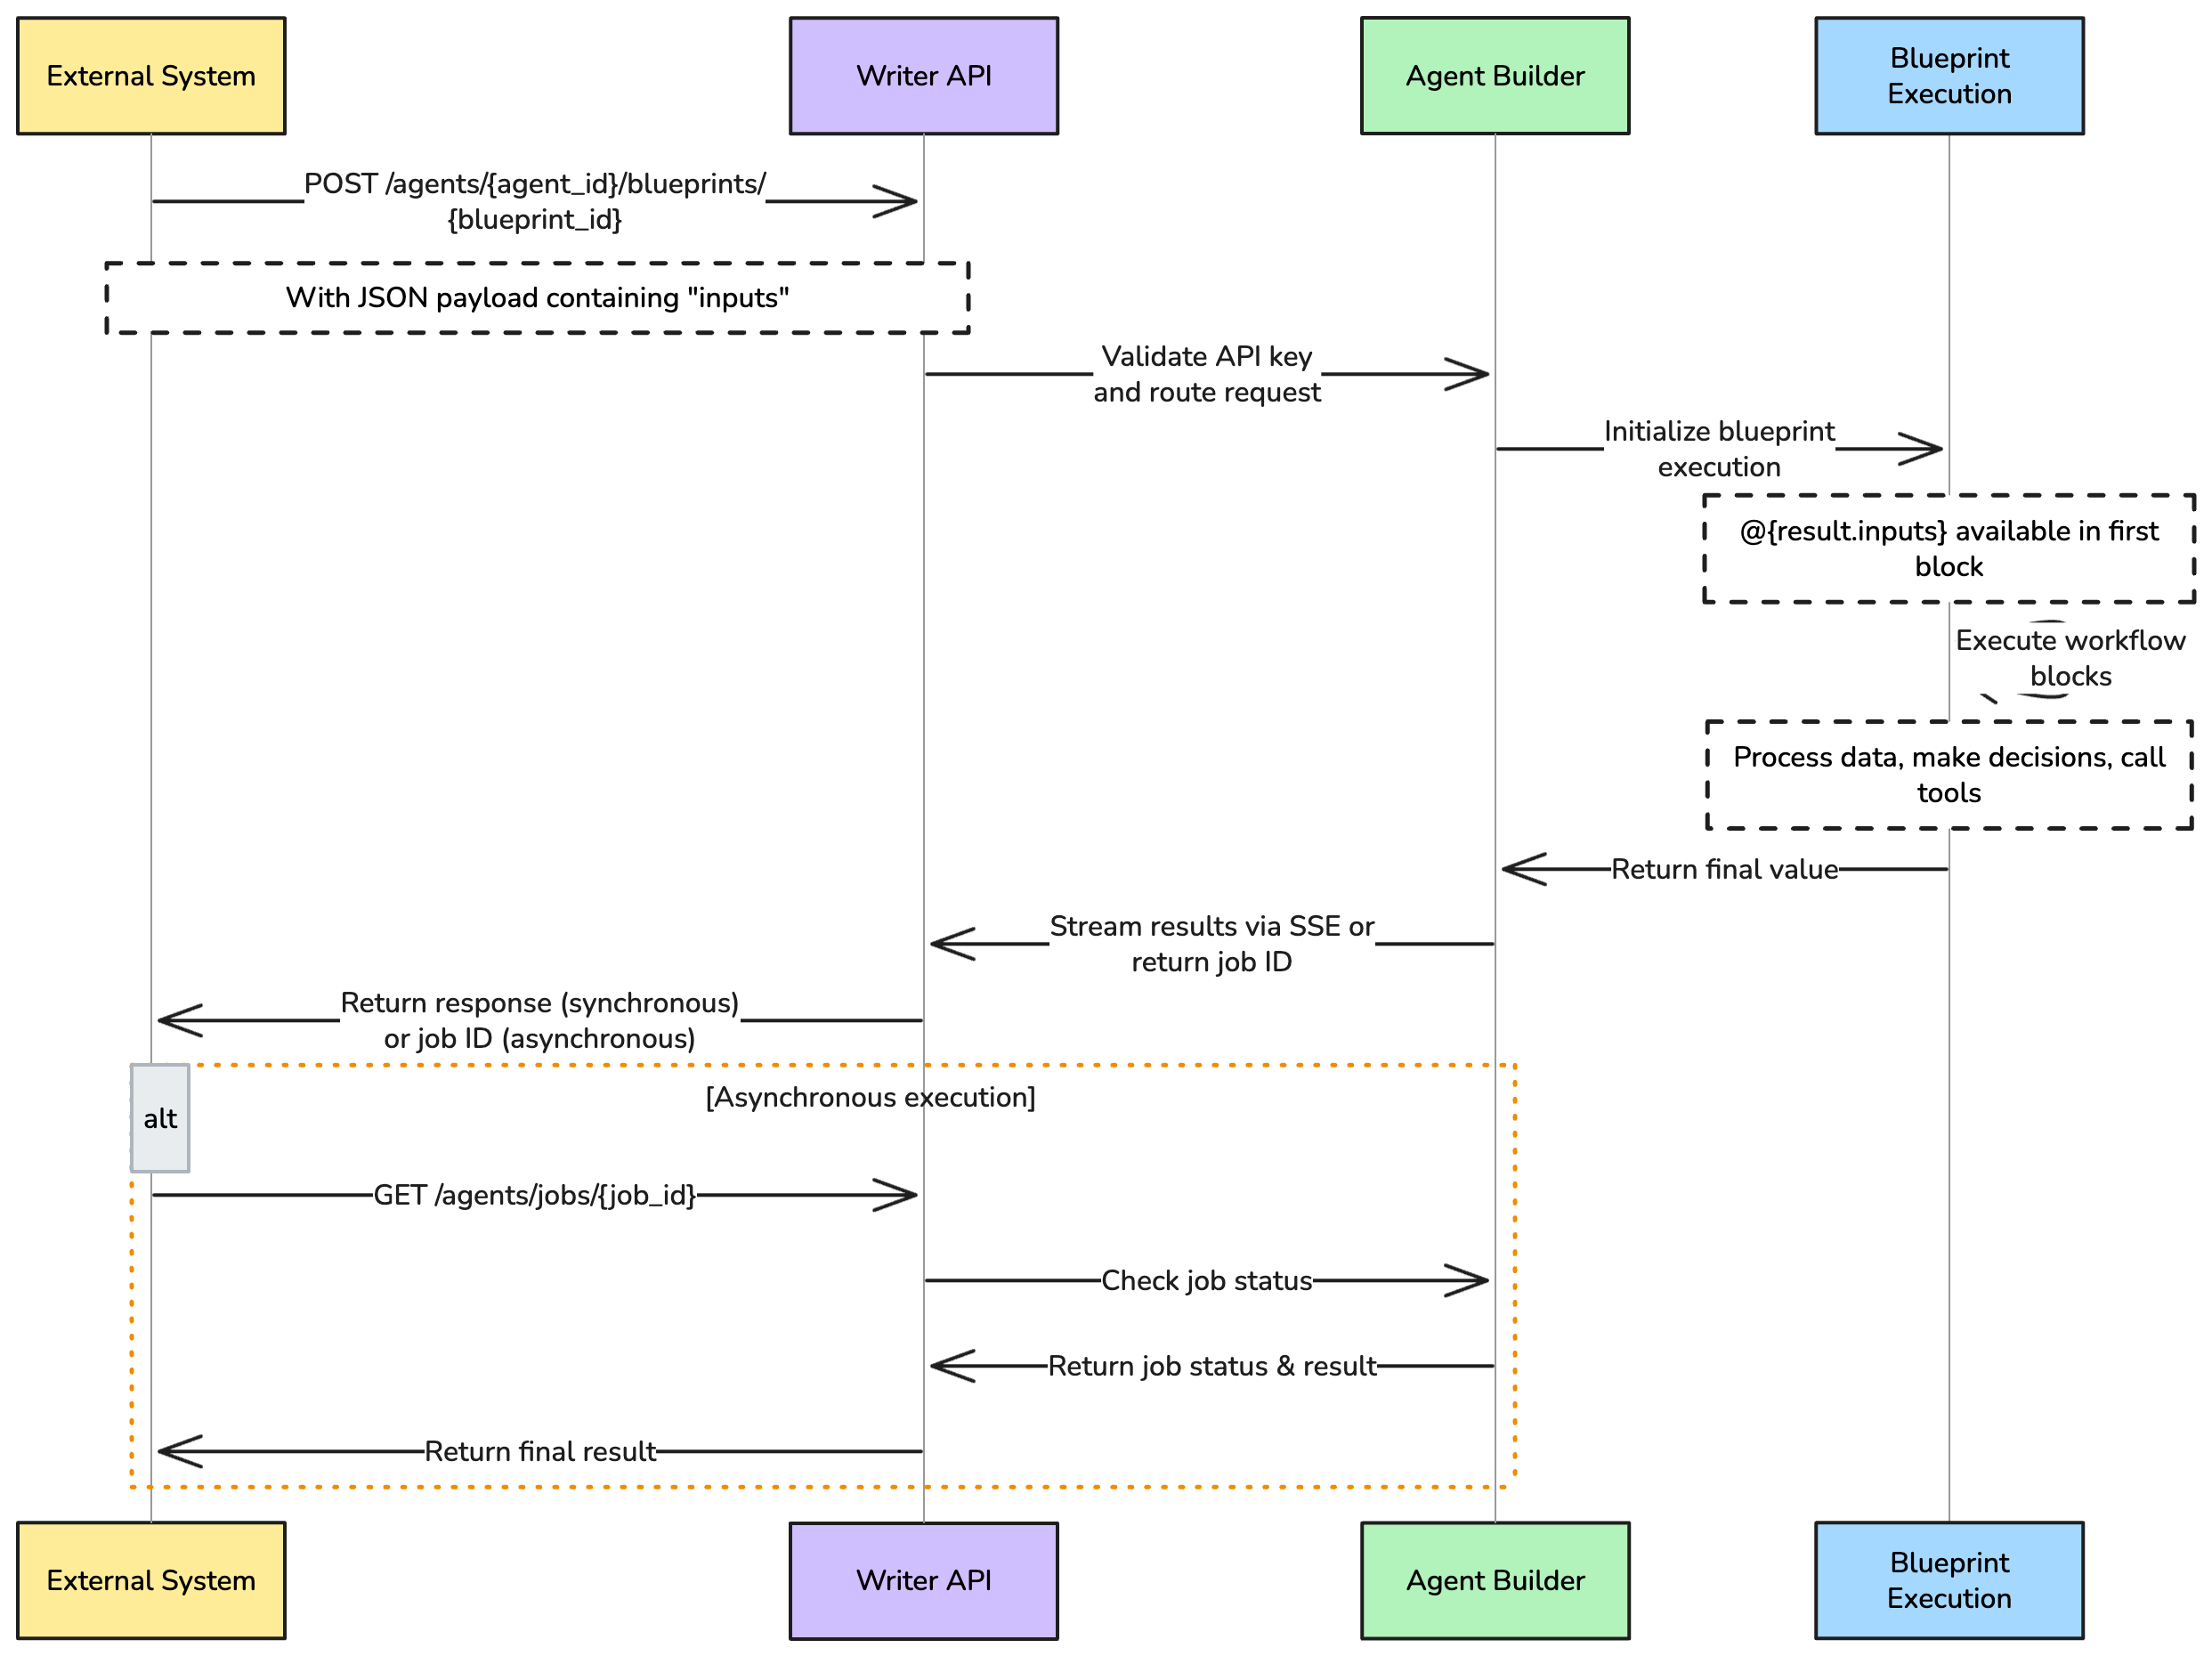
How it works
The API Trigger block creates an HTTP endpoint that external systems can use to trigger your blueprint.
 Here’s what happens when you add an API Trigger block:
Endpoint creation
The block creates two HTTP endpoints using your agent and blueprint IDs:
- A synchronous endpoint for real-time responses
- An asynchronous endpoint for long-running tasks
Request handling
When an external system calls your endpoint:
- The request body must contain an
inputs field with your data
- Your blueprint receives this data as
@{result.inputs}
- Your blueprint executes with this input data
Accessing the payload data
@{result} is only available in the block that immediately follows the API Trigger block. For subsequent blocks, you have two options to access the payload data:
- Use a Set State block: Make the first block after API Trigger a Set State block to store the payload data for use throughout your blueprint
- Access via block ID: Use
@{results.[api_trigger_block_id]} where [api_trigger_block_id] is the unique identifier found in the API Trigger block’s configuration menu
Return values
To send data back to the API caller:
- Add a Return Value block at the end of your blueprint. The value from this block becomes the API response
- For synchronous calls, the result is the final event in the SSE stream
- For asynchronous calls, the result is available when polling the job status endpoint
Blueprint structure requirements
When building blueprints that will be triggered via API, ensure your workflow ends with a Return Value block:
- Start with API Trigger: Begin your blueprint with the API Trigger block
- Process your logic: Add all the blocks needed for your workflow
- End with Return Value: Always finish with a Return Value block to specify what gets returned to the API caller
Example blueprint structure:
The Return Value block returns any value as a string. If your blueprint returns a JSON object, it will be serialized as a JSON string. You may need to parse it using JSON.parse() in JavaScript or json.loads() in Python to access the individual fields.
API endpoint
When you add an API Trigger block to your blueprint, it creates a public HTTP endpoint that you can use to trigger your blueprint. You can either use the synchronous endpoint for real-time execution and to get the result as soon as possible, or the asynchronous endpoint for long-running tasks. The asynchronous endpoint returns a job ID that you can poll for status updates and results.
Authentication
All API calls require authentication using a Bearer token in the Authorization header:
Learn how to create and manage API keys.
Synchronous endpoint
The endpoint URL follows this pattern:
Where:
{agent_id} is the unique identifier for your deployed agent. You can find this in the URL of your agent’s page in the Agent Builder or via the /agents API endpoint.{blueprint_id} is the unique identifier for your blueprint. You find this in Blueprint ID field of the blueprint in the Agent Builder UI, or via the /agents API endpoint.
The synchronous endpoint is used for real-time execution. It accepts a JSON payload and returns Server-Sent Events (SSE) with real-time execution status.
Send a POST request with a JSON body containing the data you want to pass to your blueprint.
The inputs key is required for the JSON payload. If you don’t include it, the API will return an error. Include the rest of your data under the inputs key. The value of the inputs key can be any JSON-serializable value.
@{result.inputs}; for example, @{result.inputs.document_id}, @{result.inputs.file_url}, etc.
The API returns Server-Sent Events (SSE) with real-time execution status:
Asynchronous execution
For long-running workflows, you can also use the asynchronous endpoint:
This returns a job ID that you can poll for status updates using:
Example job result
When you poll the job status, you’ll receive a response like this:
The actual return value from your agent is in the artifact field of the JSON response. The result field contains metadata about the job execution.
The artifact field always contains a string. If your blueprint returns a JSON object, it will be serialized as a JSON string. You may need to parse it using JSON.parse() in JavaScript or json.loads() in Python to access the individual fields.
Creating and polling async jobs
Here is an example of how to create an async job and then poll for results:
List available agents and blueprints
To see a list of all your agents and blueprints, you can use the following API endpoint:
This returns a list of all your deployed Agent Builder agents and includes any API-triggered blueprints associated with them. You can then use the agent and blueprint IDs to trigger the blueprint via API.
Below is an example of how to list all your agents and blueprints:
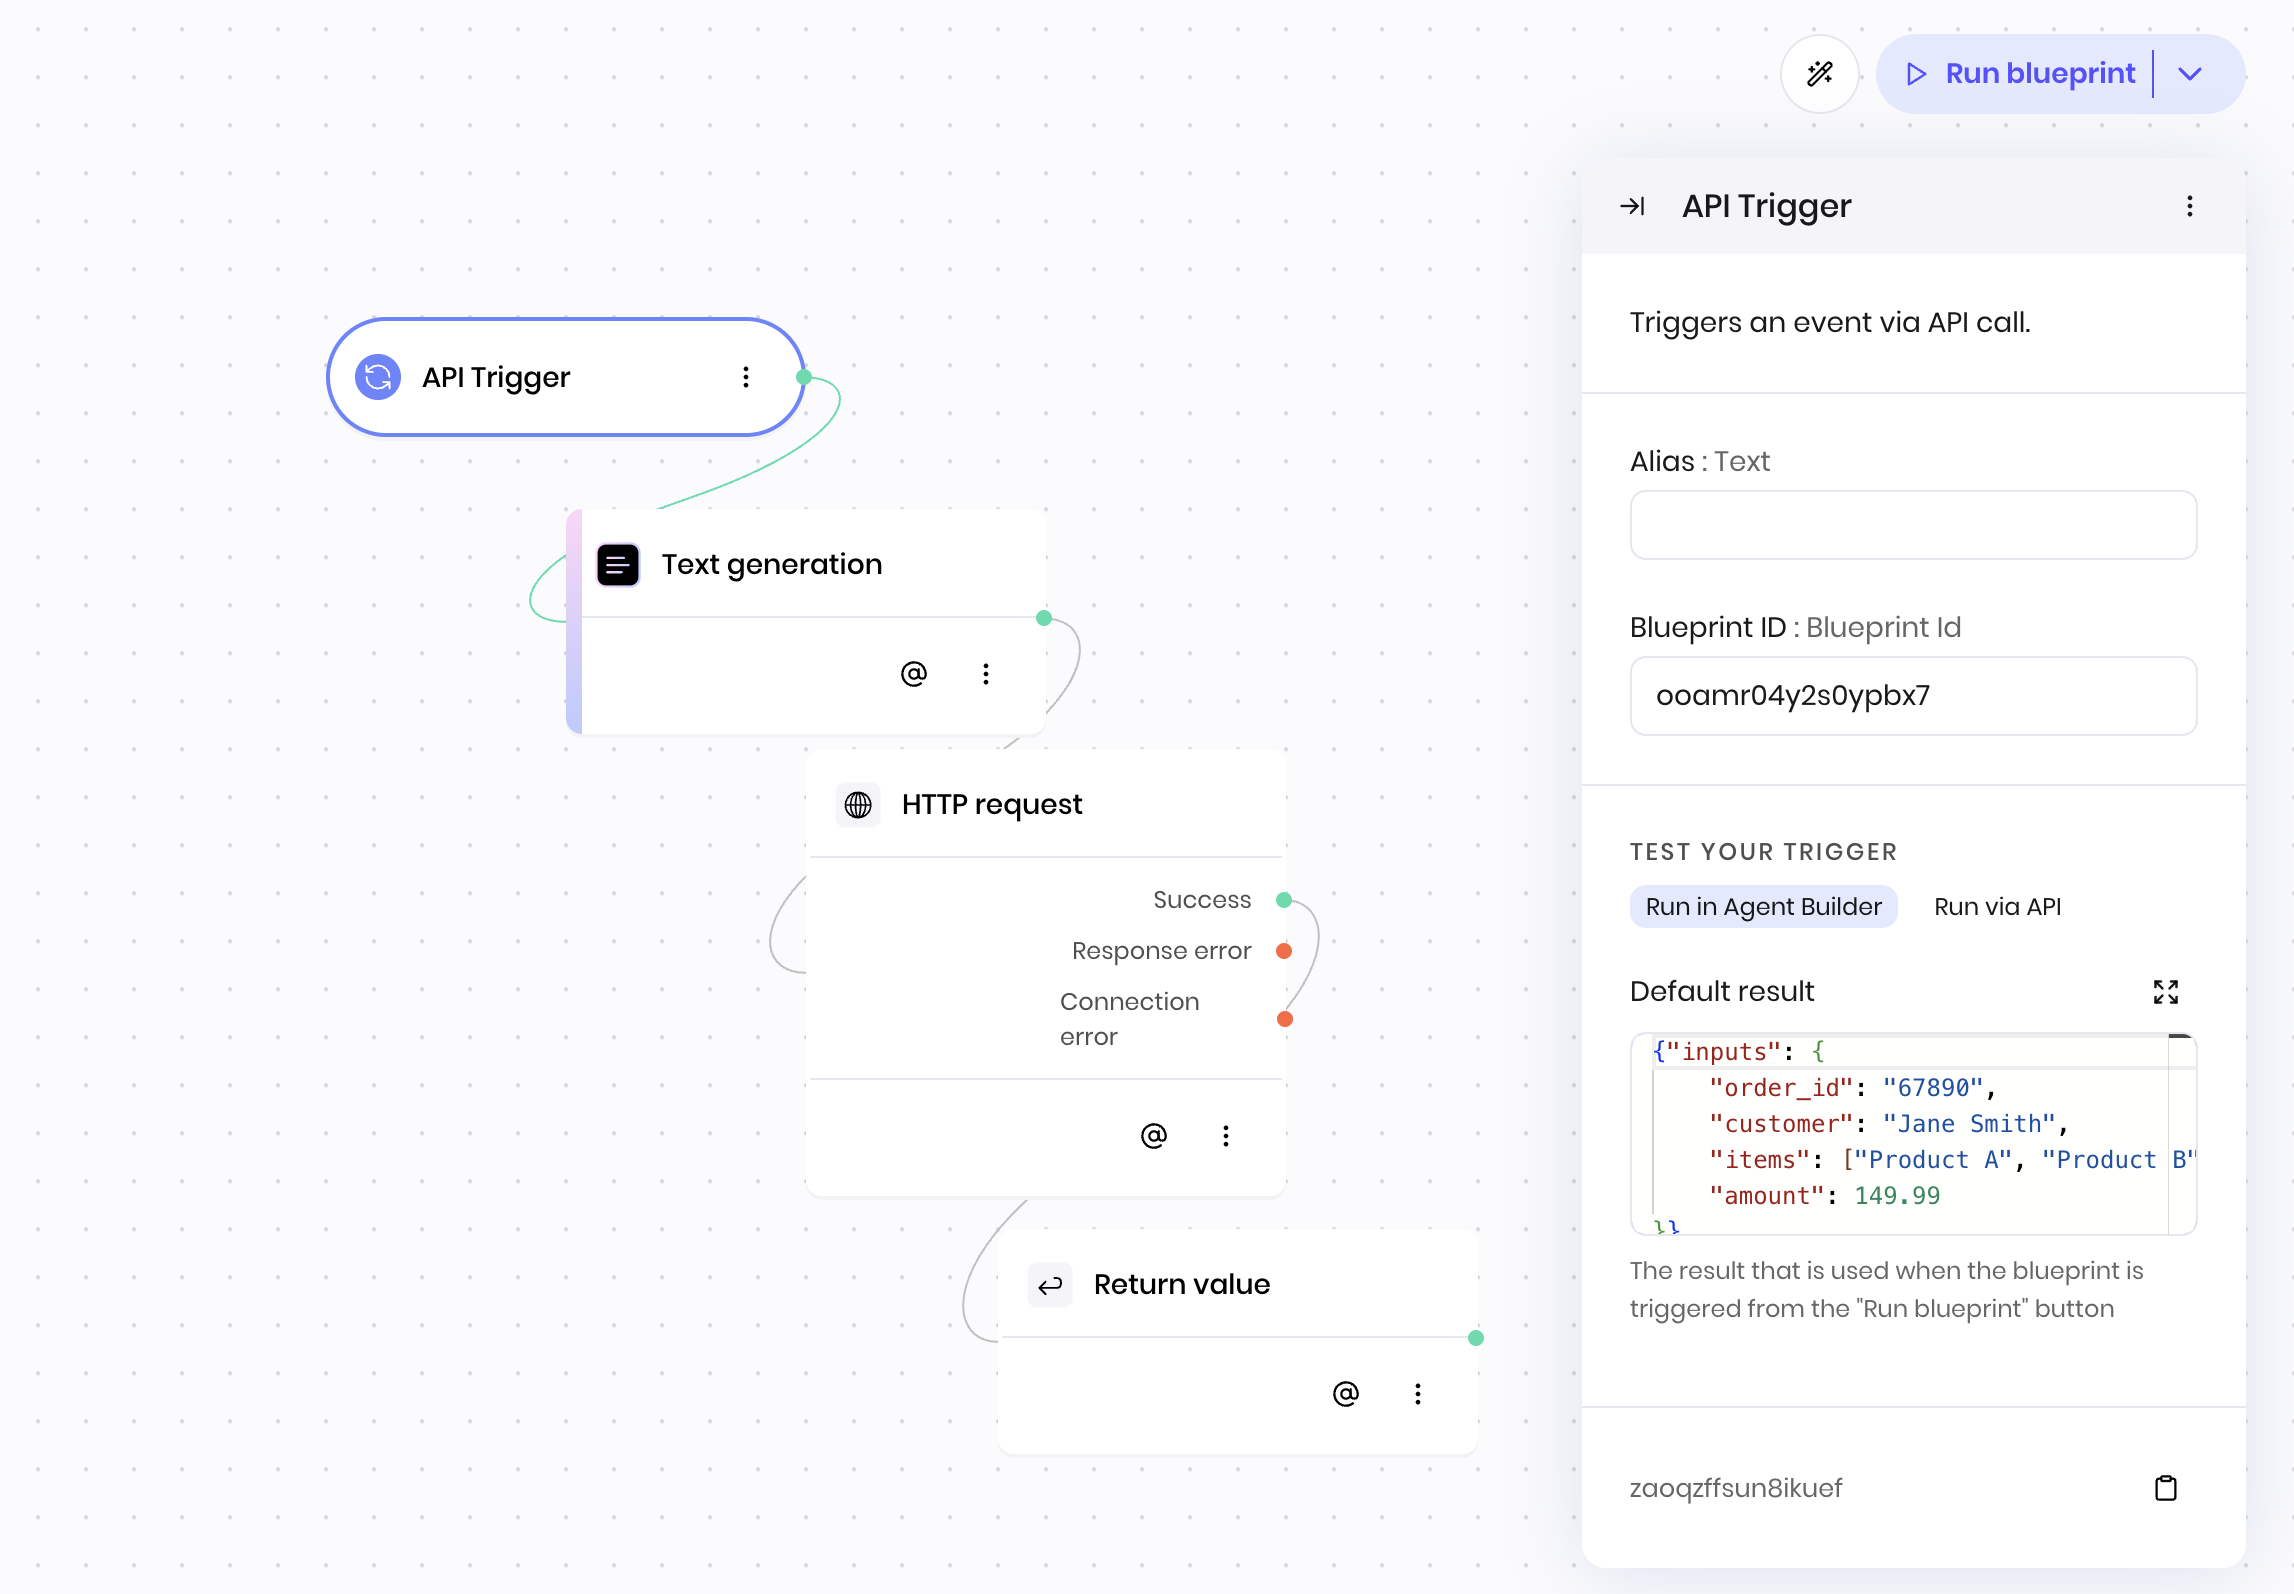
Testing
You can test your API trigger using the Run blueprint button in the Agent Builder editor.
Under Test your trigger in the API Trigger block, you can provide sample data for testing without making actual HTTP requests.
 You can also test your API trigger by sending a POST request to the API endpoint.
Troubleshooting
Common issues and solutions
I can’t see or trigger my agent via the API
Problem: Your agent doesn’t appear in the API or you get errors when trying to trigger it.
Solution: Check that your agent is deployed. Only deployed agents are accessible via the API.
I don’t see my blueprint when looking via the API
Problem: Your blueprint doesn’t show up in the list of available blueprints for your agent.
Solution: Ensure your blueprint starts with an API Trigger block. Only blueprints that begin with an API Trigger block are exposed via the API.
The blueprint isn’t returning anything
Problem: Your blueprint executes but doesn’t return any data to the API caller.
Solution: Make sure you have a Return Value block at the end of your blueprint workflow. This block is required to return data to the API caller.
Problem: You can’t access the data you sent in your API request.
Solution: Remember that your data is nested under the inputs key. Use @{result.inputs.field_name} instead of @{result.field_name}.
Debugging tips
Since there are limited logs and execution visibility, use the Return Value block for debugging:
Test payload structure: Create a simple blueprint with just API Trigger → Return Value and set the return value to @{result}. This will show you exactly what data structure the blueprint is receiving.
Test specific values: Use @{result.inputs} to see just the inputs portion of your payload.
Test state variables: Return @{state[key]} to see the value of a specific state variable in your blueprint execution.
Note: Since @{result} is only available in the block immediately following the API Trigger, consider using a Set State block as your first block to store the payload data for debugging purposes.
Next steps