This tutorial walks through building an agent that can intelligently call external APIs to get information and make decisions based on the information. It takes the name of a city and calls several tools and APIs to determine if it’s a good day to view the sunset in that location.
If you are unfamiliar with tool calling, you might want to read the Tool calling introduction first to get a sense of how it works.
While this tutorial uses free public APIs to demonstrate tool calling fundamentals, the tool calling patterns are applicable to real-world enterprise scenarios. You can use these same techniques to connect agents with your CRM, databases, internal APIs, and other business systems.
Agent overview
This agent connects with two free, publicly available APIs:
The agent uses tool calling to get the weather information and sunrise and sunset times in a particular city. It then uses the information to determine if it’s a good day to view the sunset, and if so, suggests places to view it.
Clear the demo agent
Before you start building, clear the demo agent that comes with every new Agent Builder project.
See instructions for clearing the demo agent in the Agent Builder Quickstart.
Build the UI
The agent has a plain UI with a text input for the city, a button to submit the request, a message block to display a loading message, and a text block to display the results.
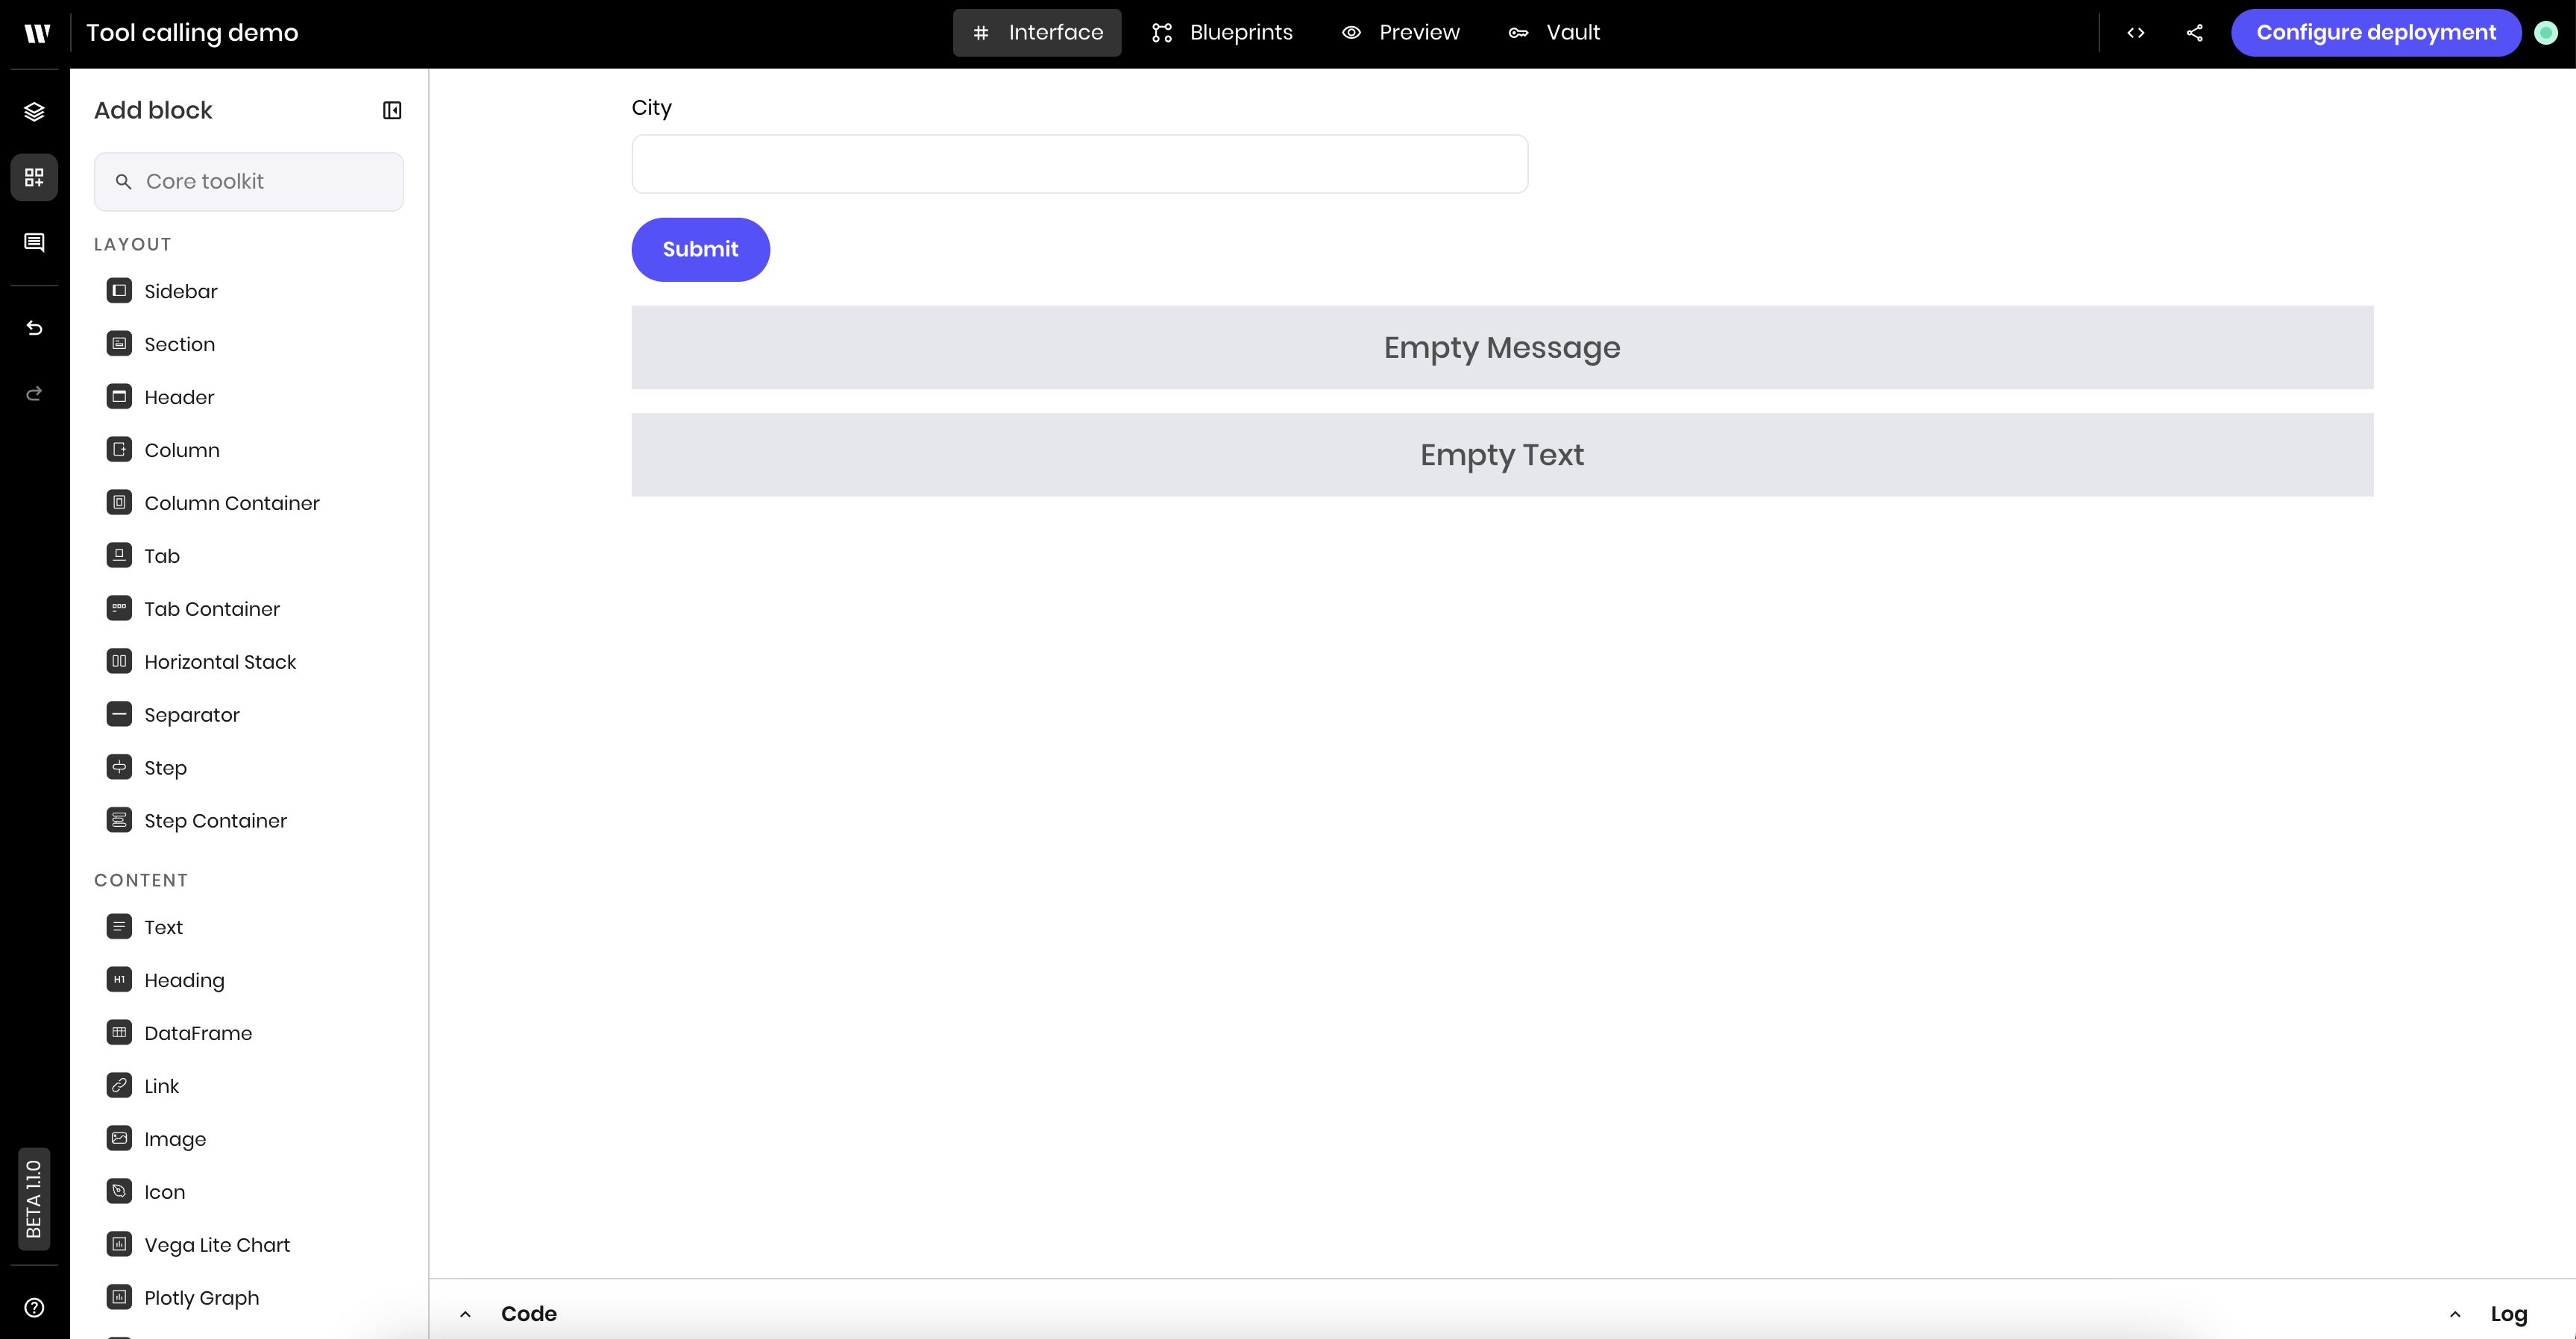
Add a text input
Drag a Text Input block to the canvas. In the block’s configuration menu, update the following:
- Label:
City
- Link variable under Binding:
city
This updates the label in the UI to City and binds whatever the user types in the text input to the city state variable. Add a button to submit the request
Drag a Button block to the canvas. In the block’s configuration menu, update the following: Add a message block to display a loading message
Drag a Message block to the canvas. In the block’s configuration menu, update the following:This displays the status state variable in the UI if it’s set. If there’s no status, the block isn’t visible. Add a text area to display the result
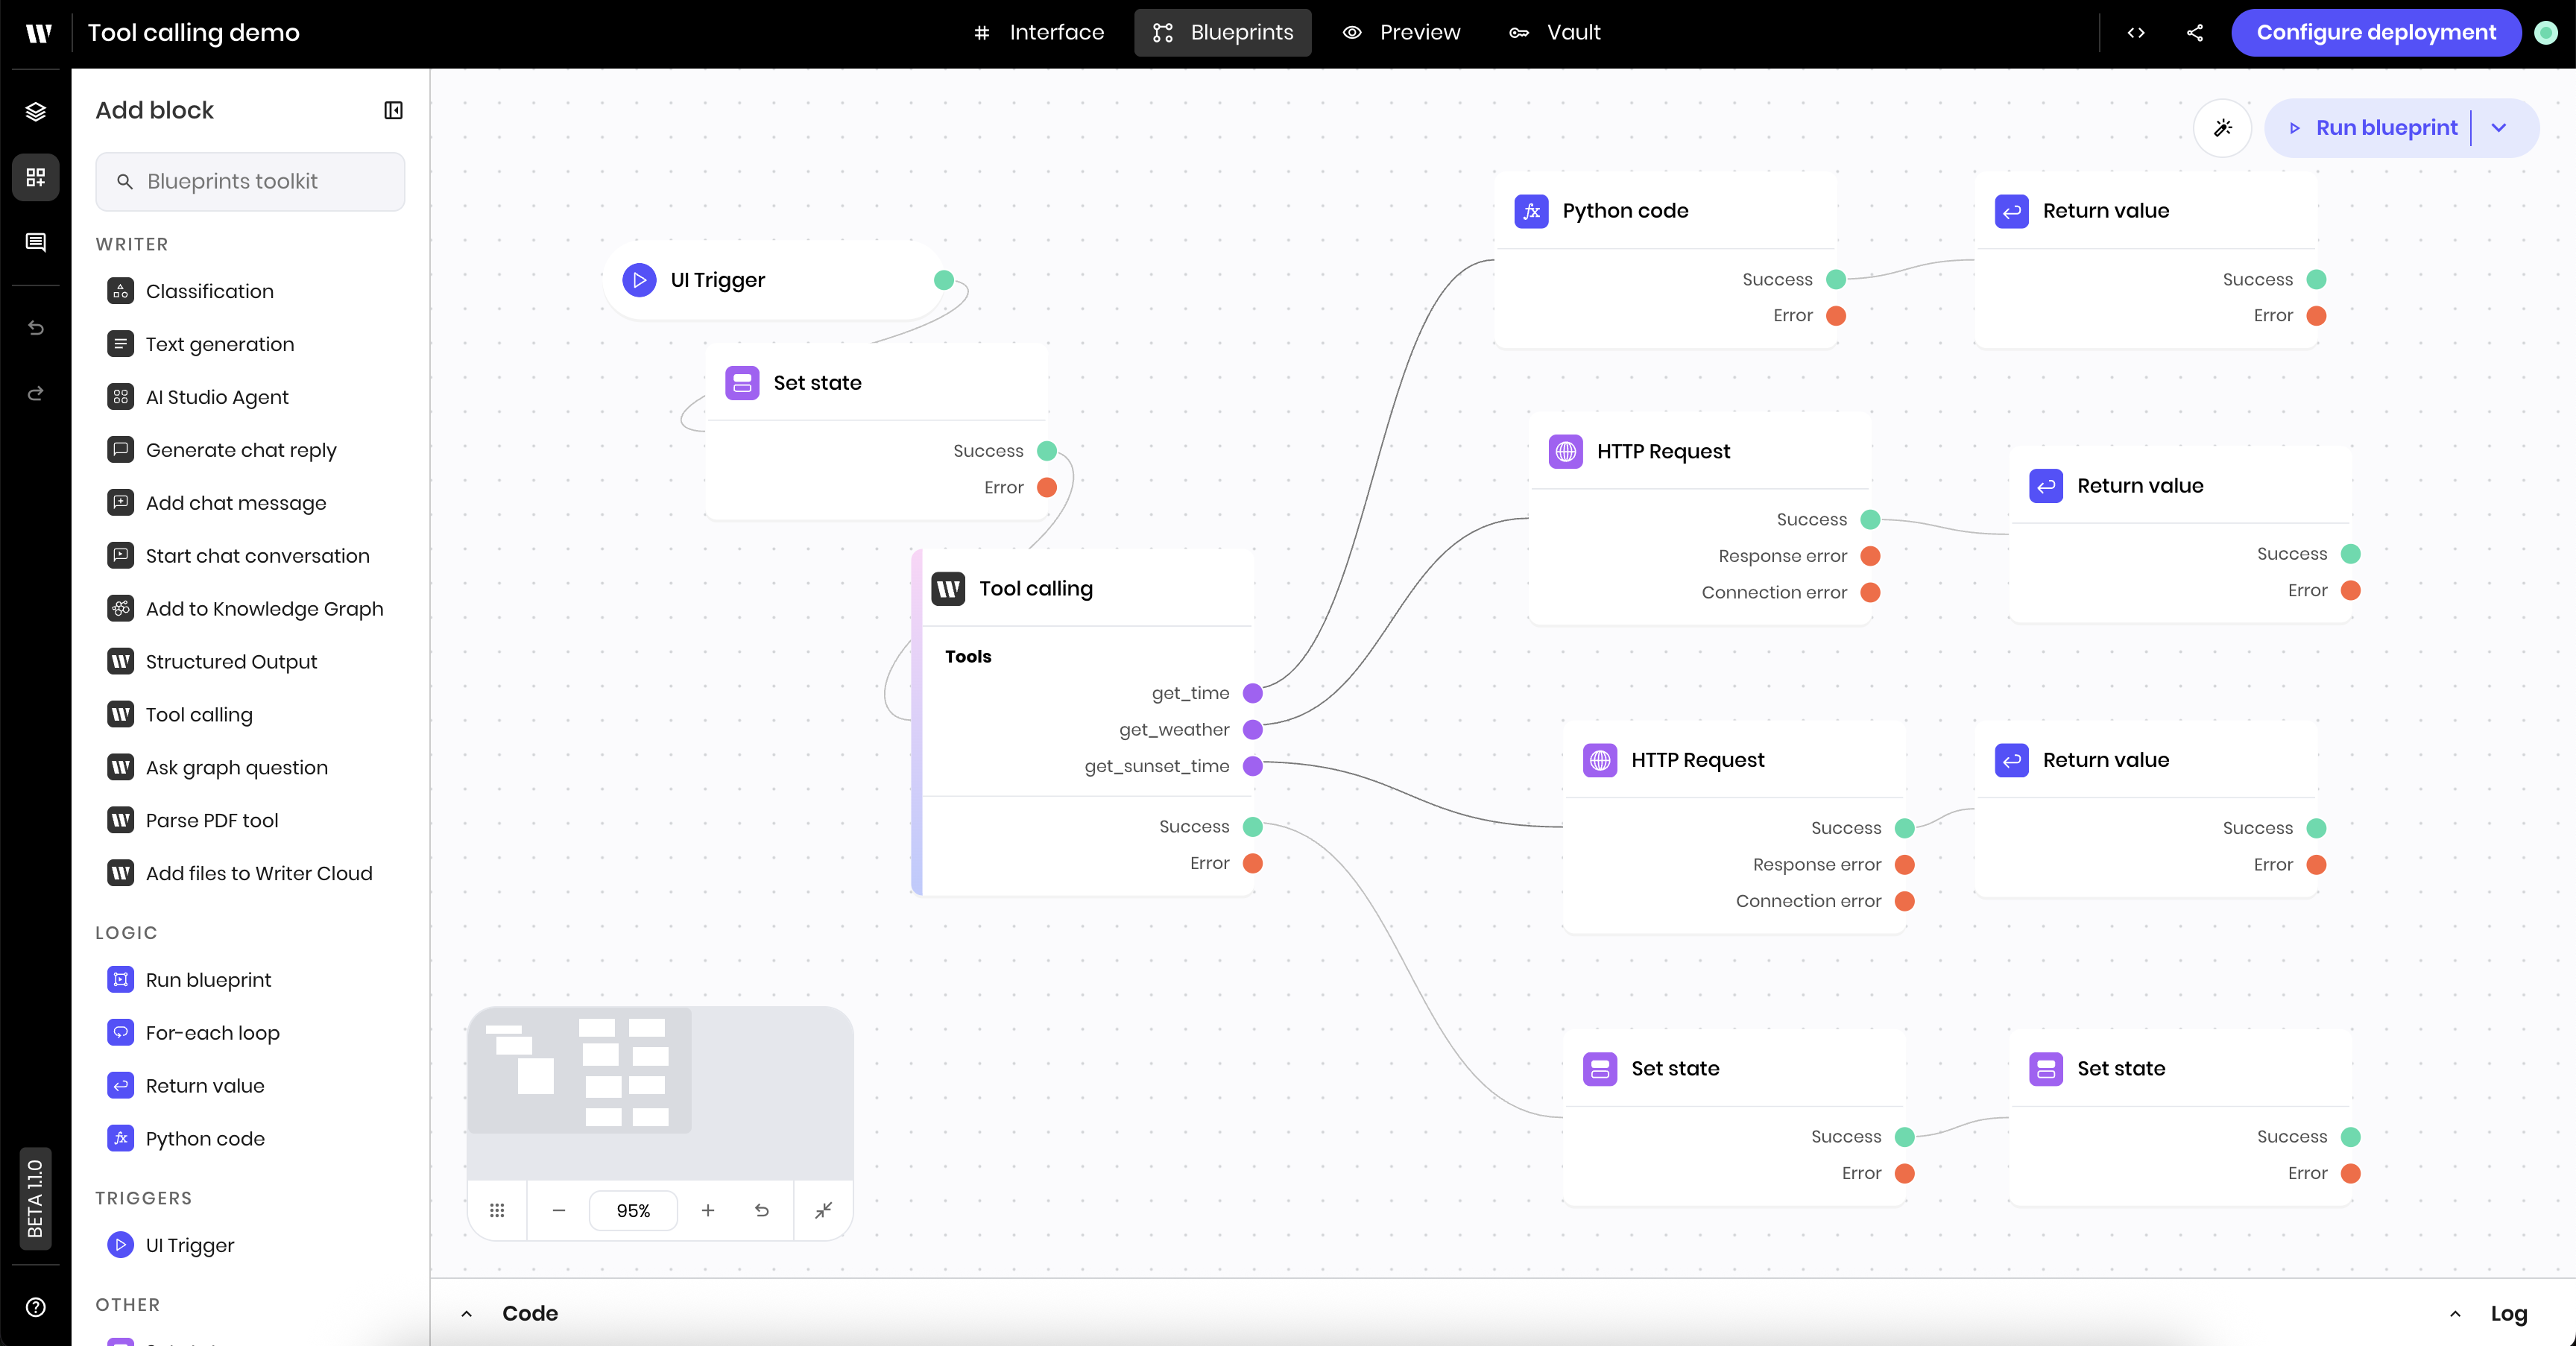
Drag a Text block to the canvas. In the block’s configuration menu, update the following:This displays the final_result state variable in the UI if it’s set. If there’s no final_result, the block isn’t visible. Build the blueprint
The logic of the blueprint is as follows:
- The UI Trigger block triggers the agent when the user clicks the button.
- The set state block adds a loading status to the UI.
- The tool calling block calls the available tools to get the current date and time, the weather information, and sunrise and sunset times. From the provided information, it makes a determination about whether it’s a good day to view the sunset.
- Once the tool calling block completes, the agent updates the state with the results and clears the loading message.
Tool calling is a powerful feature that combines the model’s knowledge with real-time data and external APIs. The model can make intelligent decisions by analyzing the data it receives and drawing on its own knowledge to interpret results. For example, you don’t need to manually parse timestamps or format weather data when you get a response from an API. You can provide the raw API responses and the model extracts and uses the relevant information appropriately.
Add a UI Trigger block
Drag a UI Trigger block to the canvas. In the block’s configuration menu, update the following:
- Component Id: Select the Submit button from the dropdown of available components.
- Trigger:
wf-click
This triggers the blueprint when the user clicks the Submit button. Add a set state block to add a loading status to the UI
Drag a Set State block to the canvas. In the block’s configuration menu, update the following:
- Link variable:
status
- Value:
%Loading...
This sets the status state variable to Loading... with an animated spinner when the blueprint starts. Add a tool calling block and set the prompt
Drag a Tool Calling block to the canvas. In the block’s configuration menu, update the following:This prompt instructs the agent to use the available tools to get the weather information and sunrise and sunset times. It then makes a determination about whether it’s a good day to view the sunset. In the next steps, you’ll define the tools and add the logic to call them.While AI models are highly intelligent and can reason about complex tasks, a well-structured prompt is essential for effective tool calling. The prompt serves as a blueprint that clearly defines what tools are available, guides the model through the decision-making workflow, and specifies the expected output format. Without this guidance, the model might miss important steps, use tools inefficiently, or produce results that don’t match your requirements. A detailed prompt ensures consistent, reliable performance across different inputs and scenarios. See Prompting strategies for more suggestions about writing prompts. Define a tool to get the current date and time
Within the Tool calling block, click Add tool+ to define a new tool for the agent to use. Define the tool as follows:
- Tool type:
function
- Tool name:
get_time
- Function tool definition:
This defines a tool that the agent can use to get the current date and time in UTC. It doesn’t require any parameters, so the parameters field is empty. The description field provides a brief description of what the tool does. Add a Python block to provide the current date and time in UTC
This example uses a Python block to get the current date and time in UTC using Python’s datetime library.Drag a Python block to the canvas. In the block’s configuration menu, update the following:To return a value from a Python block, you must use the set_output function.
Add a return value block to return the date and time to the tool calling block
If you want a tool to return a value to the Tool Calling block, you need to add a Return Value block at the end of the tool’s logic.Drag a Return Value block to the canvas. In the block’s configuration menu, update the following:This returns the result of the Python block to the Tool Calling block. Define a tool to get the weather information
Within the Tool calling block, click Add tool+ to define a new tool for the agent to use. Define the tool as follows:
- Tool type:
function
- Tool name:
get_weather
- Function tool definition:
This defines a tool that the agent can use to get the weather information for a given latitude and longitude. It instructs the agent to provide the latitude and longitude in the parameters, because the API requires latitude and longitude. Add an HTTP Request block to call the Open-meteo API
Now you need to add a block to call the Open-meteo API.Drag an HTTP Request block to the canvas. In the block’s configuration menu, update the following:
- URL:
https://api.open-meteo.com/v1/forecast?latitude=@{lat}&longitude=@{long}&hourly=temperature_2m,cloud_cover,precipitation_probability,precipitation,wind_speed_10m&forecast_days=1
This is the URL for the Open-meteo API. It includes the @{lat} and @{long} variables, which you defined as required parameters in the tool definition. The agent provides the latitude and longitude when it calls the tool.For more information about the Open-meteo API and the request this is making, see the Open-meteo documentation. Add a return value block to return the weather information to the tool calling block
The HTTP Request block returns the weather information in JSON format. You need to add a Return Value block to return the weather information to the Tool Calling block.Drag a Return Value block to the canvas. In the block’s configuration menu, update the following:This returns the result of the HTTP Request block to the Tool Calling block. The agent will be able to parse and use the JSON data that the HTTP Request block returns. Define a tool to get the sunrise and sunset times
Within the Tool calling block, click Add tool+ to define a new tool for the agent to use. Define the tool as follows:
- Tool type:
function
- Tool name:
get_sunset_time
- Function tool definition:
This defines a tool that the agent can use to get the sunrise and sunset times for a given latitude and longitude. It instructs the agent to provide the latitude and longitude in the parameters, because the API requires latitude and longitude. Add an HTTP Request block to call the Sunrise Sunset API
Now you need to add a block to call the Sunrise Sunset API.Drag an HTTP Request block to the canvas. In the block’s configuration menu, update the following:
- URL:
https://api.sunrise-sunset.org/json?lat=@{lat}&lng=@{long}&tzid=UTC&date=today
This is the URL for the Sunrise Sunset API. It includes the @{lat} and @{long} variables, which you defined as required parameters in the tool definition. The agent provides the latitude and longitude when it calls the tool.For more information about the Sunrise Sunset API and the request this is making, see the Sunrise Sunset documentation. Add a return value block to return the sunrise and sunset times to the tool calling block
The HTTP Request block returns the sunrise and sunset times in JSON format. You need to add a Return Value block to return the sunrise and sunset times to the Tool Calling block.Drag a Return Value block to the canvas. In the block’s configuration menu, update the following:This returns the result of the HTTP Request block to the Tool Calling block. The agent will be able to parse and use the JSON data that the HTTP Request block returns. Add a set state block to display the results
Now that you’ve defined the tools for the Tool Calling block and added the logic to call them, the agent can take the prompt and provided tools and make a determination about whether it’s a good day to view the sunset.Once the Tool Calling block completes, the agent should display the final results in the UI. You can display the final results in the UI by setting the final_result state variable, which will be displayed in the UI’s Text block.Drag a Set State block to the canvas. In the block’s configuration menu, update the following:
- Link variable:
final_result
- Value:
%@{result}
This sets the final_result state variable to the result of the Tool Calling block. Add a set state block to clear the loading message
Finally, you need to add a block to clear the loading message when the Tool Calling block completes.Drag a Set State block to the canvas. In the block’s configuration menu, update the following:
- Link variable:
status
- Value: Leave empty to clear the state variable
This clears the status state variable when the Tool Calling block completes. Preview the agent
Navigate to the Preview tab to test the agent.
Enter a city and click the Submit button to see the agent’s response. You should first see the loading message, then the final results when the Tool Calling block completes.
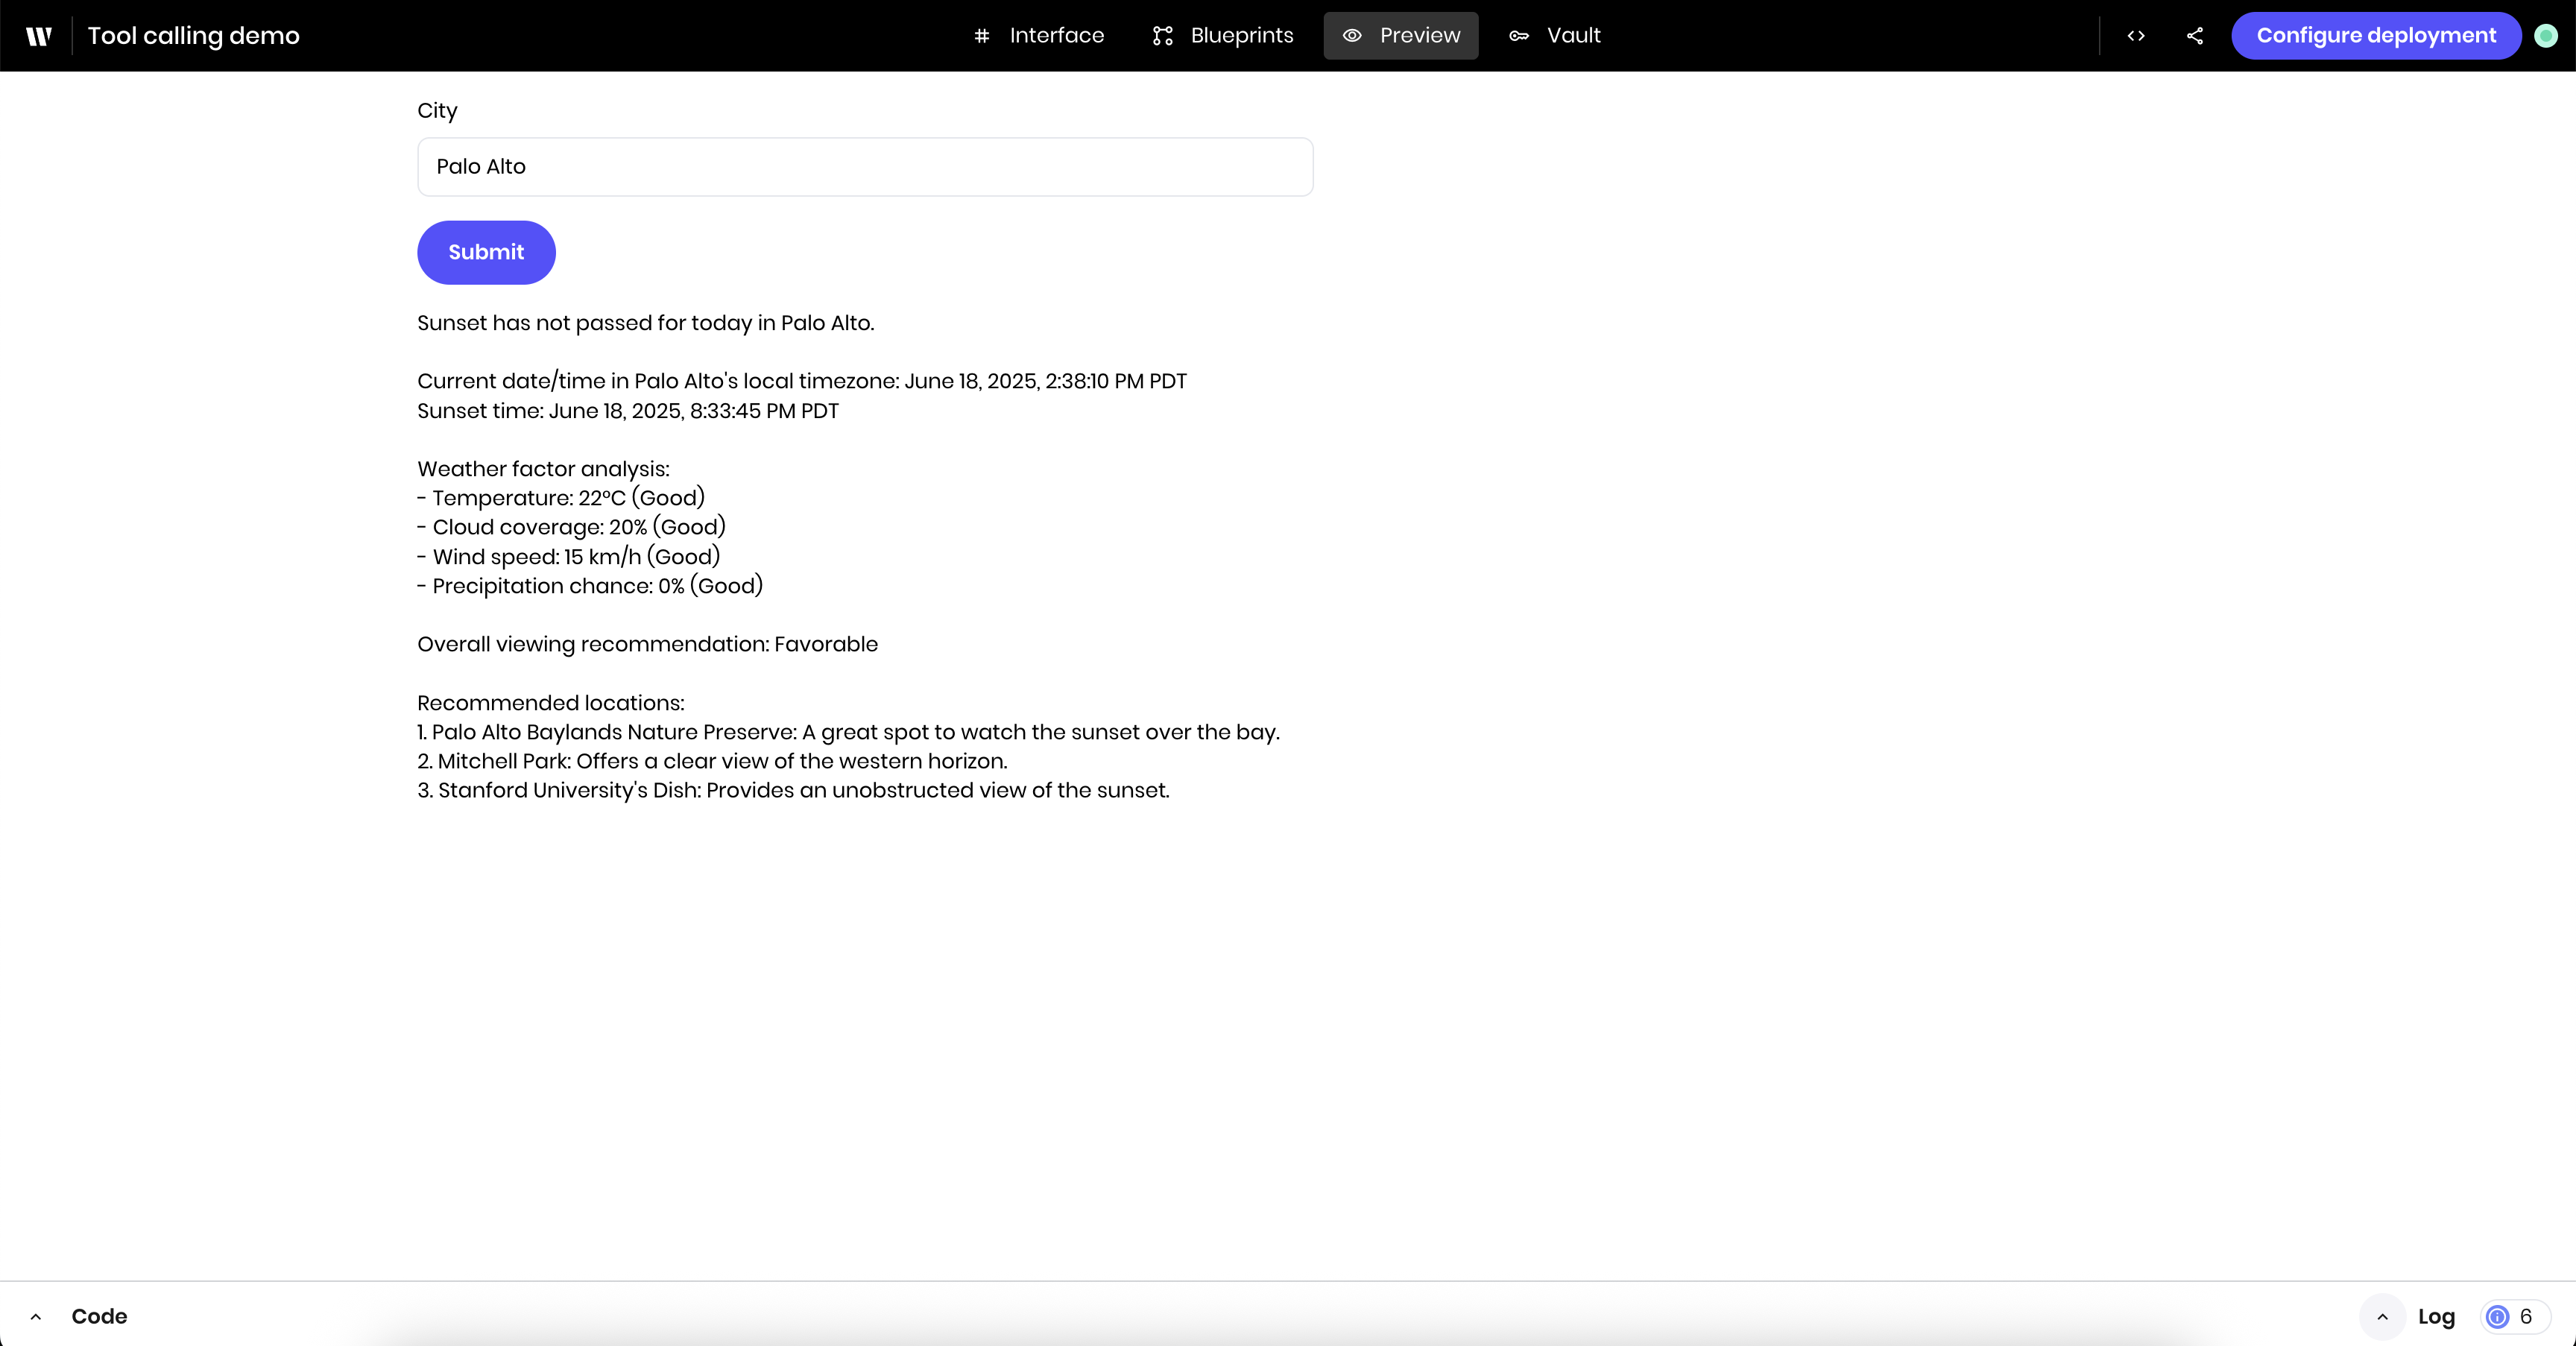 You can see the agent’s progress and reasoning in the Logs tab.

Next steps
This tutorial demonstrates the basics of tool calling with external APIs. To continue improving on this agent, you might consider adding a Structured Output block after the Tool Calling block to ensure the agent returns the results in the correct format. You could also add more components to the UI to display the results in a more user-friendly way, such as a Metric block to display the weather conditions or different Text blocks to display the different sections of the results.
Next, you might want to learn more about tool calling: