- How to navigate the Agent Builder interface
- How the UI and blueprint work together through state variables
- How to use the Classification block to route workflows
- How to connect blocks using
@{result} - How to modify an existing agent to add new behavior
Start an Agent Builder project
To create an agent with Agent Builder, log in to AI Studio and follow these steps:Click the Build an agent button
Click the Build an agent button in the top right corner of the page.
Create a new agent
In the modal that appears, select New Agent to create a new agent from scratch.
Return to the Agent Builder interface
You can get to the Agent Builder interface any time by going to the AI Studio homepage and selecting the agent you created.You’ll see the Configure Deployment page when you select the agent. To get to the edit interface, click the Edit button in the top right corner.
Preview the demo agent
Writer initializes the new agent with a demo workflow that you can use to get started. The demo agent takes a customer review and uses a series of tools to analyze the review and draft a response to the customer.Agent Builder views
The Agent Builder interface contains four views:
- Interface: The agent’s UI, where you can edit the agent’s appearance.
- Blueprints: The agent’s blueprint, where you can edit the agent’s behavior.
- Vault: The agent’s secrets, where you can add secrets like API keys or passwords.
- Preview: Test the agent’s behavior and preview what the user sees.
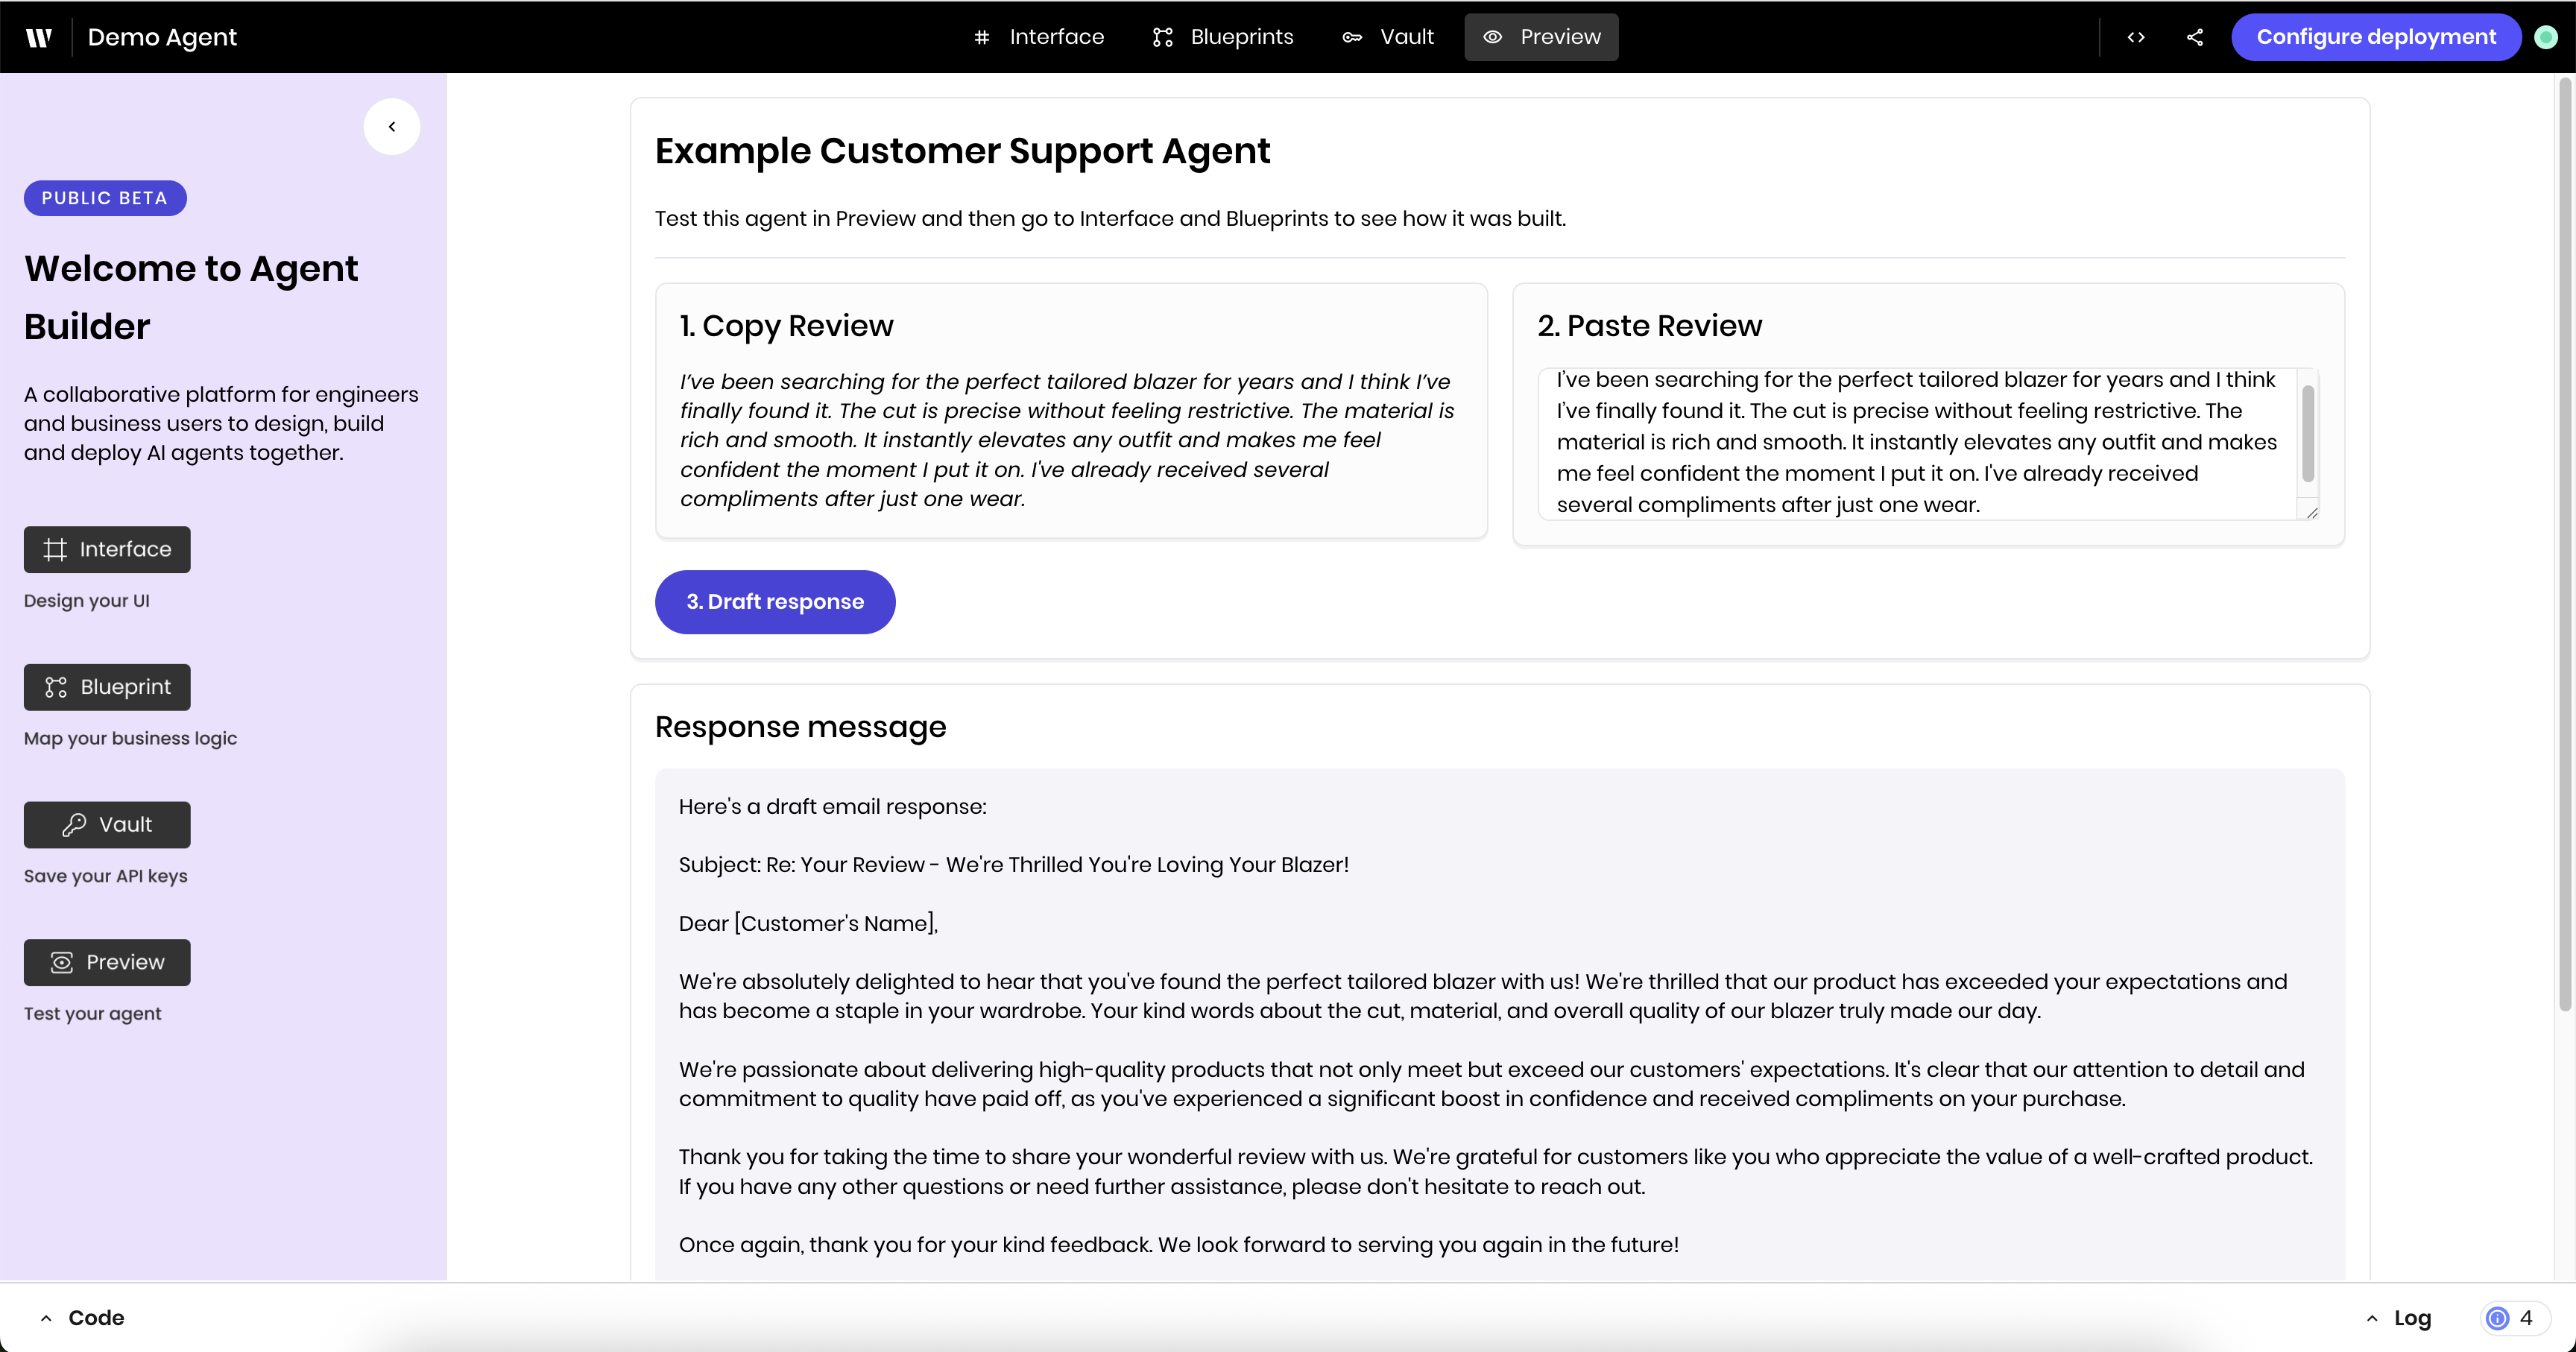
Preview the agent’s behavior
Before you start editing, preview the agent to see how it works:
Copy and paste the example customer review
Copy the example customer review under 1. Copy Review and paste it into the 2.Paste Review text input.
Click Draft response
Click Draft response. You’ll see a status message in the UI that the agent is generating a response. Once the agent has finished, you’ll see the response in the UI.
Tour of the demo agent architecture
The demo agent consists of an interface and a blueprint. The interface and blueprint are connected through the agent’s state and UI triggers.
- Interface: What the user sees and interacts with.
- Blueprint: A flowchart-like interface where you connect blocks of logic.
- Agent state: A set of values that’s shared between the UI and the blueprint. Both the UI and the blueprint can reference and update the state.
- UI trigger: A trigger from the UI that starts the agent’s blueprint. In this case, the UI trigger is attached to click events on the Draft response button.
Agent state
The agent’s state is a core component of the agent’s behavior. It contains values that the UI and blueprint can access and update. You can view the agent’s state from any view by clicking the State explorer icon in the top right of the page.Blueprints view
The Blueprints view is where you define the agent’s logic and behavior. It’s a flowchart-like interface where you connect blocks of logic. If you previewed the agent, you’ll see green boxes highlighting the path that the agent took through the blueprint. For the sample review, the agent takes the following steps: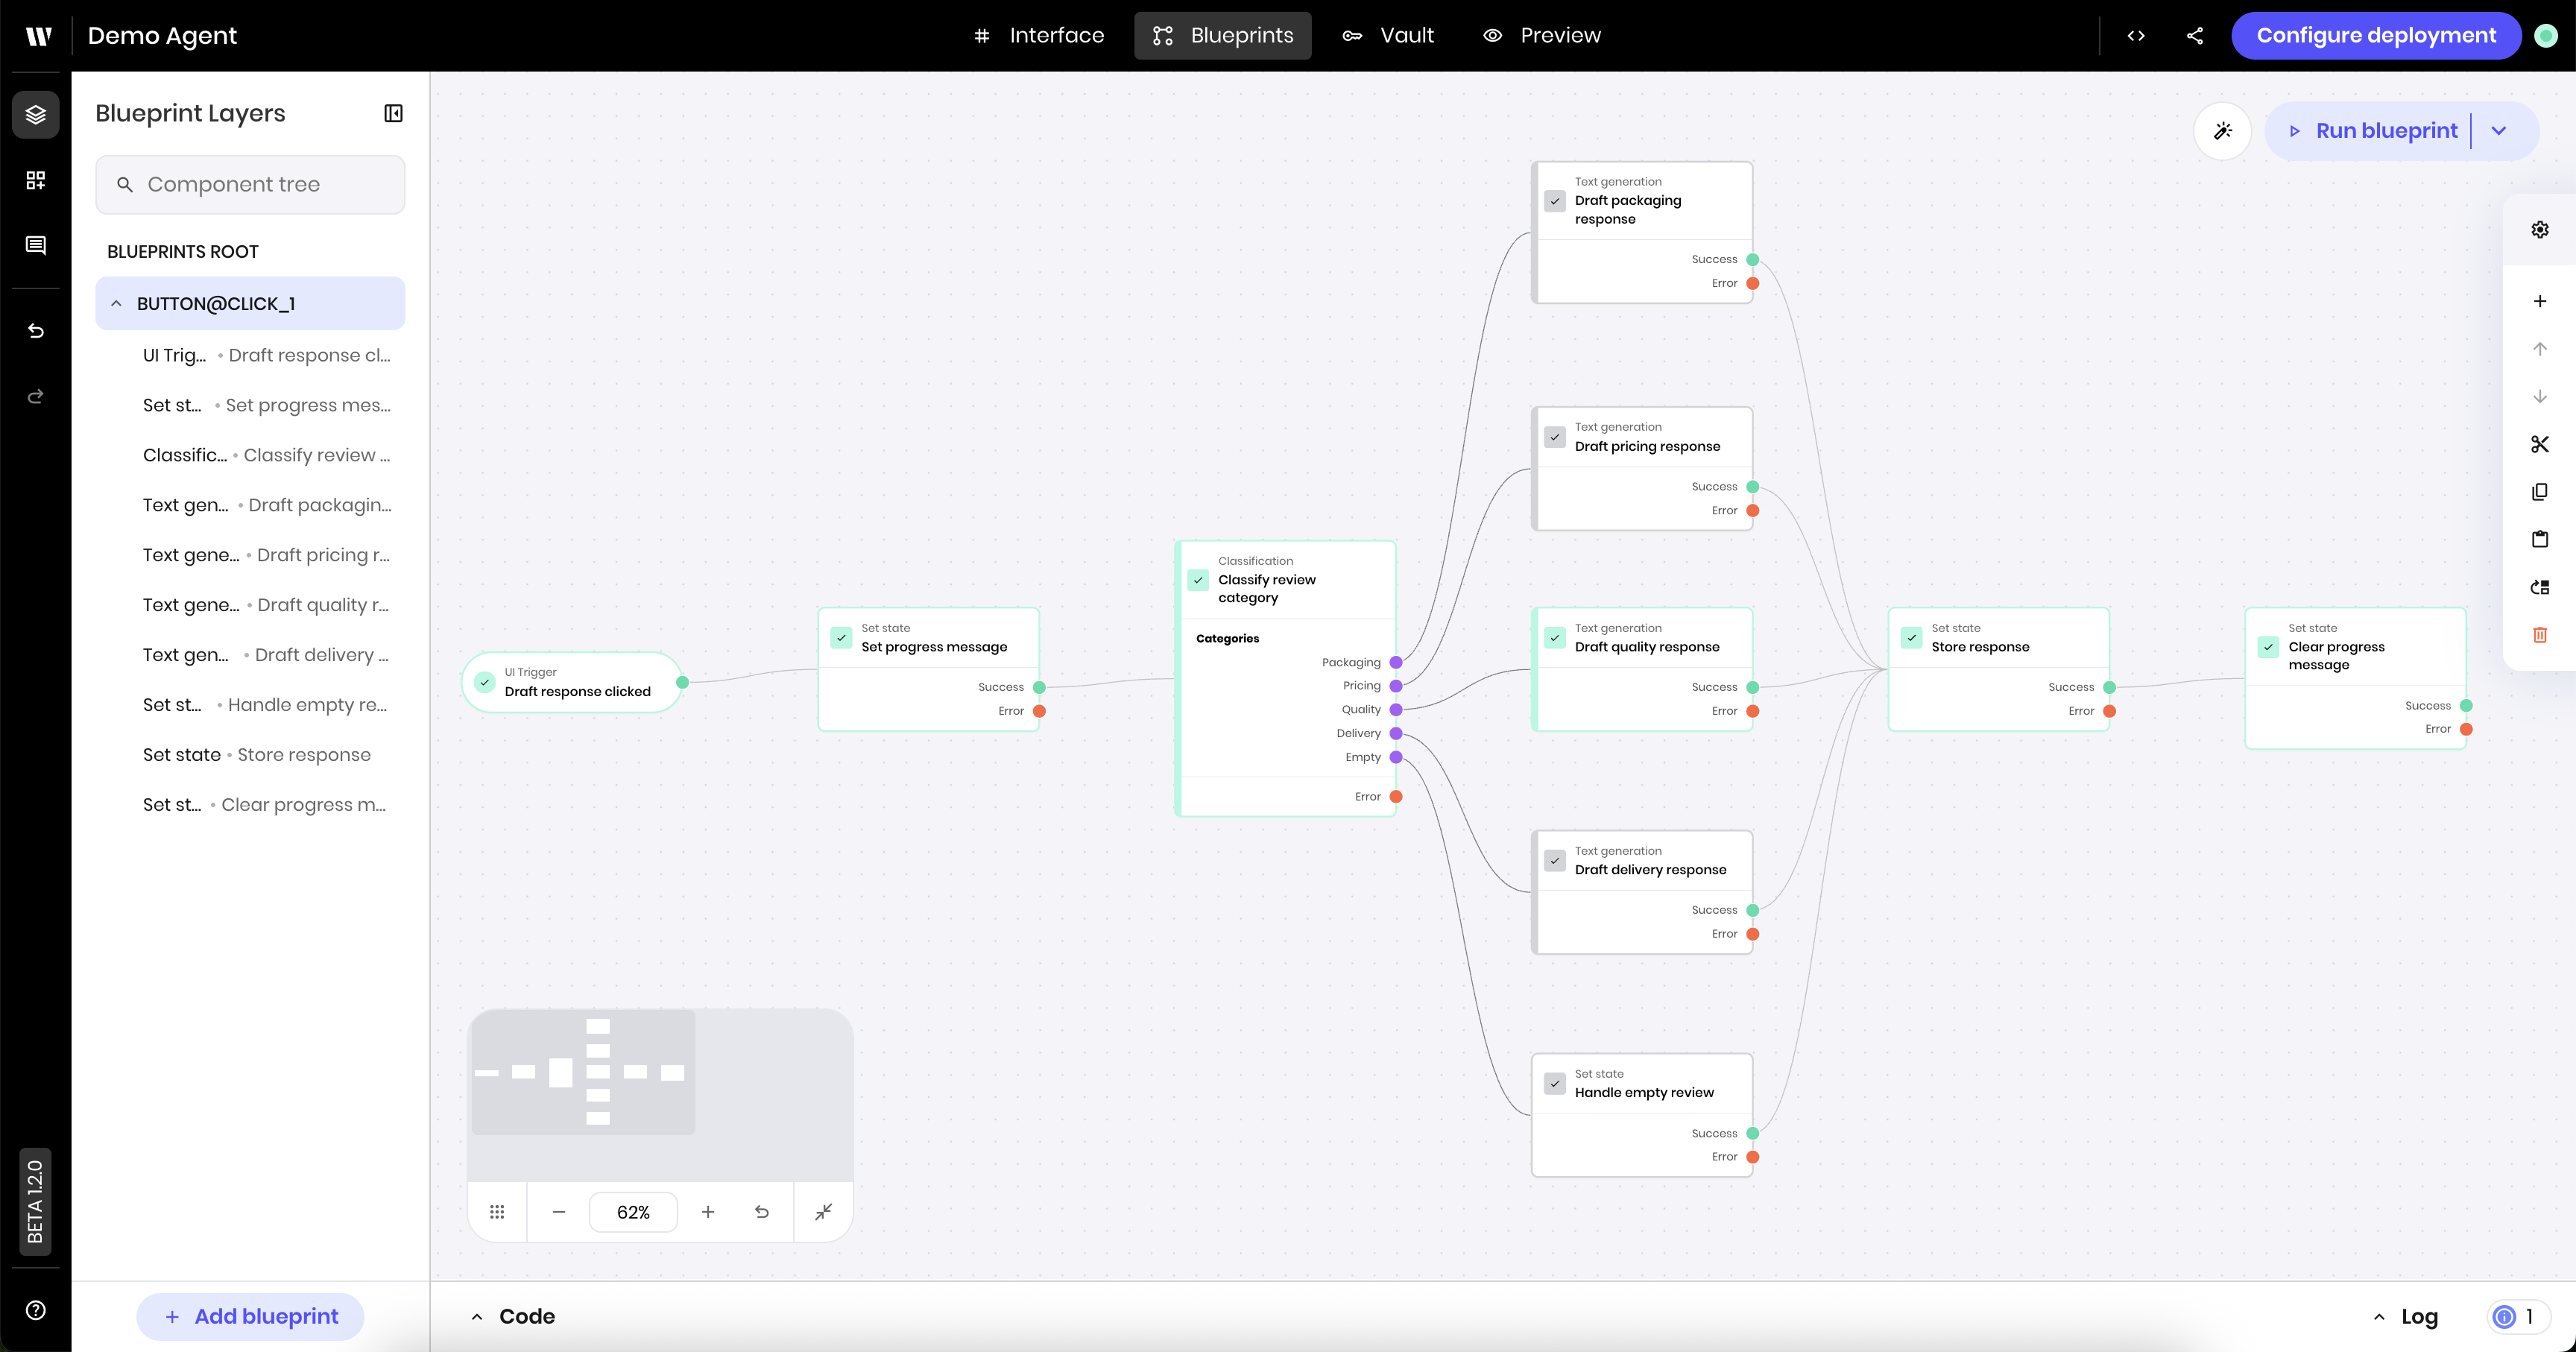
UI Trigger
The blueprint started with the UI Trigger element. In this case, the UI Trigger is configured to run when the user clicks the Draft response button in the UI.
Set state to show the progress message
The agent used the Set state block to set the
progress_message value for the agent state to show that it is generating a response.Classification
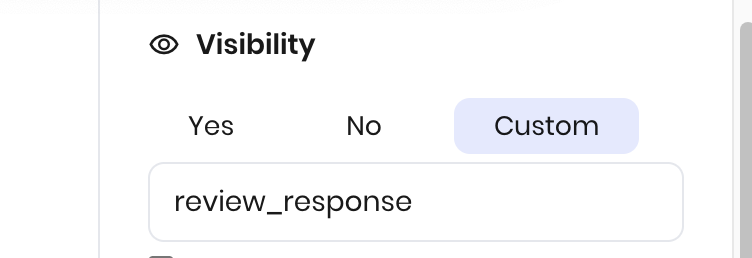
The agent uses the Classification block to analyze the review to determine the primary focus of the review, from the following:
Packaging, Pricing, Quality, Delivery, or Empty.The agent determined the review fit into the Quality category. Classification blocks are built-in blocks that use a Palmyra model to classify the input based on a set of user-defined categories.Text generation
The agent used the Text generation block to have a Palmyra model draft a response to the customer specifically focused on quality.
Set state for the response
The agent stored the drafted response using the
@{result} environment variable so it could use it in the UI.View another path through the blueprint
To view another path through the blueprint, go back to the Preview view and paste the following:I like the style but it's a lot more expensive than other brands without any difference in quality.
Click Draft response, and navigate back to the Blueprint view. You’ll see that the agent took a different path through the blueprint, this time selecting the Pricing category and drafting a response using a pricing-related prompt.
Interface view
The Interface view is where you define the agent’s appearance. You build the interface with components that you can customize and reference in the blueprint. This agent’s UI has the following components:- A welcome image in a sidebar
- A section for the review:
- A Text area Input for the customer review
- A button to Draft response
- A section for the response:
- A Message component to display the in progress status message
- A section with Text components to display the response
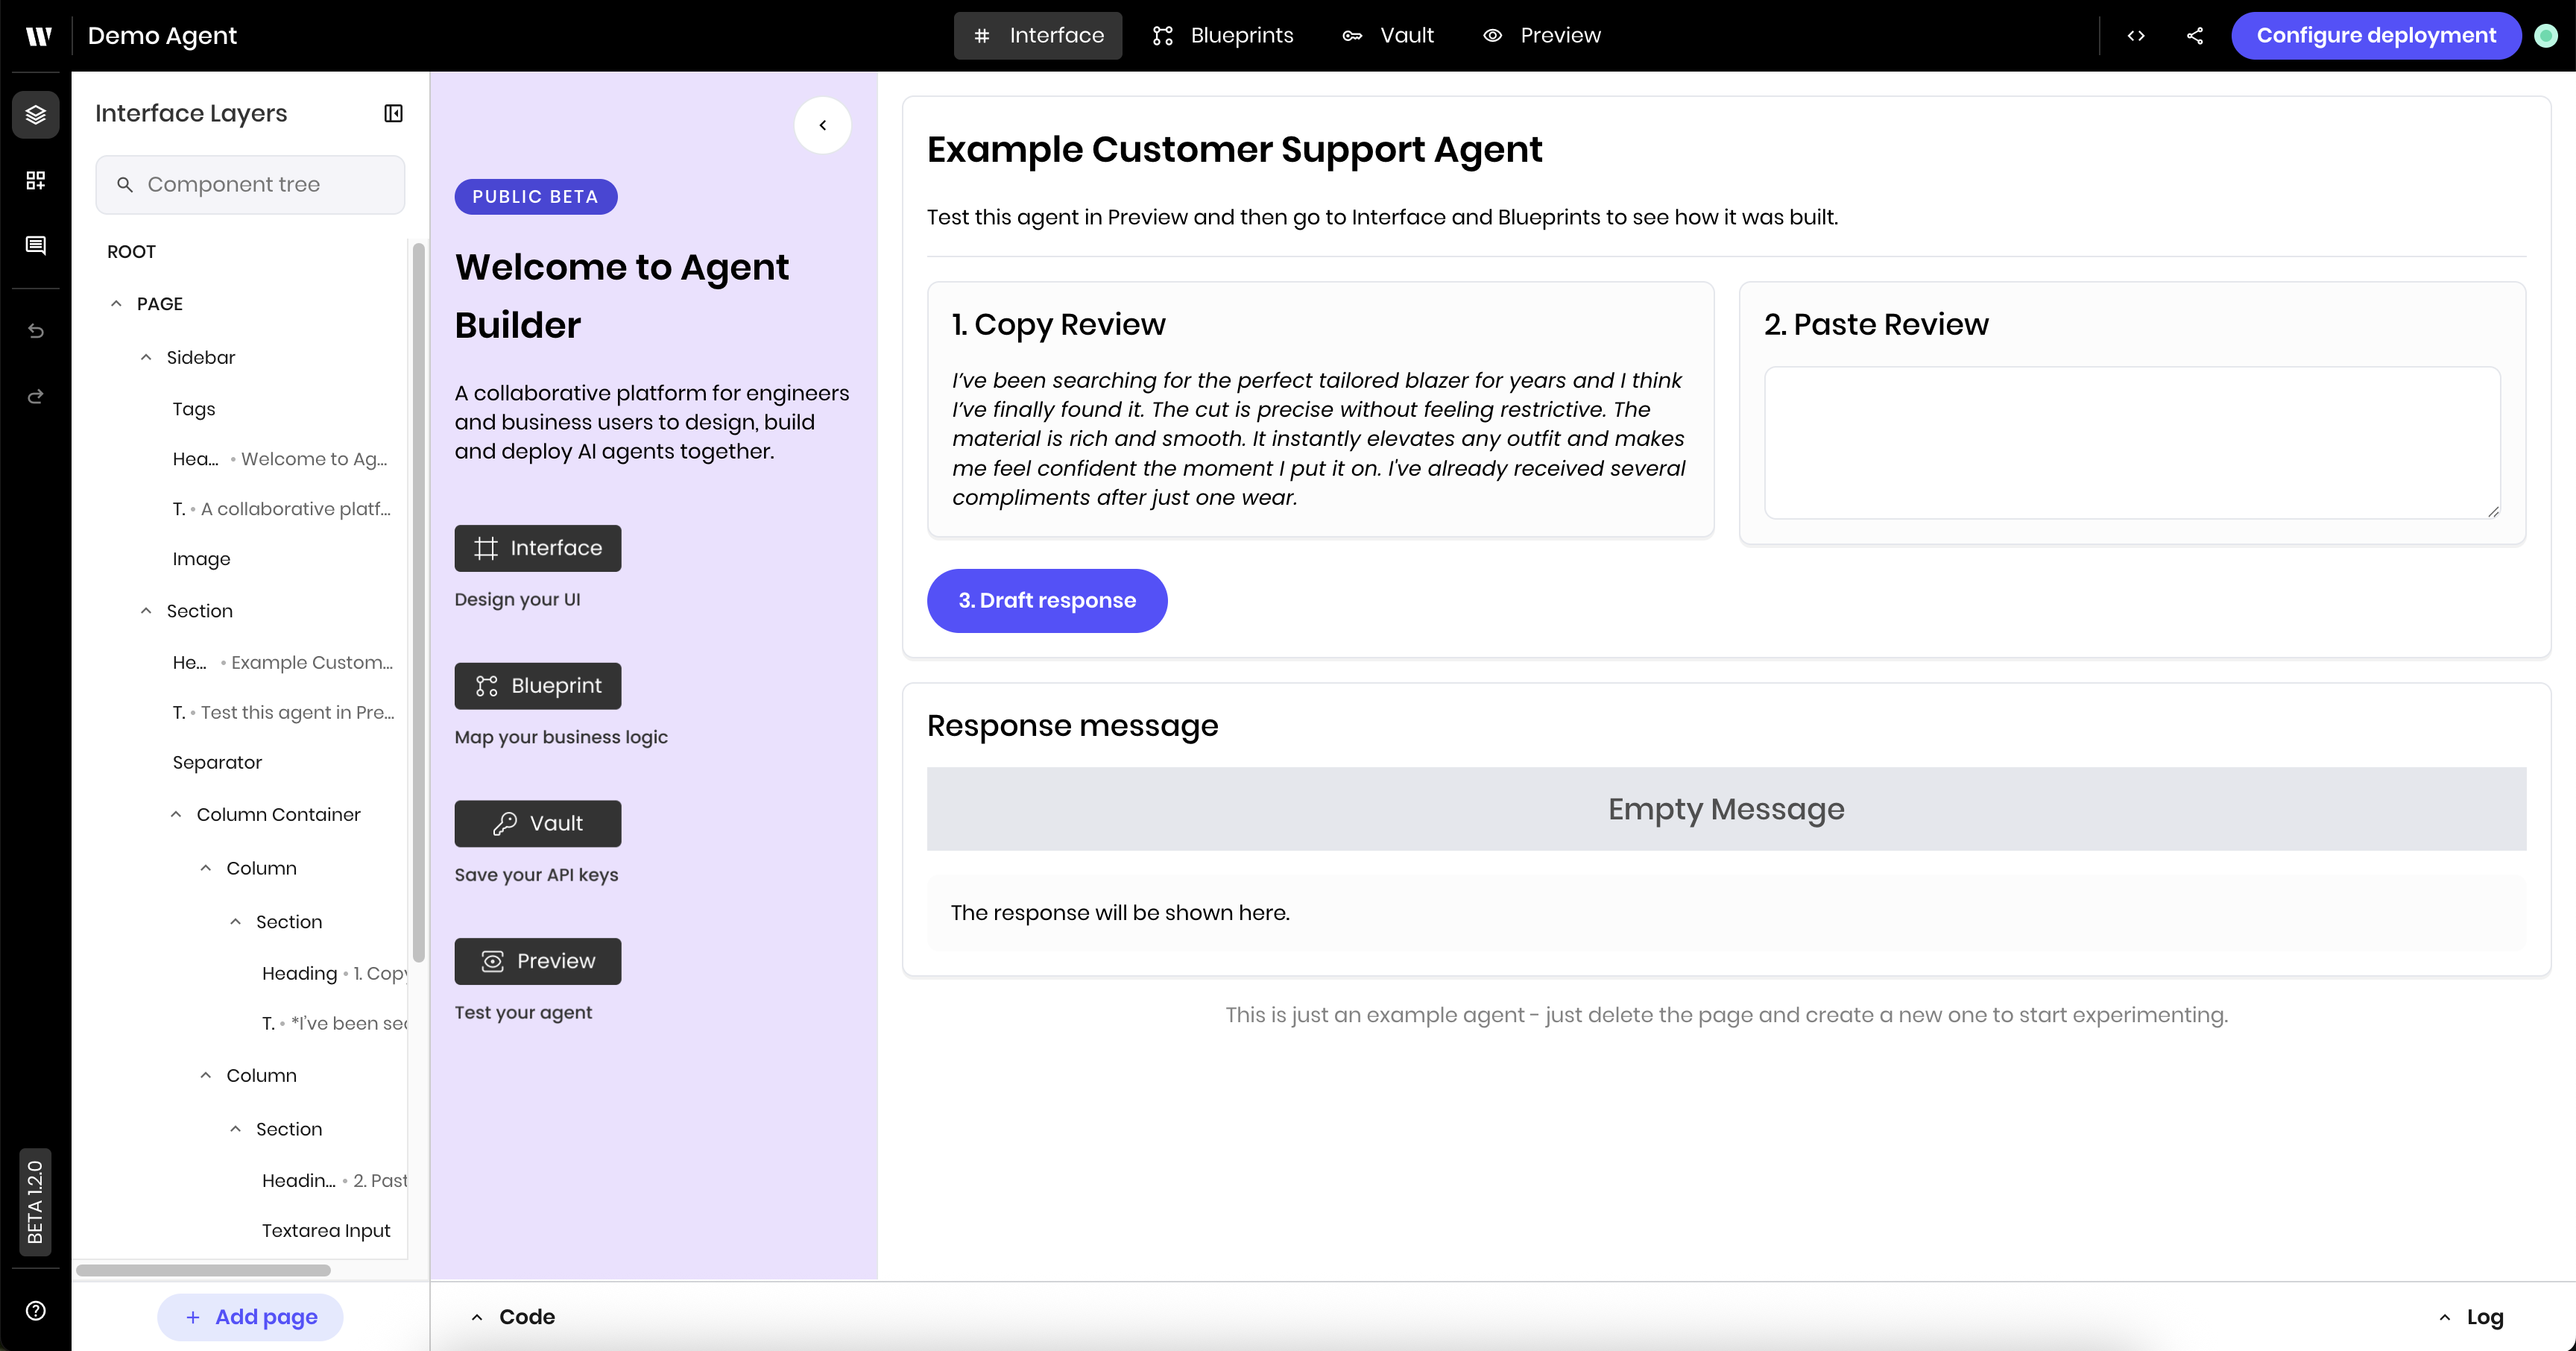
Hidden sections
You won’t see the hidden section for the results in the UI when you first load the agent. You can see that the section is in the UI from the Interface Layers view, which shows all the components in the UI. The hidden section has an icon next to it indicating that it’s not visible.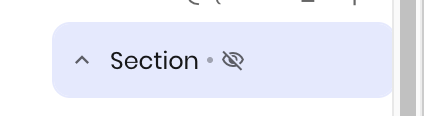
review_response state variable.
Connecting the UI and the blueprint with state variables
To build full-featured agents, you must be able to connect the UI to the blueprint. The agent’s state is the main way to pass data between the UI and the blueprint. The state contains a set of values that the UI and blueprint can both reference and set. You can also use triggers to connect the UI to the blueprint. Here are the places where the demo agent connects the UI to the blueprint and passes data between them:UI Trigger
The Draft response button in the UI is connected to the UI Trigger element in the blueprint. Click events trigger the blueprint to run.
Customer review input
The Text area Input component in the UI binds the user’s input to the
customer_review state variable. The blueprint uses this value in the Classification block.Progress message
The Message component in the UI displays the value of the
progress_message state variable to the user. The blueprint sets this value after the user clicks Generate response.Review response
The two sections in the response with Text components in the UI depend on the value of the
review_response state variable.- The blueprint sets this value after the Text generation block runs.
- Once
review_responsecontains a value, the section that had the message “The response will be shown here” disappears. - The section that displays the response appears. The text area in that section contains the value of
review_response.
Passing data between blocks
The demo agent also shows how to pass data between blocks with the@{result} variable. Once the text generation block has finished, it passes its result to the next block in the blueprint, which is the Set state block. The Set state block sets the review_response state variable with the @{result} from the text generation block.
Learn more about all available variables in Using Data from Previous Blocks.
Modify the demo agent
Now that you’ve toured the Agent Builder interface, try editing the agent’s behavior.Add a new category to the classification block
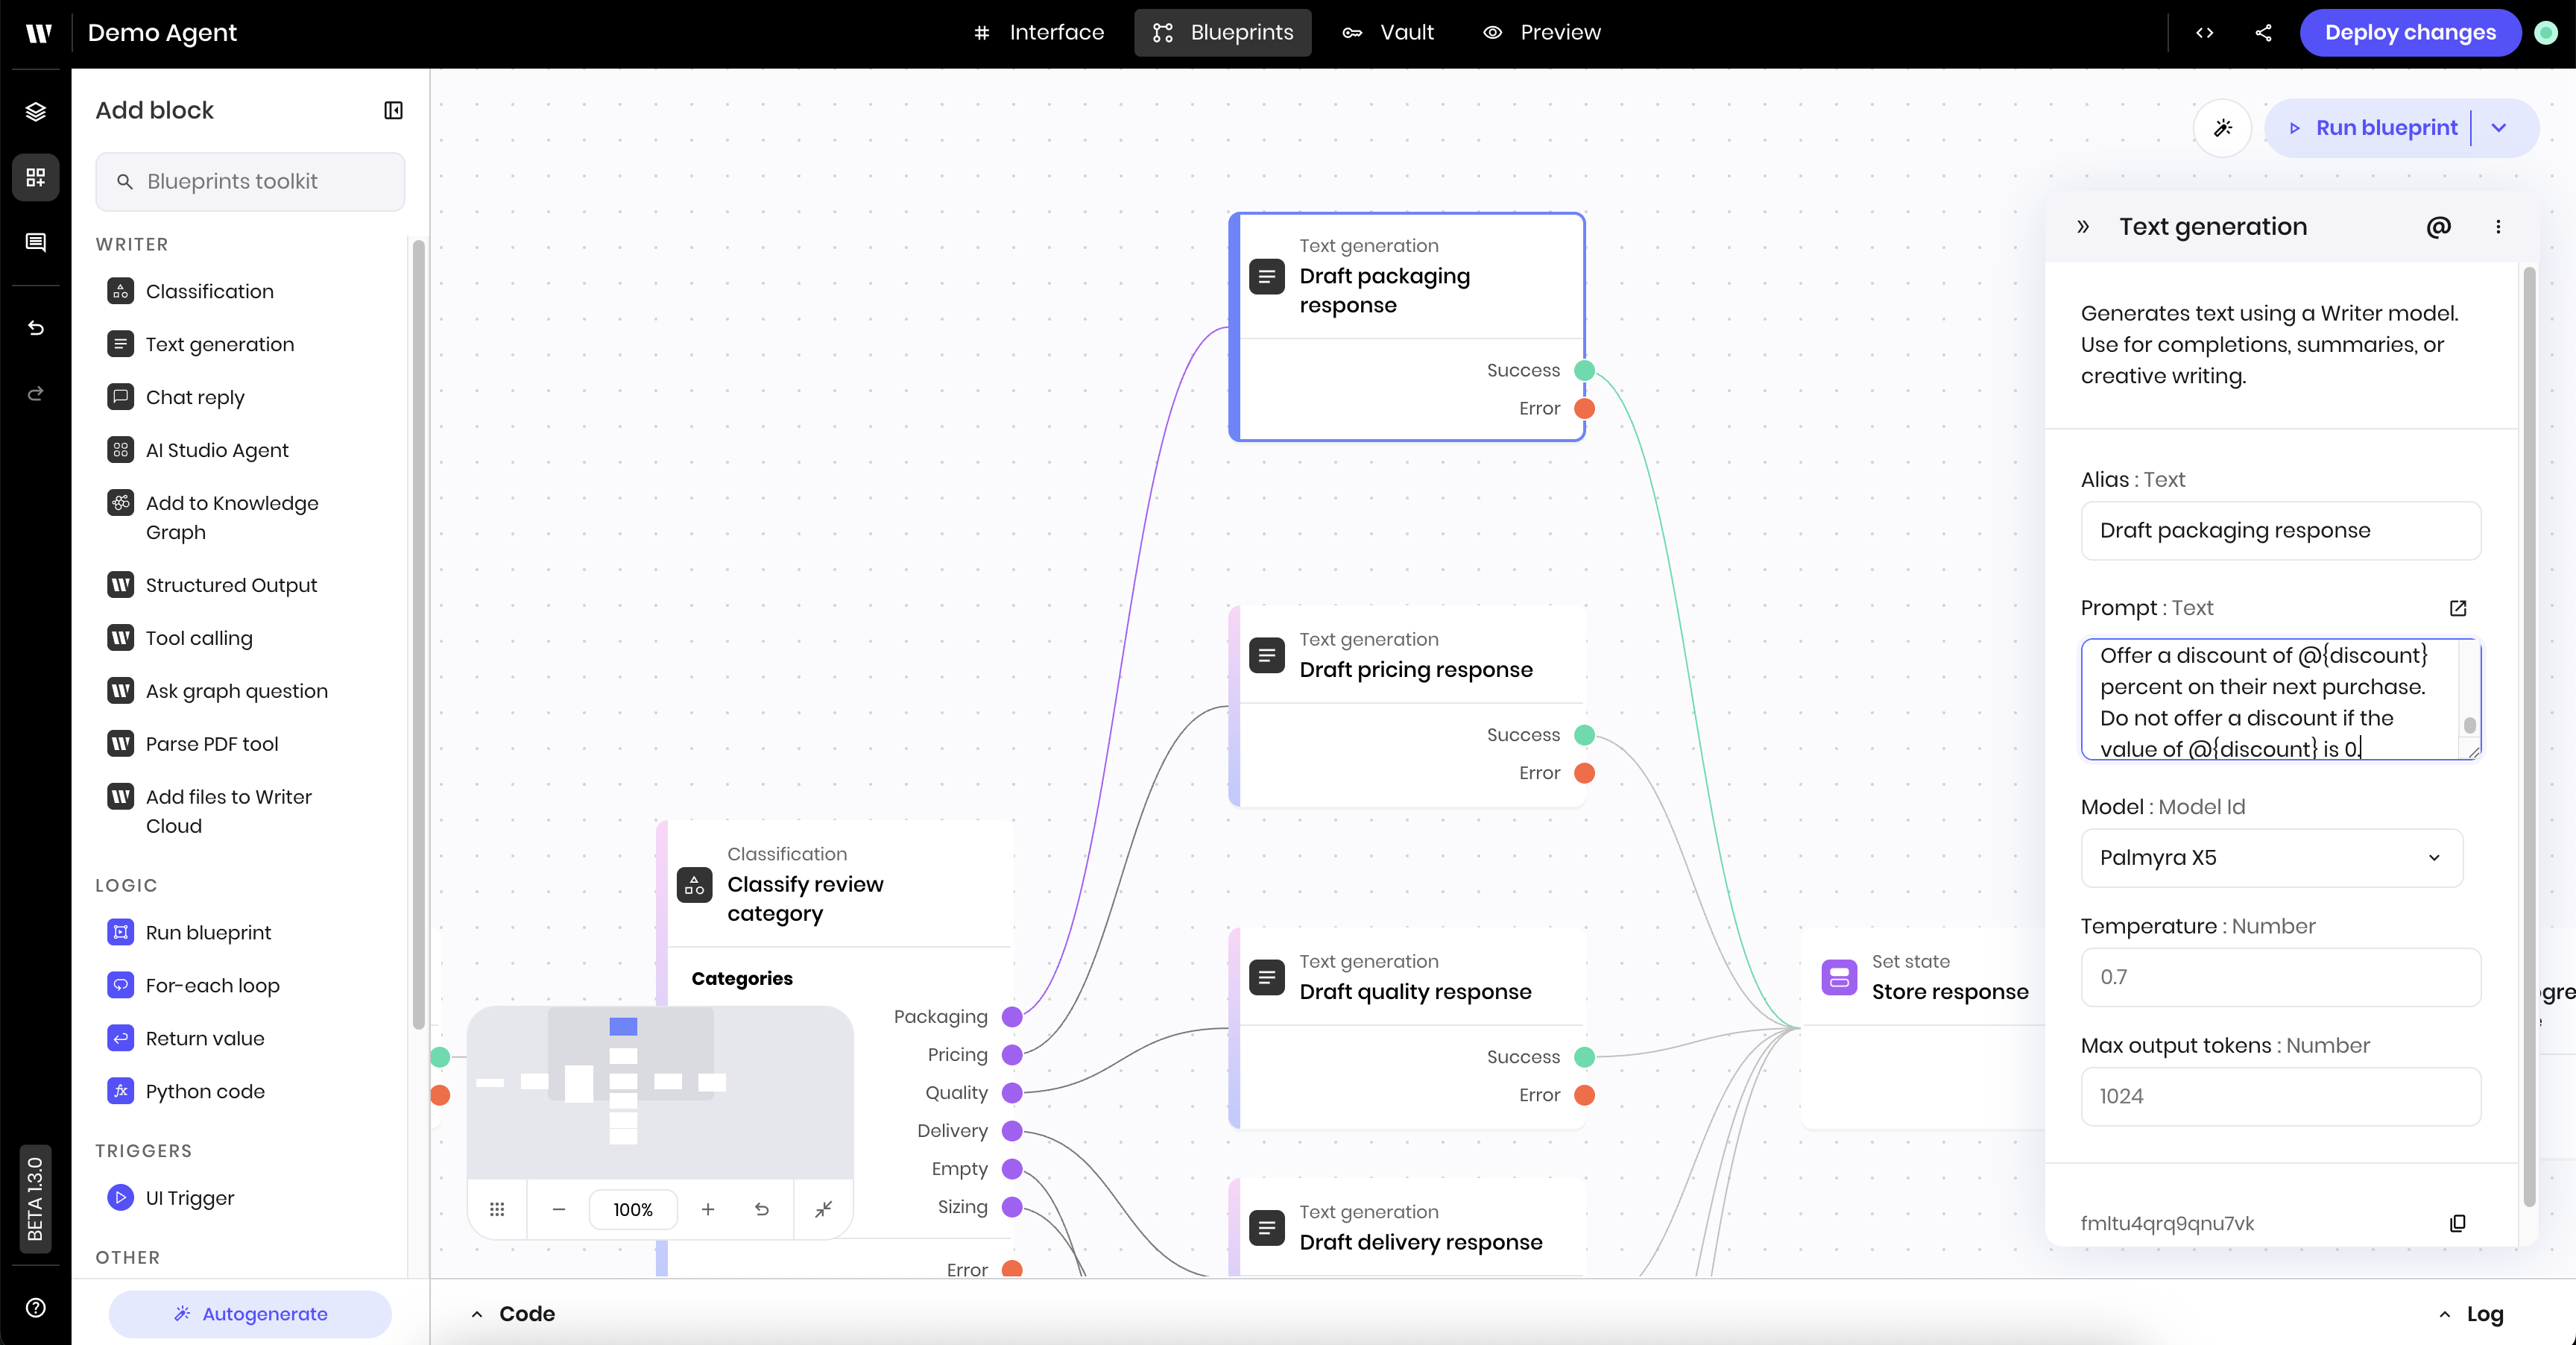
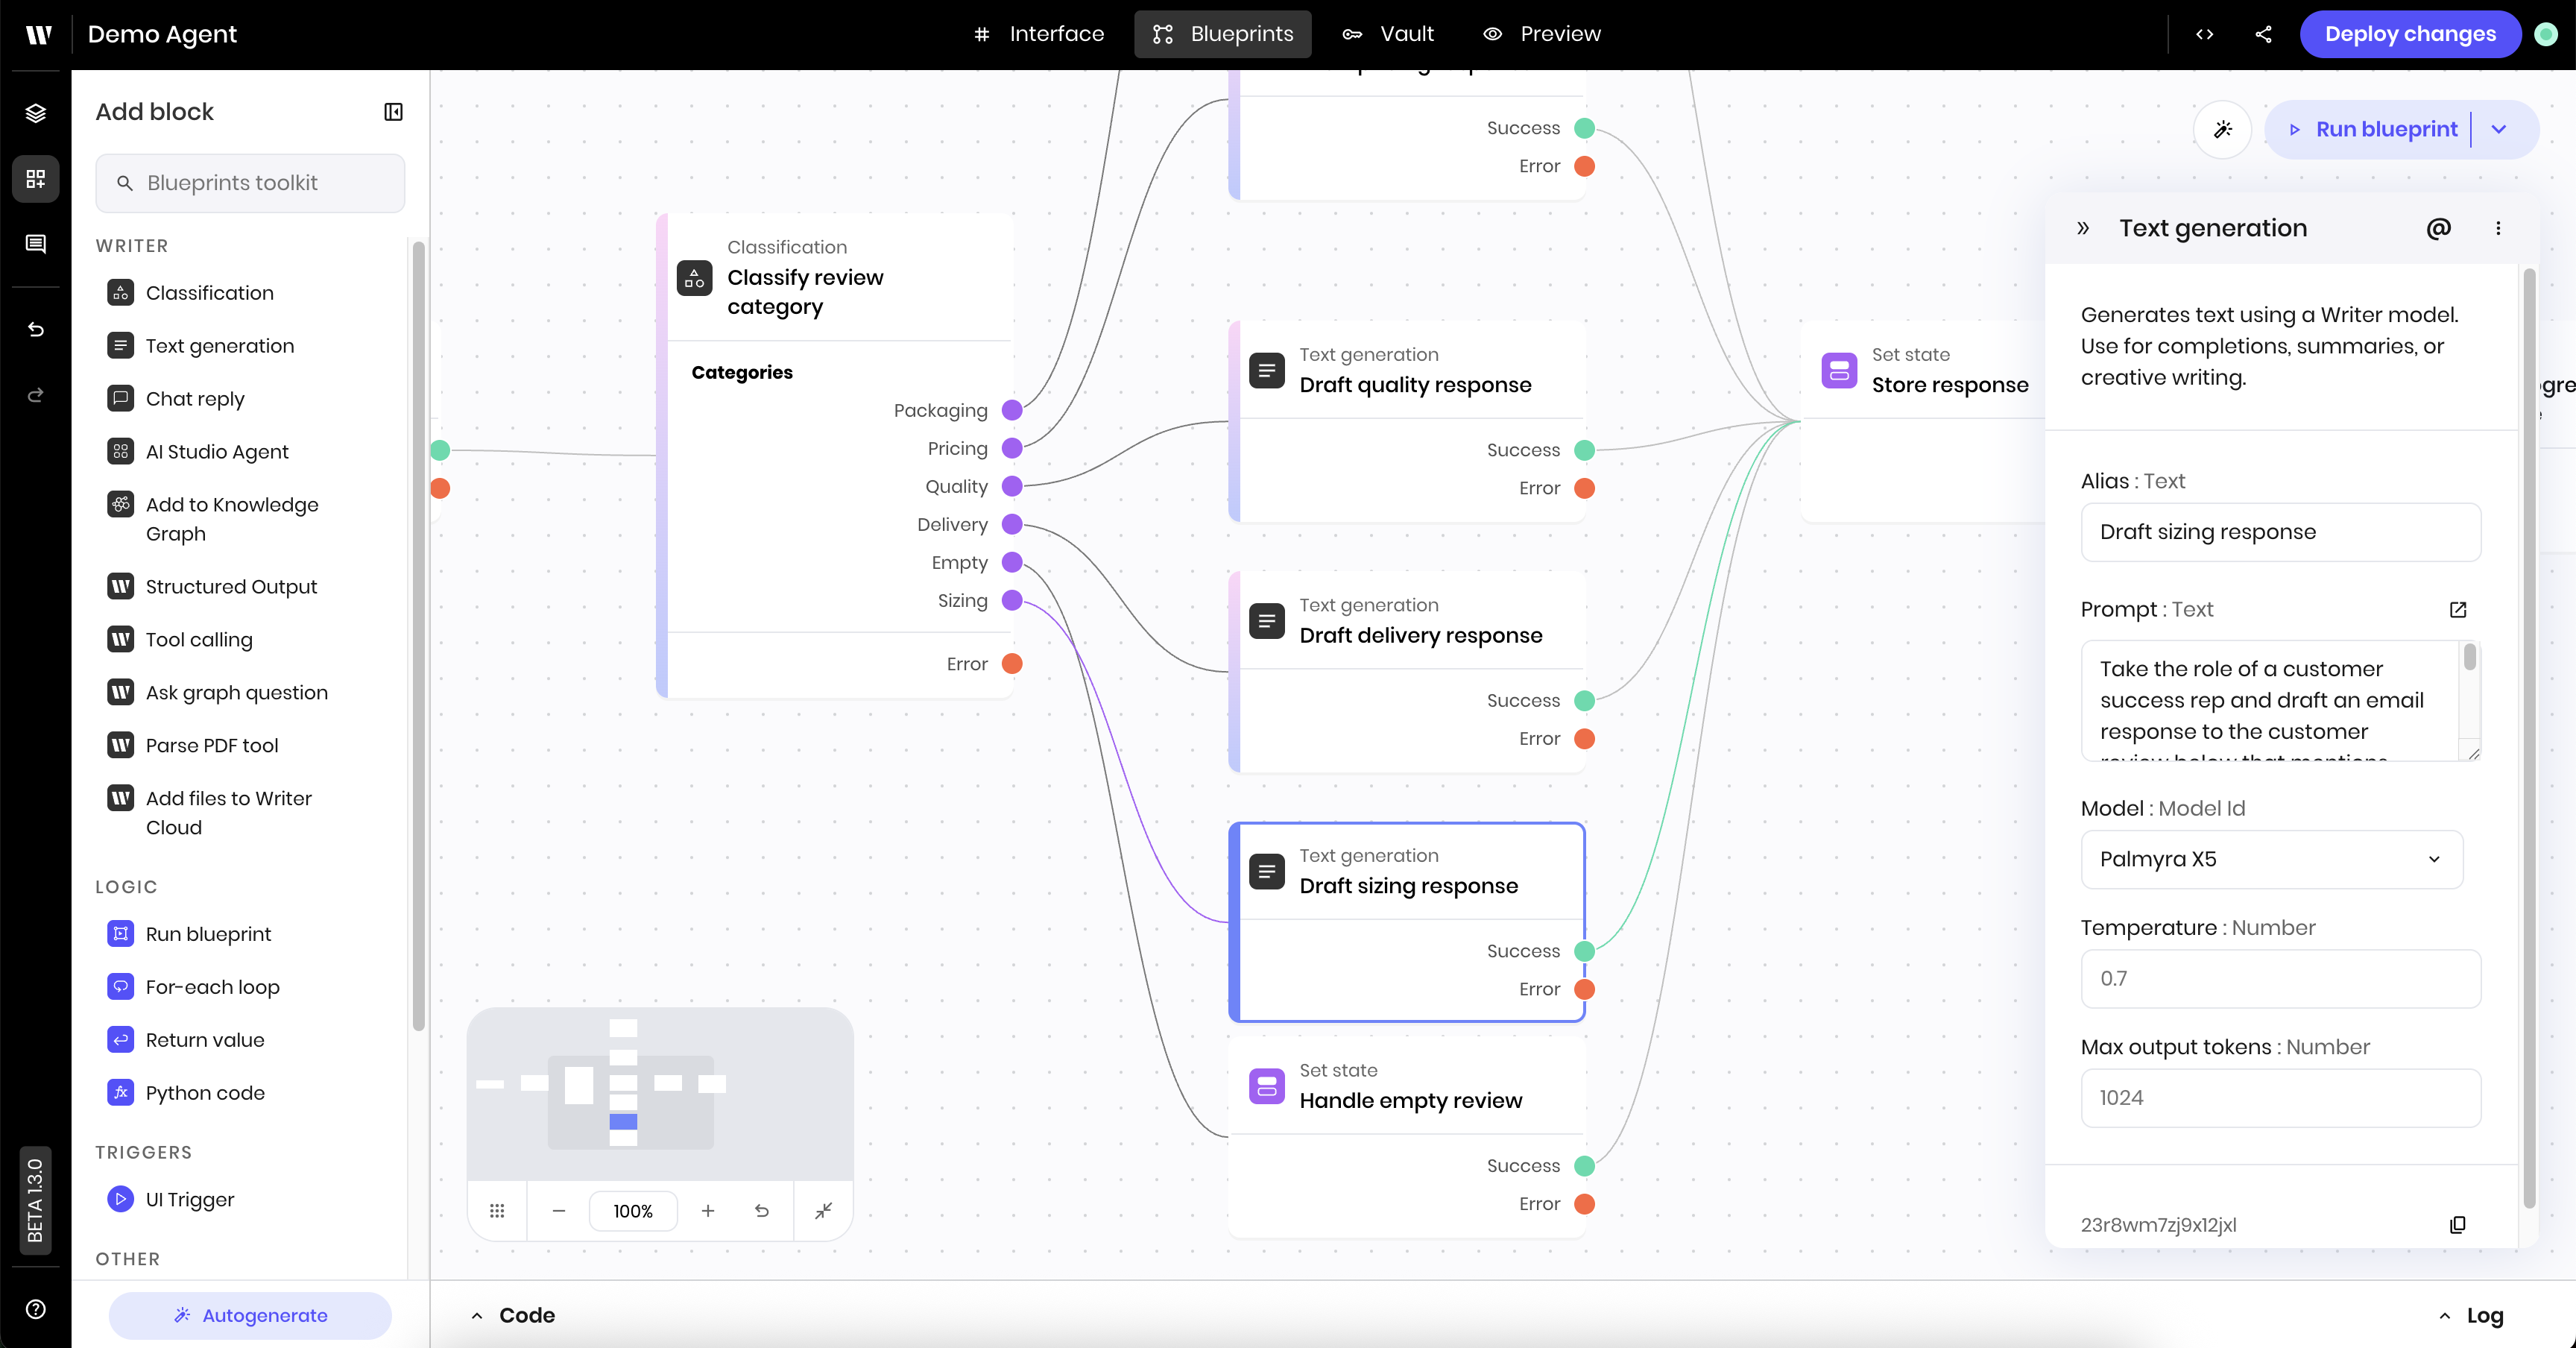
This example shows how to add a new category to the classification block to look for and respond to reviews that focus on sizing issues. First, add another category to the Classification block in the blueprint so that the agent can also classify reviews that are about sizing.Open the Classification block
Navigate to the Blueprints view and click the Classification block in the blueprint to open the block settings.
Add a new text generation block
Add a new Text generation block to the blueprint to generate a response to sizing-related reviews:
- Click one of the existing Text generation blocks in the blueprint.
- Type
Command + c(on Mac) orCtrl + c(on Windows) to copy the block. - Click onto the blueprint canvas and type
Command + v(on Mac) orCtrl + v(on Windows) to paste the block.
Edit the new text generation block
Click on the new text generation block you pasted to edit it. Update the following settings:
- Alias:
Draft sizing response - Prompt: update the prompt to focus on sizing issues:
Connect the new text generation block to the rest of the blueprint
Connect the new text generation block to the rest of the blueprint:
- Drag a line from the purple dot next to Sizing on the Classification block to connect it to the new Text generation block.
-
Drag a line from the Success connection point on the Text generation block to the Set state block.
Add a new UI component
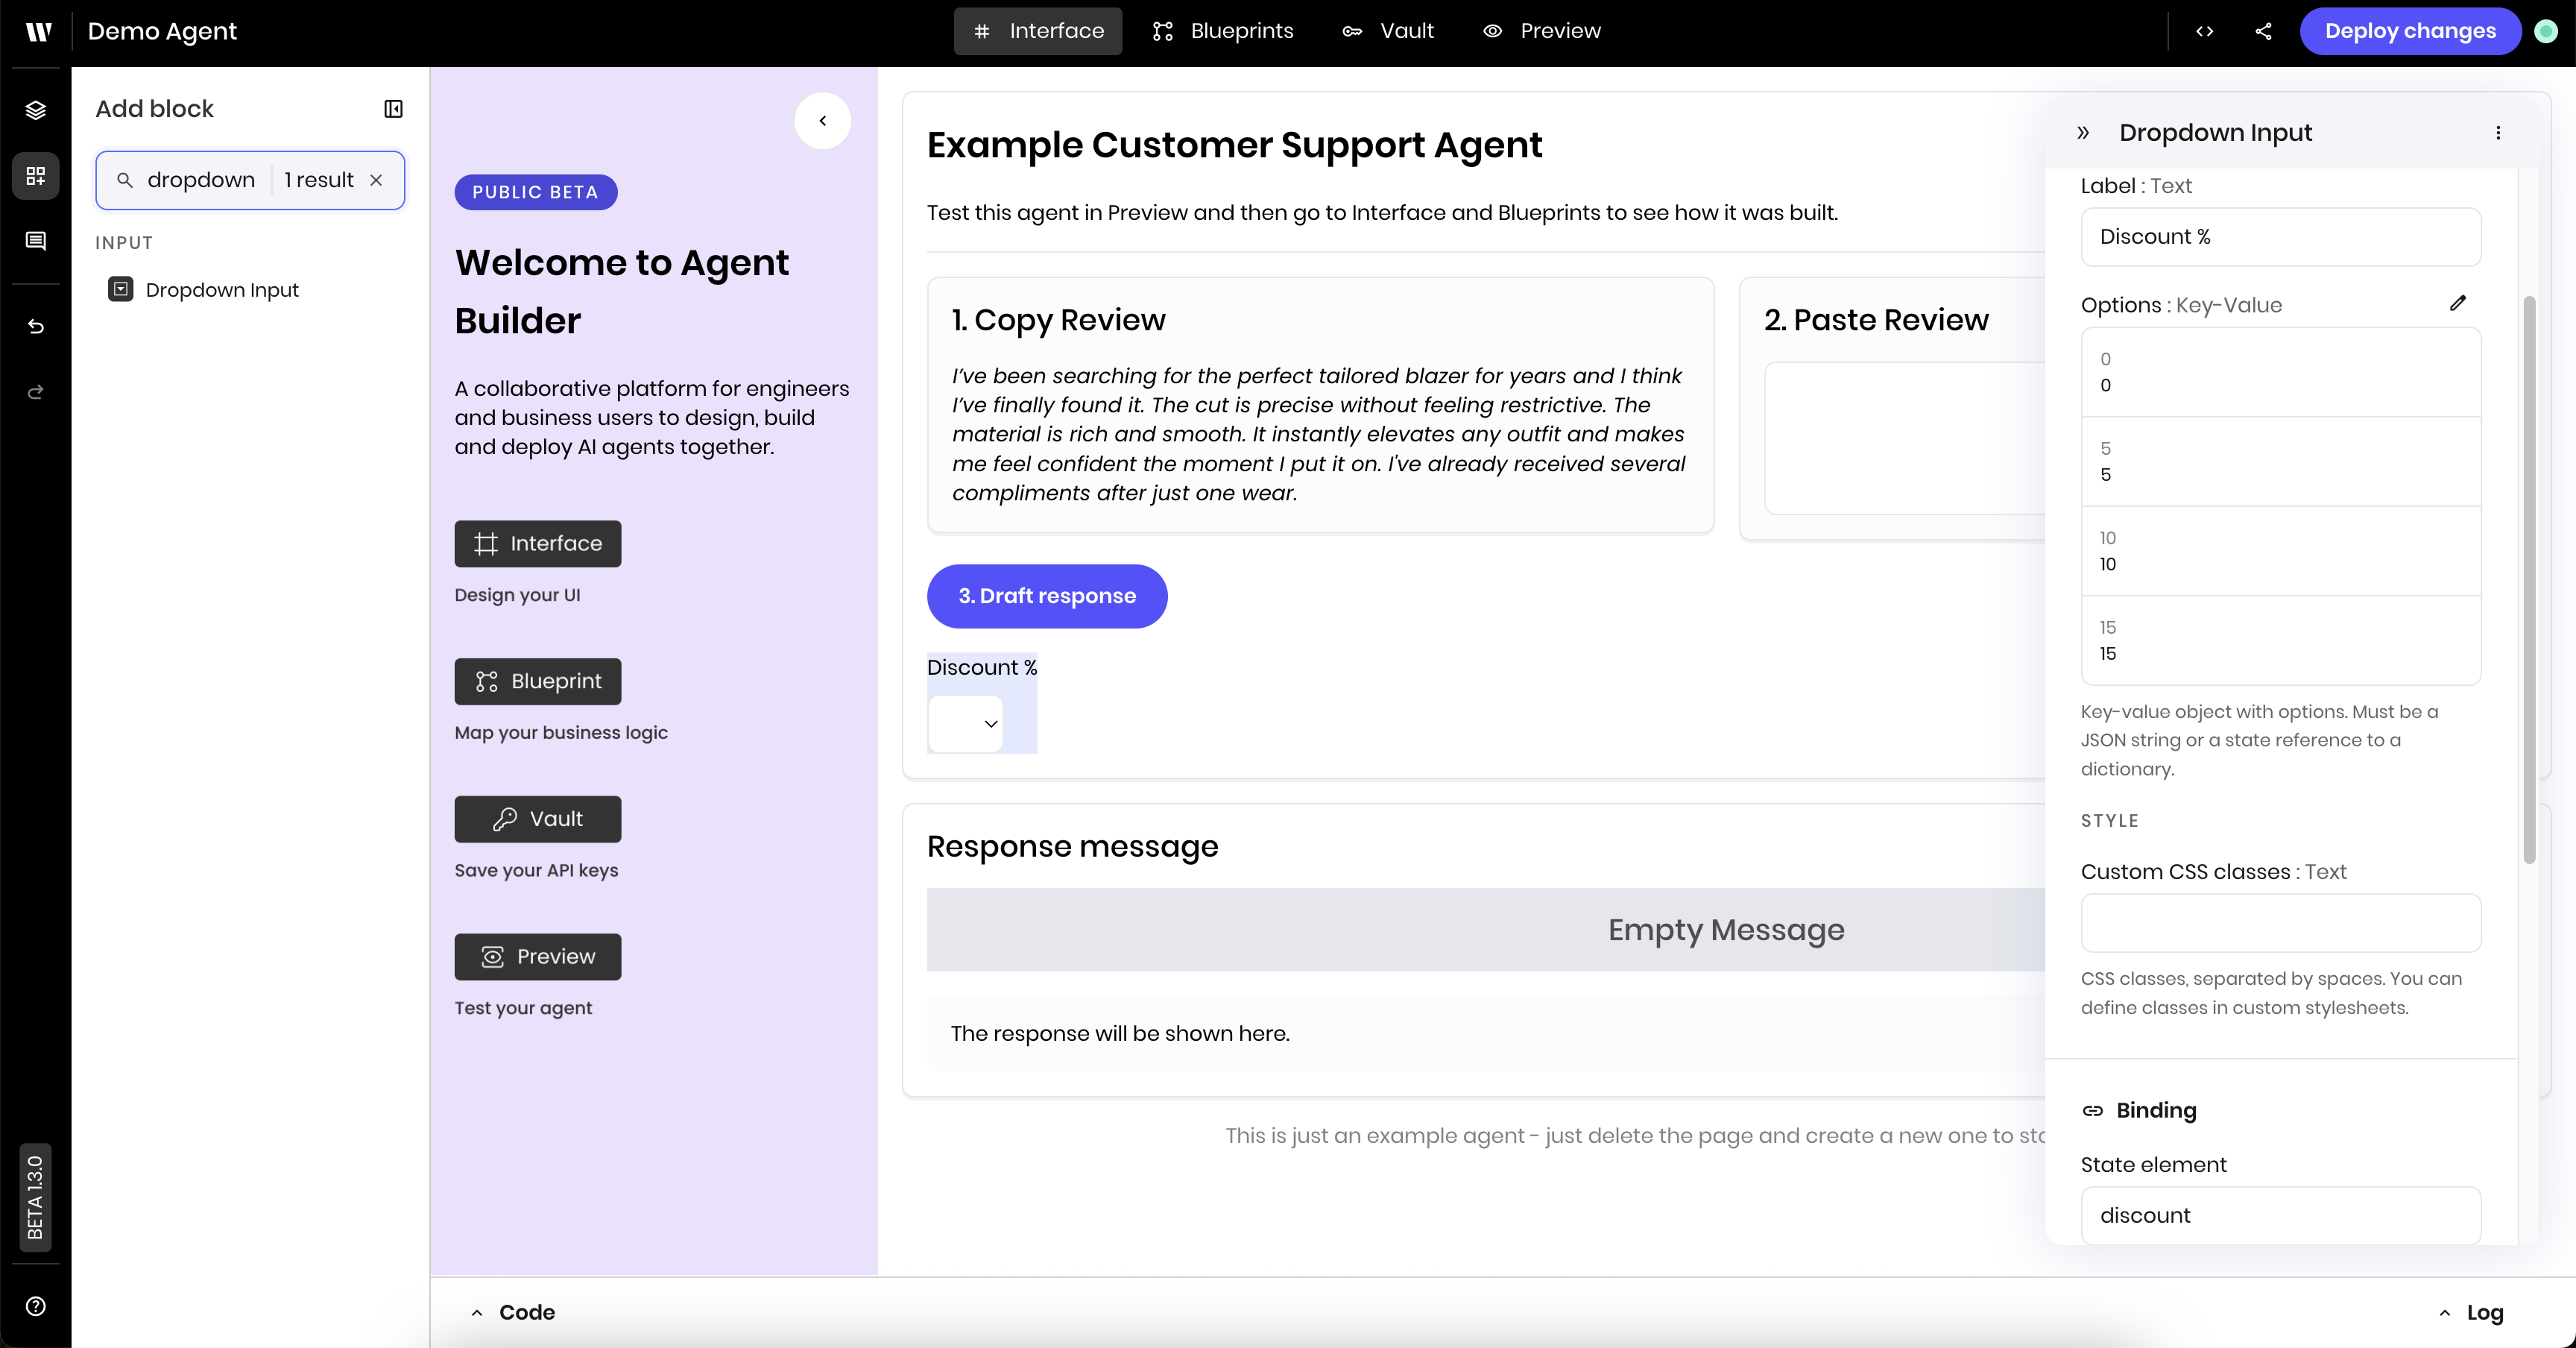
This next example shows how to add a new UI component that you can incorporate into the agent’s blueprint. The steps show how to prompt the agent to add a discount of a certain percentage when generating a response to the customer review. You will:- Add a Select input component to the UI that lists different discount percentages
- Edit the prompt for one of the Text generation blocks to add the selected discount percentage to the response if there is one
Add a new Select input component
Add a new Select input component to the UI. Drag it into the section that contains the area for pasting the review text and the Draft response button.Update the following settings in the Select input component’s settings:
- Label:
Discount % - Options:
0,5,10,15(the keys and values should be the same) - Link variable under Binding:
discount
Now, preview the agent to see the new behavior. Paste the following review into the input field: