> ## Documentation Index
> Fetch the complete documentation index at: https://dev.writer.com/llms.txt
> Use this file to discover all available pages before exploring further.
# Social post generator
In this tutorial, you'll use the Writer Framework to build an AI-powered tool for generating social media posts and tags based on the input you provide!
The process will take only minutes using a drag-and-drop visual editor to build the user interface and Python for the back-end code.
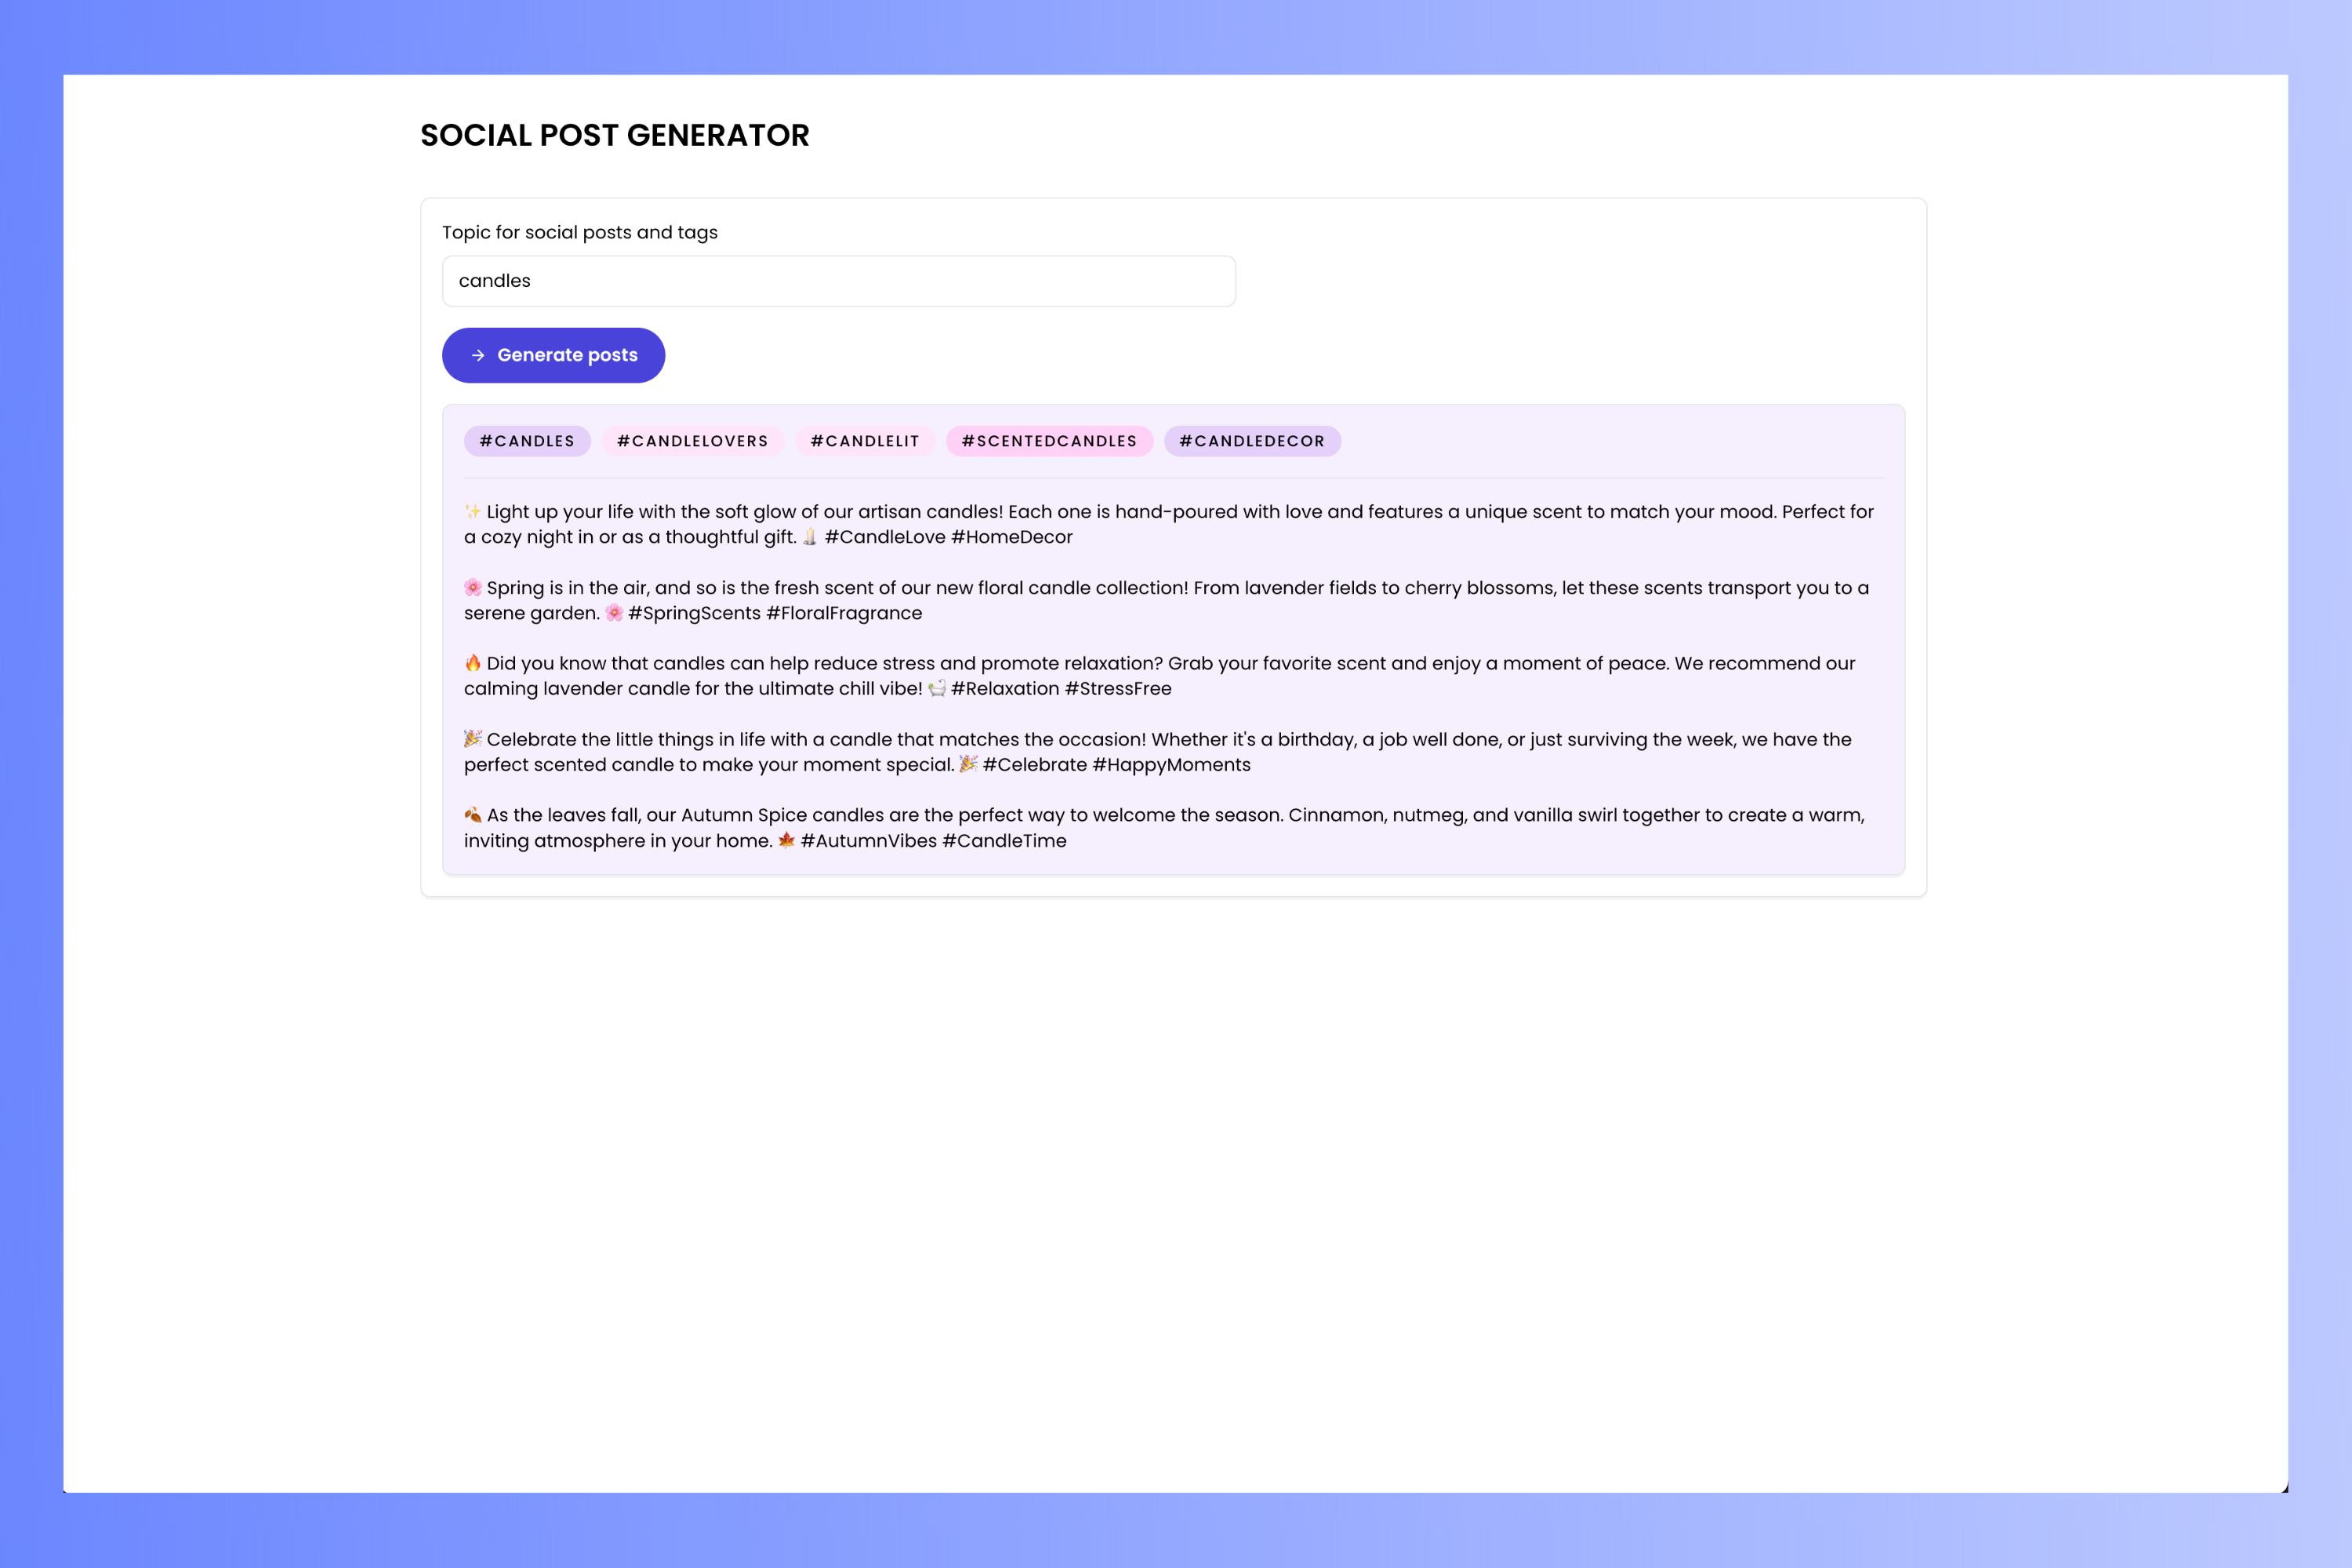
Here's what the finished project will look like:
 ## Prerequisites
Before starting, ensure you have:
* **A Writer account:** You don't need an account to use Writer Framework, but you'll need one to use the AI module. [Sign up for a free account here](https://app.writer.com/register).
* **Python 3.9.2 or later**: Use the installer from [python.org](https://www.python.org/downloads/).
* **pip:** This command-line application comes with Python and is used for installing Python packages, including those from Writer.
* **A basic understanding of Python:** You should be familiar with the basics of the language.
* **Your favorite code editor (optional):** There's a code editor built into Writer for writing back-end code, but you can also use Visual Studio Code, Notepad++, Vim, Emacs, or any text editor made for programming if you prefer.
## Setting up your project
### Create a Writer app and get its API key
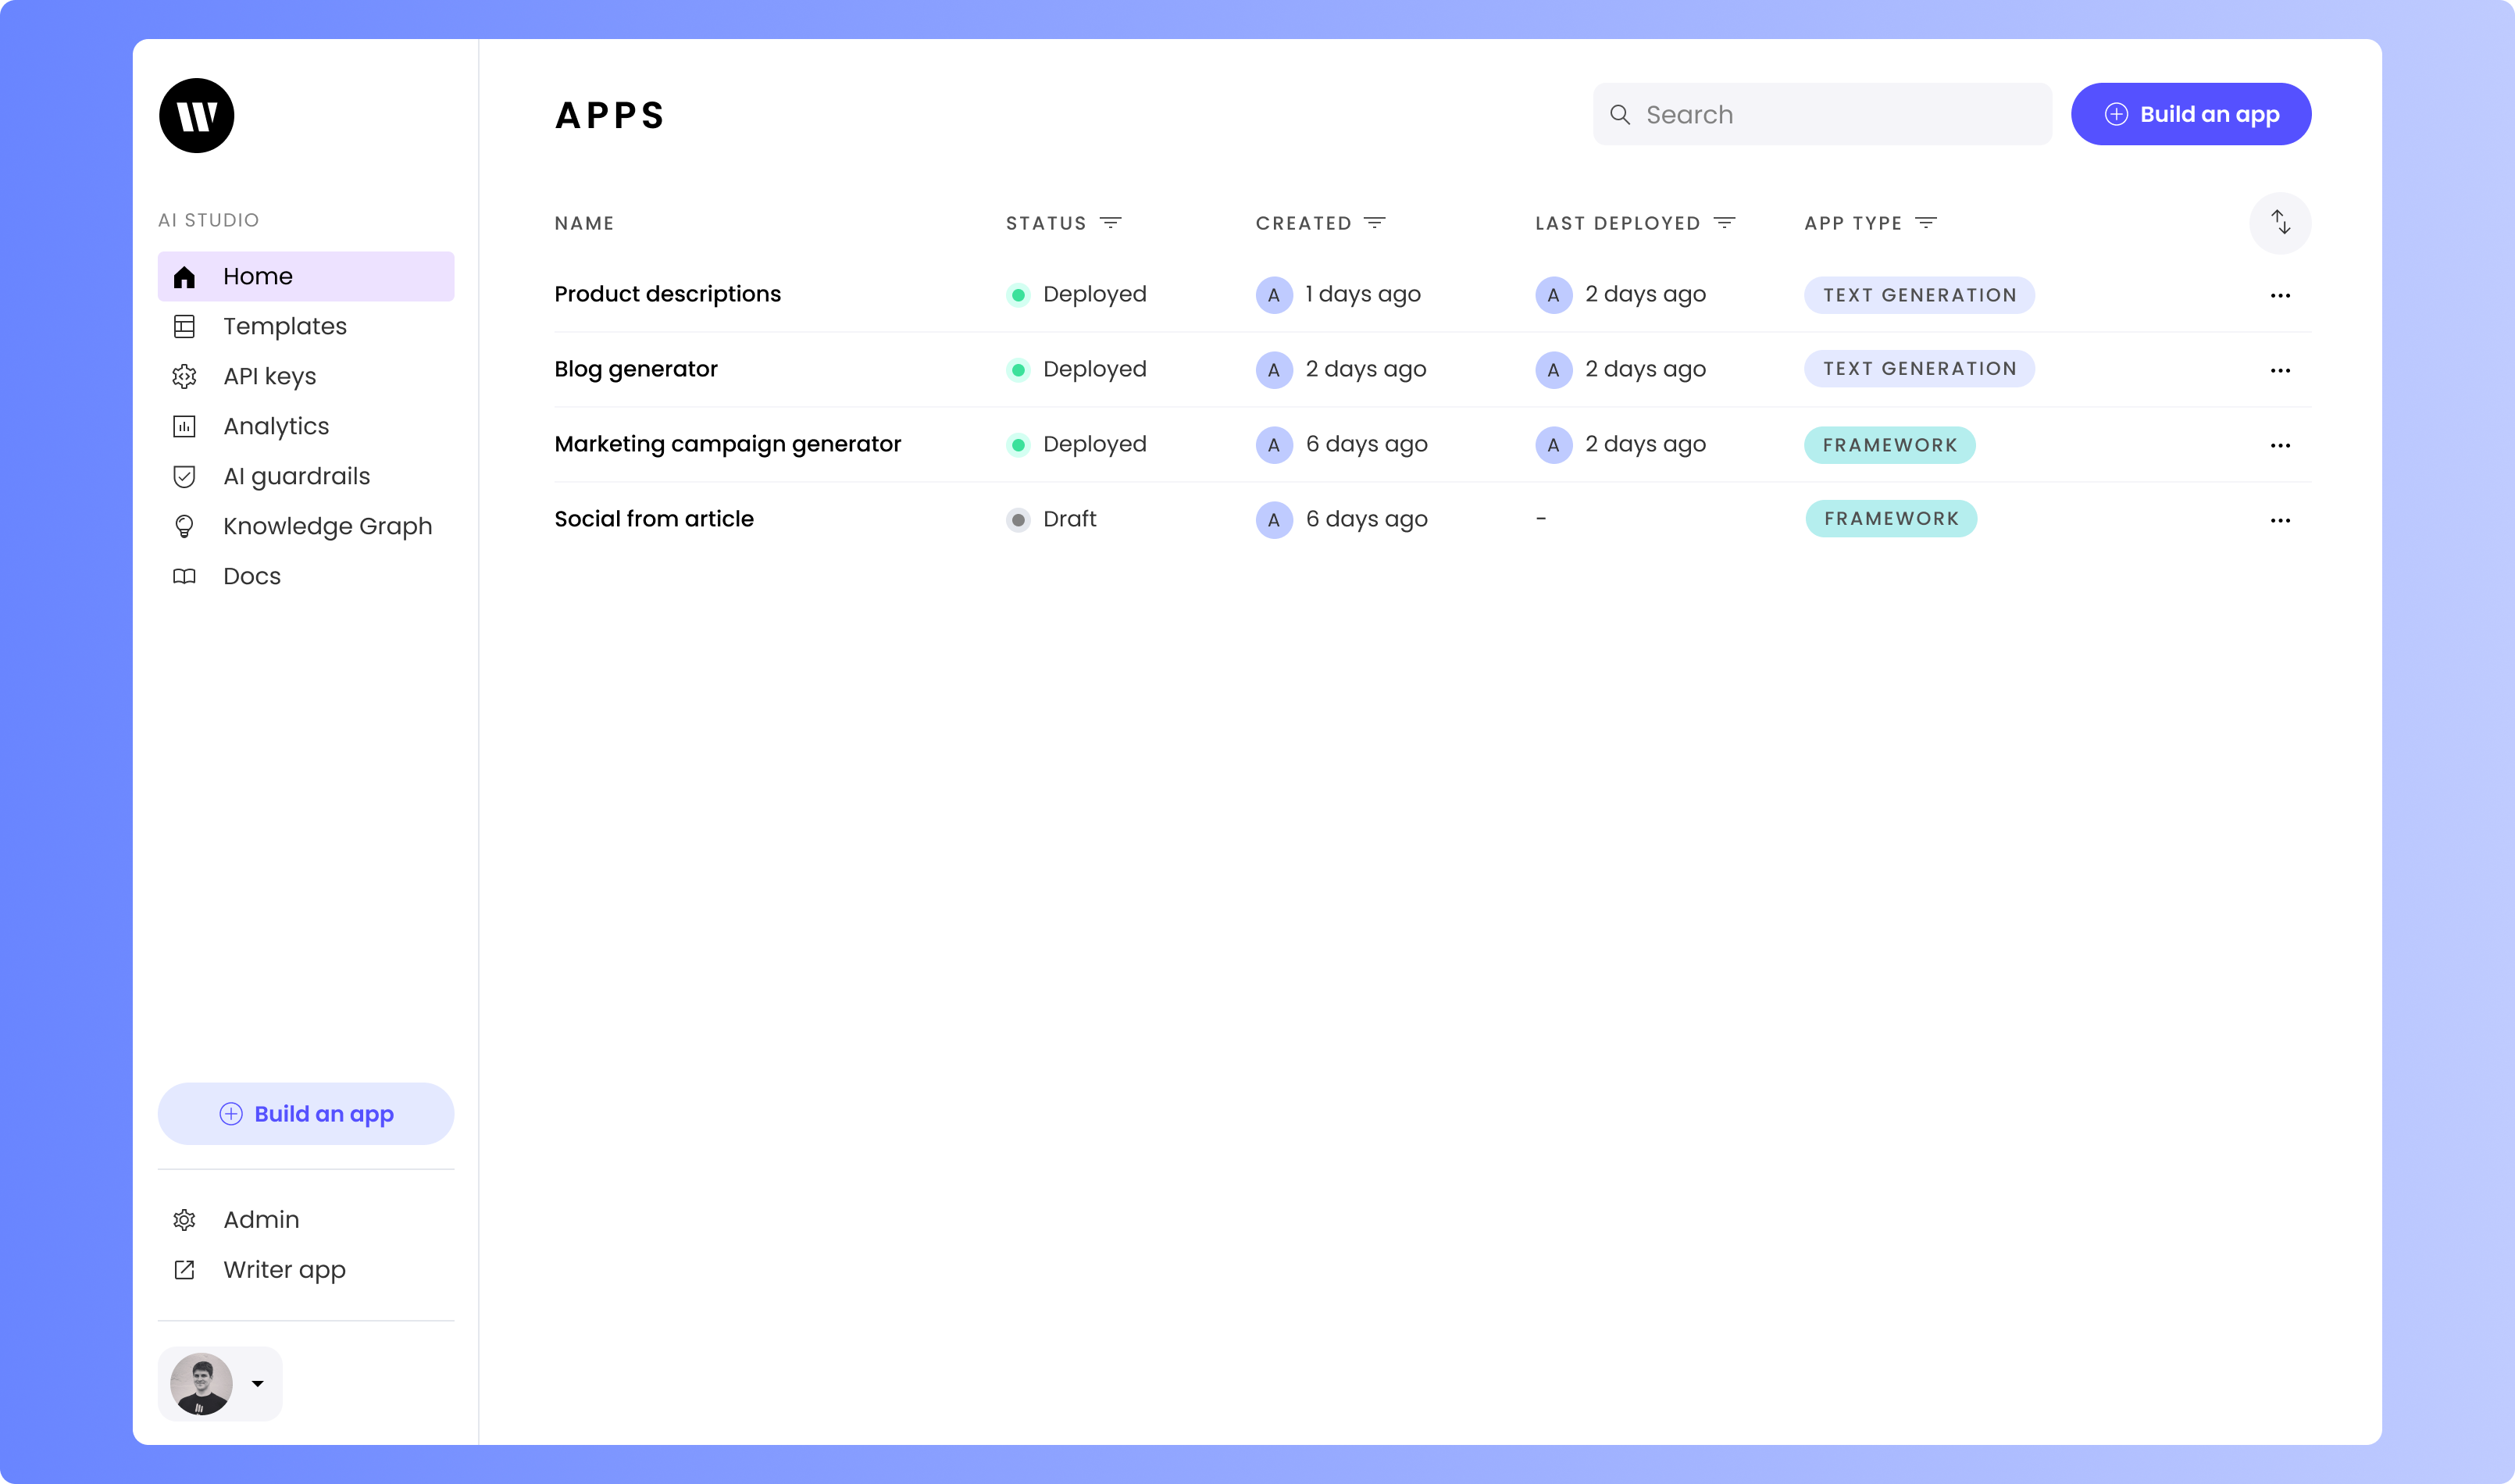
First, you'll need to create a new app within Writer.
Log into Writer. From the Home screen, click on the **Build an app** button.
## Prerequisites
Before starting, ensure you have:
* **A Writer account:** You don't need an account to use Writer Framework, but you'll need one to use the AI module. [Sign up for a free account here](https://app.writer.com/register).
* **Python 3.9.2 or later**: Use the installer from [python.org](https://www.python.org/downloads/).
* **pip:** This command-line application comes with Python and is used for installing Python packages, including those from Writer.
* **A basic understanding of Python:** You should be familiar with the basics of the language.
* **Your favorite code editor (optional):** There's a code editor built into Writer for writing back-end code, but you can also use Visual Studio Code, Notepad++, Vim, Emacs, or any text editor made for programming if you prefer.
## Setting up your project
### Create a Writer app and get its API key
First, you'll need to create a new app within Writer.
Log into Writer. From the Home screen, click on the **Build an app** button.
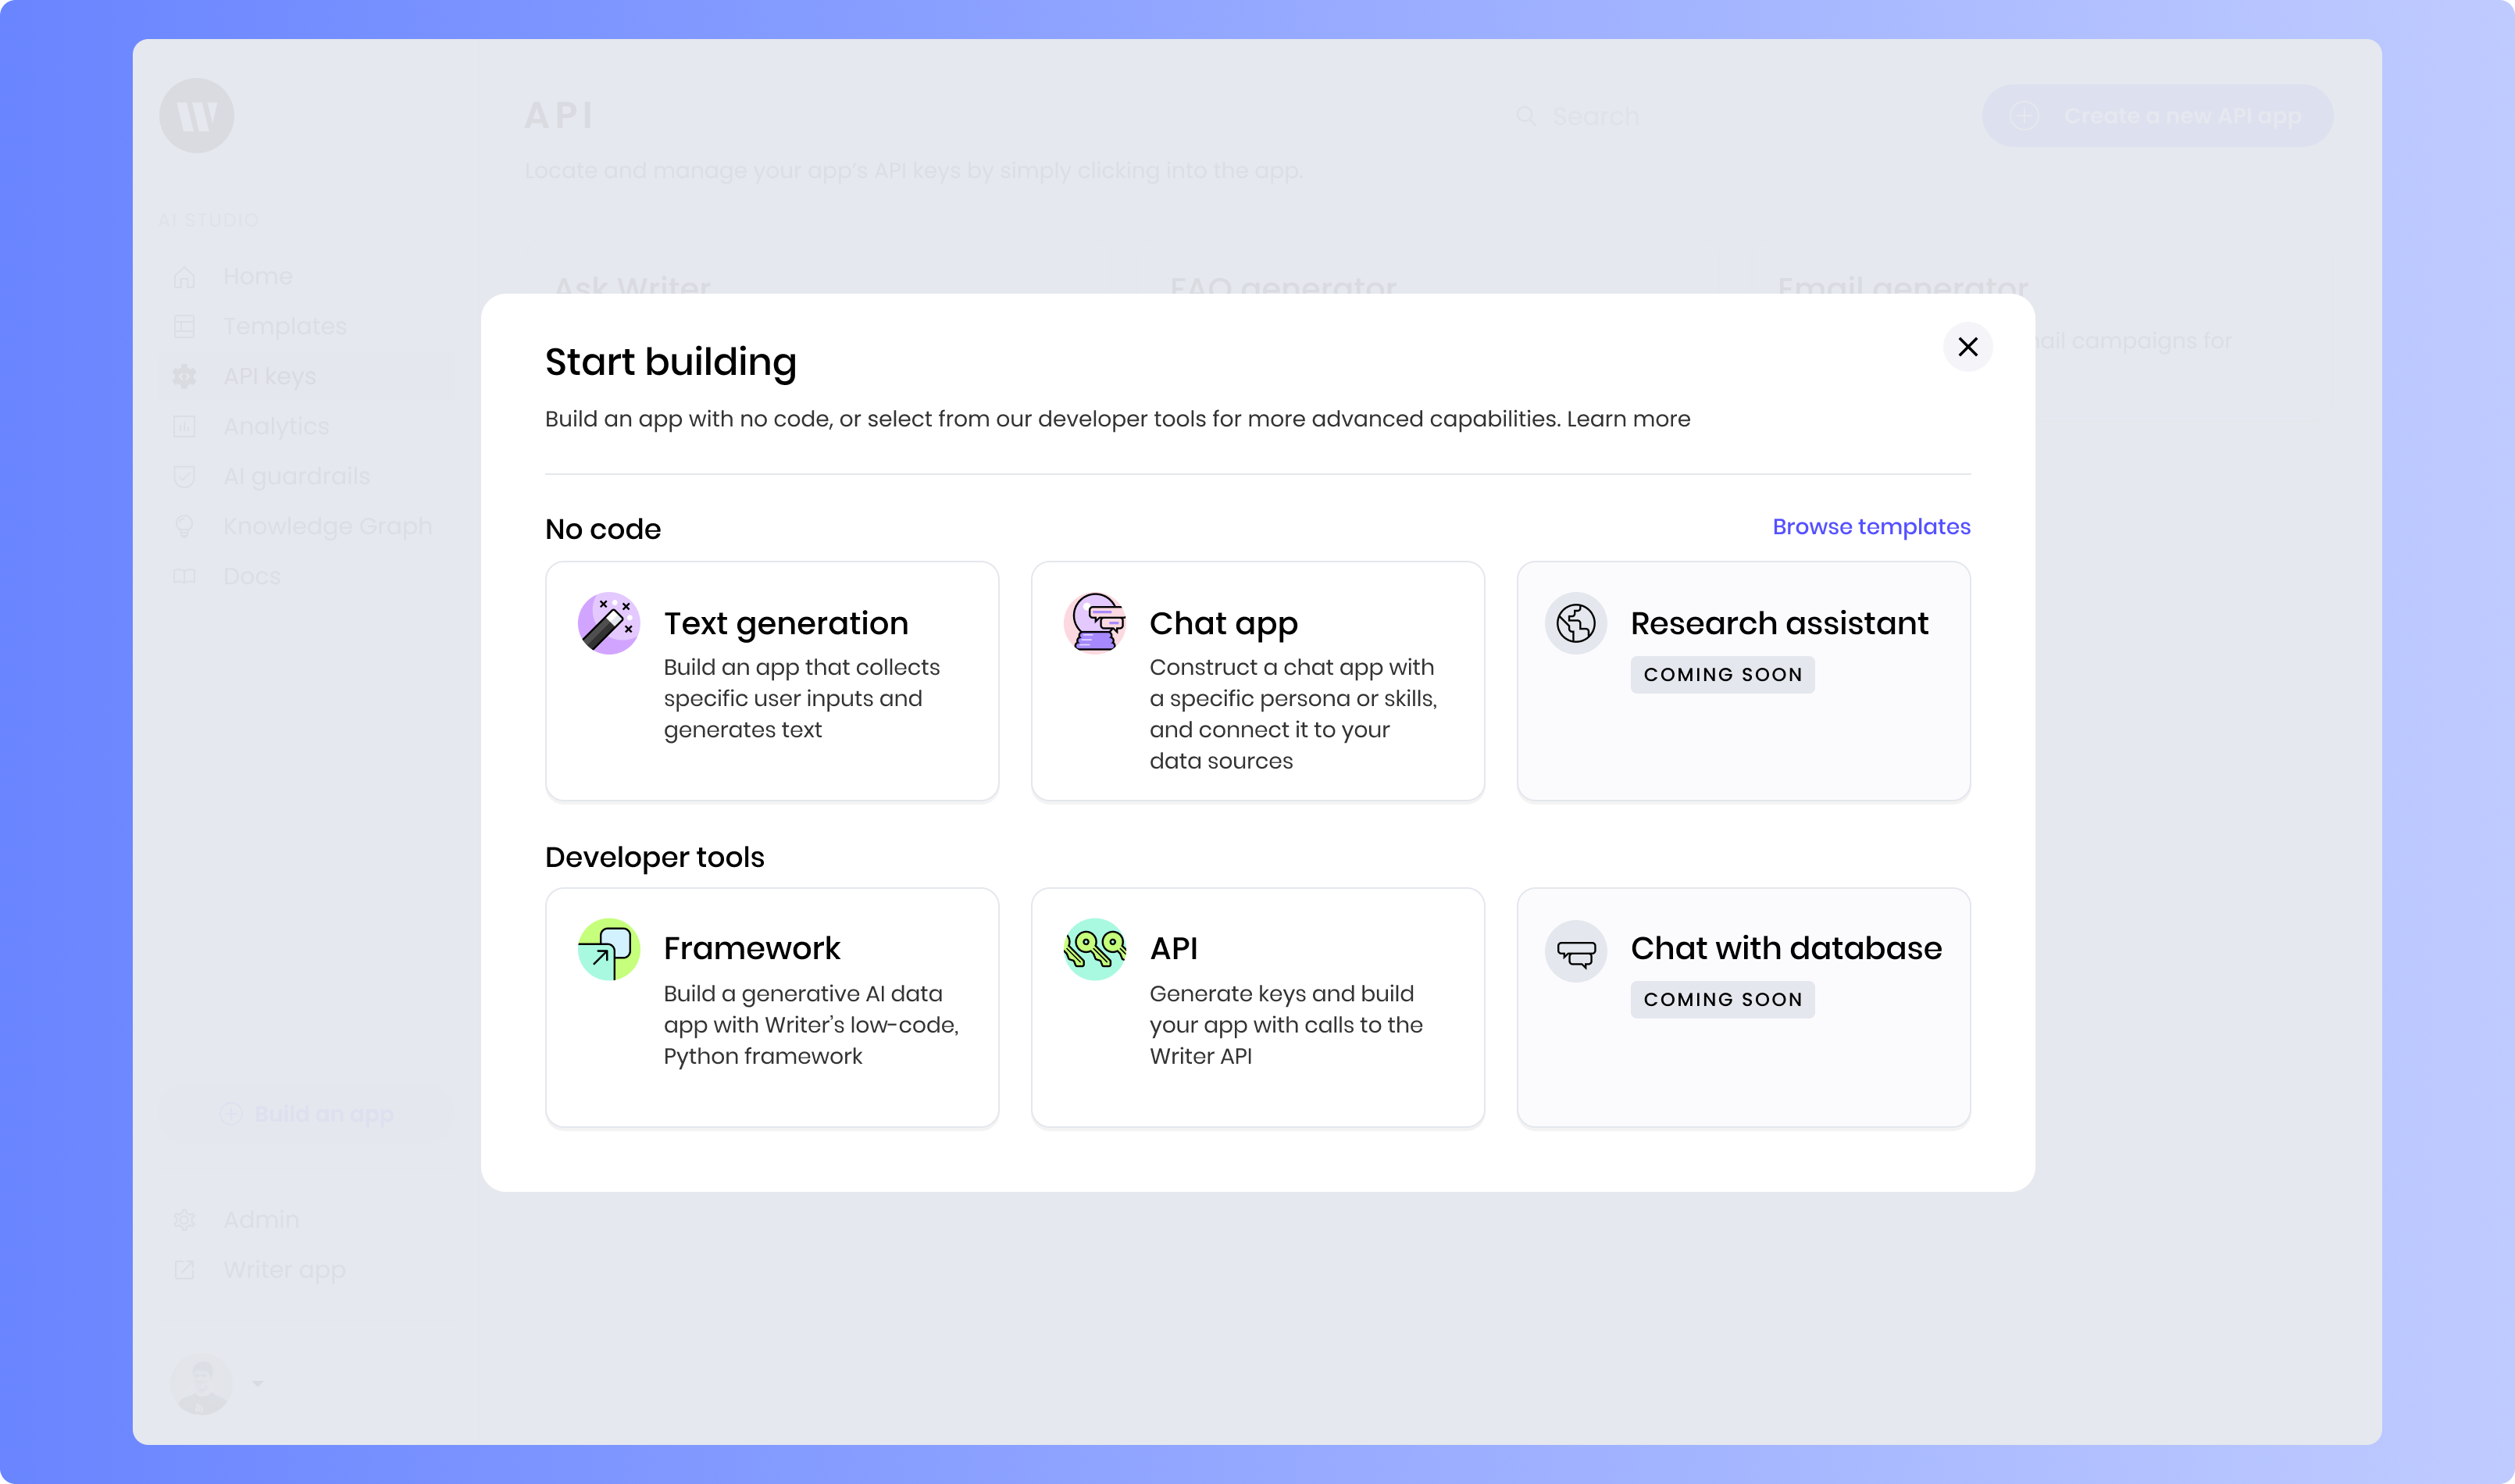
 The **Start building** menu will appear, presenting options for the types of apps you can create.
Select **Framework**, located under **Developer tools**. This will create a brand new app based on Writer Framework.
The **Start building** menu will appear, presenting options for the types of apps you can create.
Select **Framework**, located under **Developer tools**. This will create a brand new app based on Writer Framework.
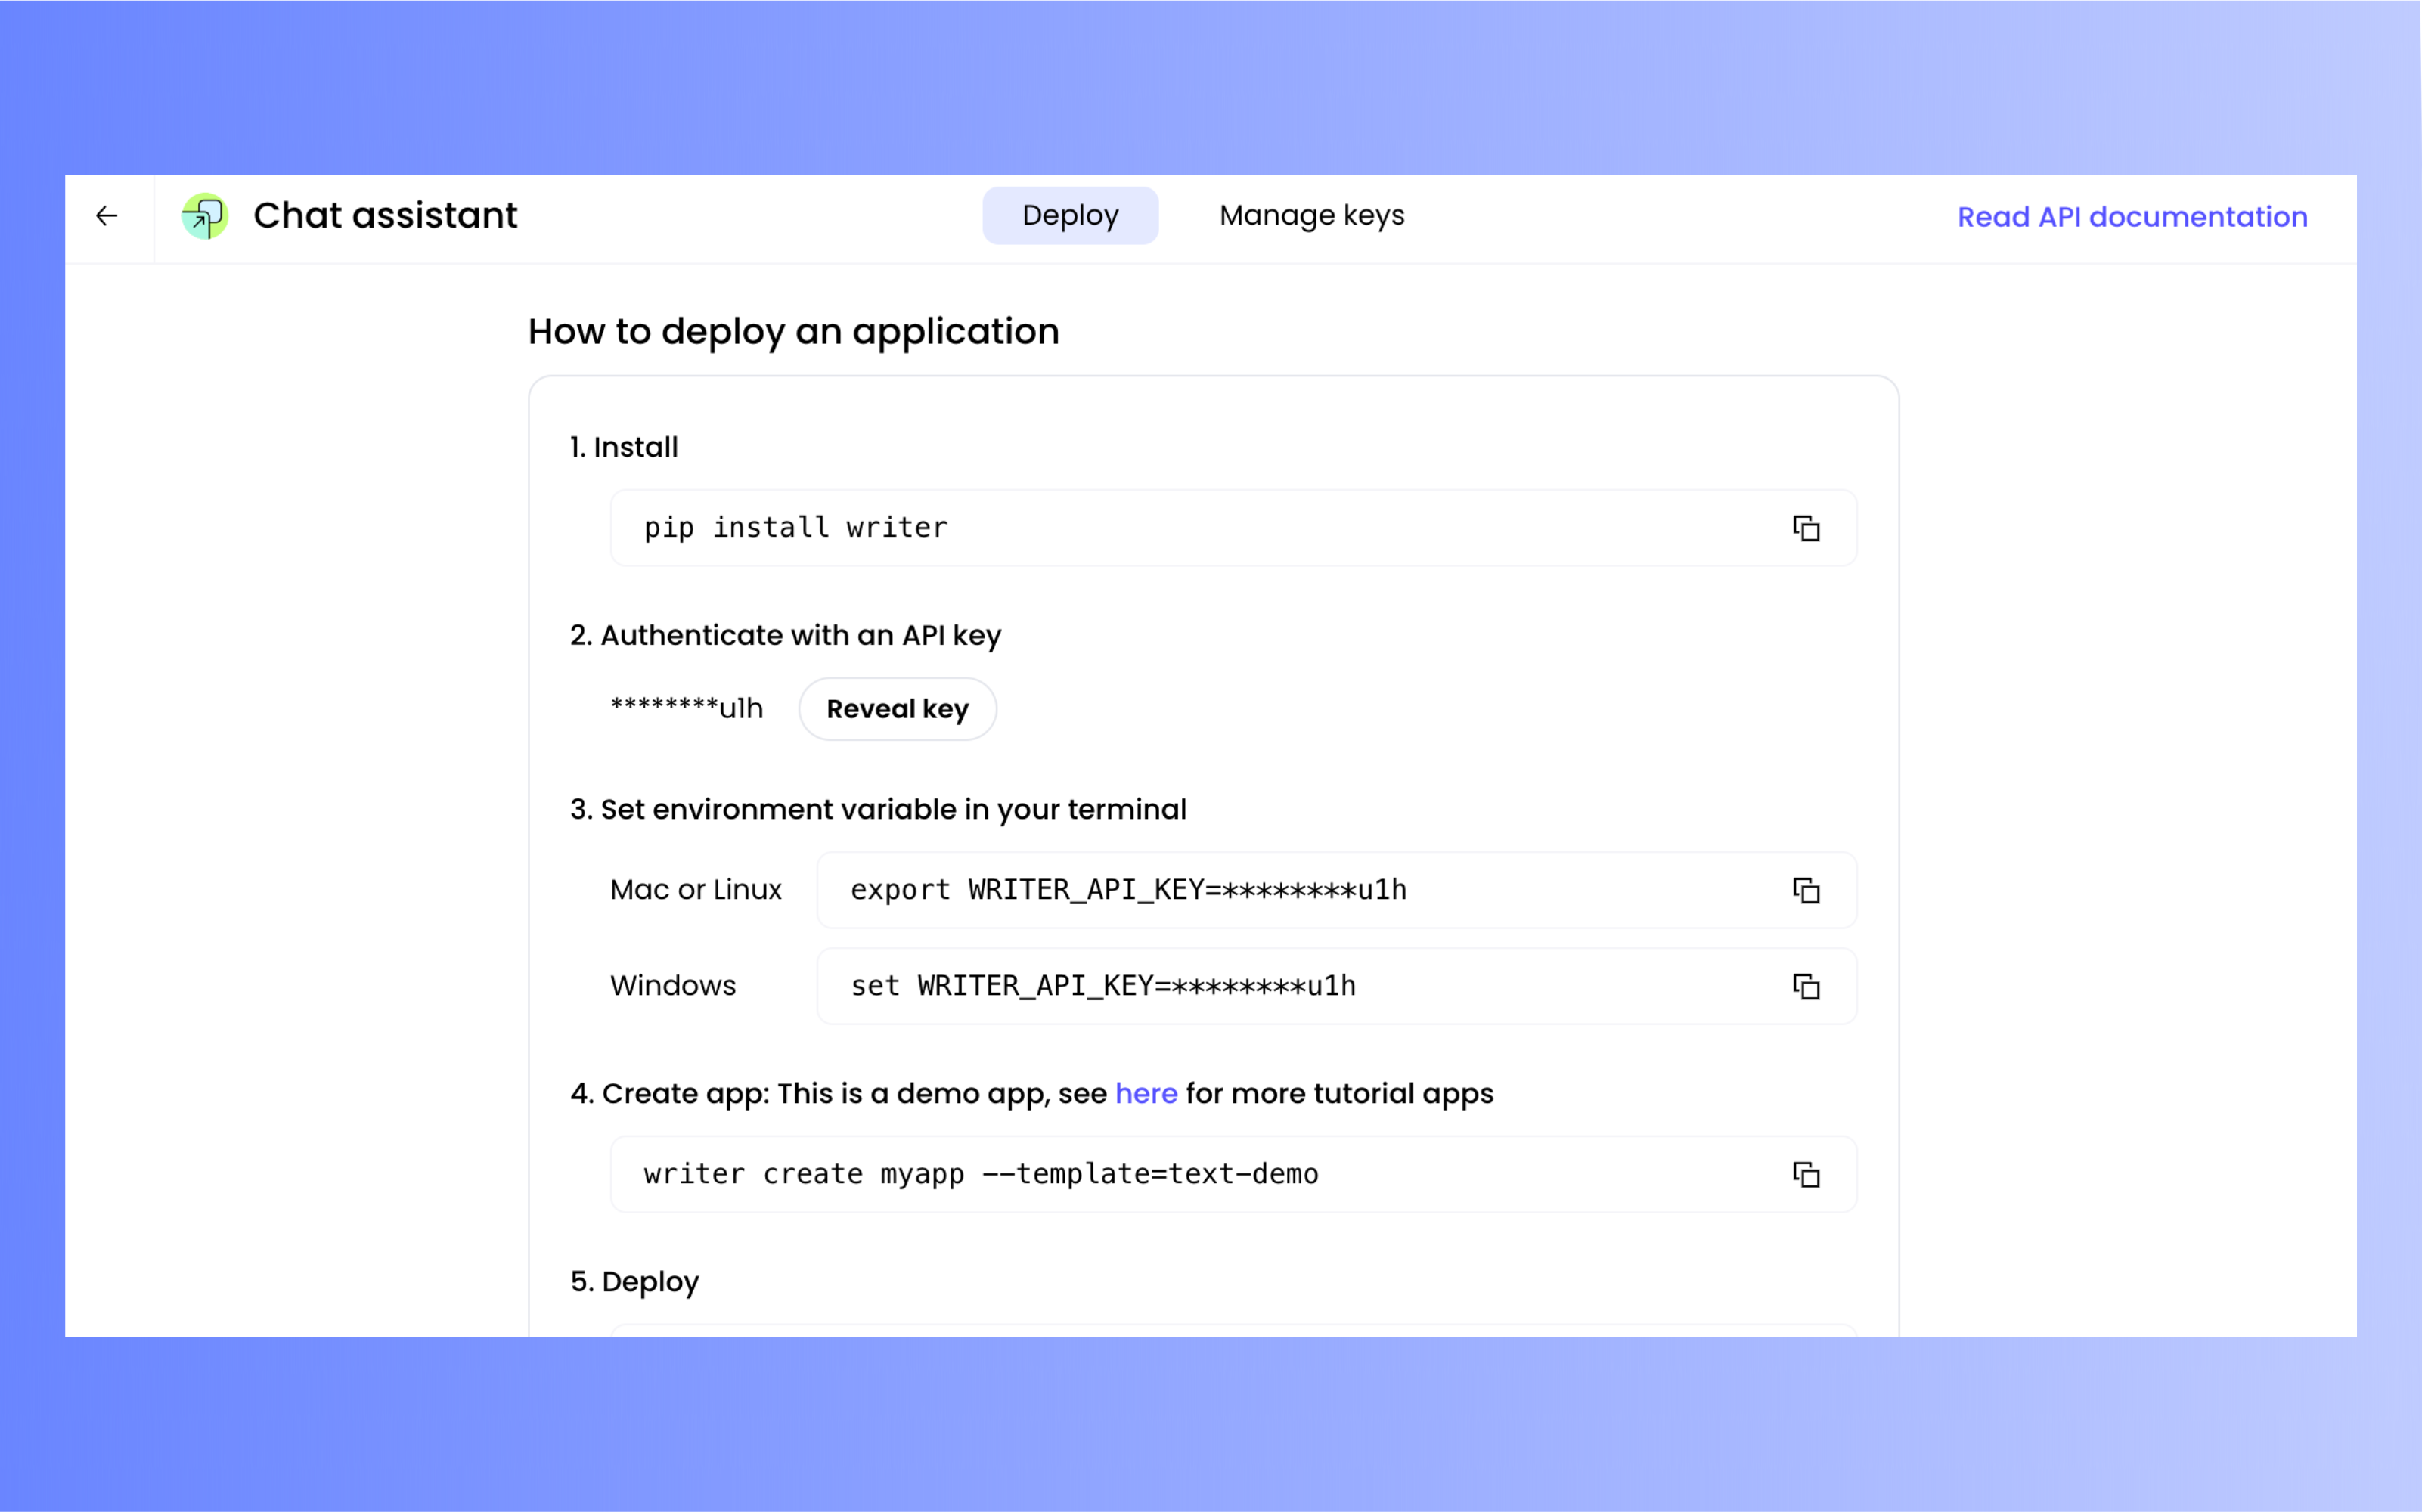
 On the next screen, titled **How to deploy an application**, you can get the API key for the app by clicking on the **Reveal key** button, located under the text **Authenticate with an API key**. Your complete API key will be displayed, and a "copy" button will appear. Click this button to copy the key; you'll use it in the next step.
 ### Set up your computer and create the app's project
The next step is to set up the Writer Framework environment on your computer. You'll do this by creating a directory for the project, installing dependencies, and creating the project for the application using a template.
Open your terminal application. On macOS and Linux, this application goes by the name *Terminal*; on Windows, you can use either *Windows PowerShell* (which is preferred) or *Command Prompt*.
If you already have the `writer` and `python-dotenv` packages installed on your computer, you can skip this step.
Install the `writer` and `python-dotenv` packages by entering the following commands in your terminal application:
```
pip install writer python-dotenv
```
This command tells `pip`, the Python package installer, to install two packages:
* `writer`, which provides some command-line commands and enables Python code to interact with Writer and the Writer Framework.
* `python-dotenv`, which makes it easy to manage environment variables by loading them from a `.env` file. This one is optional for this exercise, but you might find it useful when working on larger projects.
To pass your API key to the Writer Framework, you need to set an environment variable called `WRITER_API_KEY`.
Select your operating system and terminal application below, then copy and paste the command into your terminal application, replacing `[your_api_key]` with the API key you copied earlier:
```sh macOS/Linux (Terminal) theme={null}
export WRITER_API_KEY=[your_api_key]
```
```sh On Windows (Windows PowerShell) theme={null}
$env:WRITER_API_KEY=[your_api_key]
```
```sh On Windows (Command Prompt) theme={null}
set WRITER_API_KEY=[your_api_key]
```
The `WRITER_API_KEY` environment variable will remain defined as long your terminal session is open (that is, until you close your terminal application’s window).
Create the project by entering this command into your terminal application:
```
writer create social-post-generator --template=ai-starter
```
This command sets up a new project called `social-post-generator` using a starter template called `ai-starter` so that you're not starting "from scratch."
## Build the UI
Now that you've created the project, it's time to define the UI. The Writer Framework's drag-and-drop capabilities make it easy — even if you haven't done much UI work before!
The project editor is a web application that runs on your computer and enables you to define and edit your app's user interface. Launch it by typing the following into your terminal application:
```
writer edit social-post-generator
```
You'll see a URL. Control-click it (command-click on macOS) to open it, or copy the URL and paste it into the address bar of a browser window.
The browser window will contain the project editor, which will look like this:
### Set up your computer and create the app's project
The next step is to set up the Writer Framework environment on your computer. You'll do this by creating a directory for the project, installing dependencies, and creating the project for the application using a template.
Open your terminal application. On macOS and Linux, this application goes by the name *Terminal*; on Windows, you can use either *Windows PowerShell* (which is preferred) or *Command Prompt*.
If you already have the `writer` and `python-dotenv` packages installed on your computer, you can skip this step.
Install the `writer` and `python-dotenv` packages by entering the following commands in your terminal application:
```
pip install writer python-dotenv
```
This command tells `pip`, the Python package installer, to install two packages:
* `writer`, which provides some command-line commands and enables Python code to interact with Writer and the Writer Framework.
* `python-dotenv`, which makes it easy to manage environment variables by loading them from a `.env` file. This one is optional for this exercise, but you might find it useful when working on larger projects.
To pass your API key to the Writer Framework, you need to set an environment variable called `WRITER_API_KEY`.
Select your operating system and terminal application below, then copy and paste the command into your terminal application, replacing `[your_api_key]` with the API key you copied earlier:
```sh macOS/Linux (Terminal) theme={null}
export WRITER_API_KEY=[your_api_key]
```
```sh On Windows (Windows PowerShell) theme={null}
$env:WRITER_API_KEY=[your_api_key]
```
```sh On Windows (Command Prompt) theme={null}
set WRITER_API_KEY=[your_api_key]
```
The `WRITER_API_KEY` environment variable will remain defined as long your terminal session is open (that is, until you close your terminal application’s window).
Create the project by entering this command into your terminal application:
```
writer create social-post-generator --template=ai-starter
```
This command sets up a new project called `social-post-generator` using a starter template called `ai-starter` so that you're not starting "from scratch."
## Build the UI
Now that you've created the project, it's time to define the UI. The Writer Framework's drag-and-drop capabilities make it easy — even if you haven't done much UI work before!
The project editor is a web application that runs on your computer and enables you to define and edit your app's user interface. Launch it by typing the following into your terminal application:
```
writer edit social-post-generator
```
You'll see a URL. Control-click it (command-click on macOS) to open it, or copy the URL and paste it into the address bar of a browser window.
The browser window will contain the project editor, which will look like this:
 You'll see the following:
* The **canvas** is in the center. It displays the app's user interface.
* The column on the left contains:
* The **Core toolkit**, which contains all the UI components. You define the user interface by dragging components from the Toolkit and placing them on the canvas.
* The **Component tree**, which shows the arrangement of the UI components on the canvas. It's also useful for selecting items on the canvas, especially when it has a lot of UI components.
It's time to build the UI!
Select the **Header** component by clicking it — it's the component at the top, containing the title **AI STARTER** and a gray area labeled **Empty Header**.
When you click it, you'll see the **properties** panel appear on the right side of the page. This lets you view and edit the properties of the selected component.
You'll see the following:
* The **canvas** is in the center. It displays the app's user interface.
* The column on the left contains:
* The **Core toolkit**, which contains all the UI components. You define the user interface by dragging components from the Toolkit and placing them on the canvas.
* The **Component tree**, which shows the arrangement of the UI components on the canvas. It's also useful for selecting items on the canvas, especially when it has a lot of UI components.
It's time to build the UI!
Select the **Header** component by clicking it — it's the component at the top, containing the title **AI STARTER** and a gray area labeled **Empty Header**.
When you click it, you'll see the **properties** panel appear on the right side of the page. This lets you view and edit the properties of the selected component.
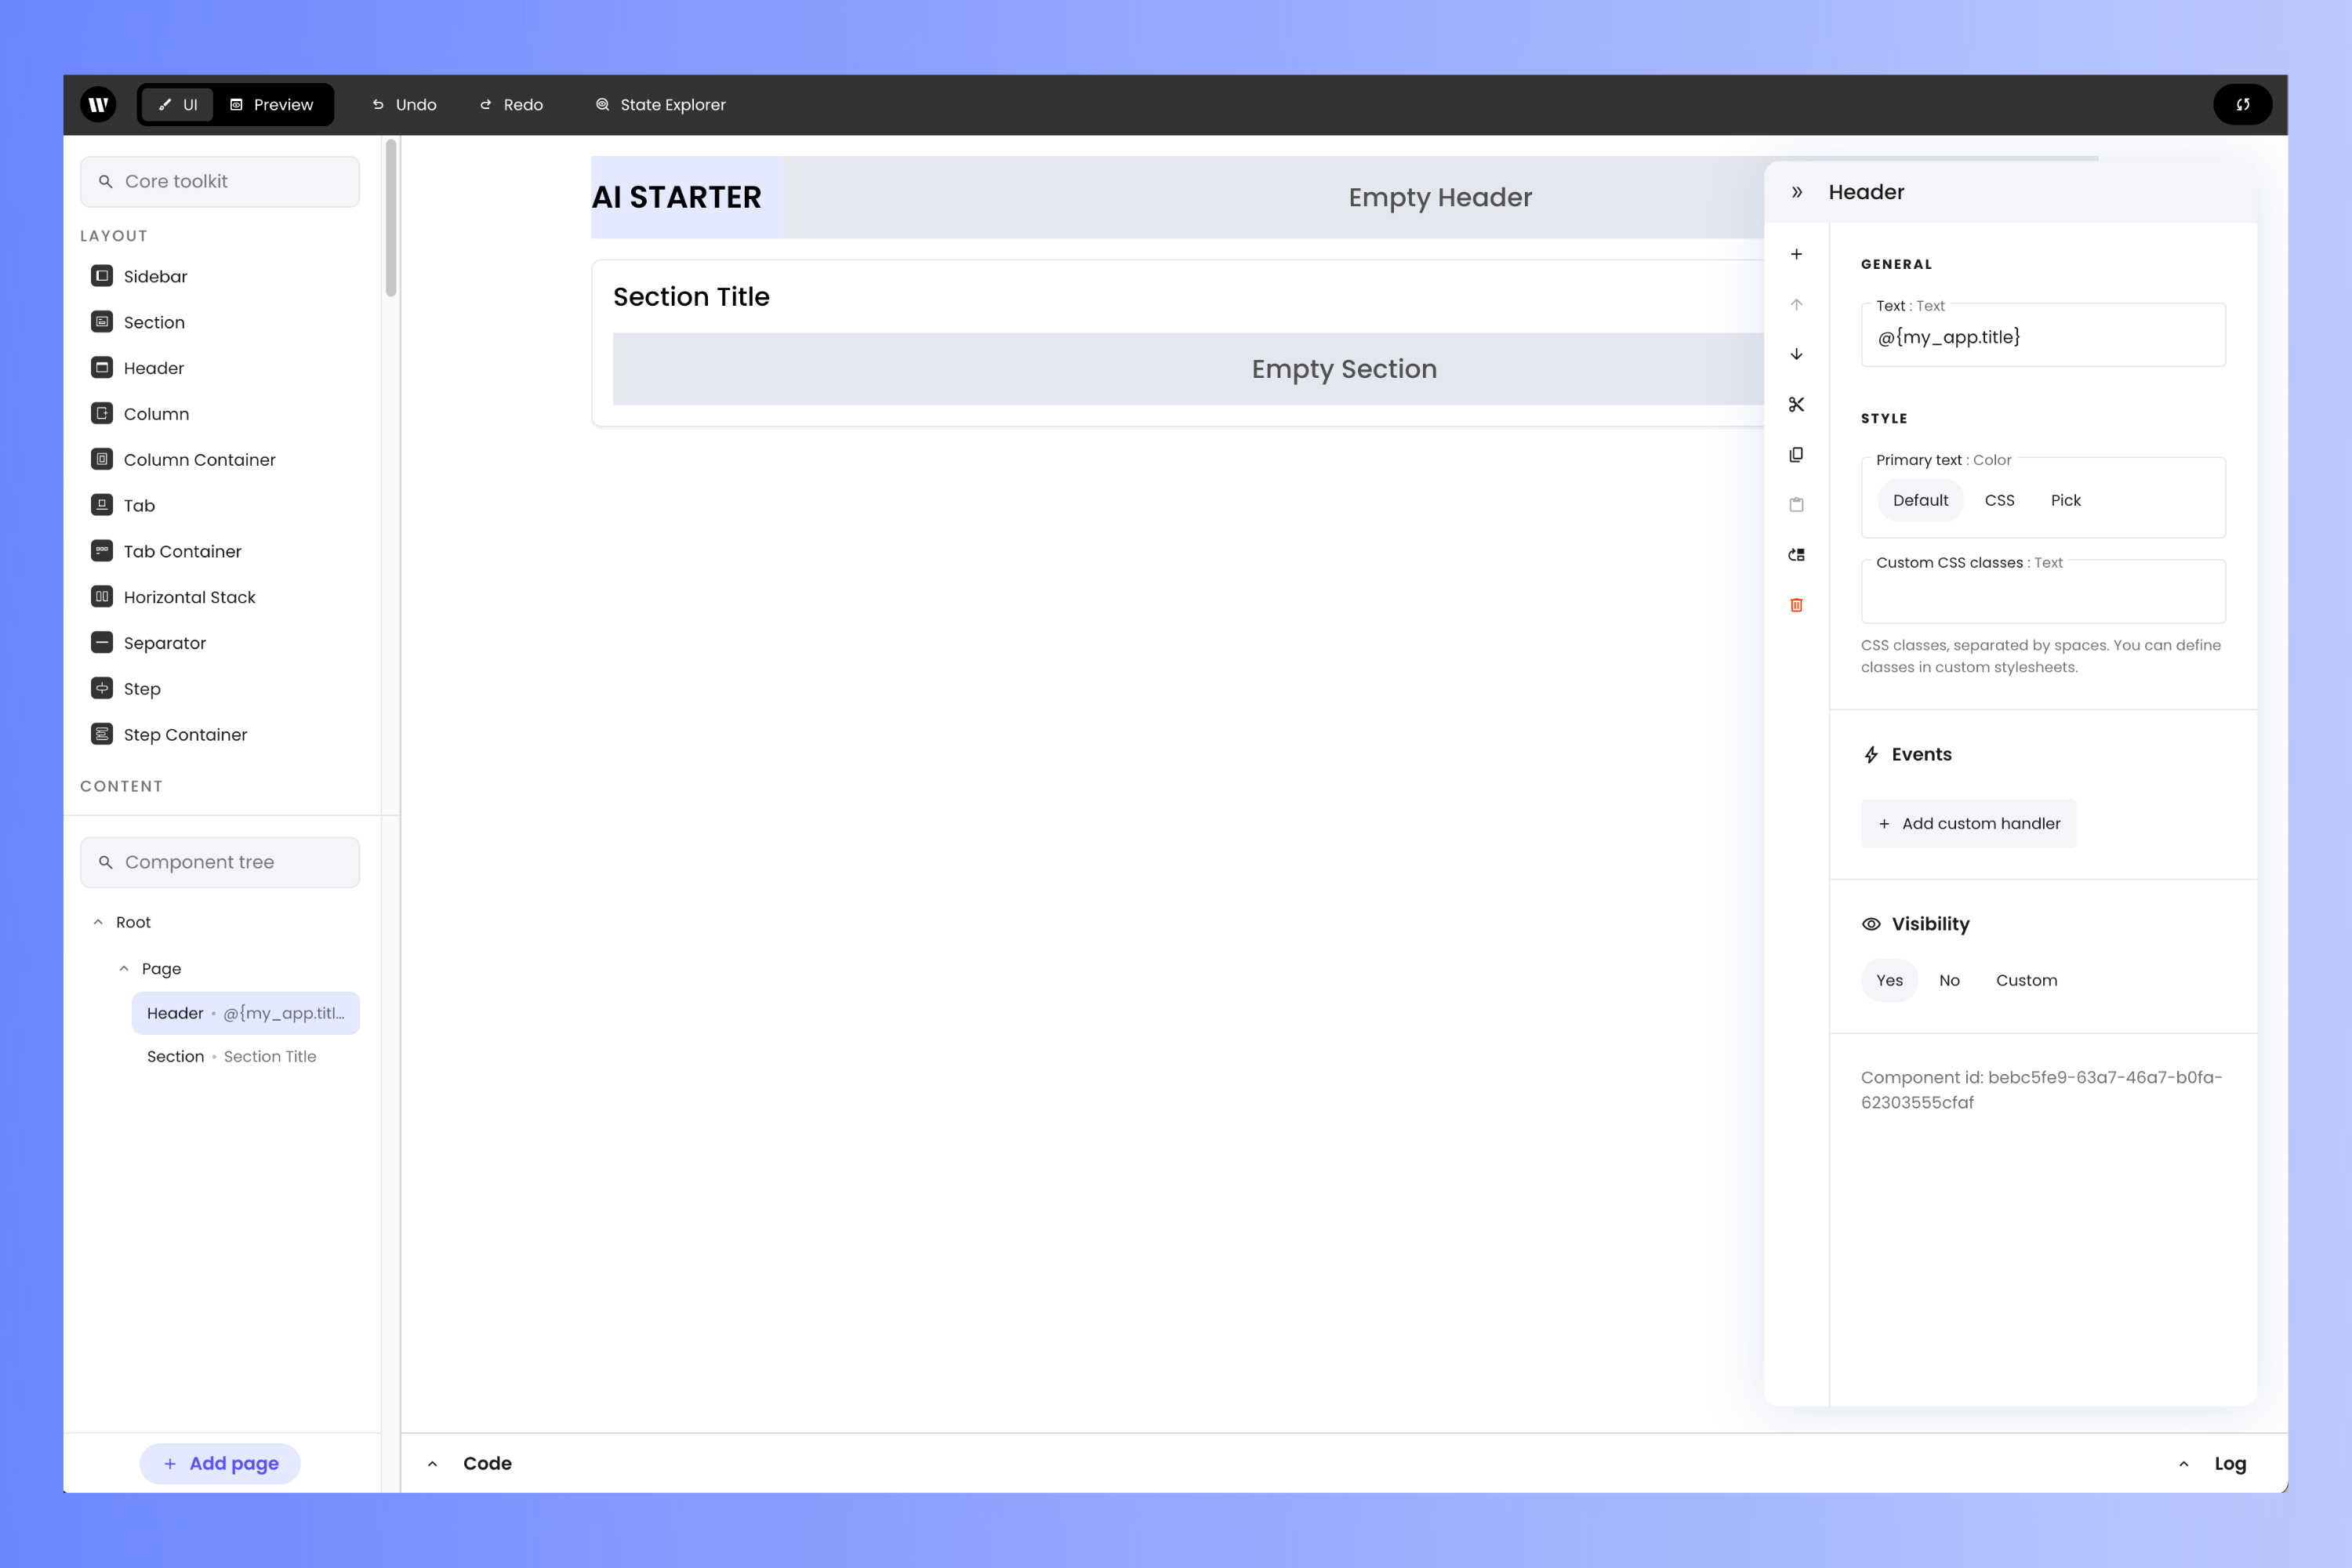 The first property you'll see in the panel is the **Text** property, which defines the text that appears as the header's title. It should contain the value `@{my_app.title}`. The `@{` and `}` indicate that `my_app.title` is a variable and that its contents should be the text displayed instead of the literal text "my\_app.title". You'll set the value of this variable soon.
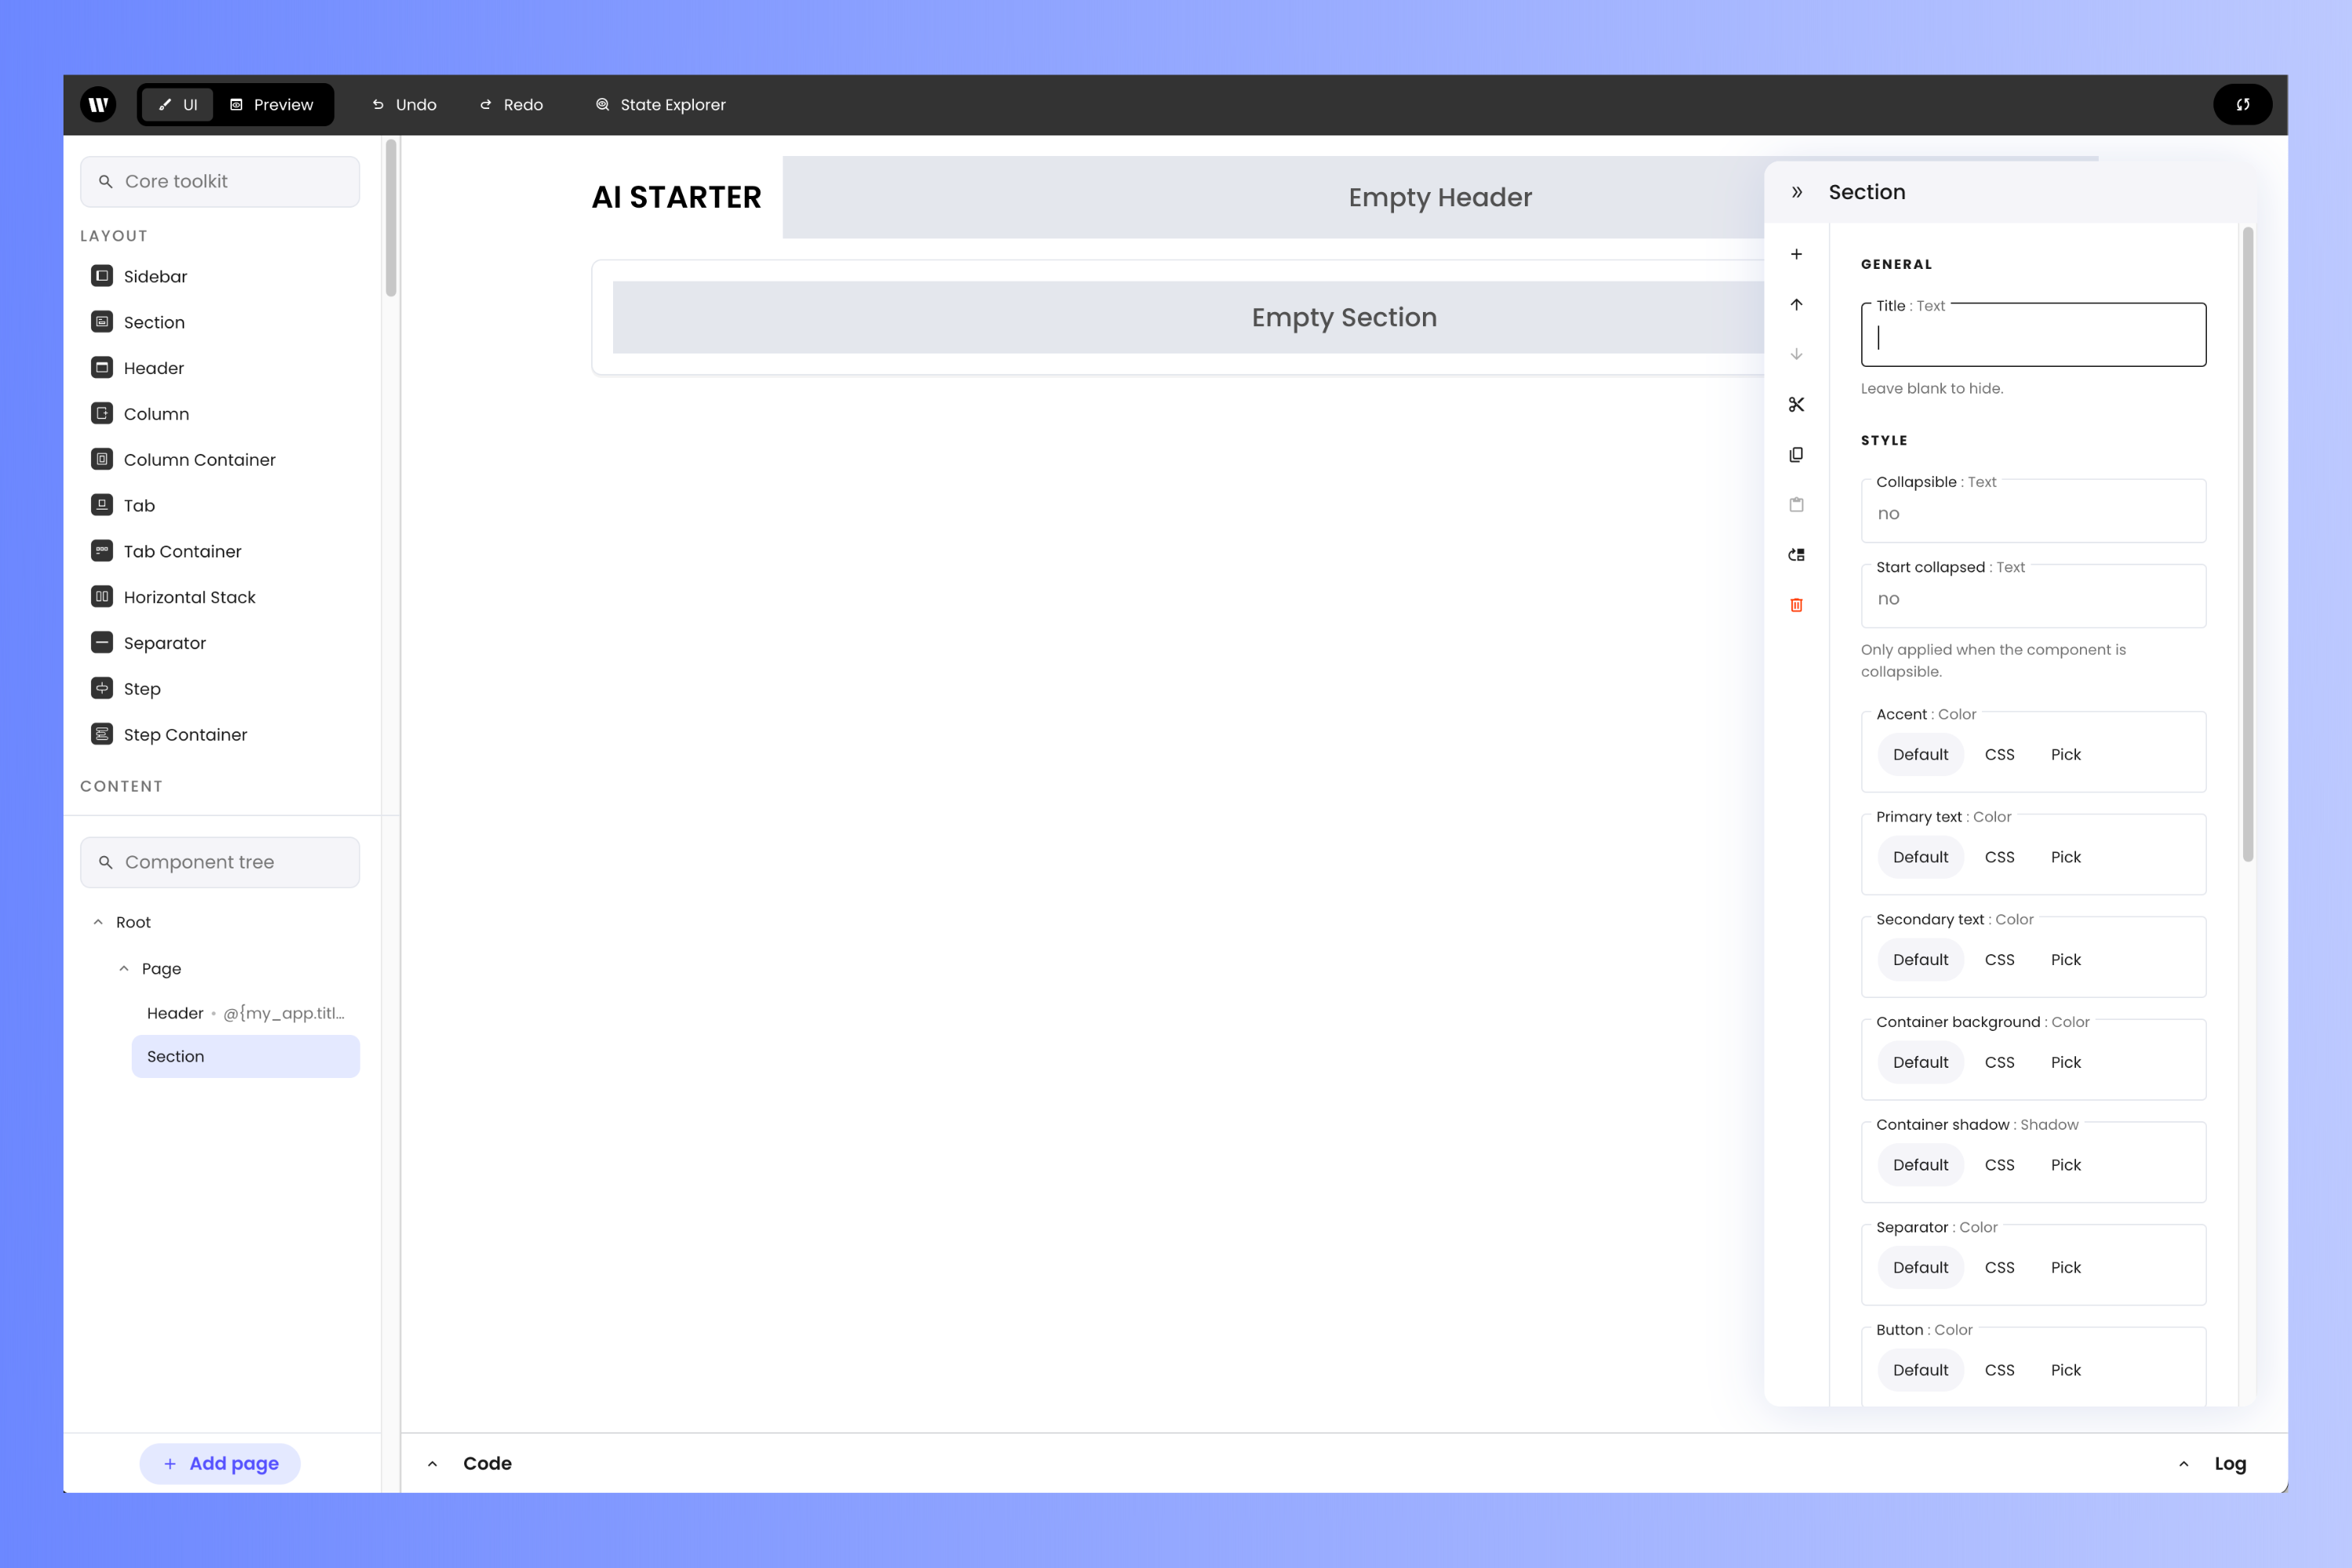
Select the **Section** component by clicking it — it's just below the **Header** component and contains the title **Section Title** and a gray area labeled **Empty Section**.
In the **properties** panel, clear out the value of the **Title** property. This will remove the *Section*'s default title.
The first property you'll see in the panel is the **Text** property, which defines the text that appears as the header's title. It should contain the value `@{my_app.title}`. The `@{` and `}` indicate that `my_app.title` is a variable and that its contents should be the text displayed instead of the literal text "my\_app.title". You'll set the value of this variable soon.
Select the **Section** component by clicking it — it's just below the **Header** component and contains the title **Section Title** and a gray area labeled **Empty Section**.
In the **properties** panel, clear out the value of the **Title** property. This will remove the *Section*'s default title.
 The user will need a place to enter words or phrases that the app will use as the basis for generating posts and tags.
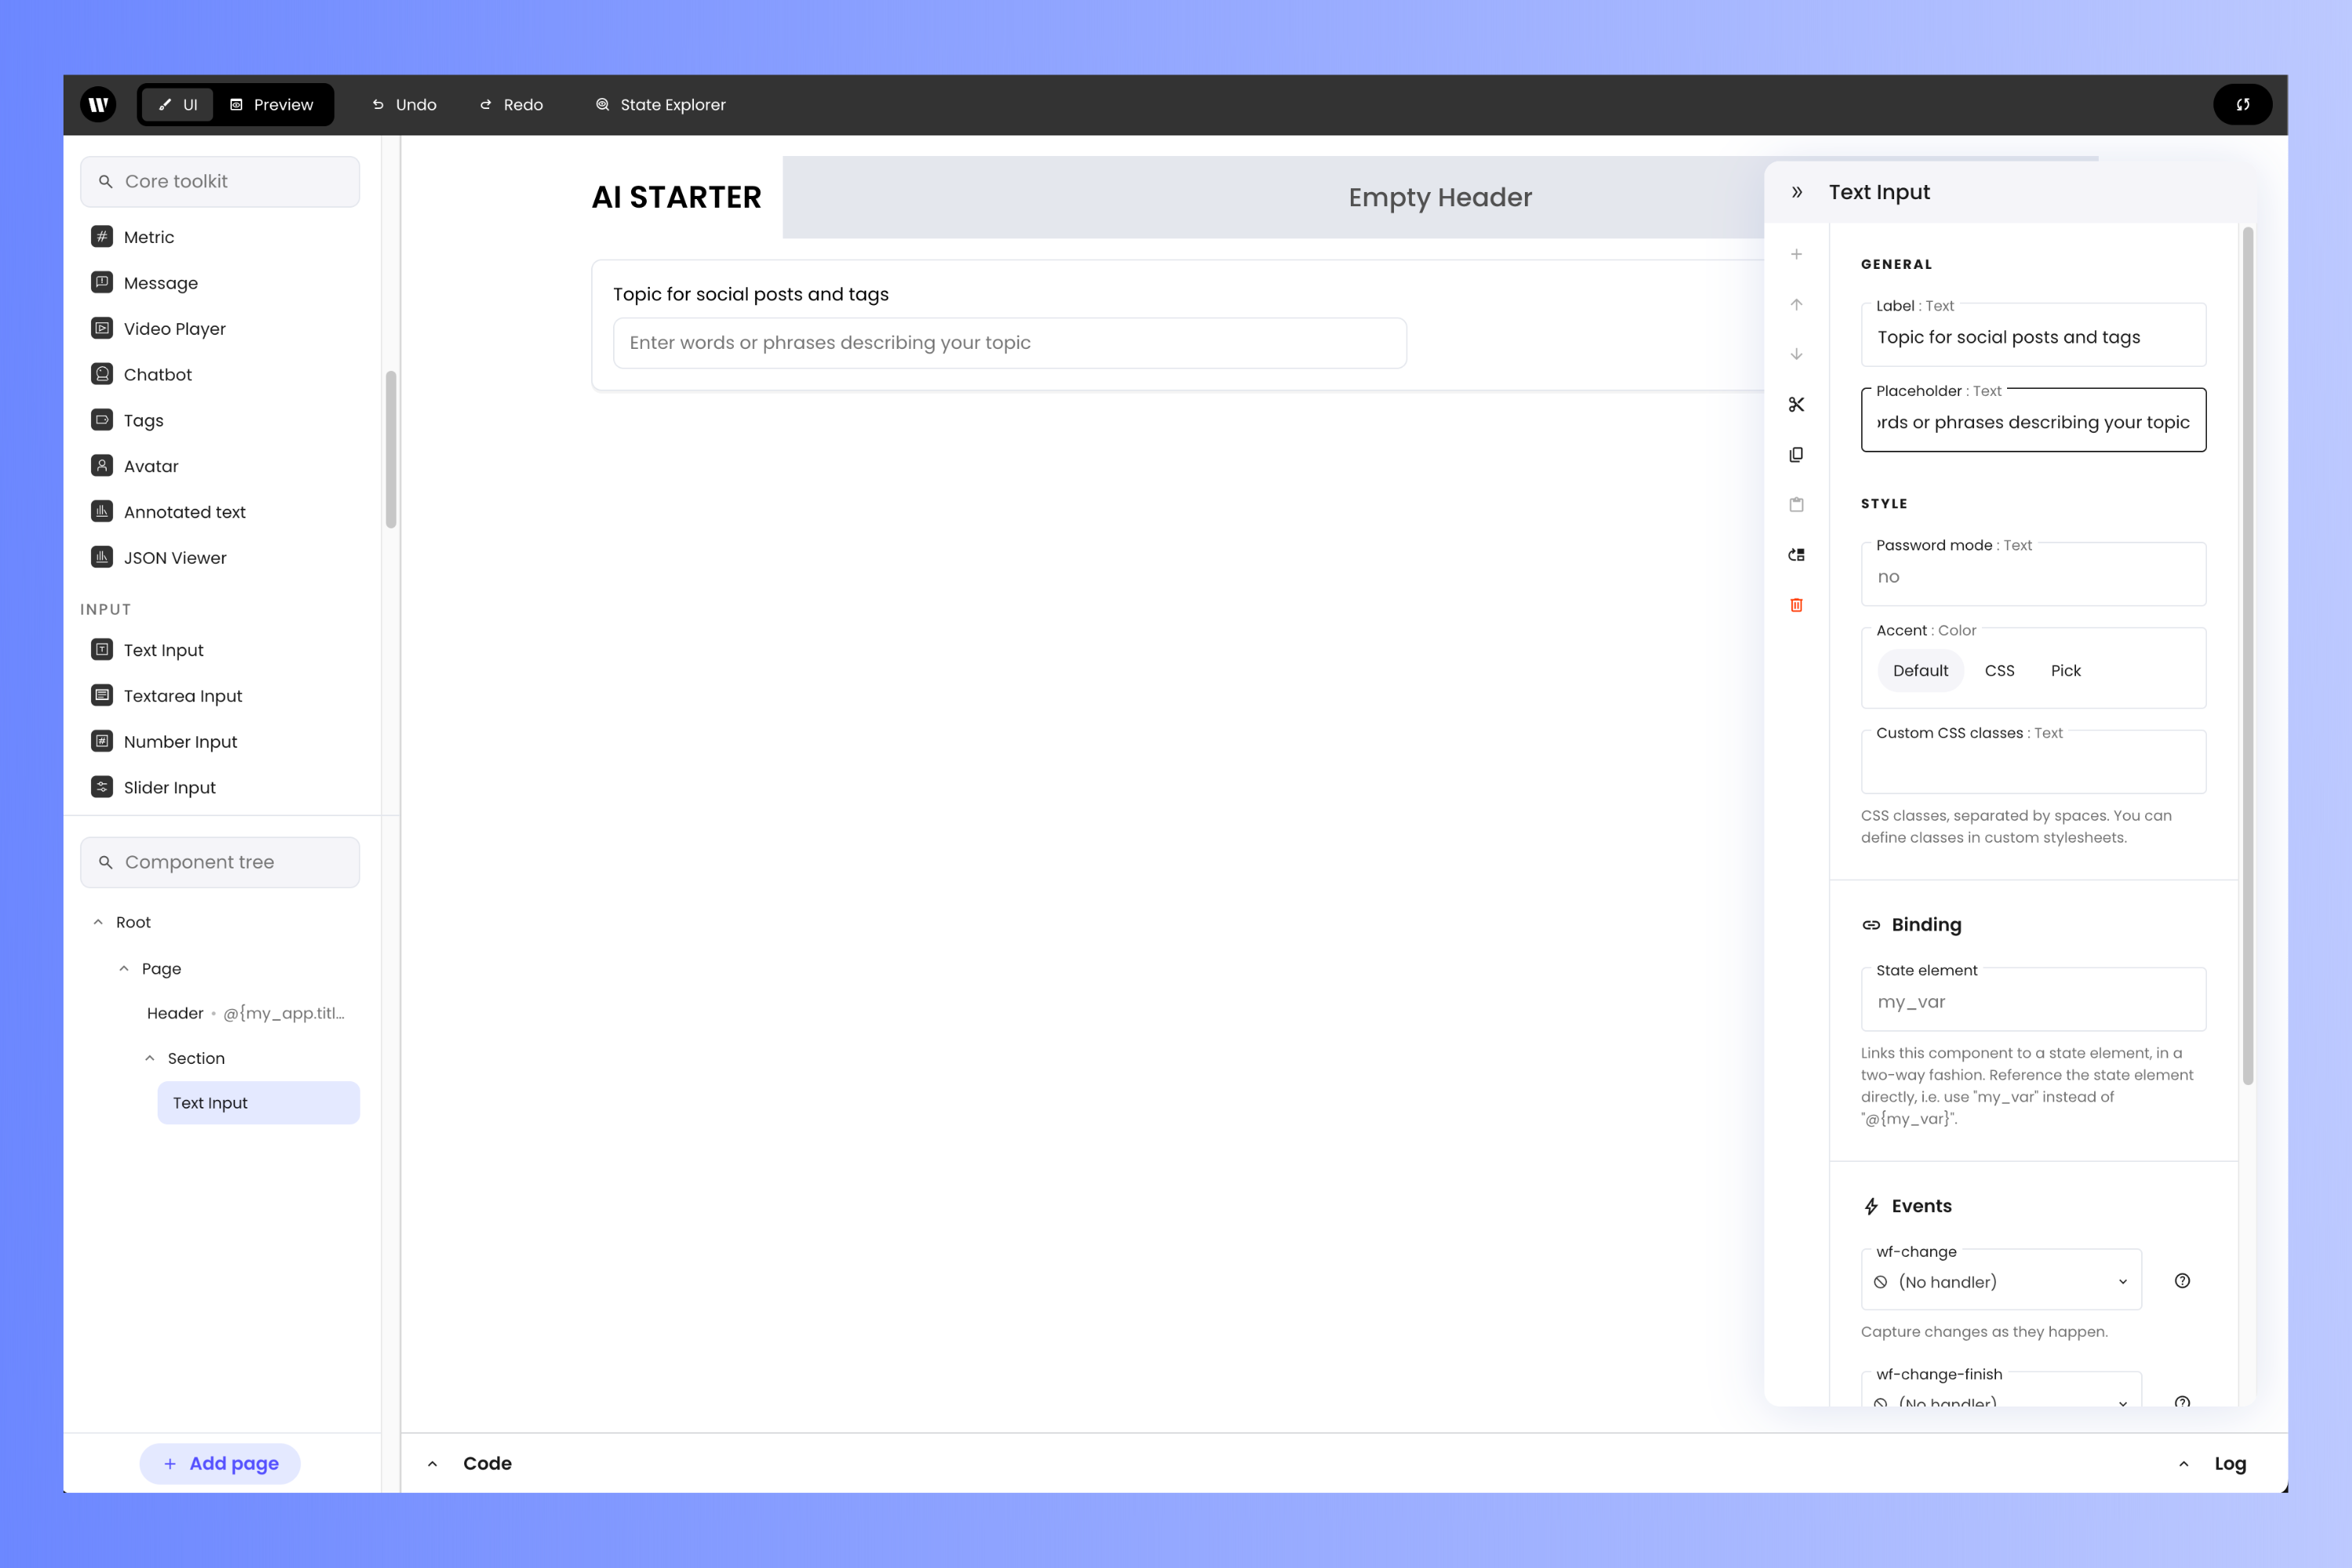
Drag a **Text Input** component — and note, it's **Text *Input***, not **Text** — from the **Core toolkit** panel on the left (it's under **Input**, and you may need to scroll down a little to find it) and into the **Section**. Sections can act as containers for other components.
You can search for a specific component by using the search bar at the top of the **Core toolkit** panel.
Select the **Text Input** component. In the **properties** panel:
* Find the **Label** property and set its value to `Topic for social posts and tags`.
* (Optional) Feel free to add some placeholder to the *Text Input* component by setting the value of the **Placeholder** property with something like `Enter words or phrases describing your topic`.
The user will need a place to enter words or phrases that the app will use as the basis for generating posts and tags.
Drag a **Text Input** component — and note, it's **Text *Input***, not **Text** — from the **Core toolkit** panel on the left (it's under **Input**, and you may need to scroll down a little to find it) and into the **Section**. Sections can act as containers for other components.
You can search for a specific component by using the search bar at the top of the **Core toolkit** panel.
Select the **Text Input** component. In the **properties** panel:
* Find the **Label** property and set its value to `Topic for social posts and tags`.
* (Optional) Feel free to add some placeholder to the *Text Input* component by setting the value of the **Placeholder** property with something like `Enter words or phrases describing your topic`.
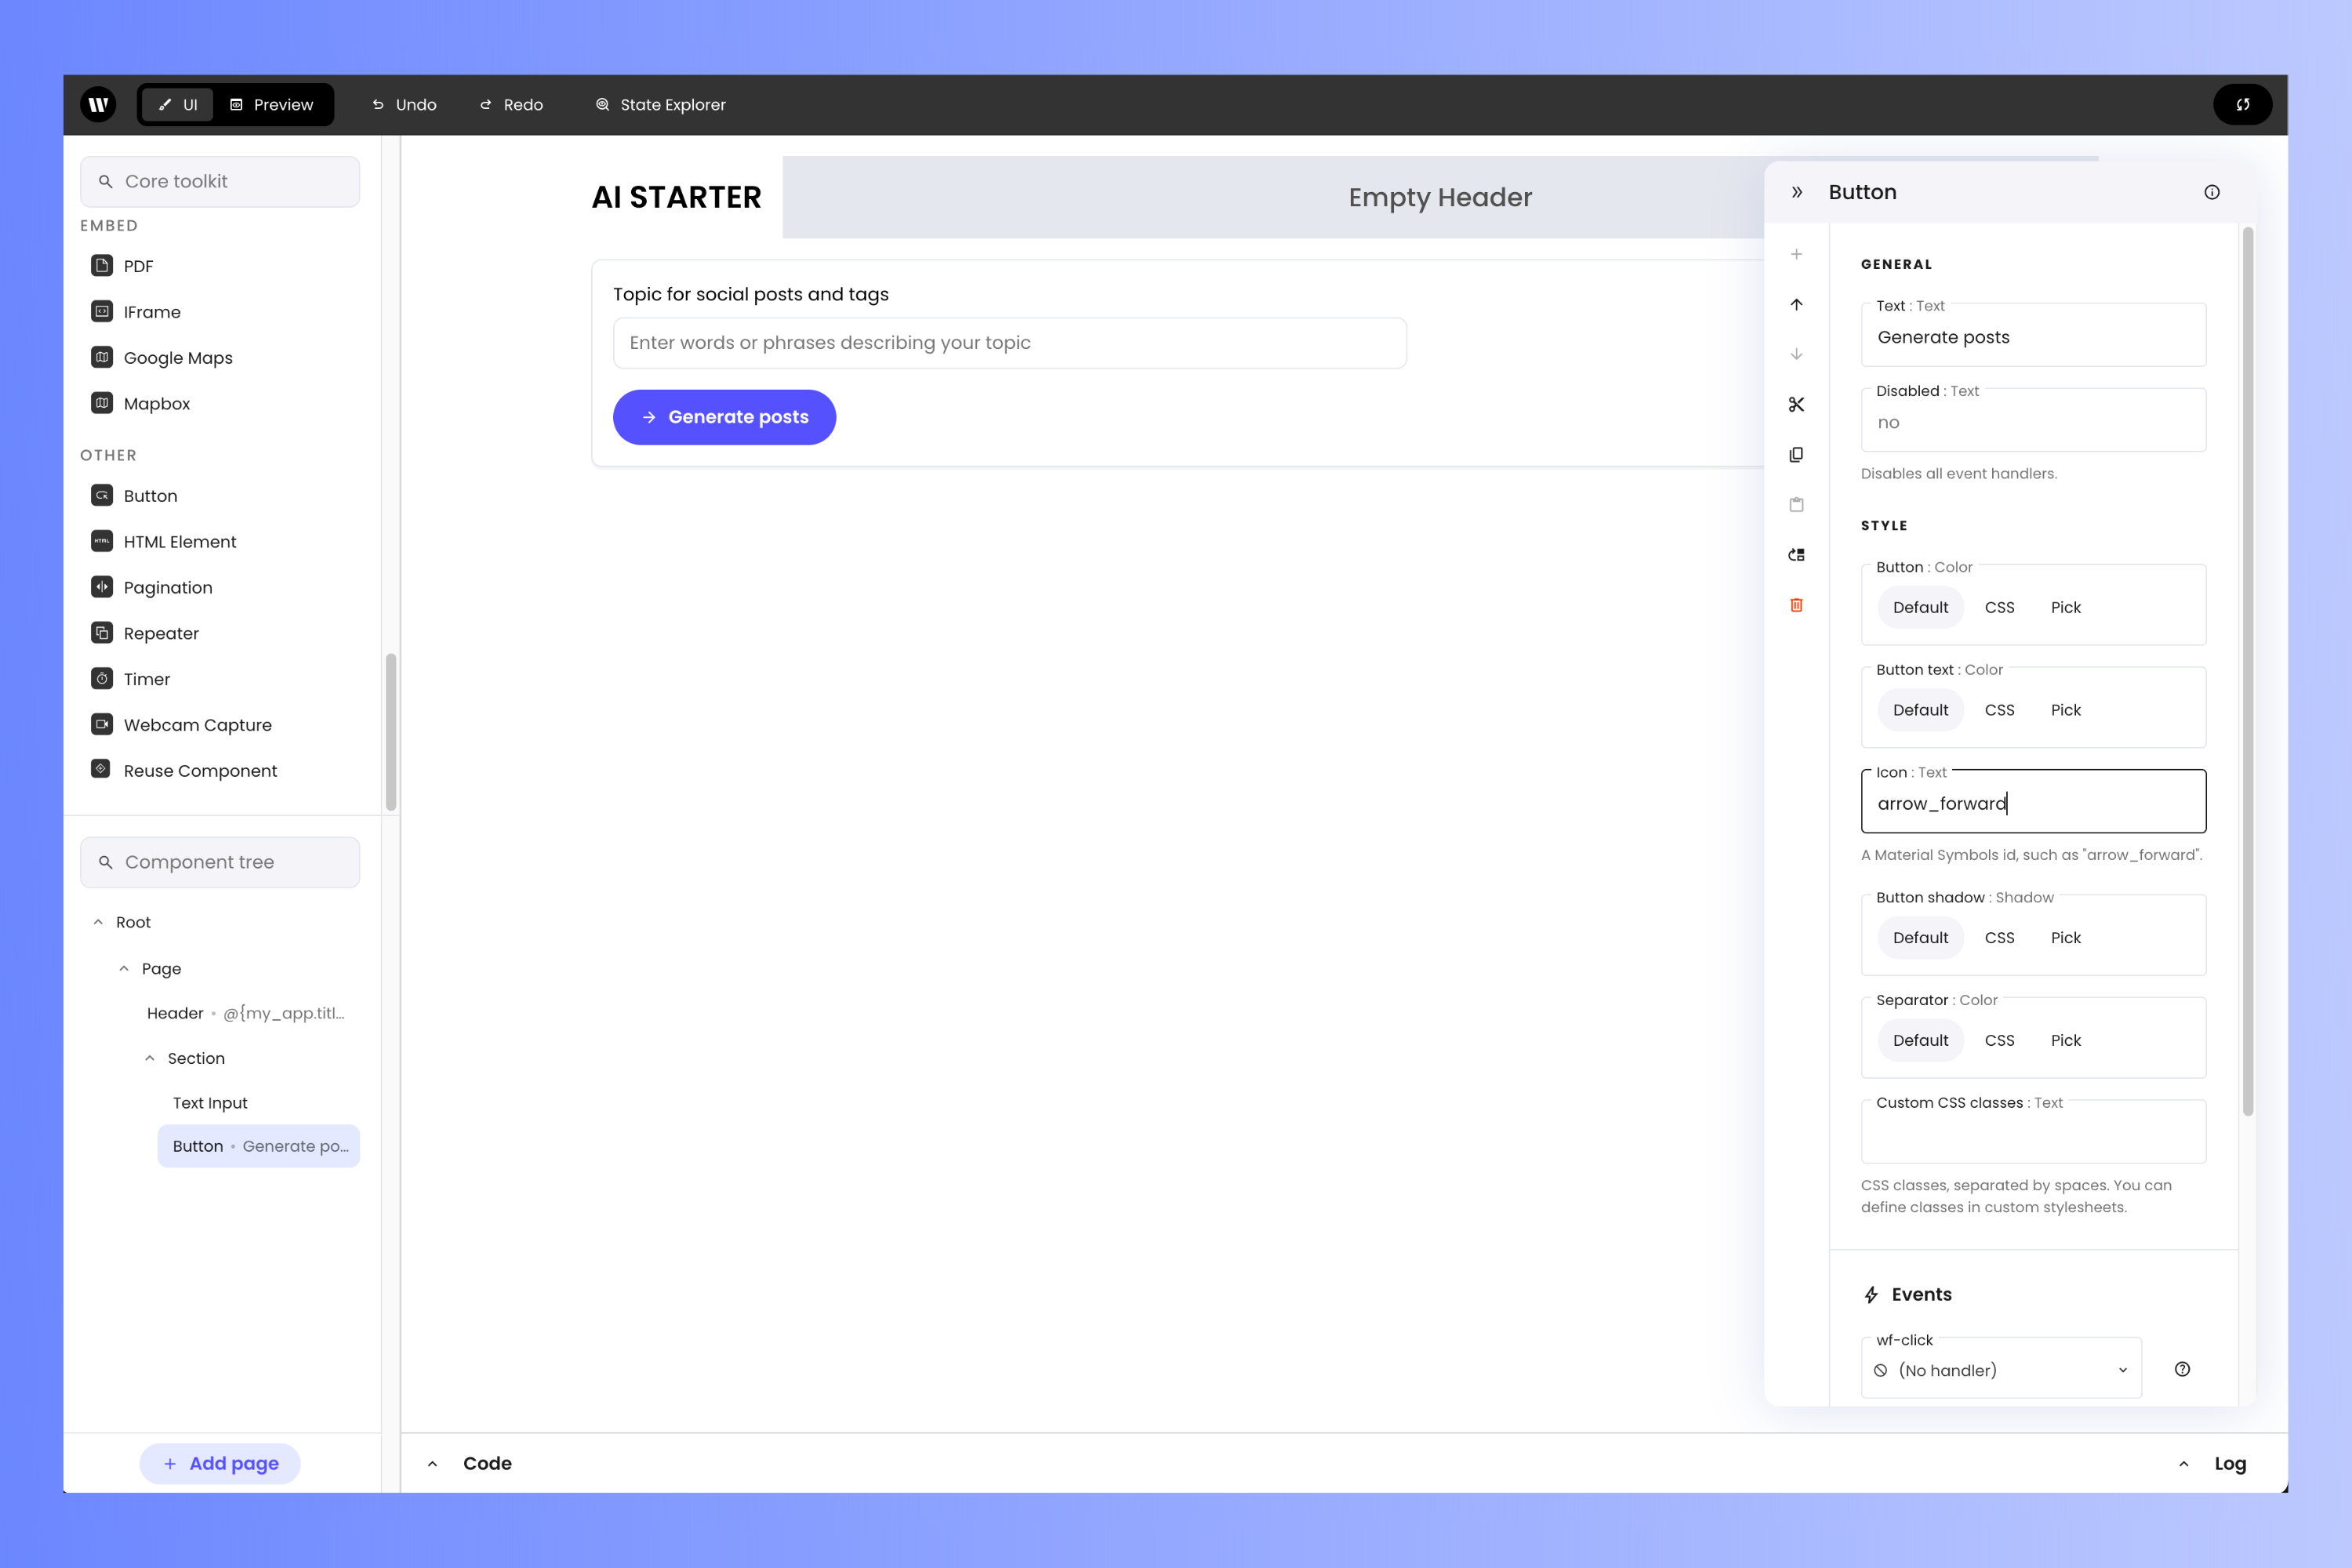
 Drag a **Button** component from the **Core toolkit** panel (it's under **Other**, and you may need to scroll down a little to find it) into the **Section**, directly below the **Text Input**. The user will click this button to submit their prompt.
Select the **Button**. In the **properties** panel:
* Set the **Text** property's value to `Generate posts`.
* Find the **Icon** property, and set its value to `arrow_forward`.
Drag a **Button** component from the **Core toolkit** panel (it's under **Other**, and you may need to scroll down a little to find it) into the **Section**, directly below the **Text Input**. The user will click this button to submit their prompt.
Select the **Button**. In the **properties** panel:
* Set the **Text** property's value to `Generate posts`.
* Find the **Icon** property, and set its value to `arrow_forward`.
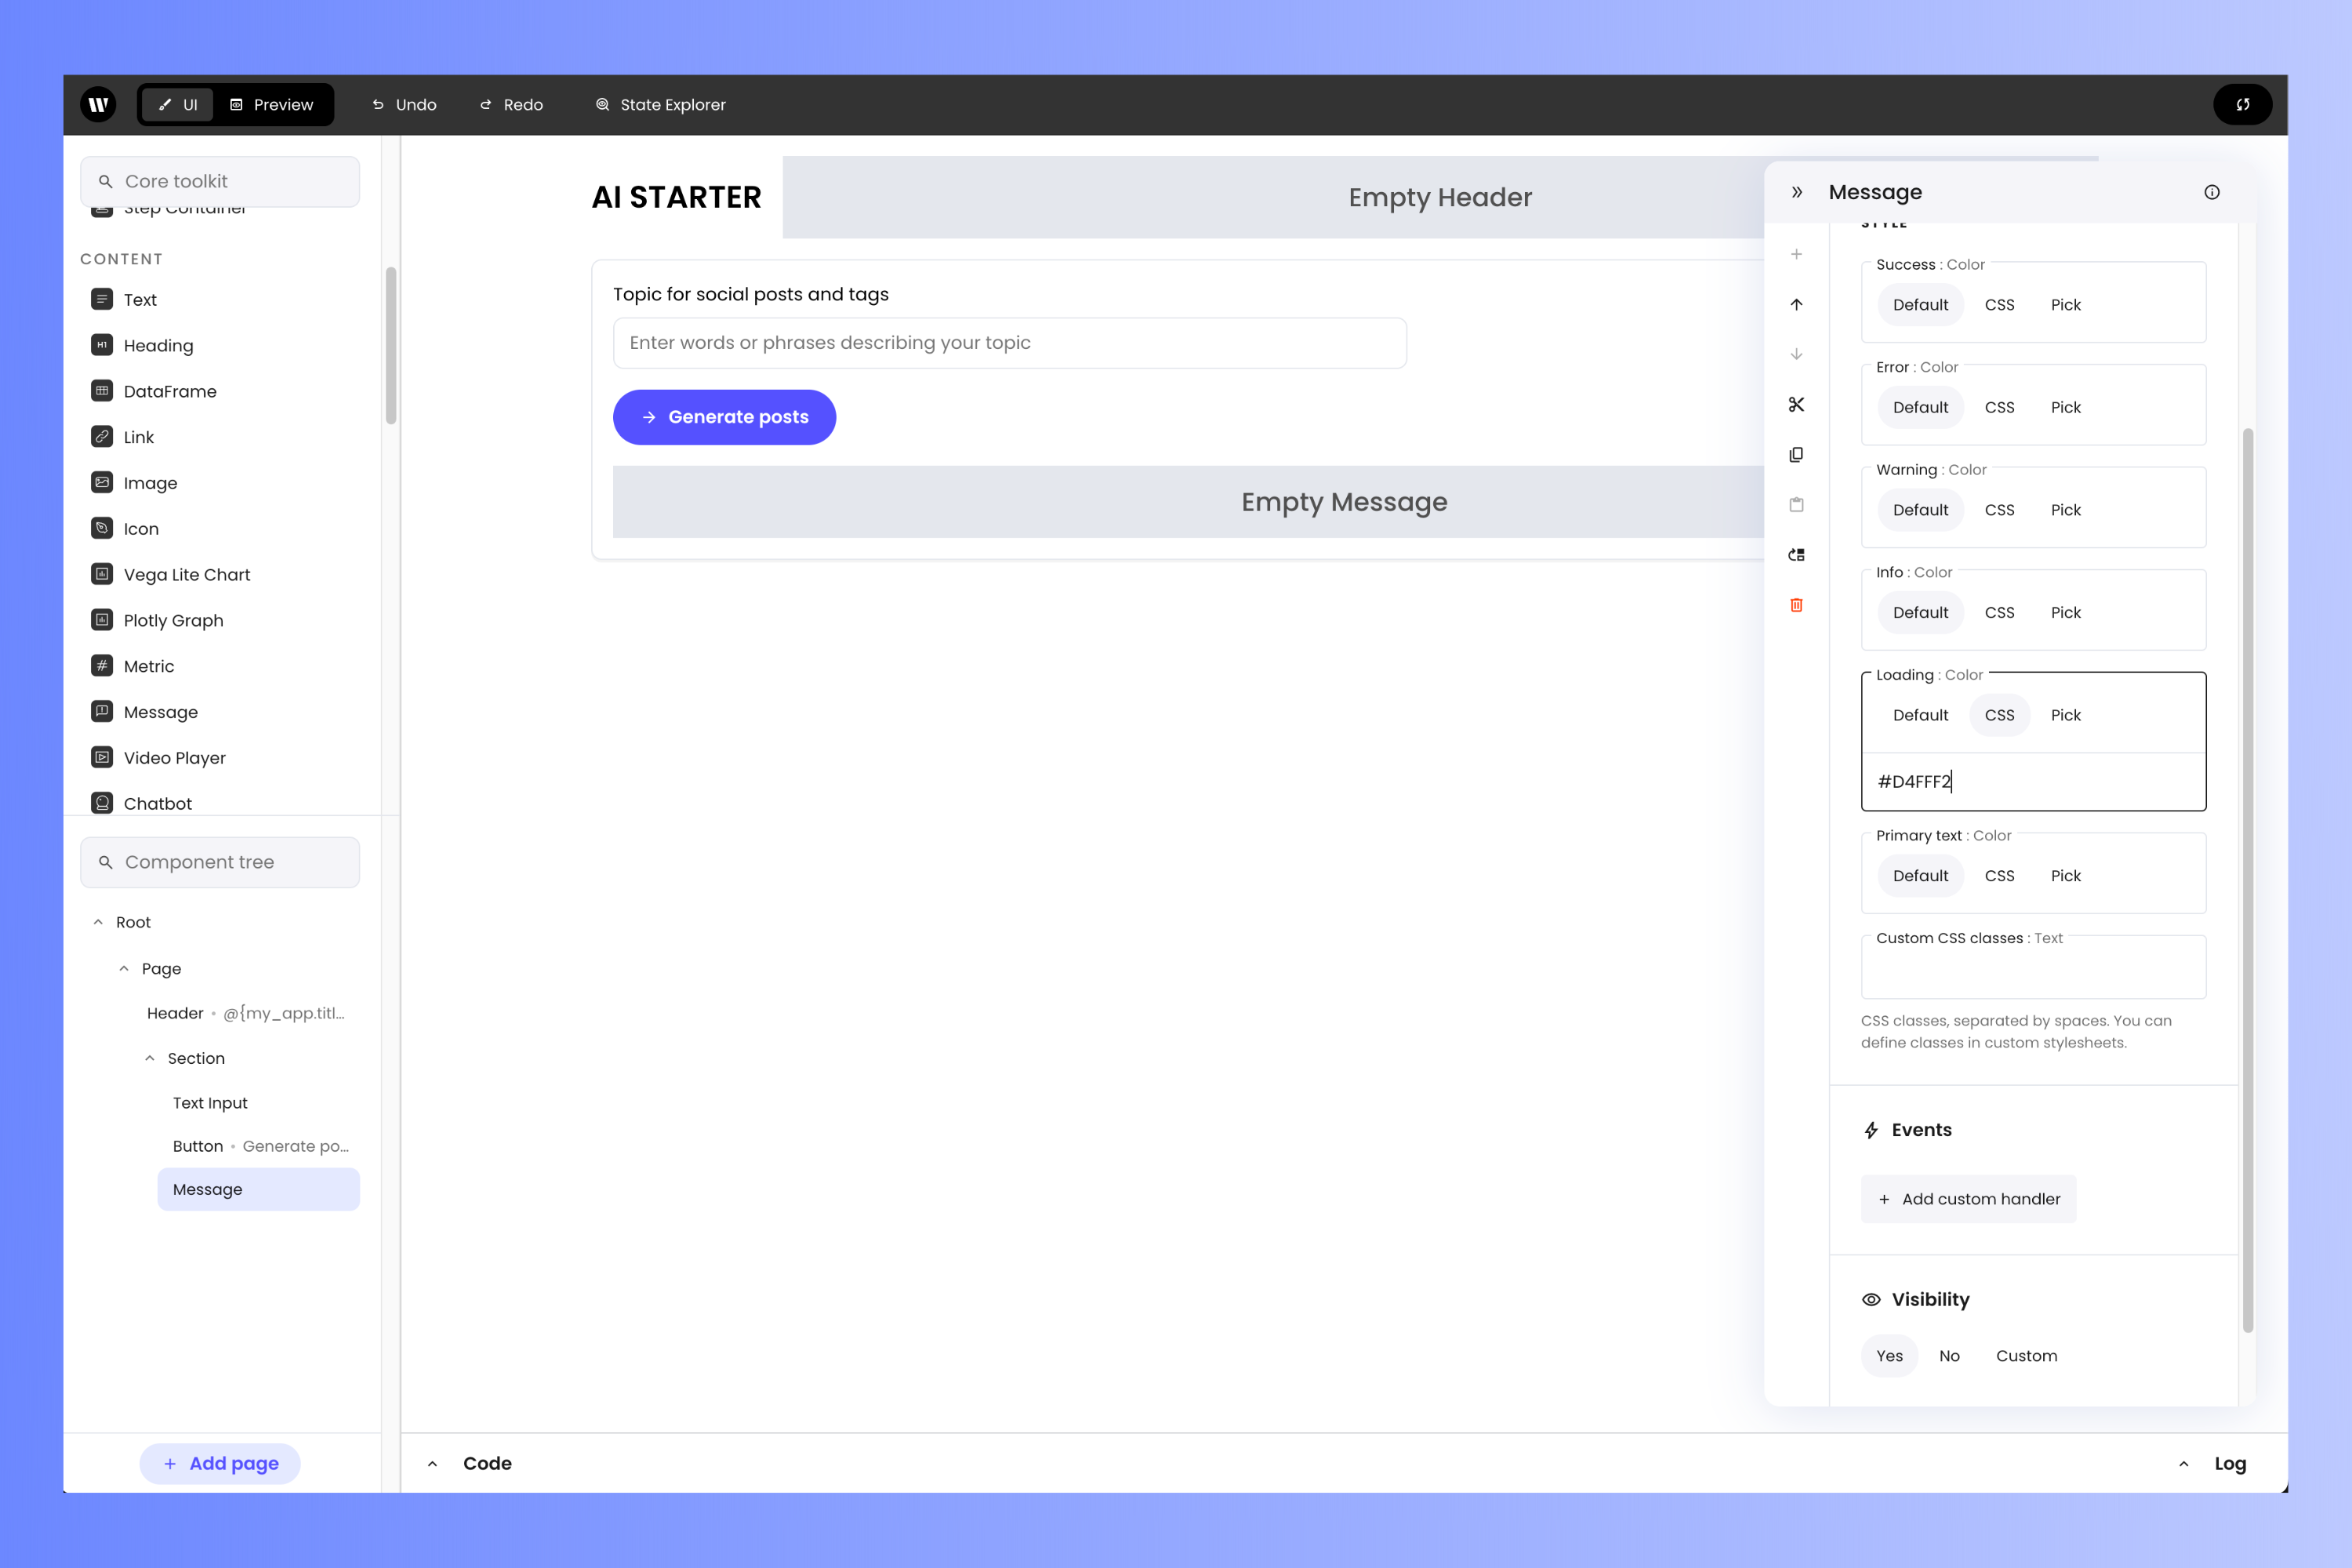
 The process of creating social media posts and tags takes a few moments. In order to reassure the user that the app is working and hasn't crashed, it will use a **Message** component to display something reassuring while it's generating.
Drag a **Message** component from the **Core toolkit** panel into the **Section** positioning it immediately below the **Button**.
Select the **Message** component. In the **properties** panel:
* Scroll down to the **Style** section and look for the **Loading** property, which sets the color of the **Message** component when it's loading.
* Click its **CSS** button, which will cause a text field to appear below it.
* Enter this color value into the text field: `#D4FFF2`.
The process of creating social media posts and tags takes a few moments. In order to reassure the user that the app is working and hasn't crashed, it will use a **Message** component to display something reassuring while it's generating.
Drag a **Message** component from the **Core toolkit** panel into the **Section** positioning it immediately below the **Button**.
Select the **Message** component. In the **properties** panel:
* Scroll down to the **Style** section and look for the **Loading** property, which sets the color of the **Message** component when it's loading.
* Click its **CSS** button, which will cause a text field to appear below it.
* Enter this color value into the text field: `#D4FFF2`.
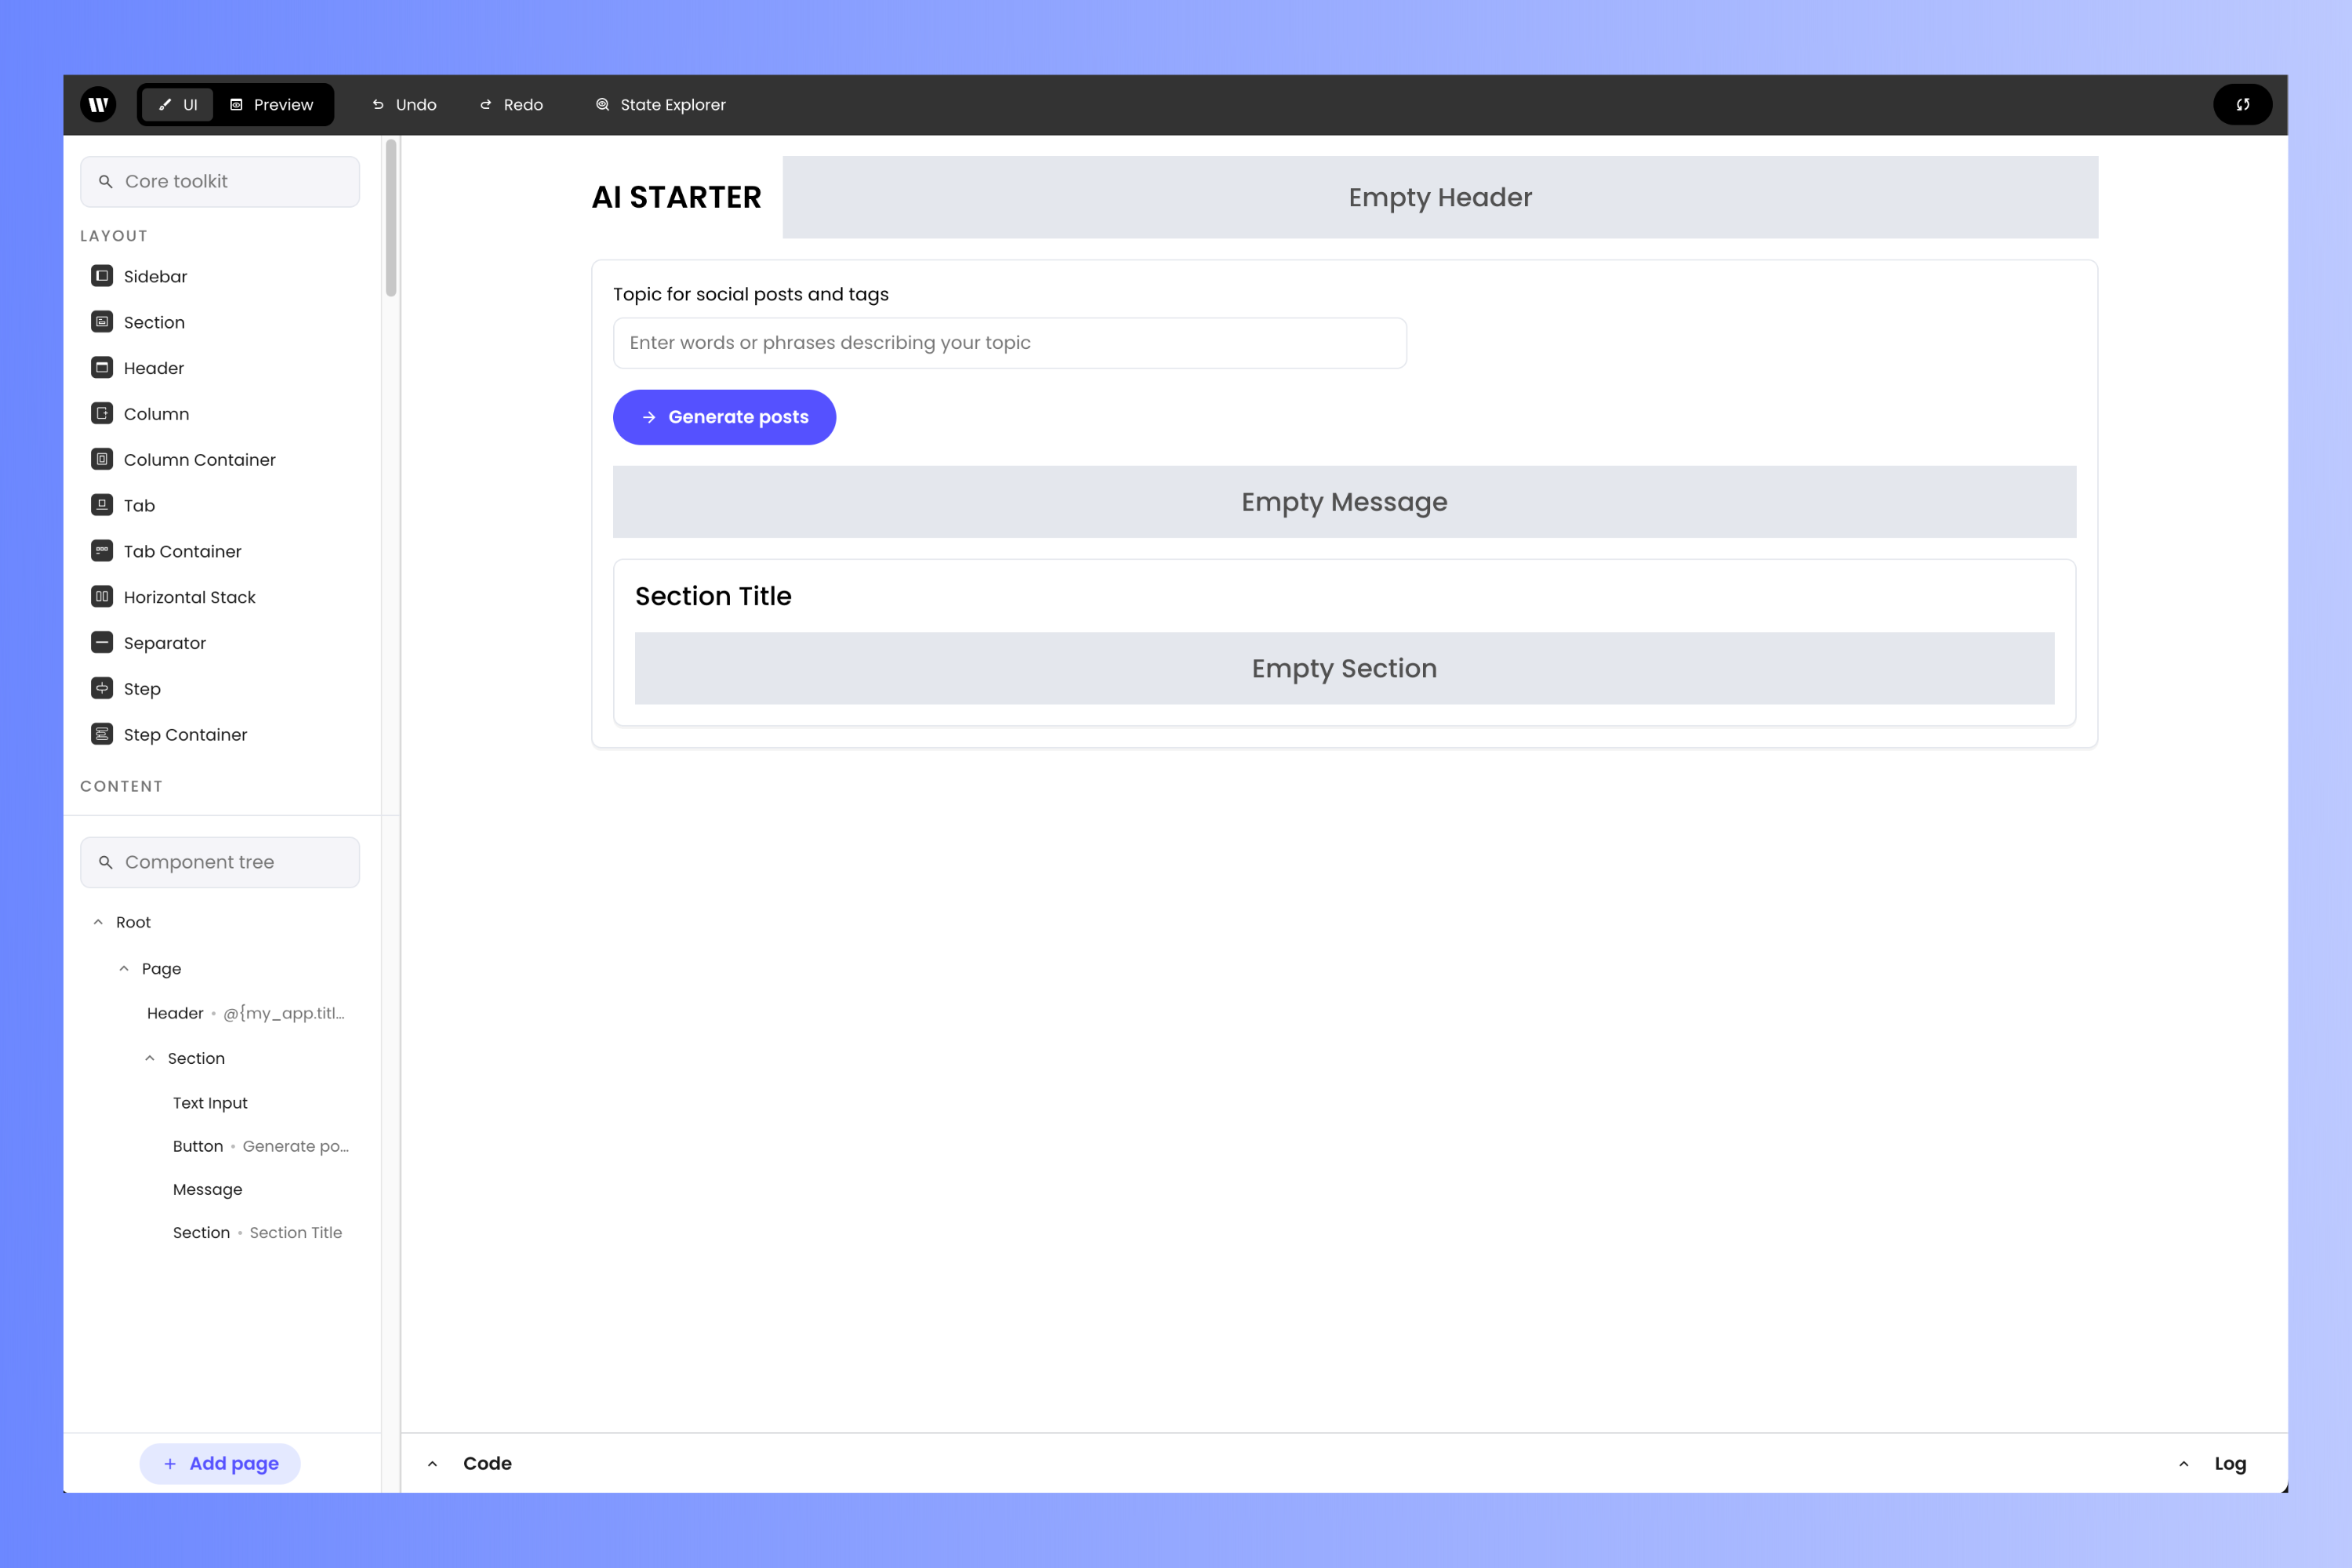
 The **Section** that you were working on is for user input. Let's add a new **Section** to hold the output — the social media posts and tags the app will generate.
Drag a **Section** component from the **Toolbox** panel and place it *inside* the **Section** that's already there, just below the **Message** component.
That's right — **Sections** can contain other **Sections**!
The **Section** that you were working on is for user input. Let's add a new **Section** to hold the output — the social media posts and tags the app will generate.
Drag a **Section** component from the **Toolbox** panel and place it *inside* the **Section** that's already there, just below the **Message** component.
That's right — **Sections** can contain other **Sections**!
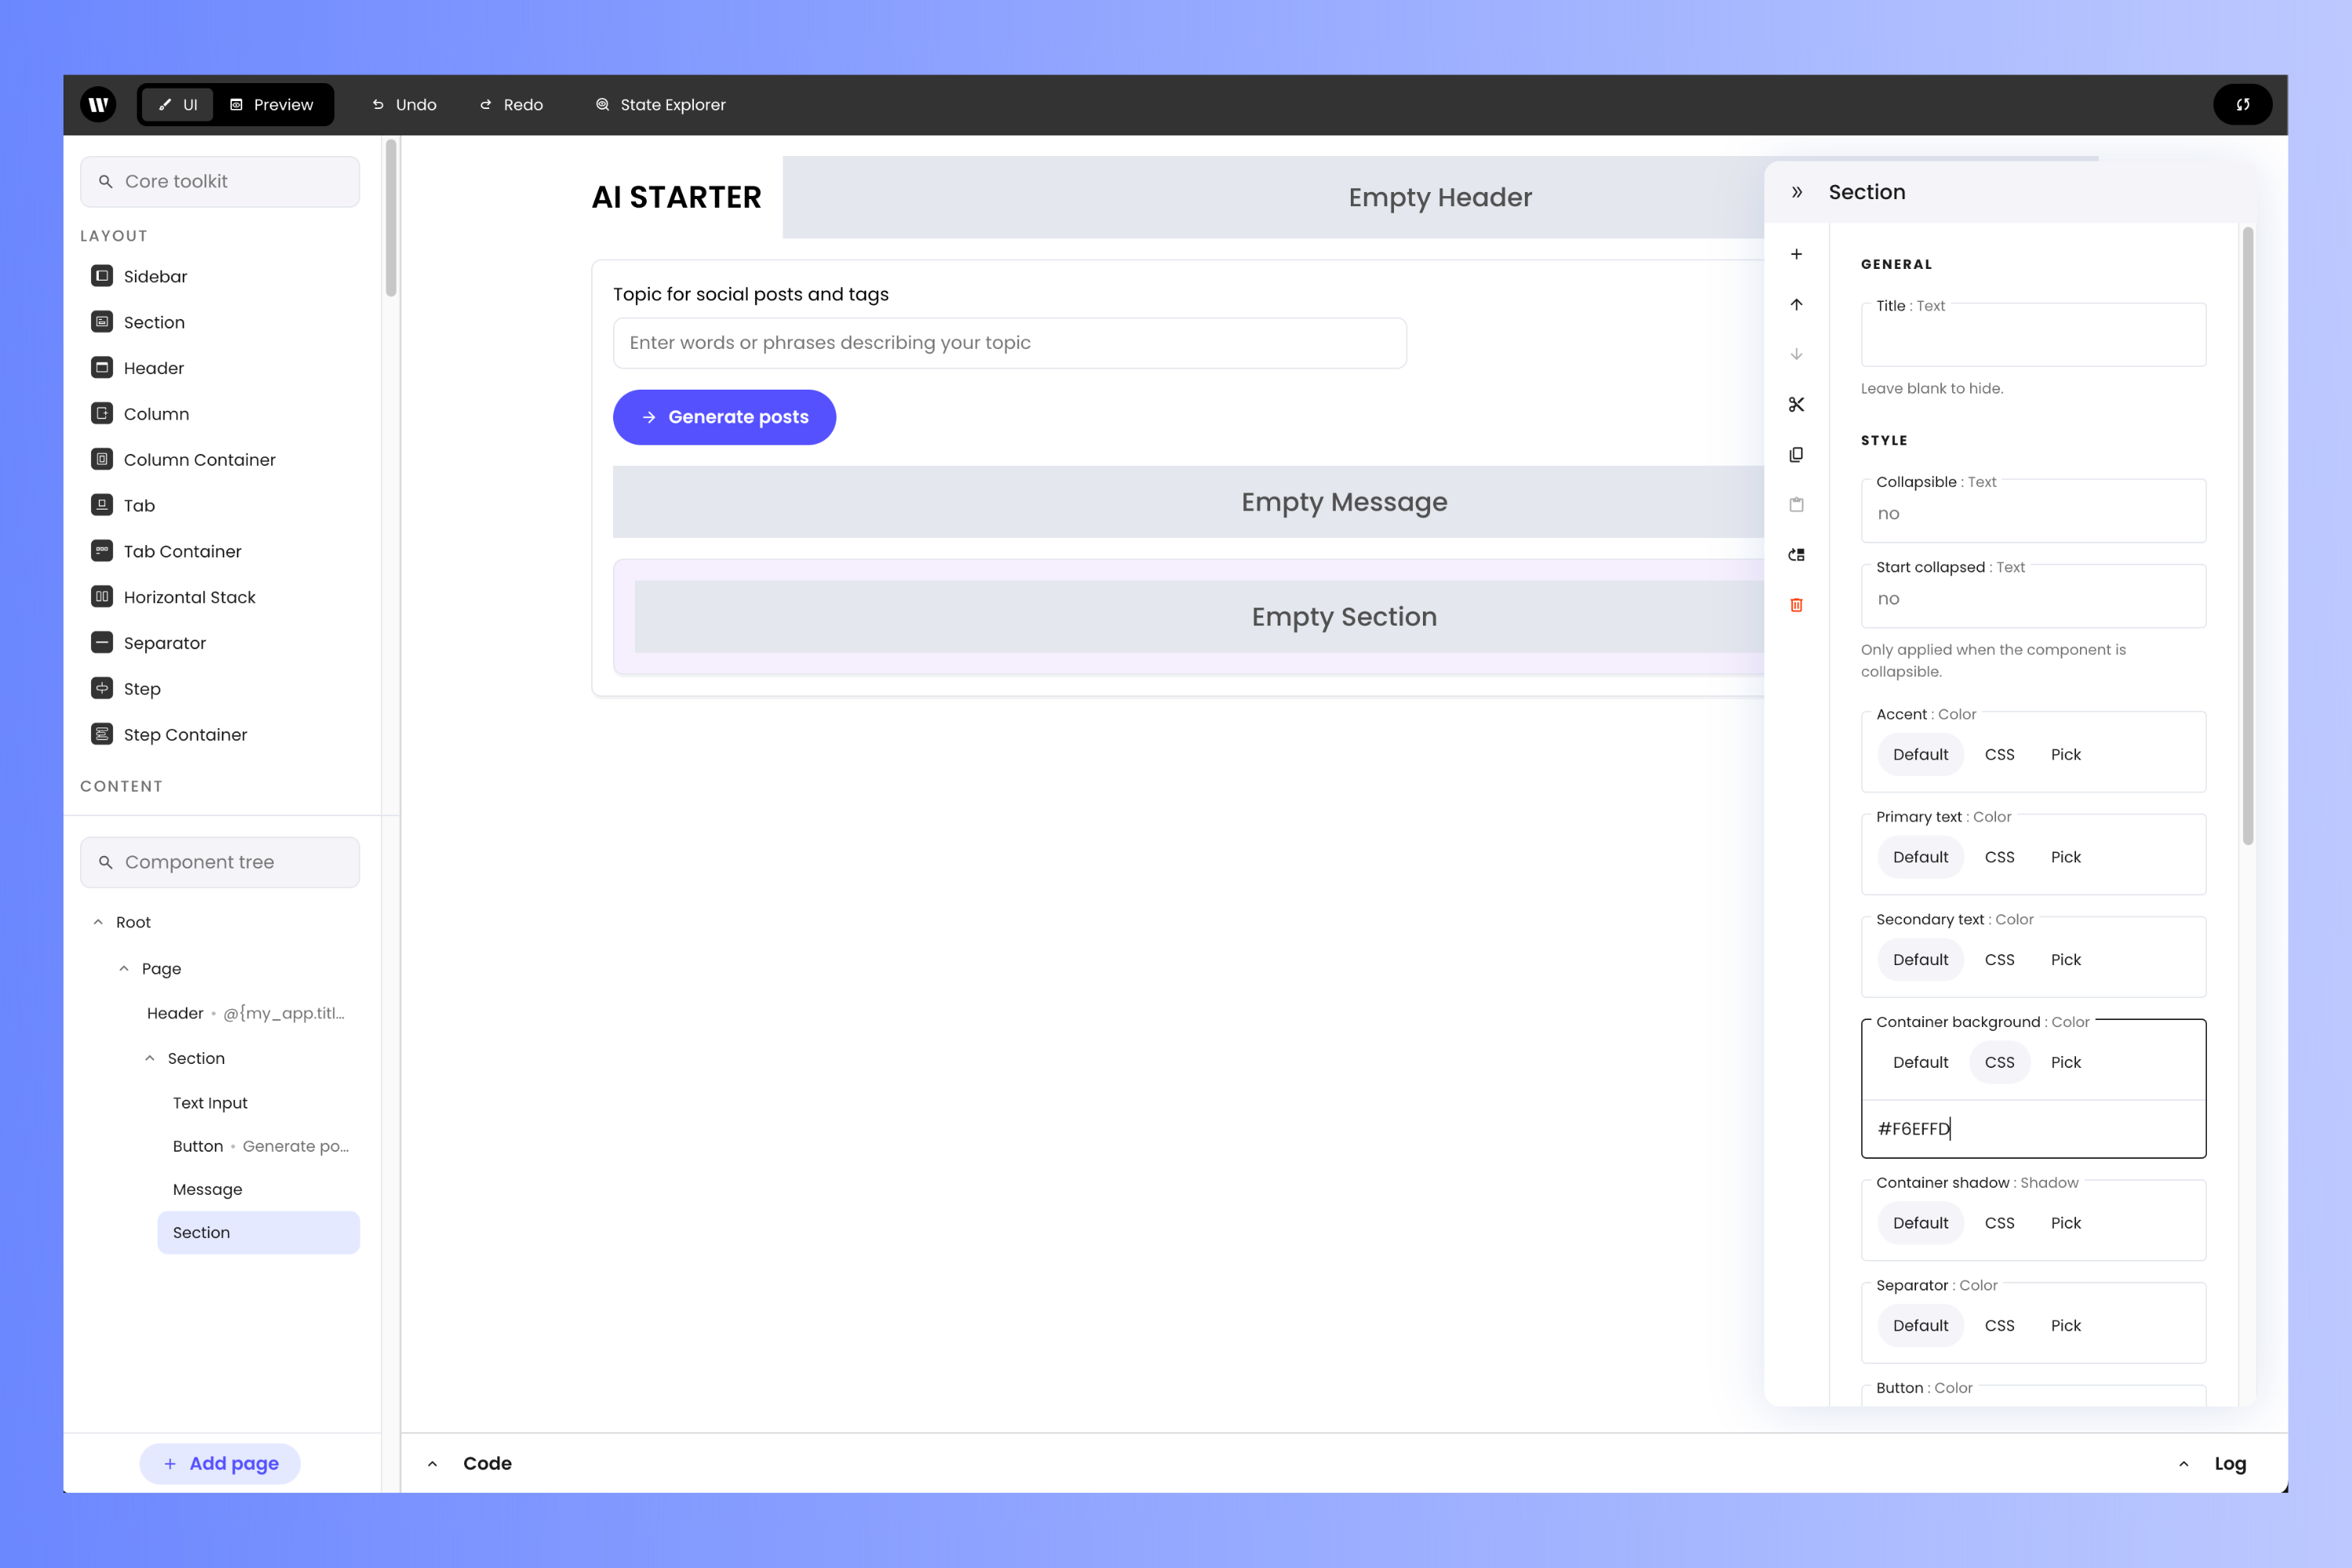
 Select the **Section** you just added. In the **properties** panel:
* Find the **Title** property and clear it its value to remove the **Section**'s title.
* Scroll down to the **Style** section and look for the **Container background** property, which sets the **Section**'s background color.
* Click its **CSS** button, which will cause a text field to appear below it.
* Enter this color value into the text field: `#F6EFFD`.
Select the **Section** you just added. In the **properties** panel:
* Find the **Title** property and clear it its value to remove the **Section**'s title.
* Scroll down to the **Style** section and look for the **Container background** property, which sets the **Section**'s background color.
* Click its **CSS** button, which will cause a text field to appear below it.
* Enter this color value into the text field: `#F6EFFD`.
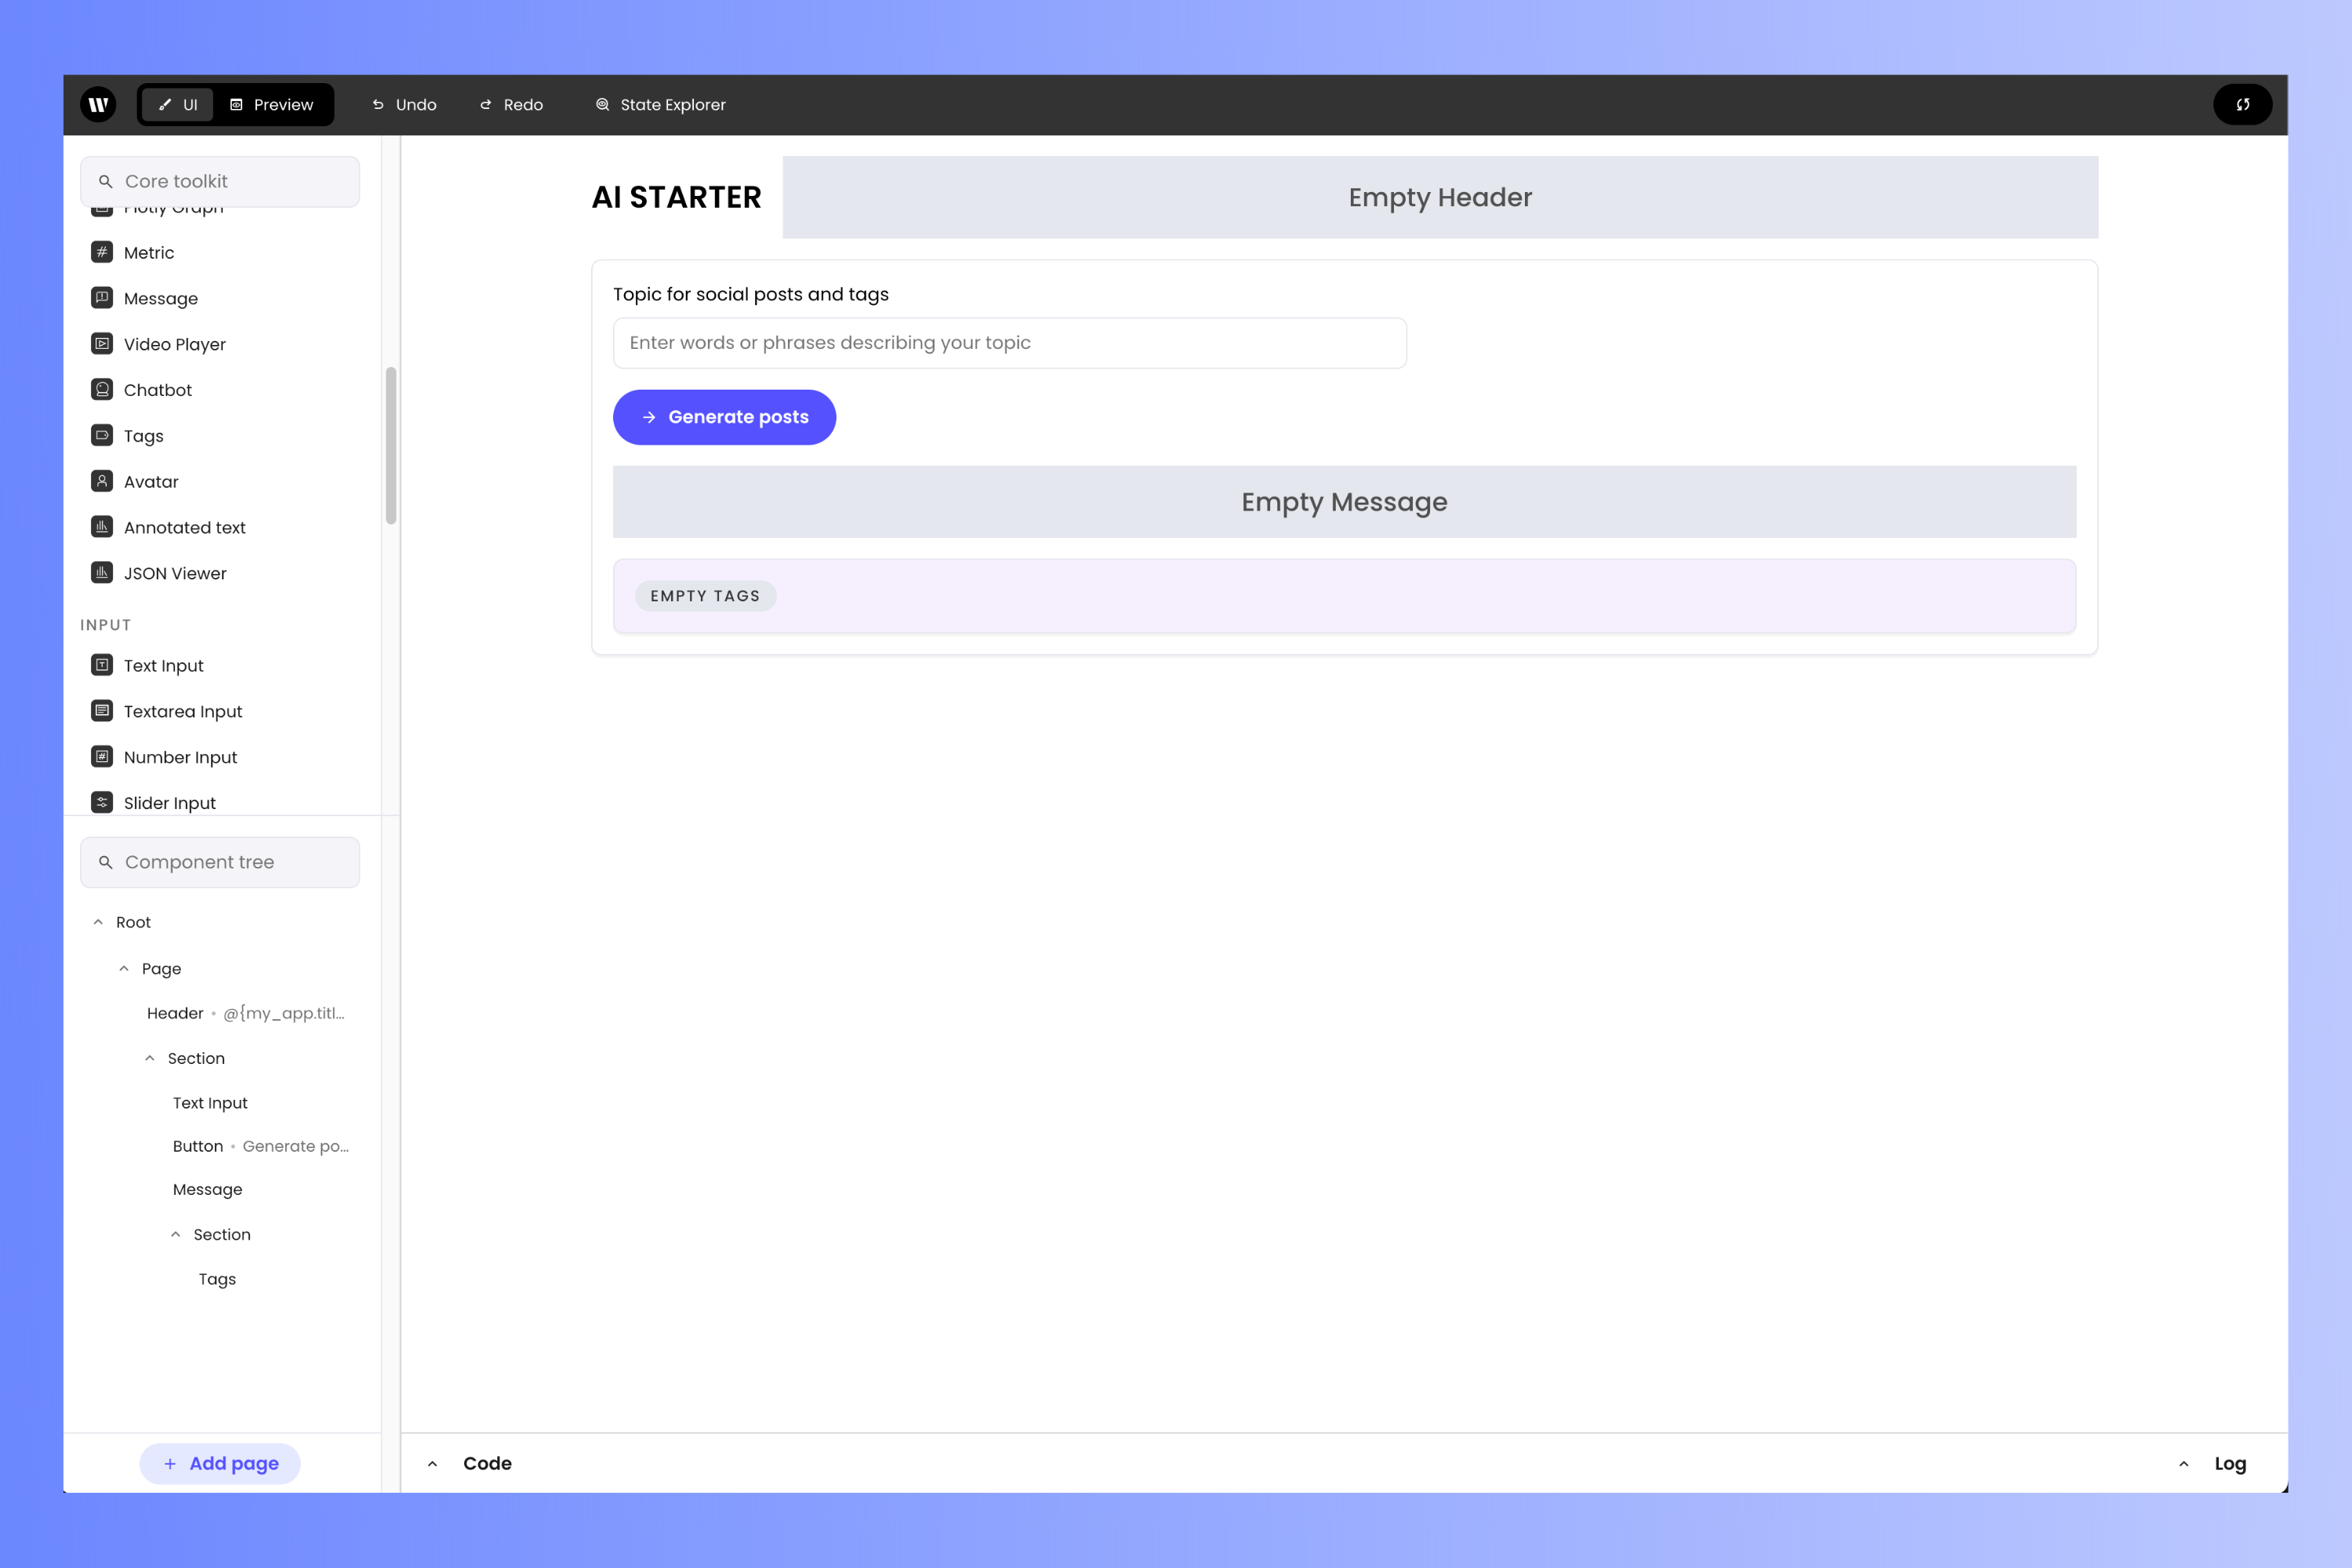
 Writer Framework has a number of useful components to make your apps more functional and beautiful. One of these is the **Tags** component, which can take a list of hashtags (or words, or short phrases) and display them inside colorful "bubbles" to make them stand out. This app will display the social media tags it generates in a **Tags** component.
Drag a **Tags** component from the **Toolbox** panel and place it inside the new **Section**.
Writer Framework has a number of useful components to make your apps more functional and beautiful. One of these is the **Tags** component, which can take a list of hashtags (or words, or short phrases) and display them inside colorful "bubbles" to make them stand out. This app will display the social media tags it generates in a **Tags** component.
Drag a **Tags** component from the **Toolbox** panel and place it inside the new **Section**.
 Drag a **Separator** component from the **Toolbox** panel and place it inside the new **Section**, just below the **Tags** component. This will separate the tags from the posts.
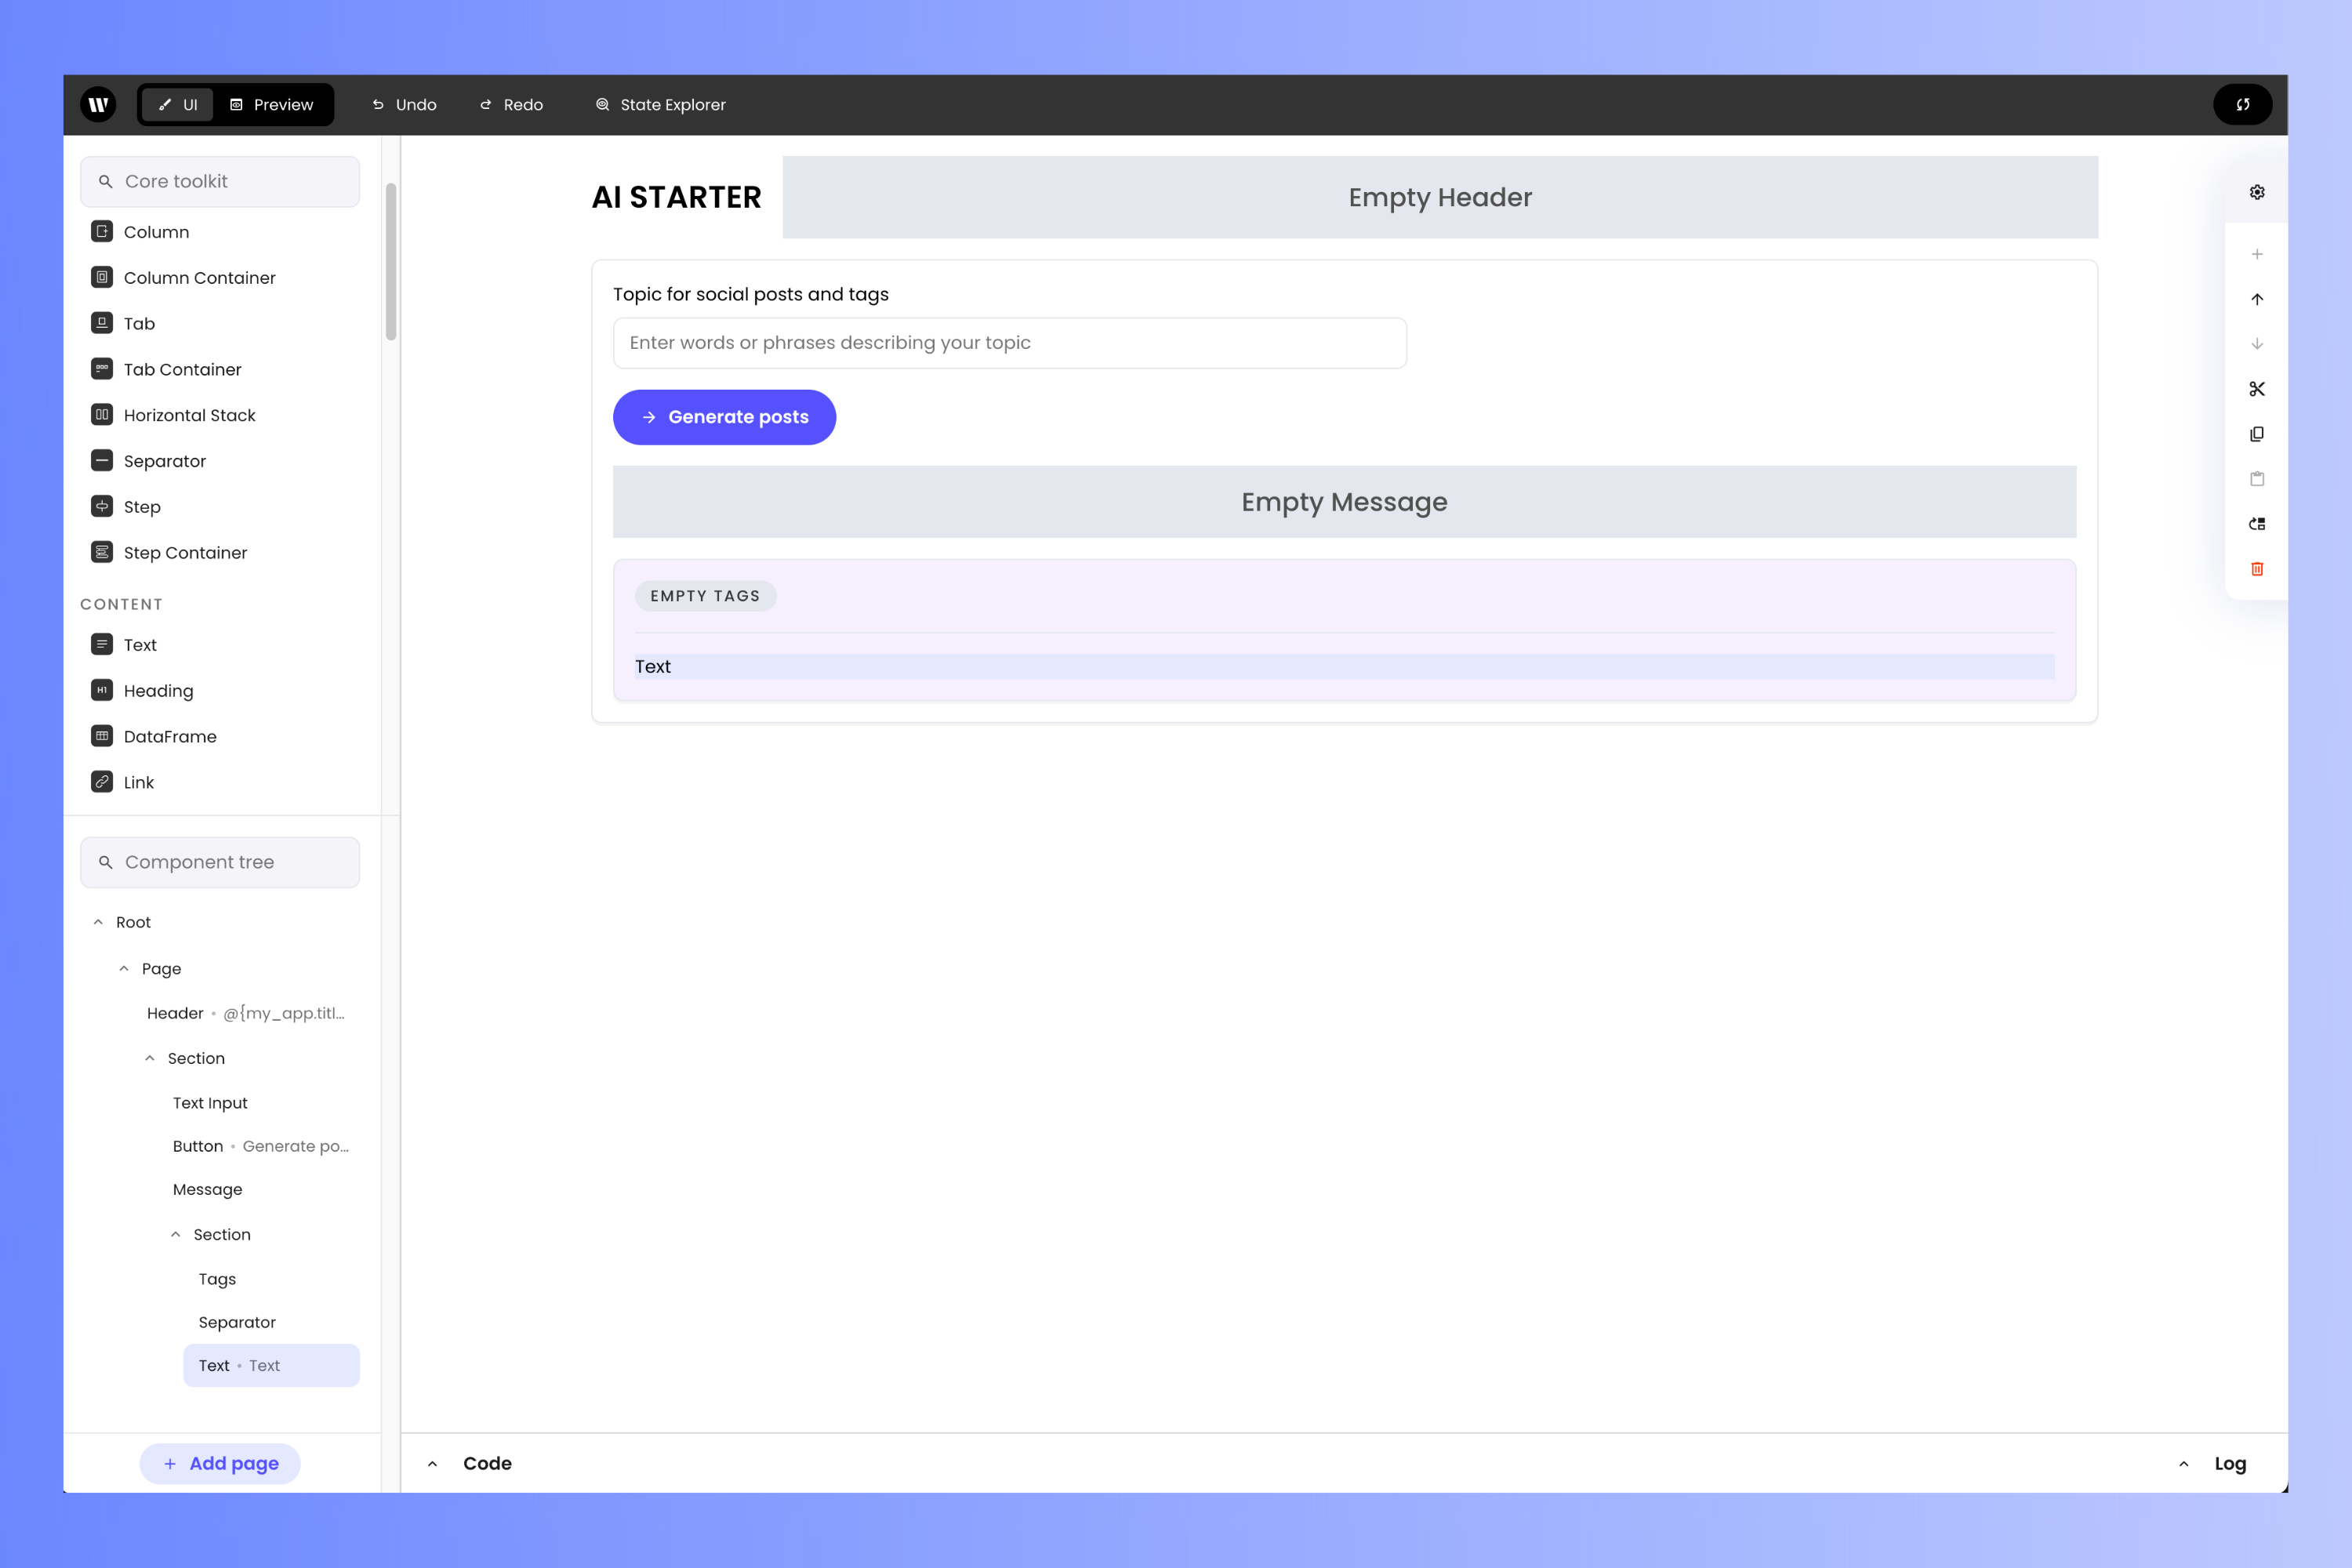
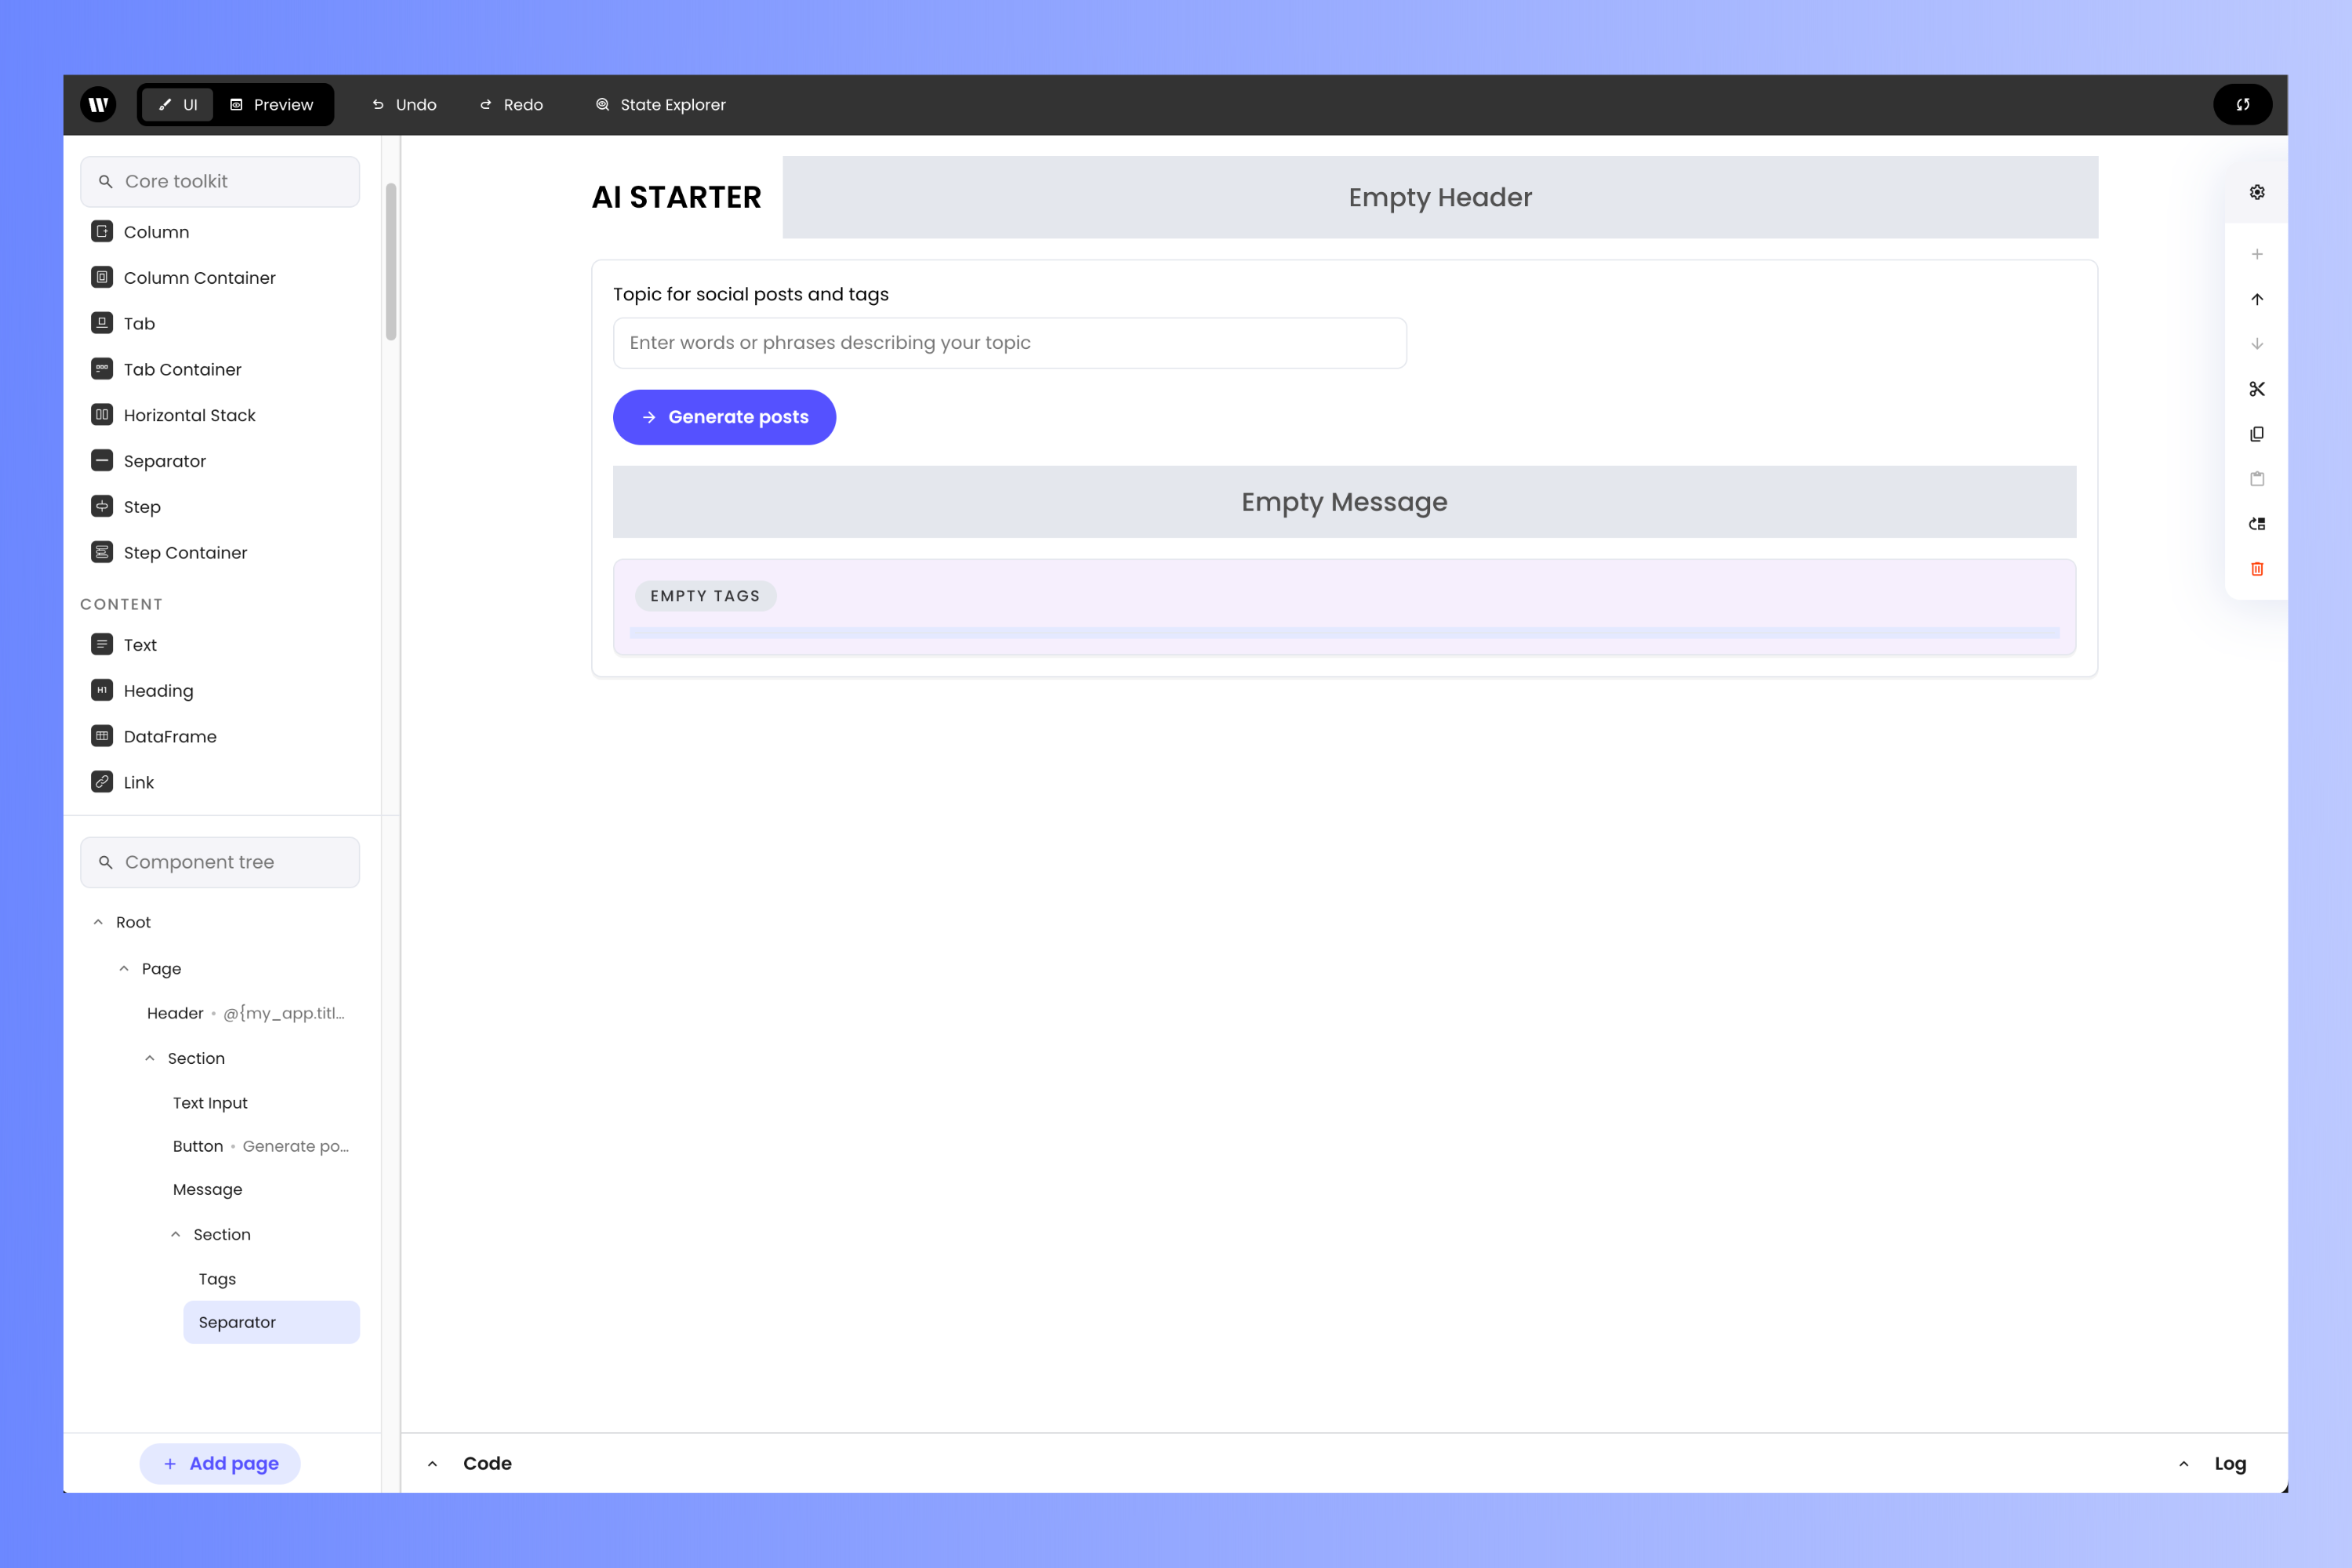 Finally, drag a **Text** component from the **Toolbox** panel and position it below the **Separator**. This will hold the generated social media posts.
 ## Add the back-end code
With the UI laid out, it's time to work on the logic behind it.
The logic behind the user interface is defined in a file named `main.py`, which is in your project's directory. This file was automatically generated; you'll update the code in it to define the behavior of your app.
The simplest way to edit `main.py` is within the project editor. Click on the "toggle code" button (beside the word **Code**) near the lower left corner of the project editor page.
## Add the back-end code
With the UI laid out, it's time to work on the logic behind it.
The logic behind the user interface is defined in a file named `main.py`, which is in your project's directory. This file was automatically generated; you'll update the code in it to define the behavior of your app.
The simplest way to edit `main.py` is within the project editor. Click on the "toggle code" button (beside the word **Code**) near the lower left corner of the project editor page.
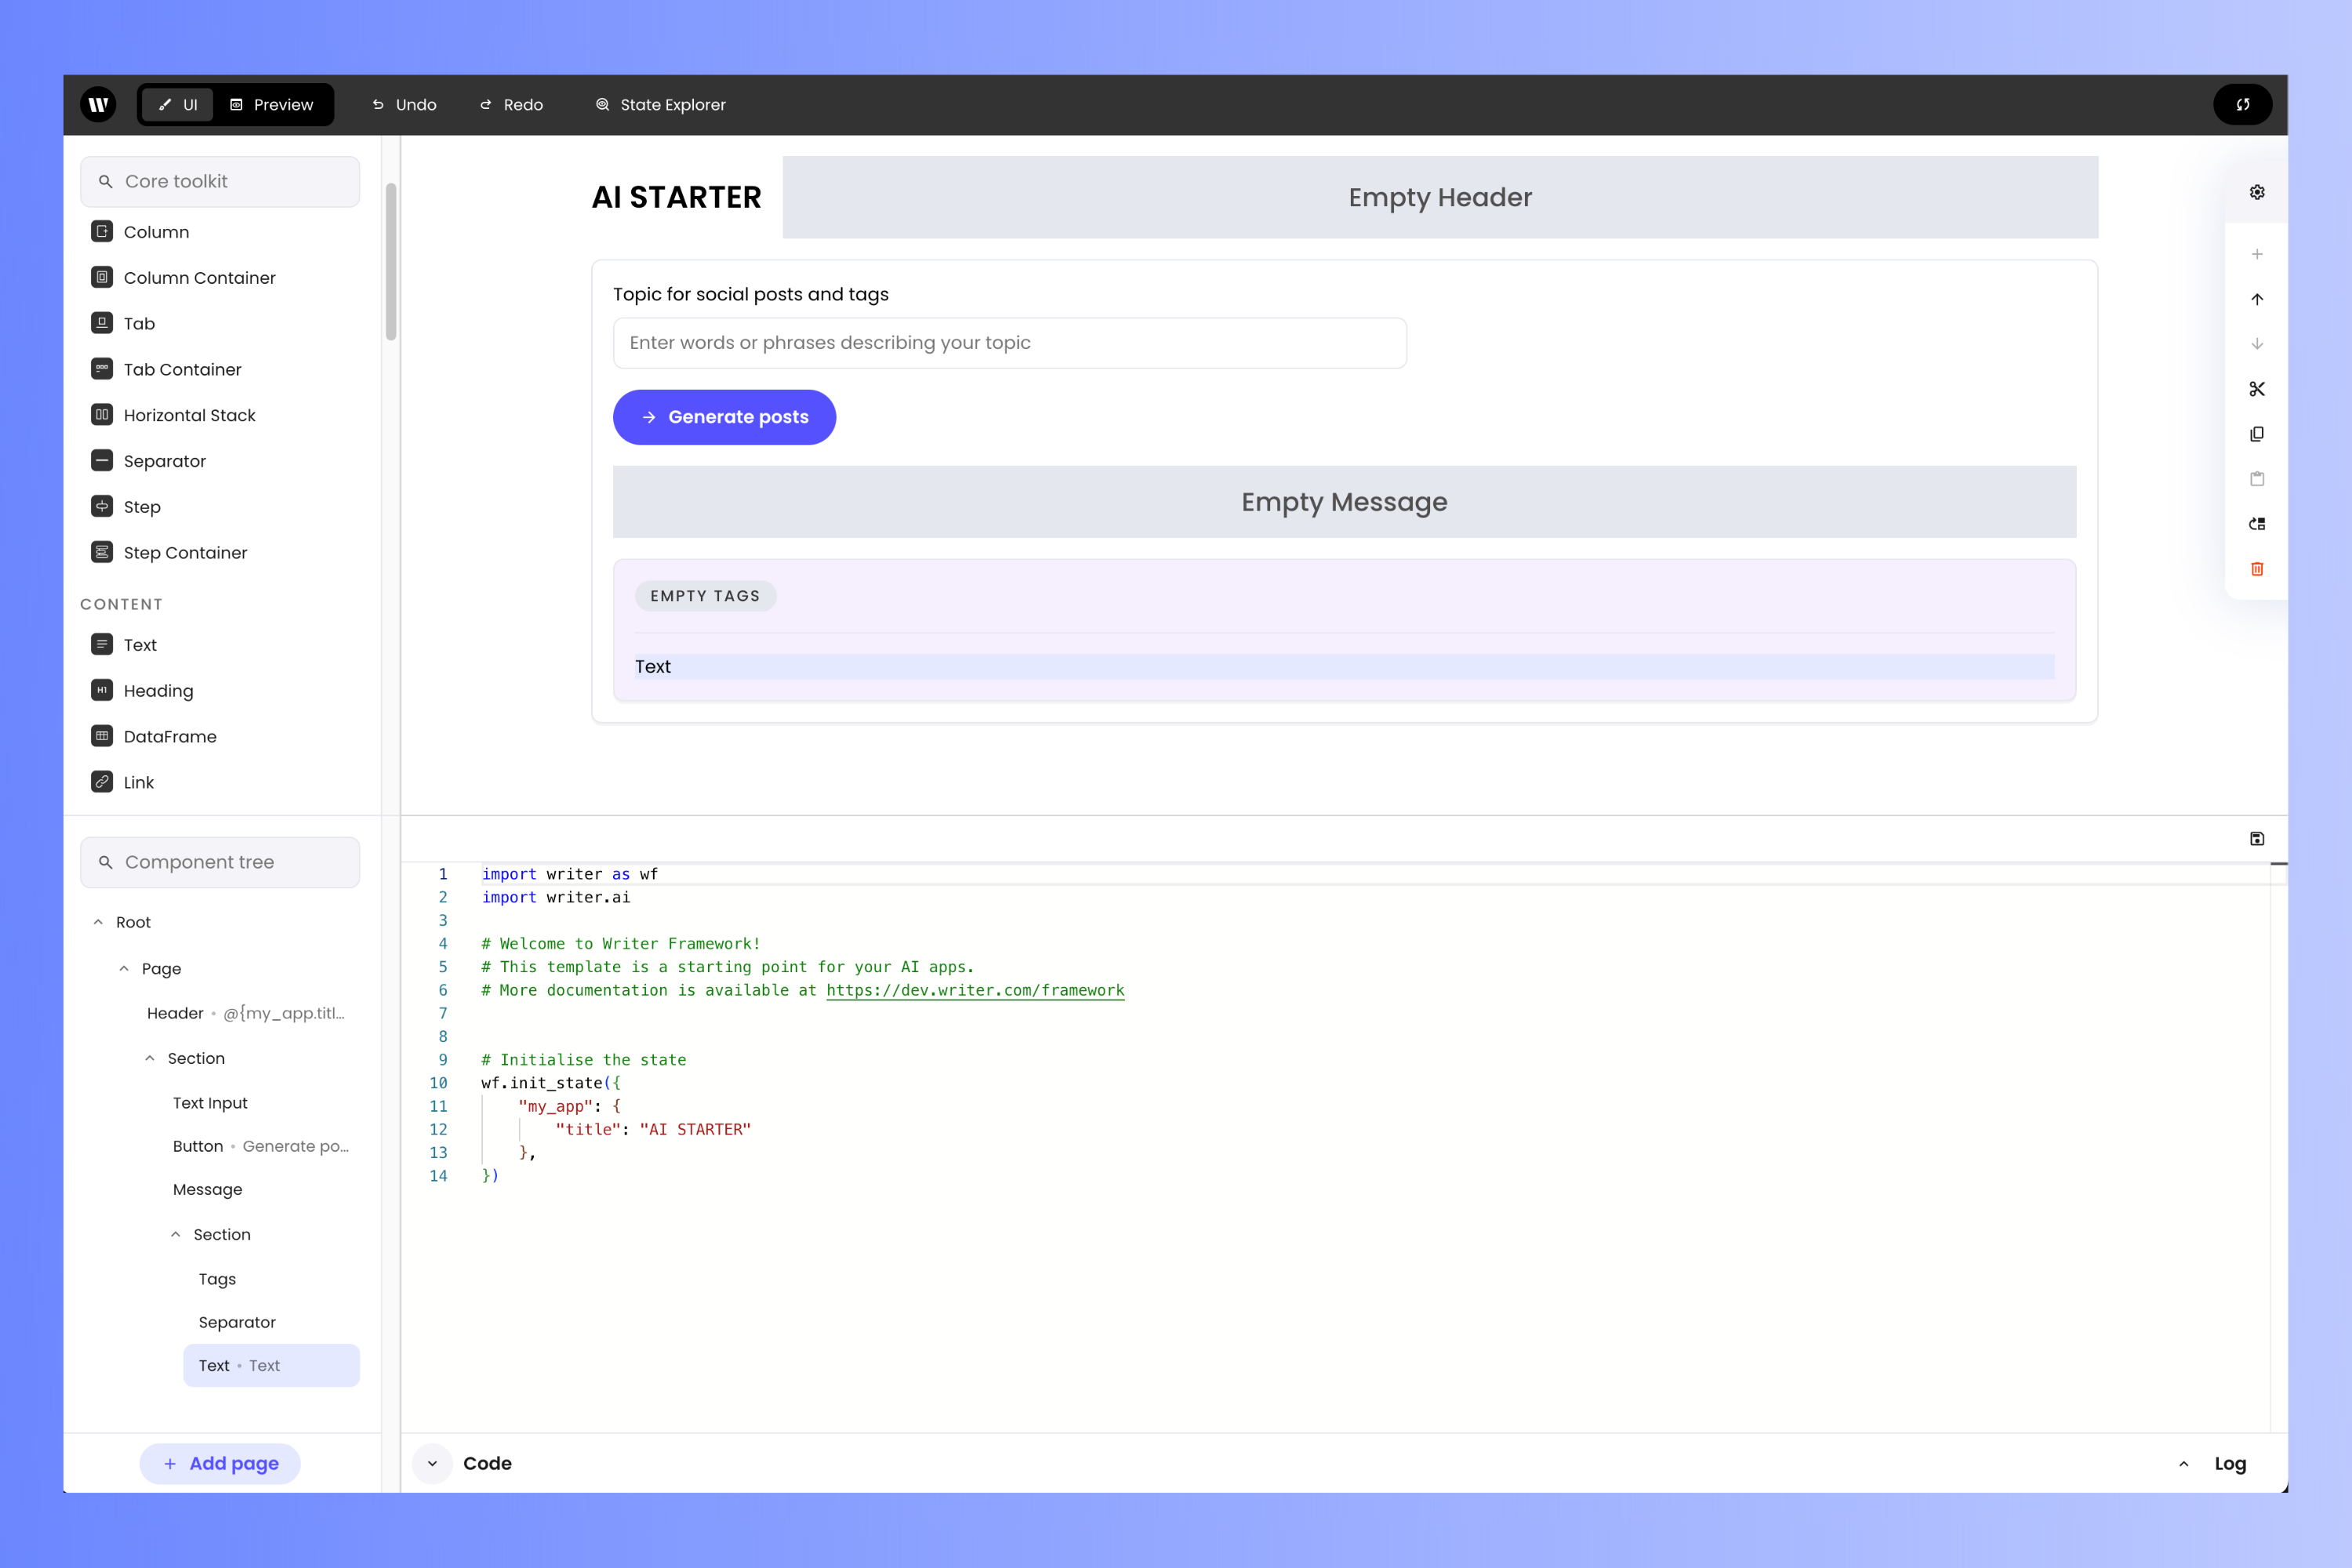
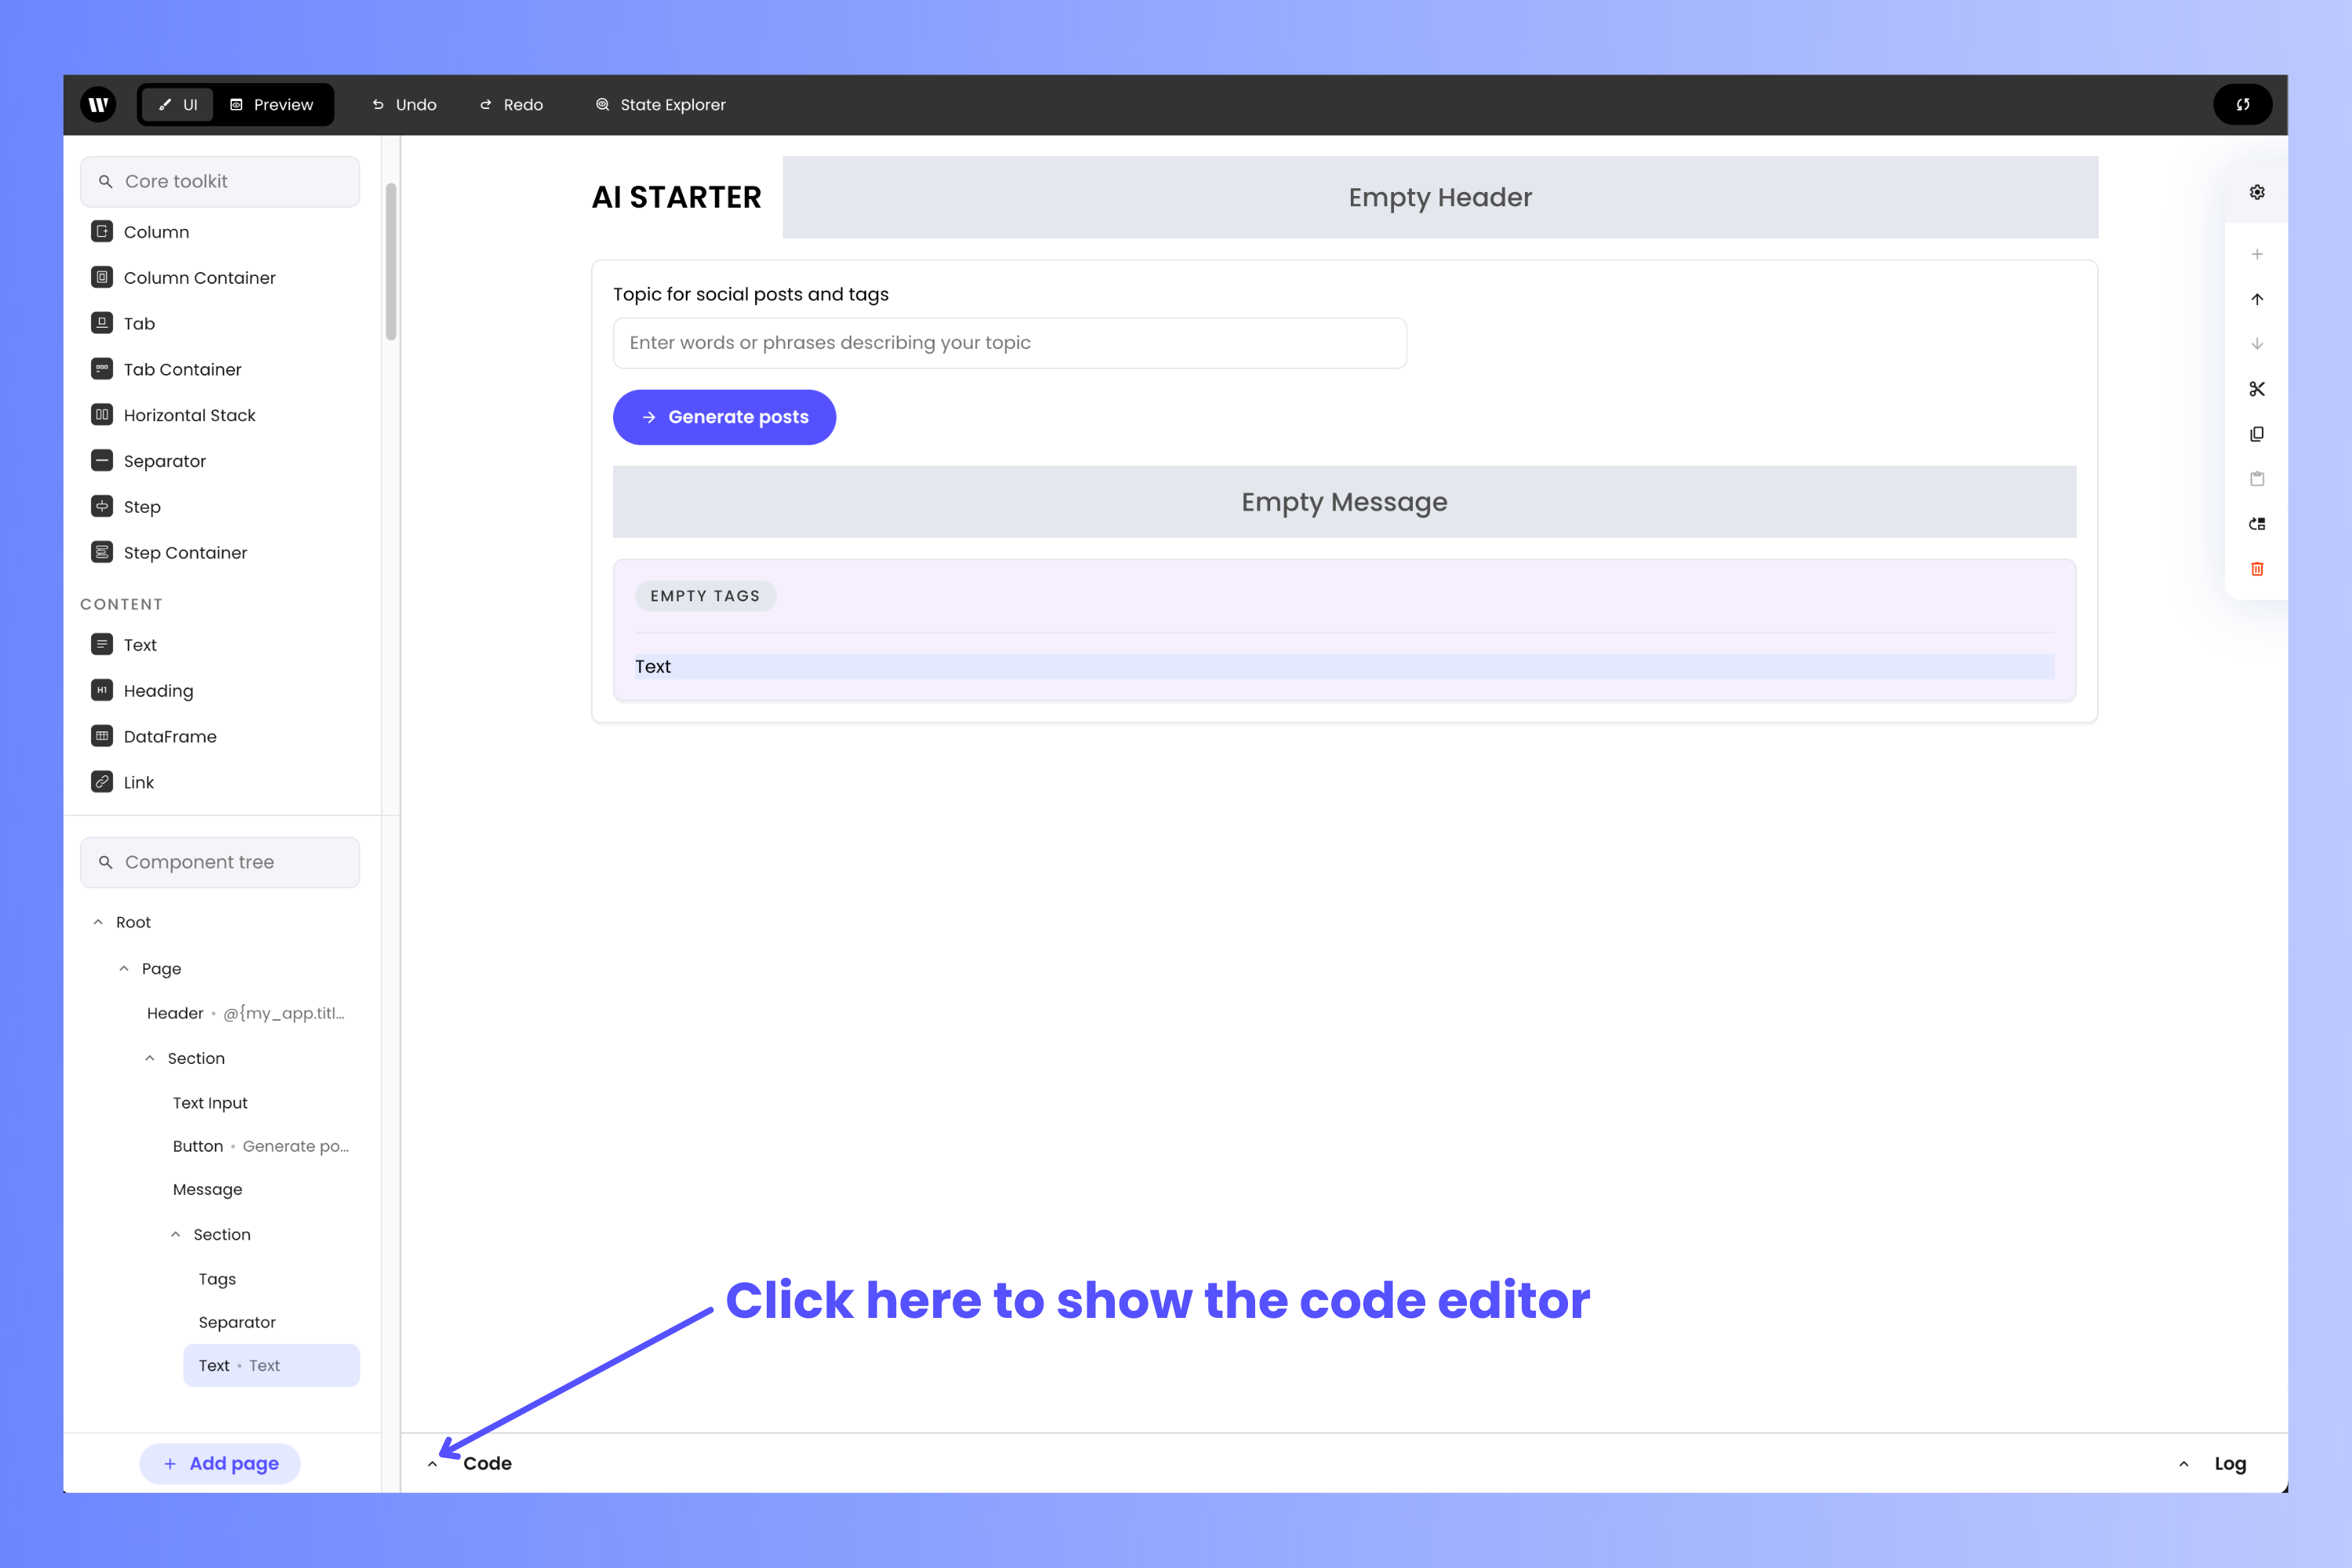 A pane with the name **Code** will appear at the bottom half of the screen, displaying an editor for the the contents of `main.py`.
 If you'd rather use a code editor instead of coding in the browser, use it to open the `main.py` file in your project's directory.
Now follow these steps:
You should see the following at the start of the file:
```python theme={null}
import writer as wf
import writer.ai
```
Replace that code with the following:
```python theme={null}
import os
import re
import writer as wf
import writer.ai
# Set the API key
wf.api_key = os.getenv("WRITER_API_KEY")
```
This code imports the libraries that the application will need and then reads your Writer Framework API key in the `WRITER_API_KEY` environment variable.
When the user presses the app's **Button**, the app needs to call a function to generate and display the social media posts and tags. Find these comments in the code...
```python theme={null}
# Welcome to Writer Framework!
# This template is a starting point for your AI apps.
# More documentation is available at https://dev.writer.com/framework
```
...and replace them with the following function:
```python theme={null}
def generate_and_display_posts_and_tags(state):
print(f"Here's what the user entered: {state['topic']}")
# Display message
state["message"] = "% Generating social media posts and tags for you..."
# Generate and display social posts
prompt = f"You are a social media expert. Generate 5 engaging social media posts about {state['topic']}. Include emojis, and put a blank line between each post."
state["posts"] = writer.ai.complete(prompt)
print(f"Posts: {state['posts']}")
# Generate and display hashtags
prompt = f"You are a social media expert. Generate around 5 hashtags about {state['topic']}, delimited by spaces. For example, #dogs #cats #ducks #elephants #badgers"
pattern = r"#\w+"
hashtags = re.findall(pattern, writer.ai.complete(prompt))
state["tags"] = {item: item for item in hashtags}
print(f"Tags: {state['tags']}")
# Hide message
state["message"] = ""
```
The `%` at the start of the string being assigned to `state["message"]` will be replaced by a “spinning circle” progress indicator graphic in the *Message* component.
The `pattern` variable in the `# Generate and display hashtags` section defines a regular expression pattern to search for words that begin with the `#` character. The `r` in front of the opening quote specifies that the string is a *raw string*, which means that the `\` character should be treated as a literal backslash and not as the start of an escape character sequence.
Note that `generate_and_display_posts_and_tags()` uses `print()` functions for debugging purposes, and you can use them to get a better idea of what's happening in the function. You'll see their output in both your terminal application and in the project editor's 'log' pane (which will be covered shortly) as you use the social post generator. This output will include:
* The topic the user entered
* The posts generated by the LLM
* The hashtags generated by the LLM
The `print()` functions don't affect the operation of the social post generator in any way, and you can remove them if you wish.
The final step is to set the application's initial state. Find this code, which should be just after the `generate_and_display_posts_and_tags()` function...
```python theme={null}
# Initialise the state
wf.init_state({
"my_app": {
"title": "AI STARTER"
},
})
```
...and replace it with this:
```python theme={null}
# Initialize the state
wf.init_state({
"topic": "writing",
"message": "",
"tags": {},
"posts": "",
"my_app": {
"title": "SOCIAL POST GENERATOR"
}
})
```
The Writer Framework's `init_state()` method sets the initial value of `state`, a dictionary containing values that define the state of the application. The key-value pairs in `state` are how you store values used by your app and how you pass data between the back-end code and the UI.
The code above sets the initial value of `state` so that it has these key-value pairs:
* `topic`: A string containing the topic that the application should generate social media posts and tags for. You'll bind its value to the *Text Input* component where the user will enter the topic.
* `message`: A string containing text of the message that will be displayed to the user while the application is generating posts and tags. You'll bind its value to the **Message** component.
* `tags`: A list containing the hashtags generated by the LLM. You'll bind its value to the **Tags** component.
* `posts`: A string containing the social media posts generated by the LLM. You'll bind its value to the **Text** component.
* `my_app`: A dictionary containing values that define the application's appearance. This dictionary has a single key-value pair, `title`, which defines the text that appears as the application's title.
For more details about the `state` variable, see our [*Application state*](https://dev.writer.com/framework/application-state#application-state) page.
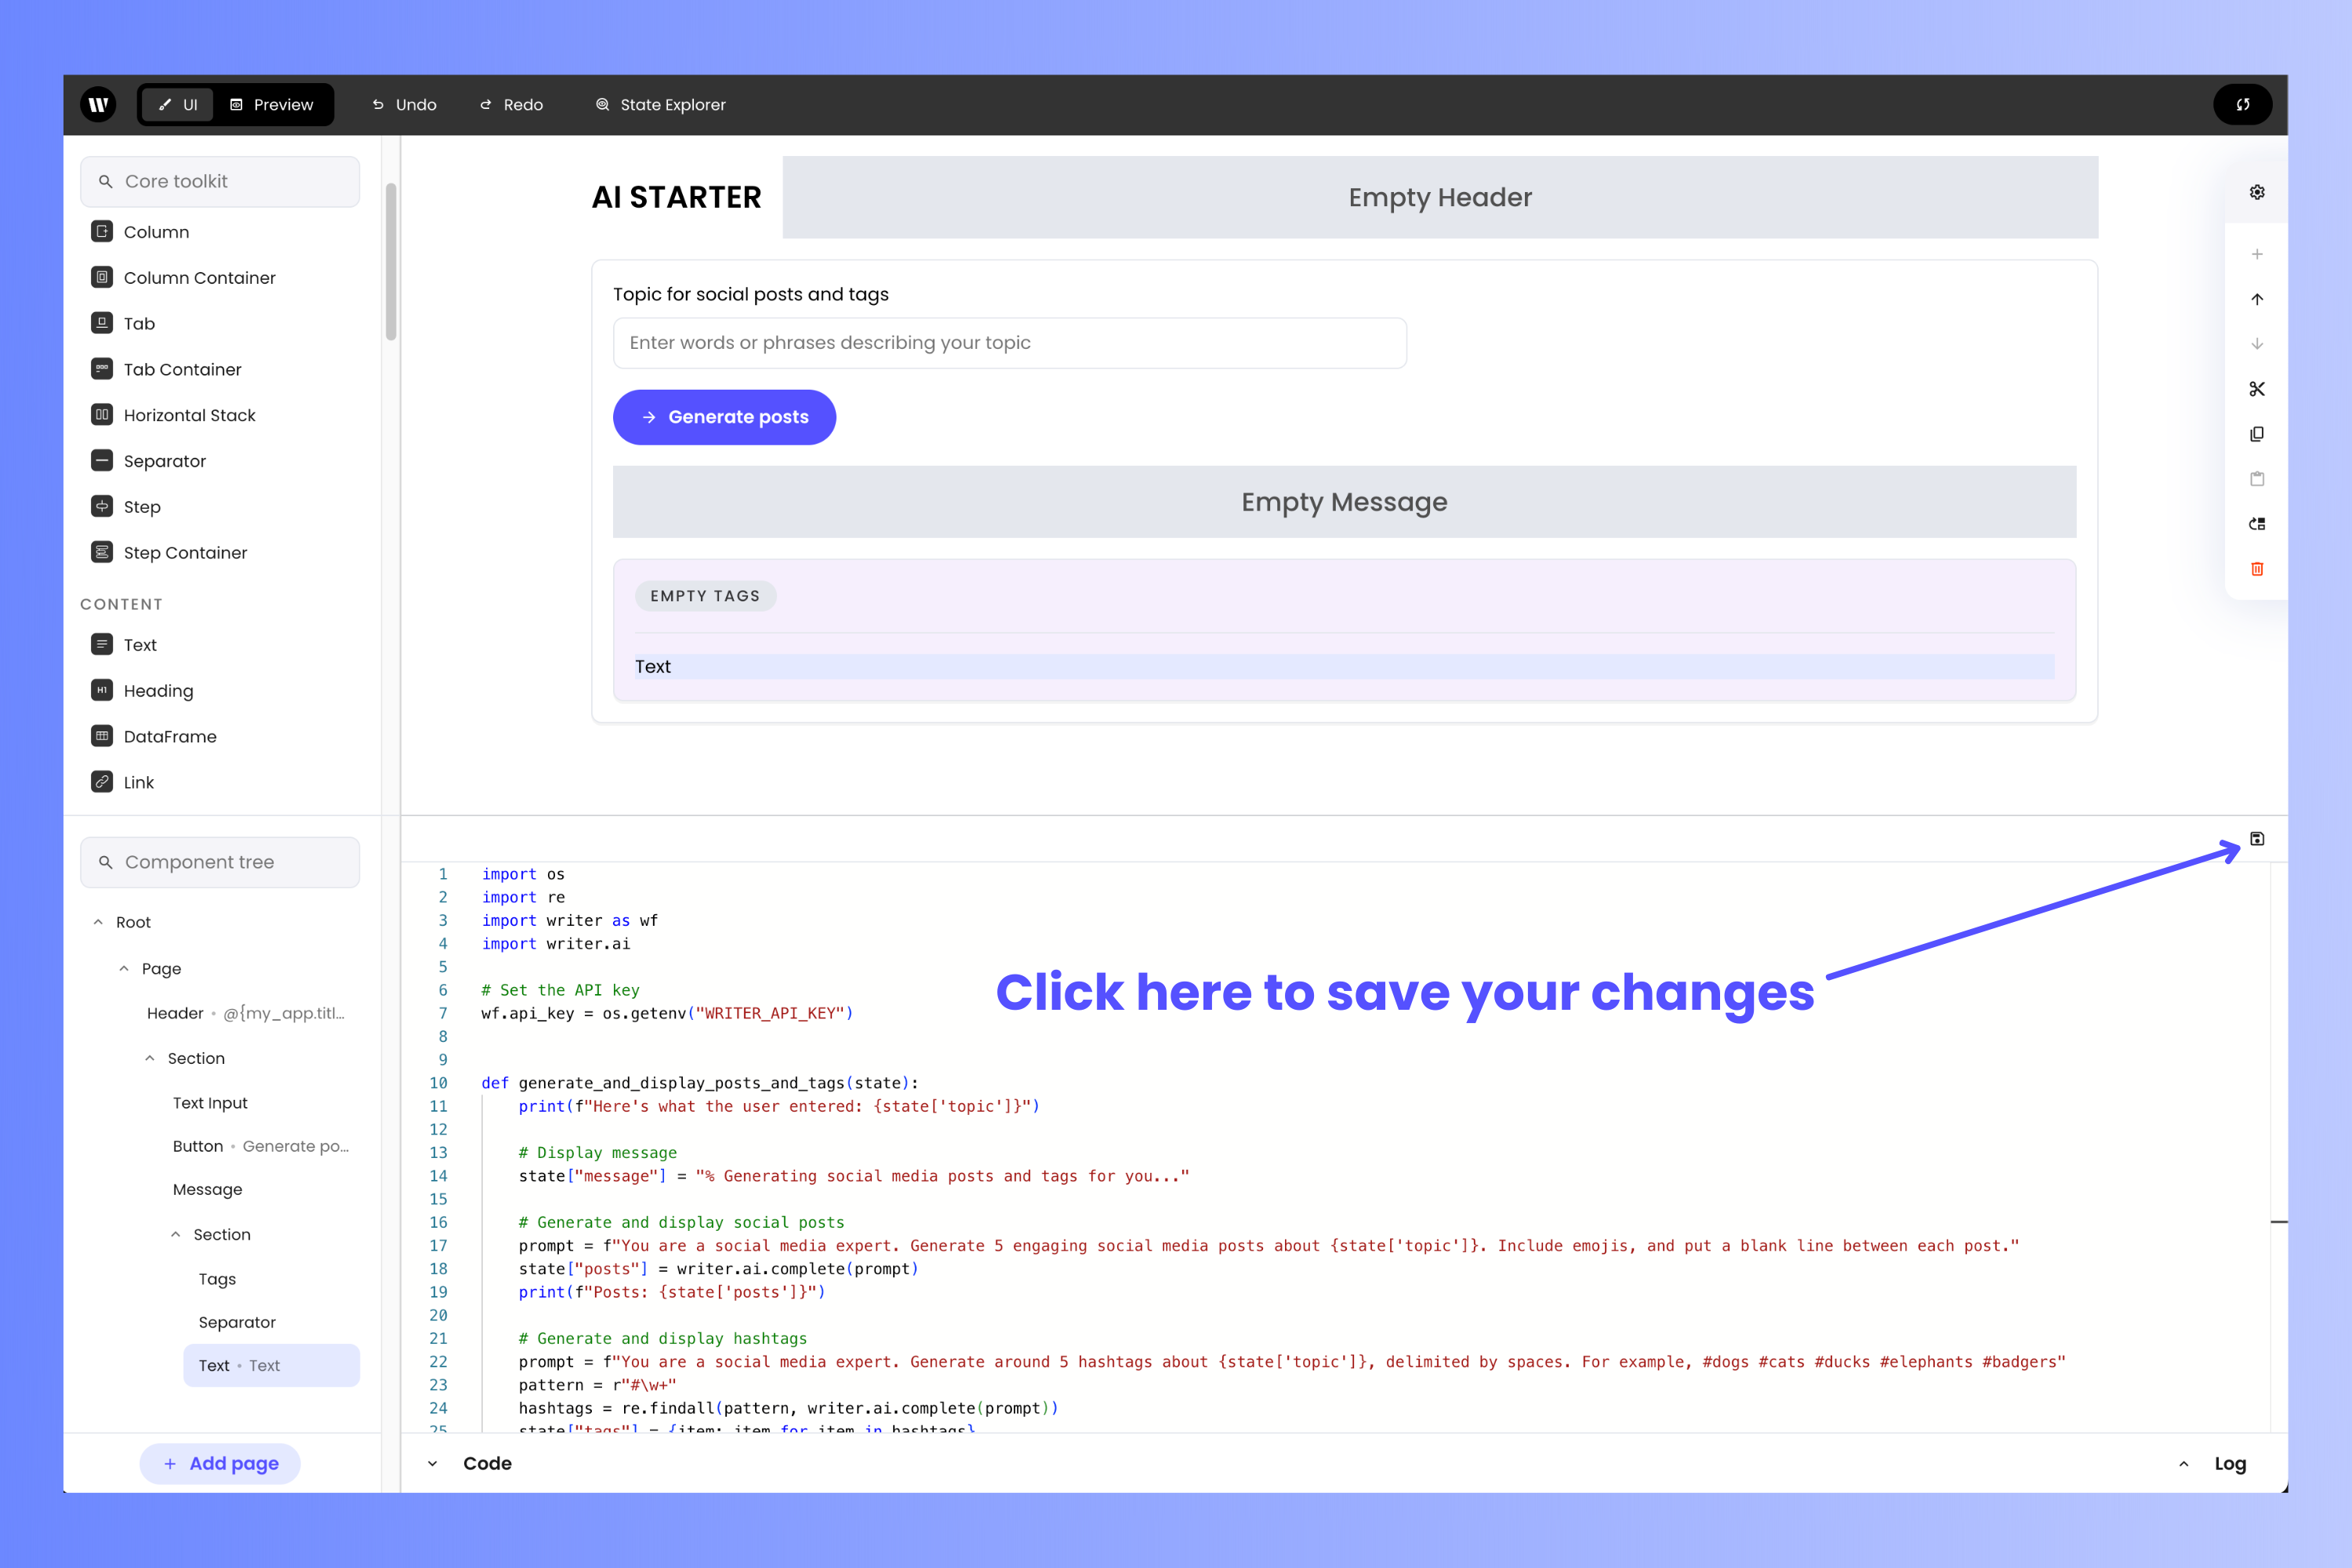
That’s all the code. If you edited the code in the browser, save it by clicking the “save” button near the top right corner of the code editor.
If you'd rather use a code editor instead of coding in the browser, use it to open the `main.py` file in your project's directory.
Now follow these steps:
You should see the following at the start of the file:
```python theme={null}
import writer as wf
import writer.ai
```
Replace that code with the following:
```python theme={null}
import os
import re
import writer as wf
import writer.ai
# Set the API key
wf.api_key = os.getenv("WRITER_API_KEY")
```
This code imports the libraries that the application will need and then reads your Writer Framework API key in the `WRITER_API_KEY` environment variable.
When the user presses the app's **Button**, the app needs to call a function to generate and display the social media posts and tags. Find these comments in the code...
```python theme={null}
# Welcome to Writer Framework!
# This template is a starting point for your AI apps.
# More documentation is available at https://dev.writer.com/framework
```
...and replace them with the following function:
```python theme={null}
def generate_and_display_posts_and_tags(state):
print(f"Here's what the user entered: {state['topic']}")
# Display message
state["message"] = "% Generating social media posts and tags for you..."
# Generate and display social posts
prompt = f"You are a social media expert. Generate 5 engaging social media posts about {state['topic']}. Include emojis, and put a blank line between each post."
state["posts"] = writer.ai.complete(prompt)
print(f"Posts: {state['posts']}")
# Generate and display hashtags
prompt = f"You are a social media expert. Generate around 5 hashtags about {state['topic']}, delimited by spaces. For example, #dogs #cats #ducks #elephants #badgers"
pattern = r"#\w+"
hashtags = re.findall(pattern, writer.ai.complete(prompt))
state["tags"] = {item: item for item in hashtags}
print(f"Tags: {state['tags']}")
# Hide message
state["message"] = ""
```
The `%` at the start of the string being assigned to `state["message"]` will be replaced by a “spinning circle” progress indicator graphic in the *Message* component.
The `pattern` variable in the `# Generate and display hashtags` section defines a regular expression pattern to search for words that begin with the `#` character. The `r` in front of the opening quote specifies that the string is a *raw string*, which means that the `\` character should be treated as a literal backslash and not as the start of an escape character sequence.
Note that `generate_and_display_posts_and_tags()` uses `print()` functions for debugging purposes, and you can use them to get a better idea of what's happening in the function. You'll see their output in both your terminal application and in the project editor's 'log' pane (which will be covered shortly) as you use the social post generator. This output will include:
* The topic the user entered
* The posts generated by the LLM
* The hashtags generated by the LLM
The `print()` functions don't affect the operation of the social post generator in any way, and you can remove them if you wish.
The final step is to set the application's initial state. Find this code, which should be just after the `generate_and_display_posts_and_tags()` function...
```python theme={null}
# Initialise the state
wf.init_state({
"my_app": {
"title": "AI STARTER"
},
})
```
...and replace it with this:
```python theme={null}
# Initialize the state
wf.init_state({
"topic": "writing",
"message": "",
"tags": {},
"posts": "",
"my_app": {
"title": "SOCIAL POST GENERATOR"
}
})
```
The Writer Framework's `init_state()` method sets the initial value of `state`, a dictionary containing values that define the state of the application. The key-value pairs in `state` are how you store values used by your app and how you pass data between the back-end code and the UI.
The code above sets the initial value of `state` so that it has these key-value pairs:
* `topic`: A string containing the topic that the application should generate social media posts and tags for. You'll bind its value to the *Text Input* component where the user will enter the topic.
* `message`: A string containing text of the message that will be displayed to the user while the application is generating posts and tags. You'll bind its value to the **Message** component.
* `tags`: A list containing the hashtags generated by the LLM. You'll bind its value to the **Tags** component.
* `posts`: A string containing the social media posts generated by the LLM. You'll bind its value to the **Text** component.
* `my_app`: A dictionary containing values that define the application's appearance. This dictionary has a single key-value pair, `title`, which defines the text that appears as the application's title.
For more details about the `state` variable, see our [*Application state*](https://dev.writer.com/framework/application-state#application-state) page.
That’s all the code. If you edited the code in the browser, save it by clicking the “save” button near the top right corner of the code editor.
 Click the "toggle code" button to hide the code editor.
## Bind the UI to the back-end code
You've built the UI and written the code behind it. Let's connect the two! Go back to the browser window with the project editor and do the following:
Earlier, you saw that the **Header** component's **Text** property was set to `@{my_app.title}`, a value in the app's `state` variable. You changed this value when you update the call to the Writer Framework's `init_state()` method.
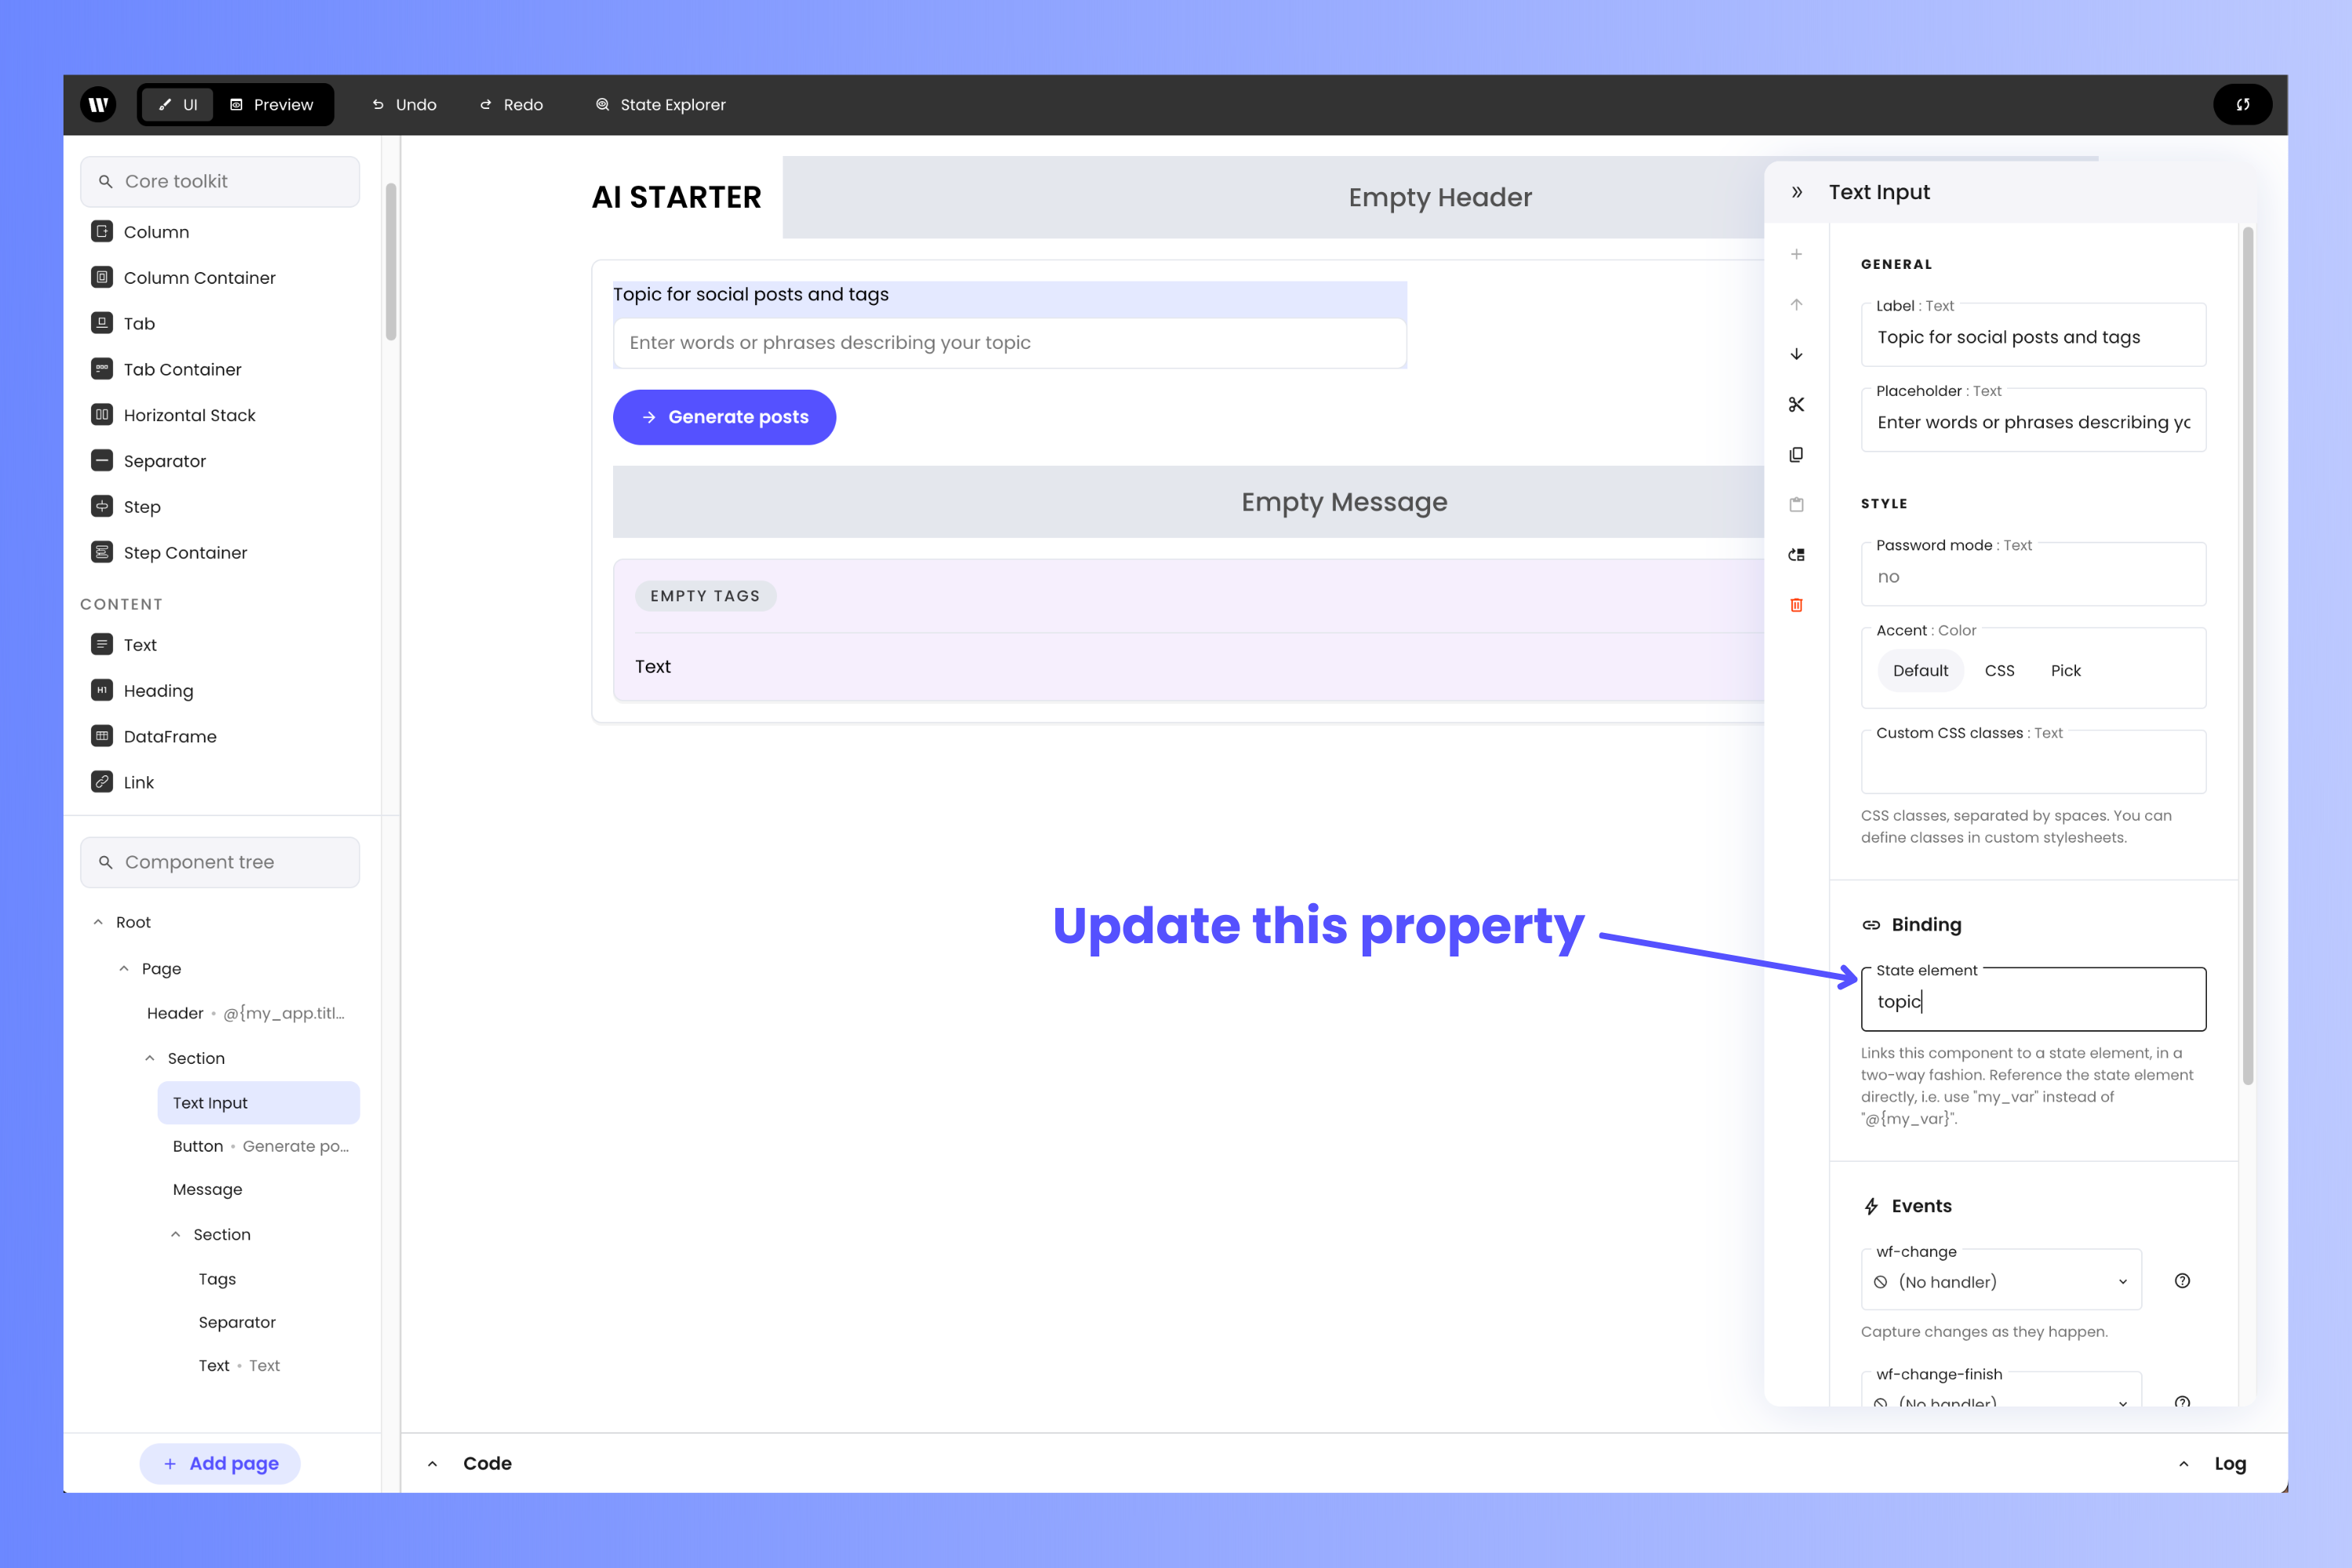
Select the **Text Input** component. In the **properties** panel, scroll down to the **Binding** section and find the **State element** property. This is where you specify the `state` variable key whose value will be connected to the **Text Input** component. Set its value to `topic`.
Click the "toggle code" button to hide the code editor.
## Bind the UI to the back-end code
You've built the UI and written the code behind it. Let's connect the two! Go back to the browser window with the project editor and do the following:
Earlier, you saw that the **Header** component's **Text** property was set to `@{my_app.title}`, a value in the app's `state` variable. You changed this value when you update the call to the Writer Framework's `init_state()` method.
Select the **Text Input** component. In the **properties** panel, scroll down to the **Binding** section and find the **State element** property. This is where you specify the `state` variable key whose value will be connected to the **Text Input** component. Set its value to `topic`.
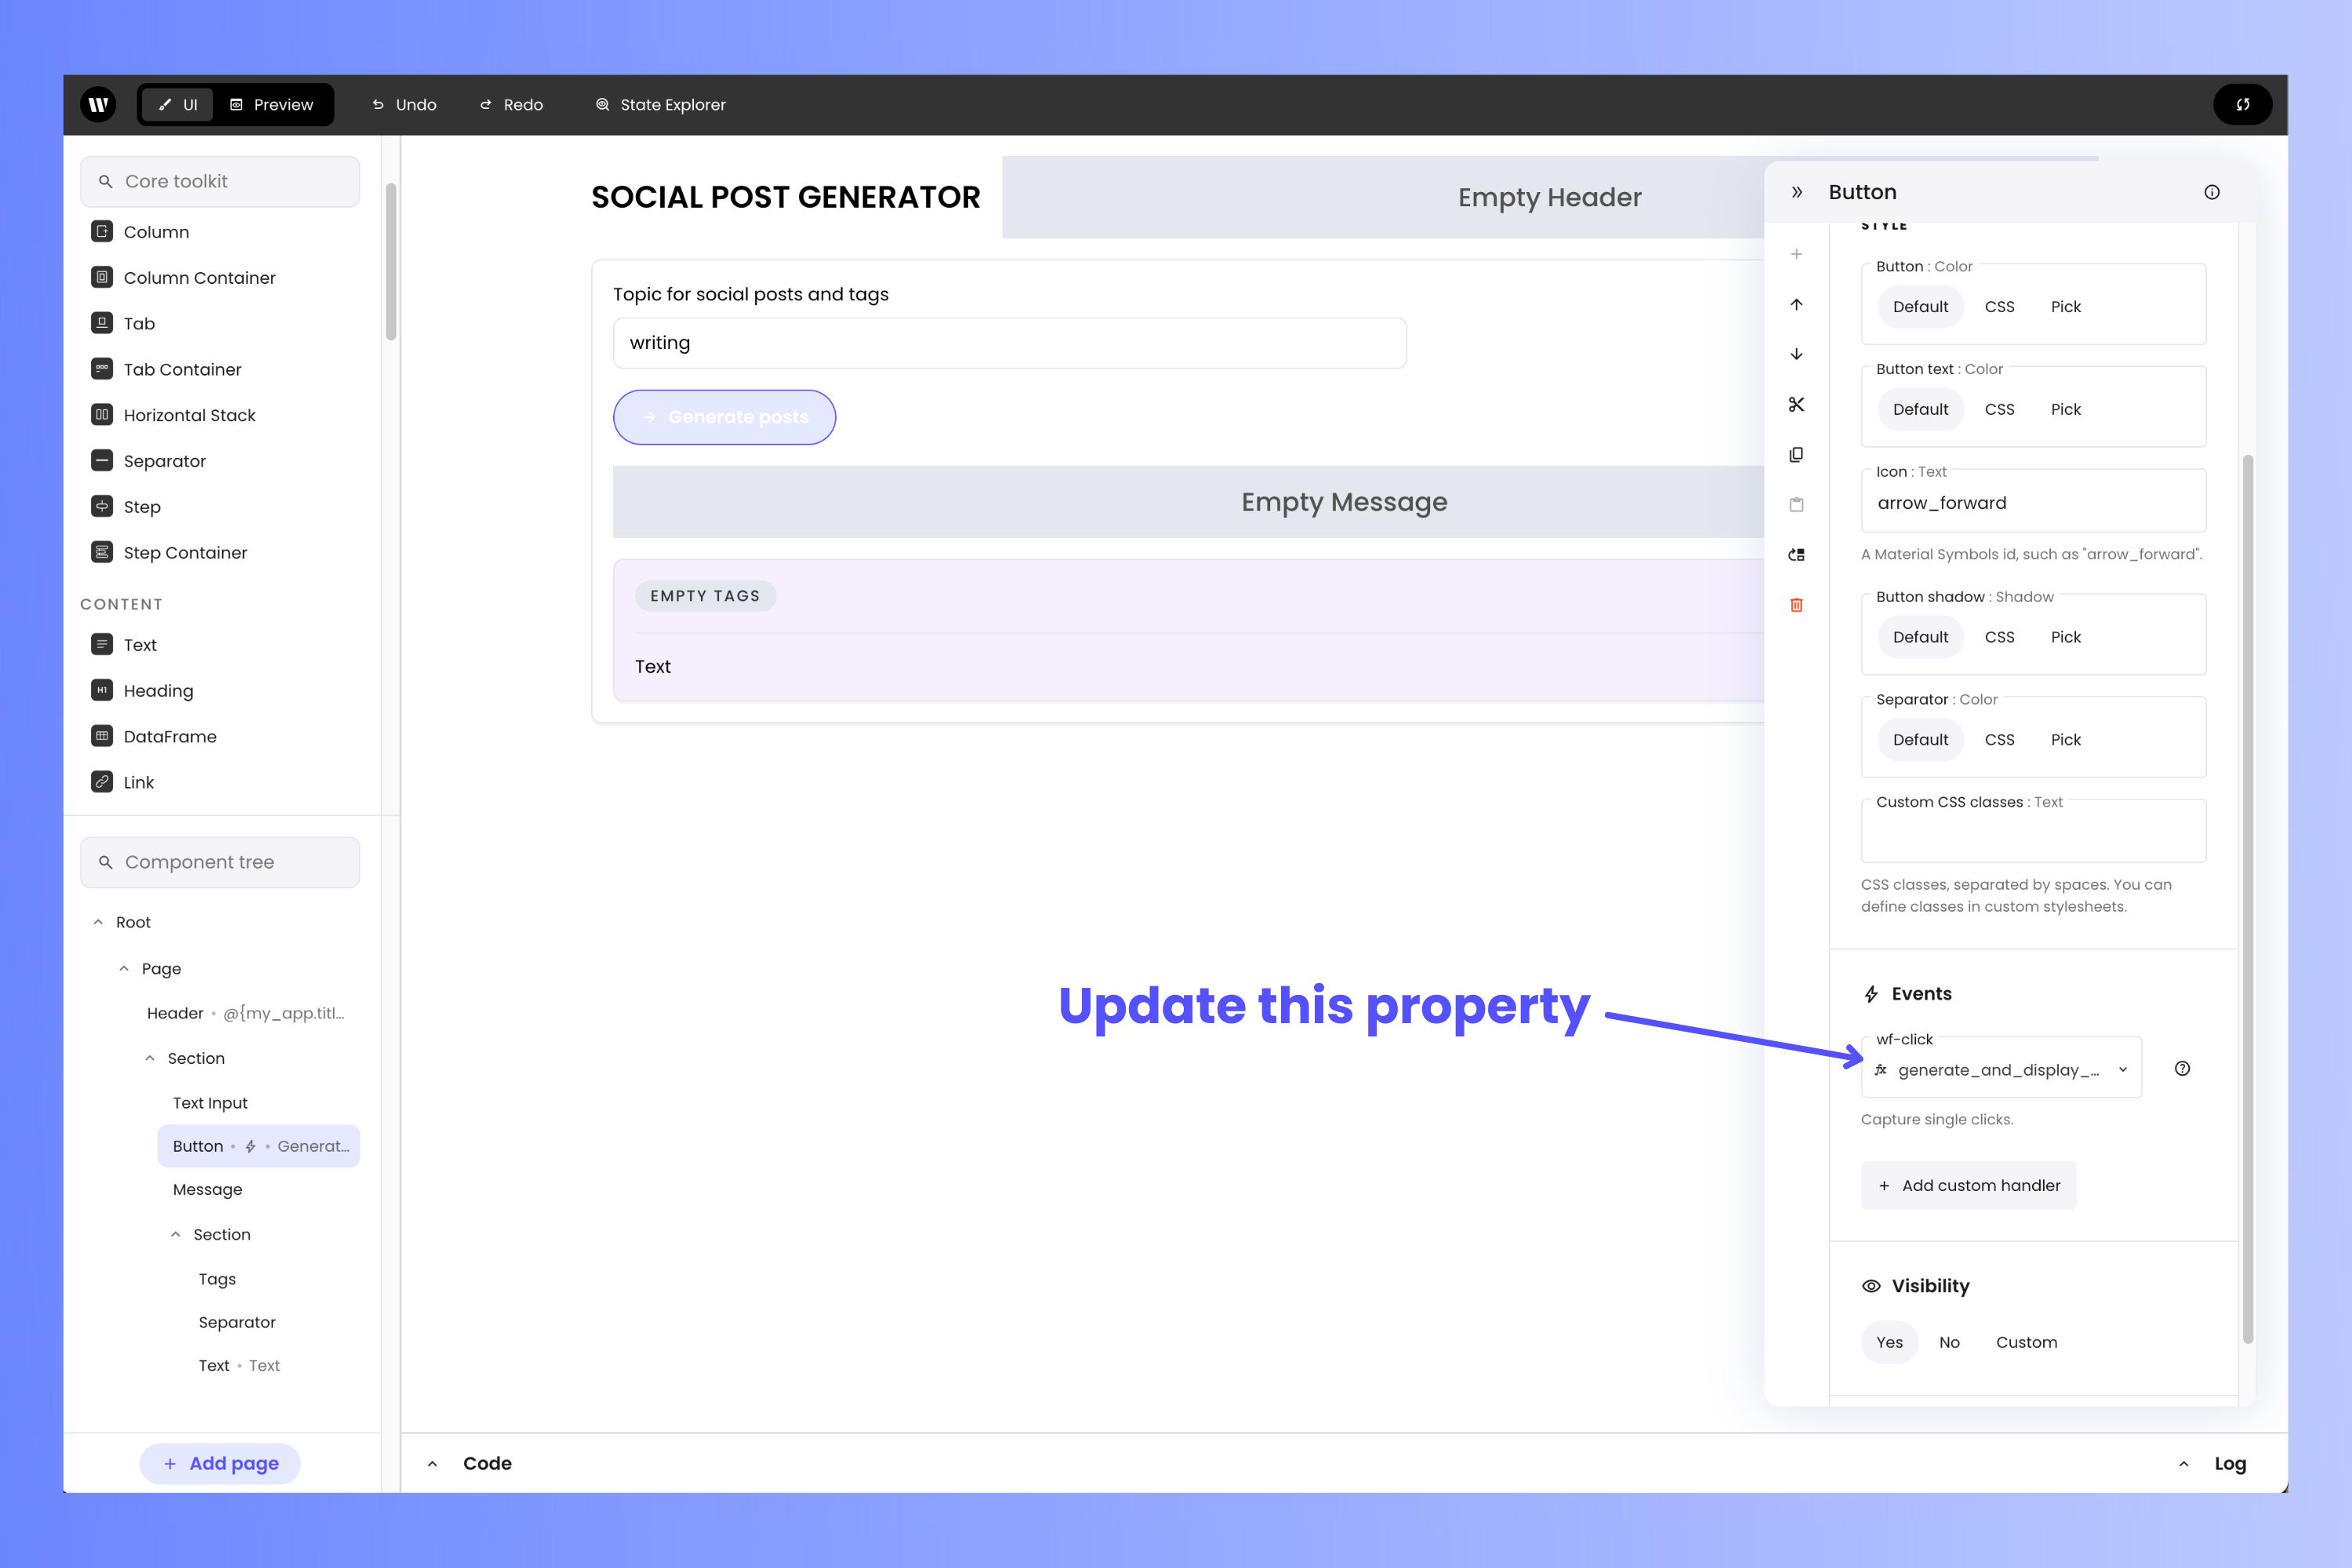
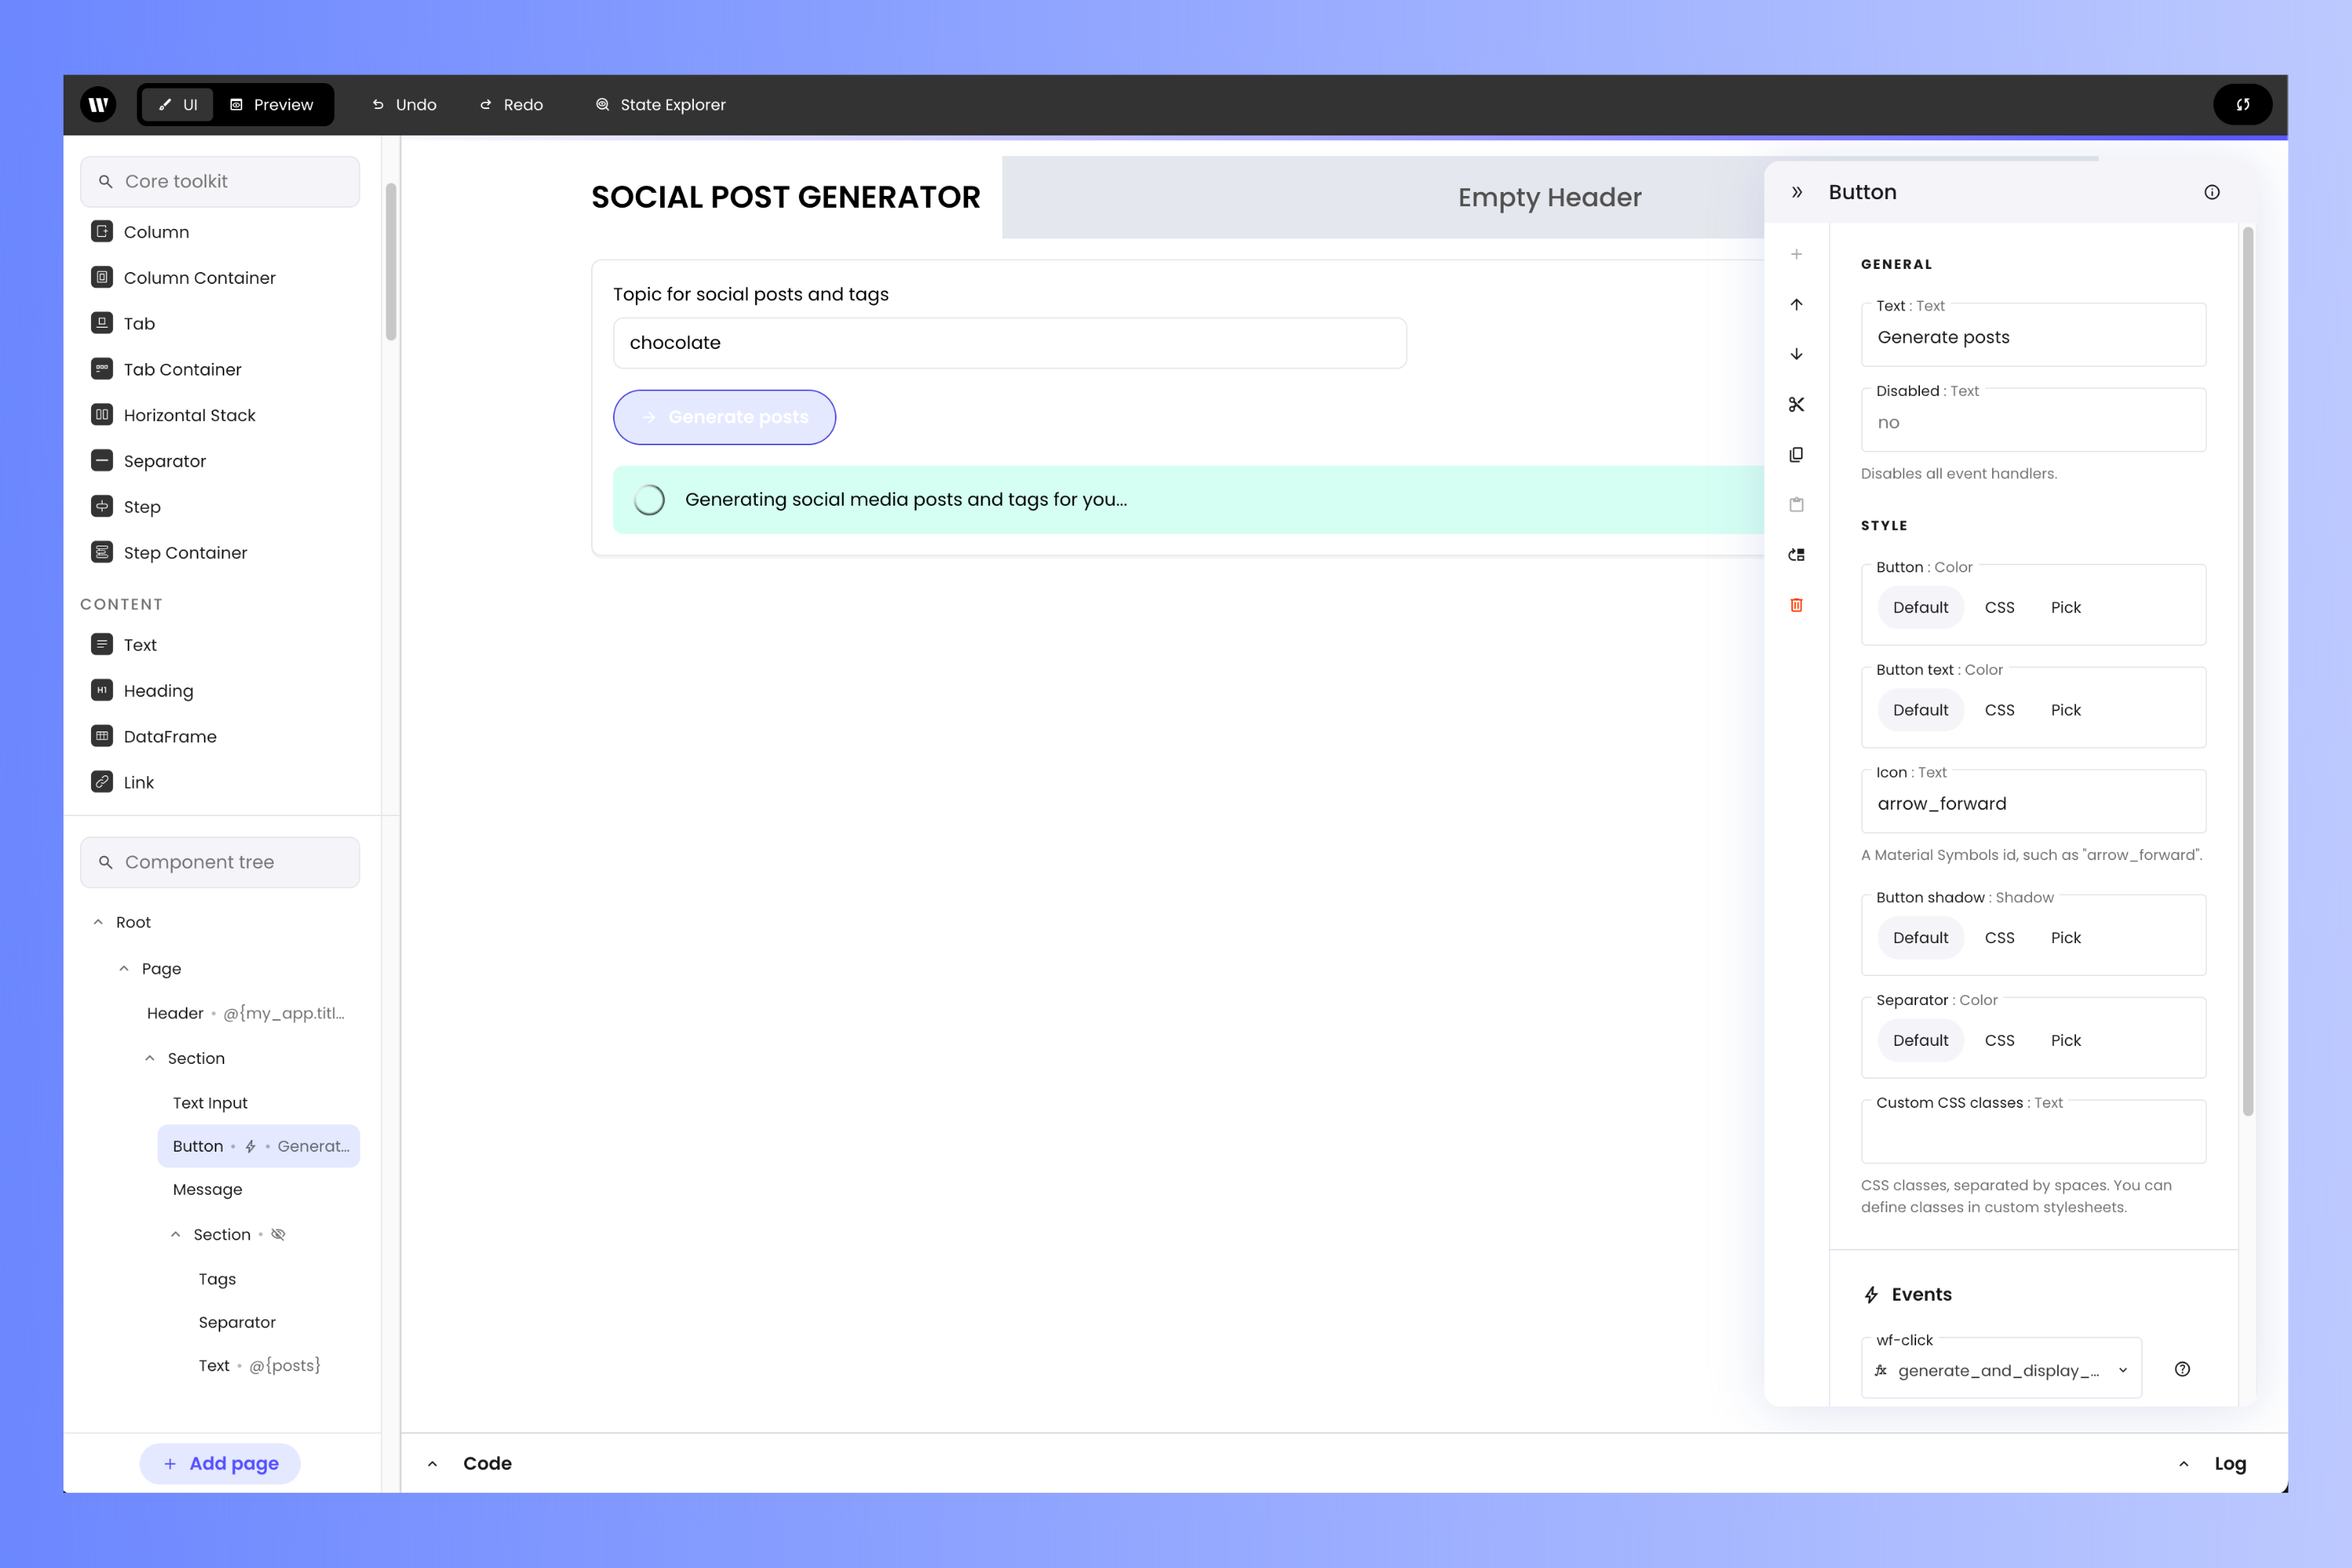
 Select the **Button** component. In the **properties** panel, scroll down to the **Events** section and find the **`wf-click`** property. This is where you specify the function to call when the user clicks the button — set its value to `generate_and_display_posts_and_tags`.
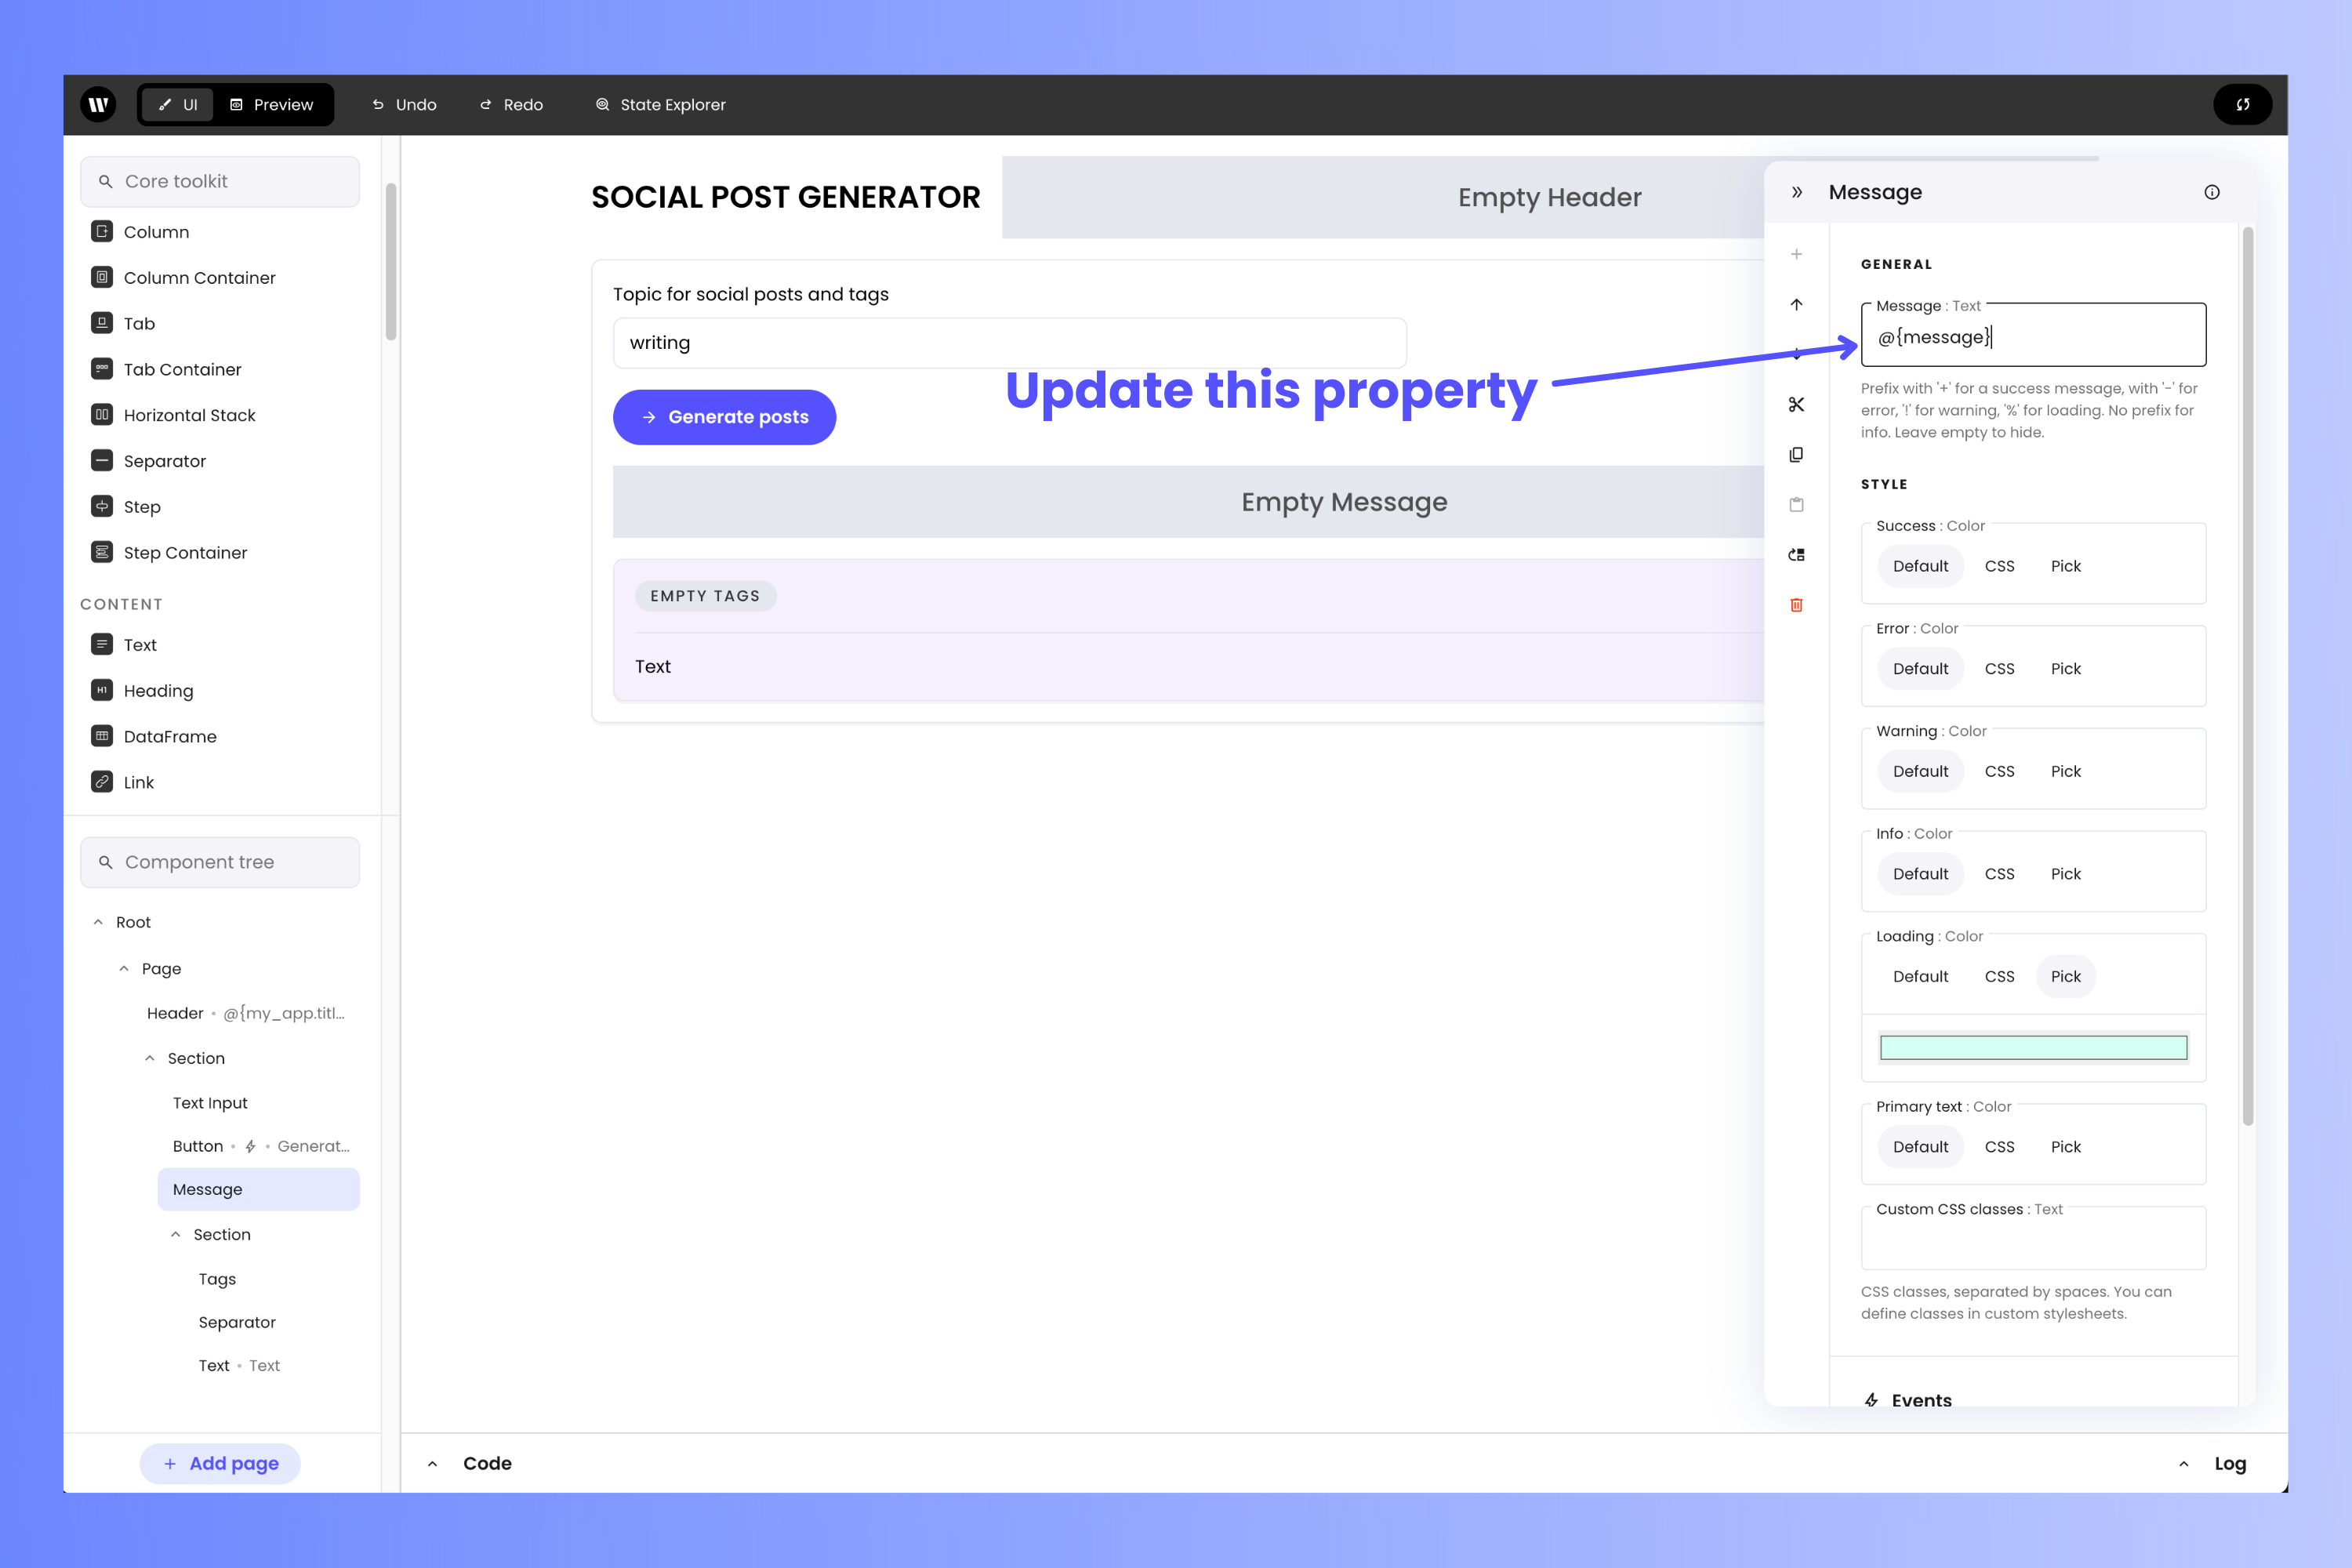
 Select the **Message** component. In the **properties** panel, find the **Message** property, which specifies the content of the **Message** component. Set its value to `@{message}`.
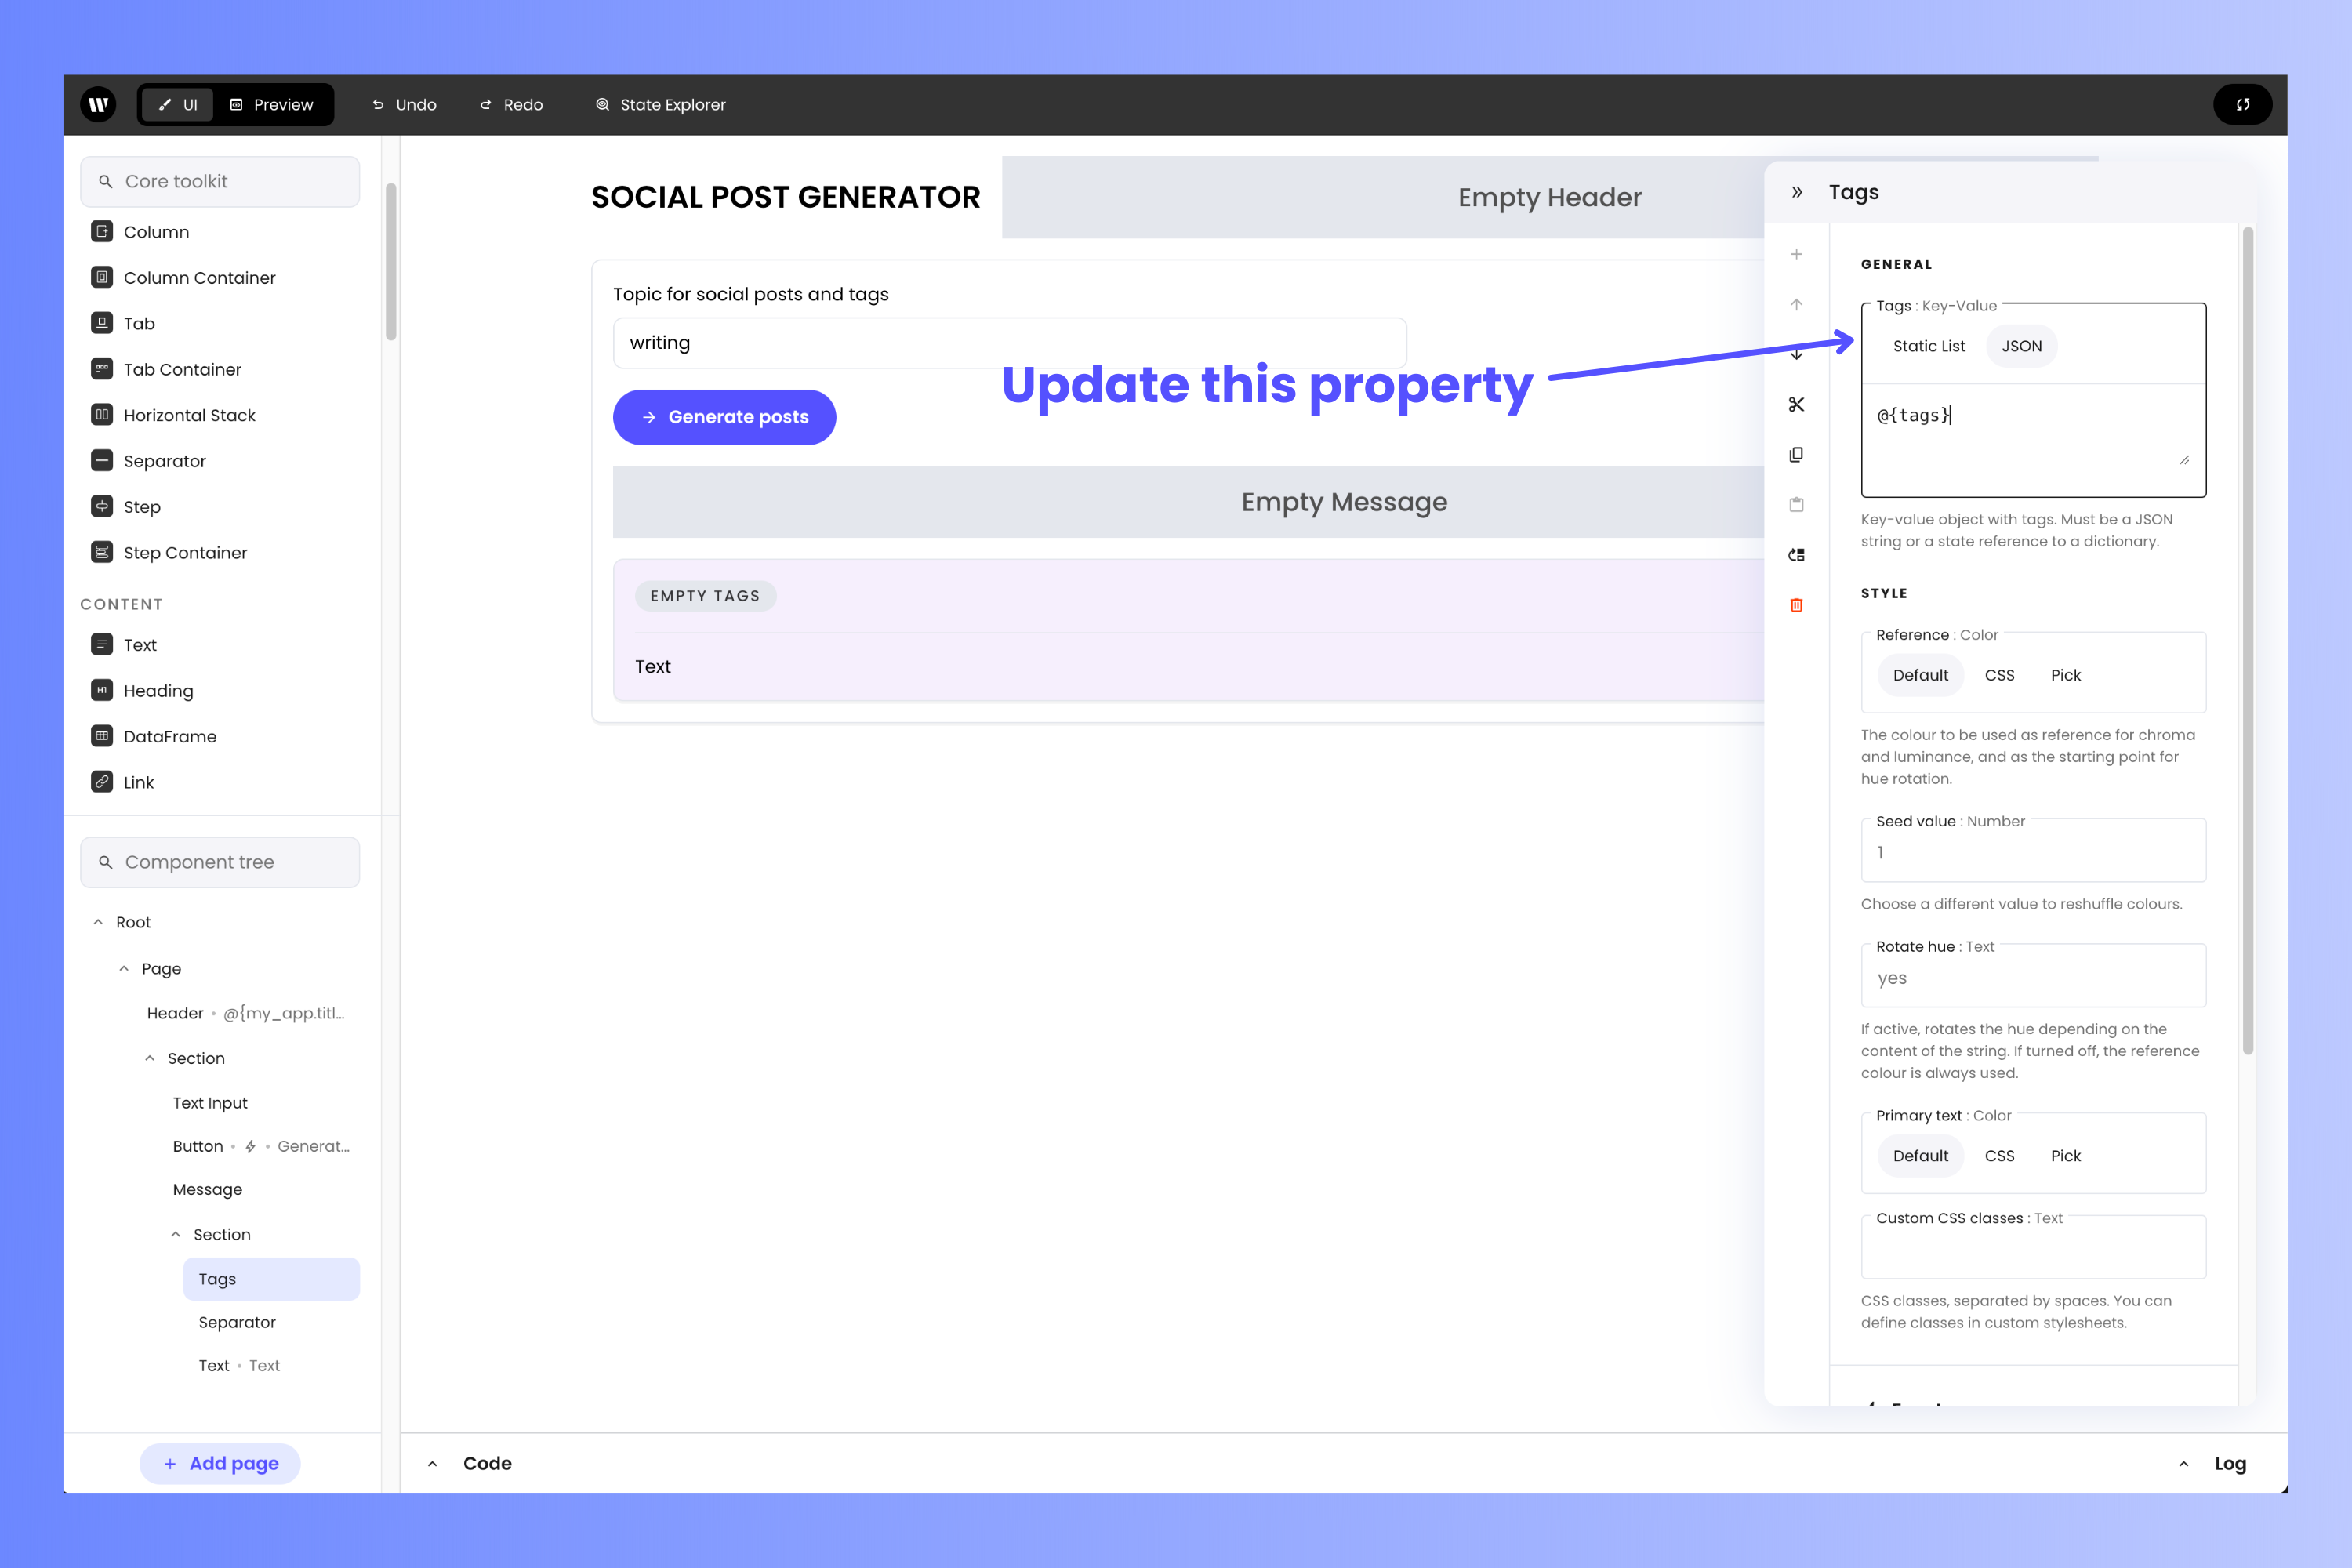
 Select the **Tags** component. In the **properties** panel:
* Find the **Tags** property, which specifies the source of the tags that the component will display.
* Click its **JSON** button.
* In the text field below the **JSON** button, set the **Tags** property's value to `@{tags}`.
Select the **Tags** component. In the **properties** panel:
* Find the **Tags** property, which specifies the source of the tags that the component will display.
* Click its **JSON** button.
* In the text field below the **JSON** button, set the **Tags** property's value to `@{tags}`.
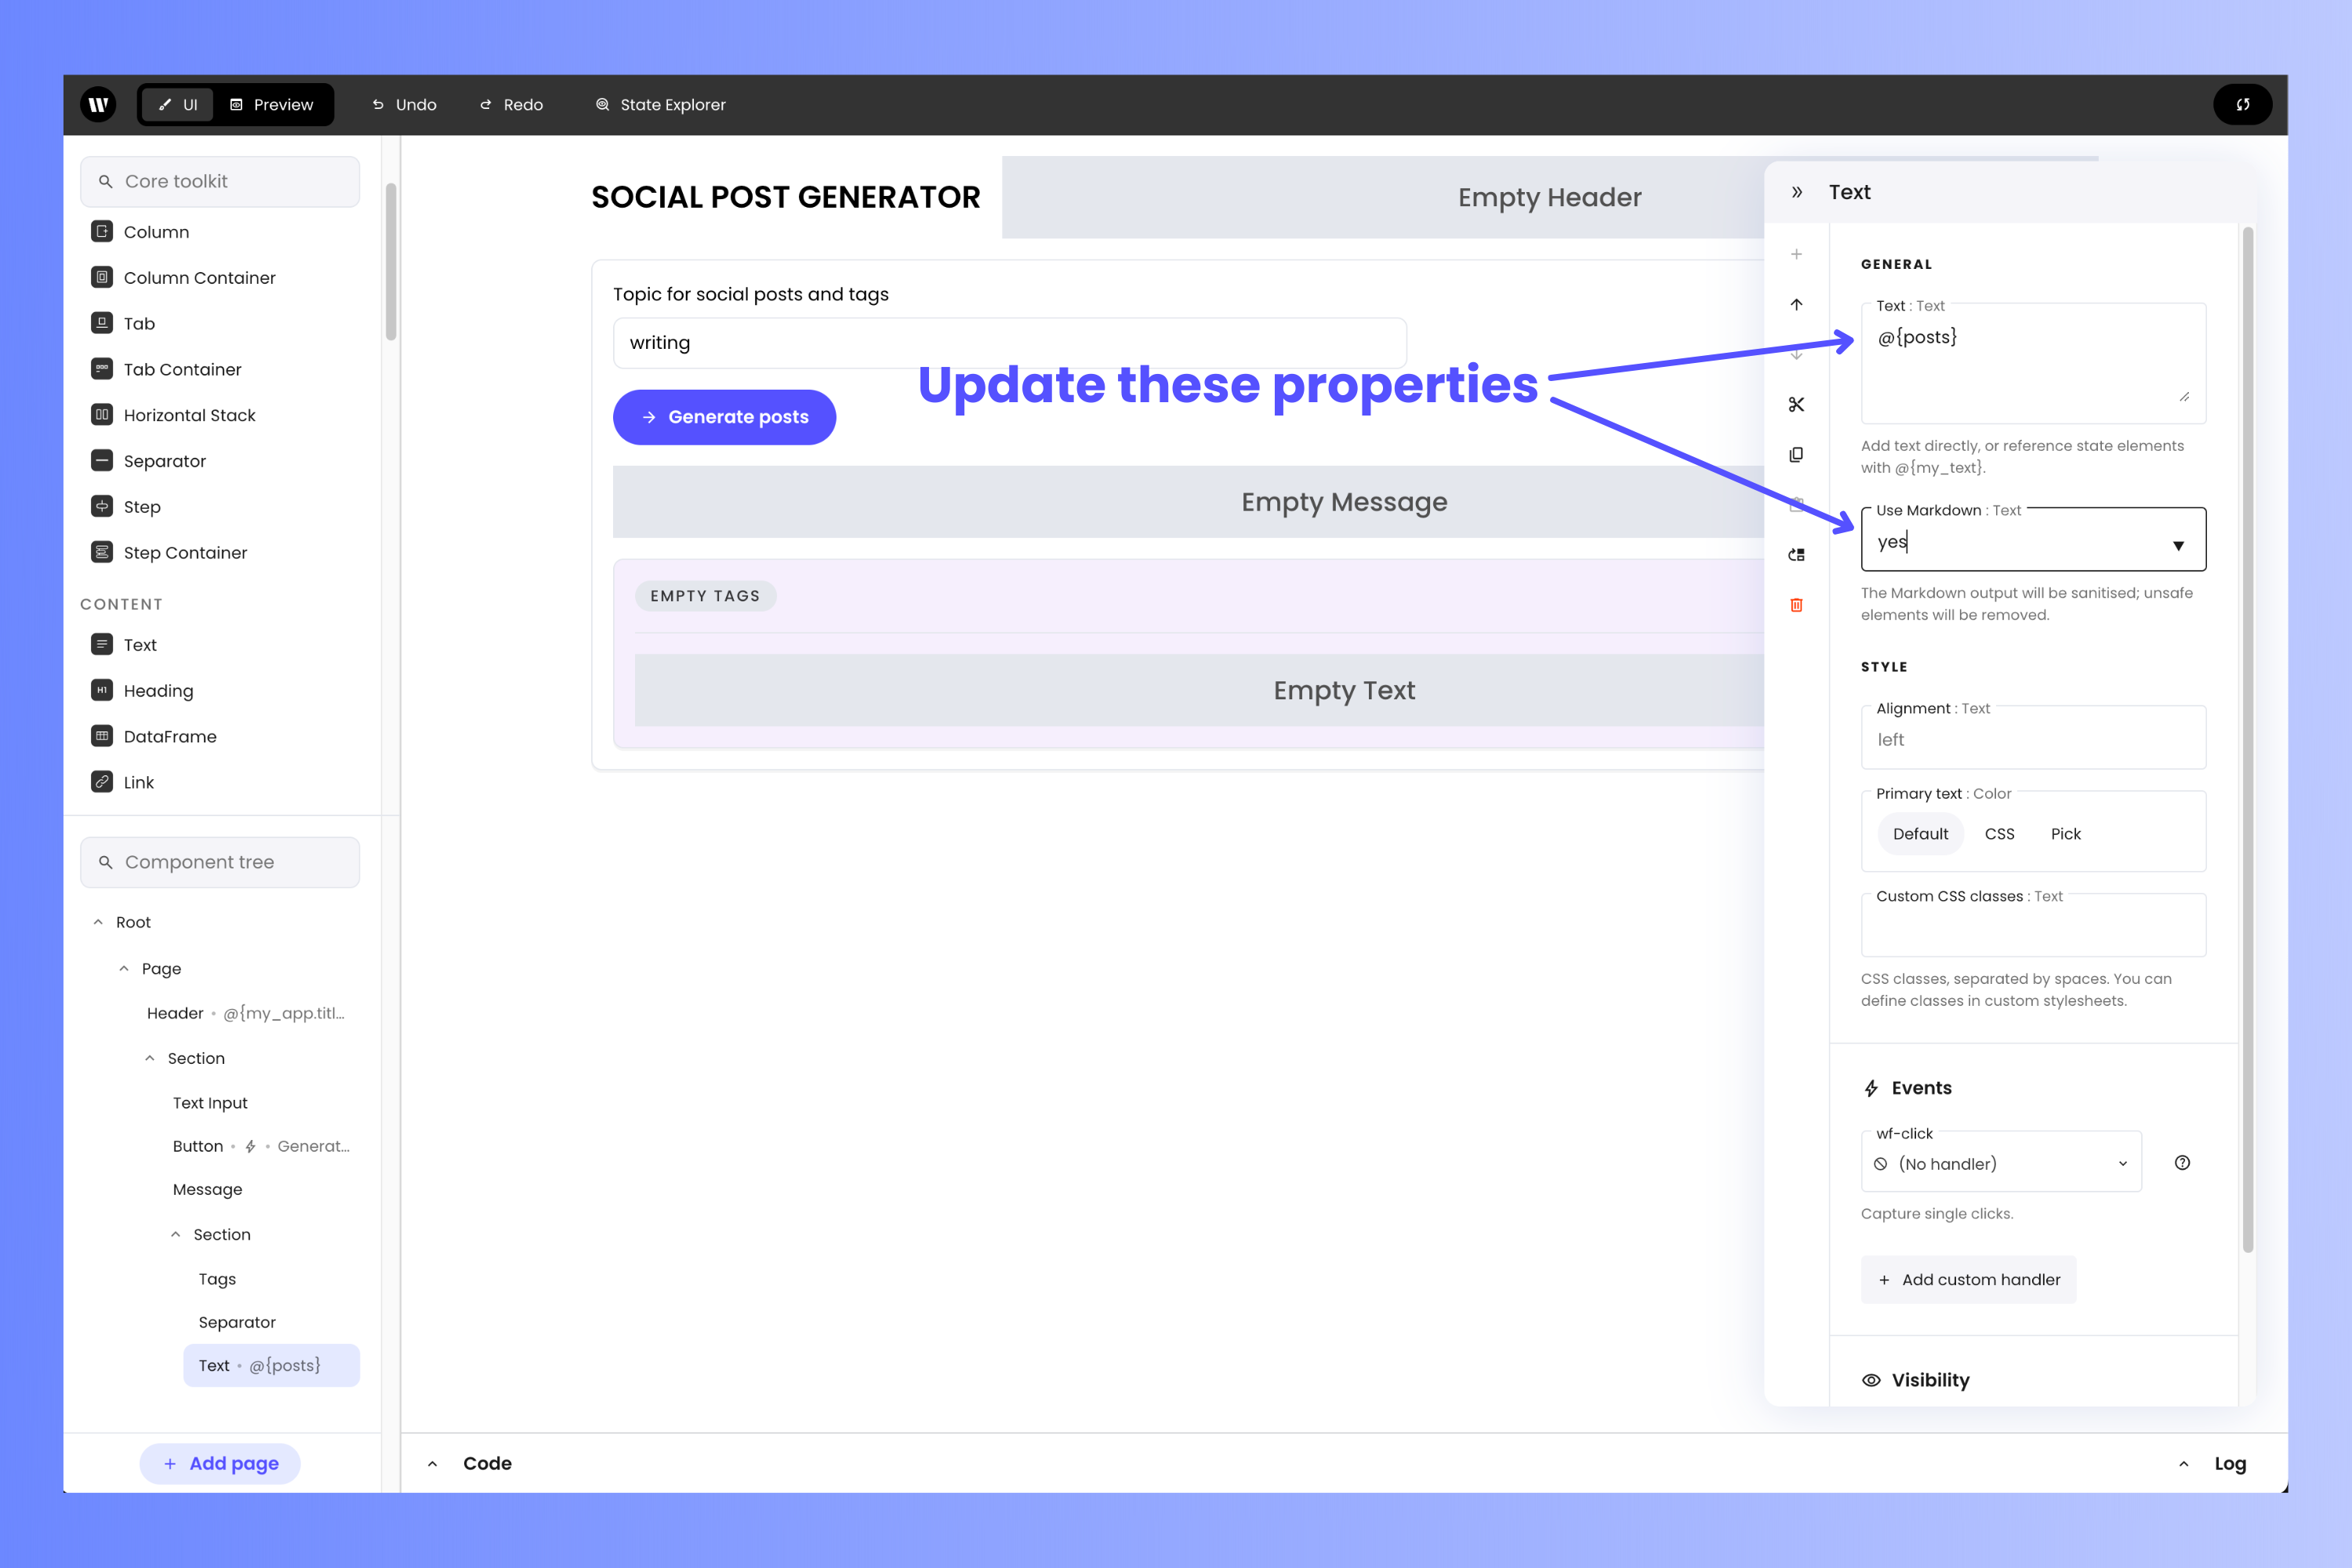
 Select the **Text** component. In the **properties** panel:
* Find the **Text** property, which specifies the content of the **Text** component. Set its value to `@{posts}`.
* Set the **Use Markdown** property to **yes**.
Select the **Text** component. In the **properties** panel:
* Find the **Text** property, which specifies the content of the **Text** component. Set its value to `@{posts}`.
* Set the **Use Markdown** property to **yes**.
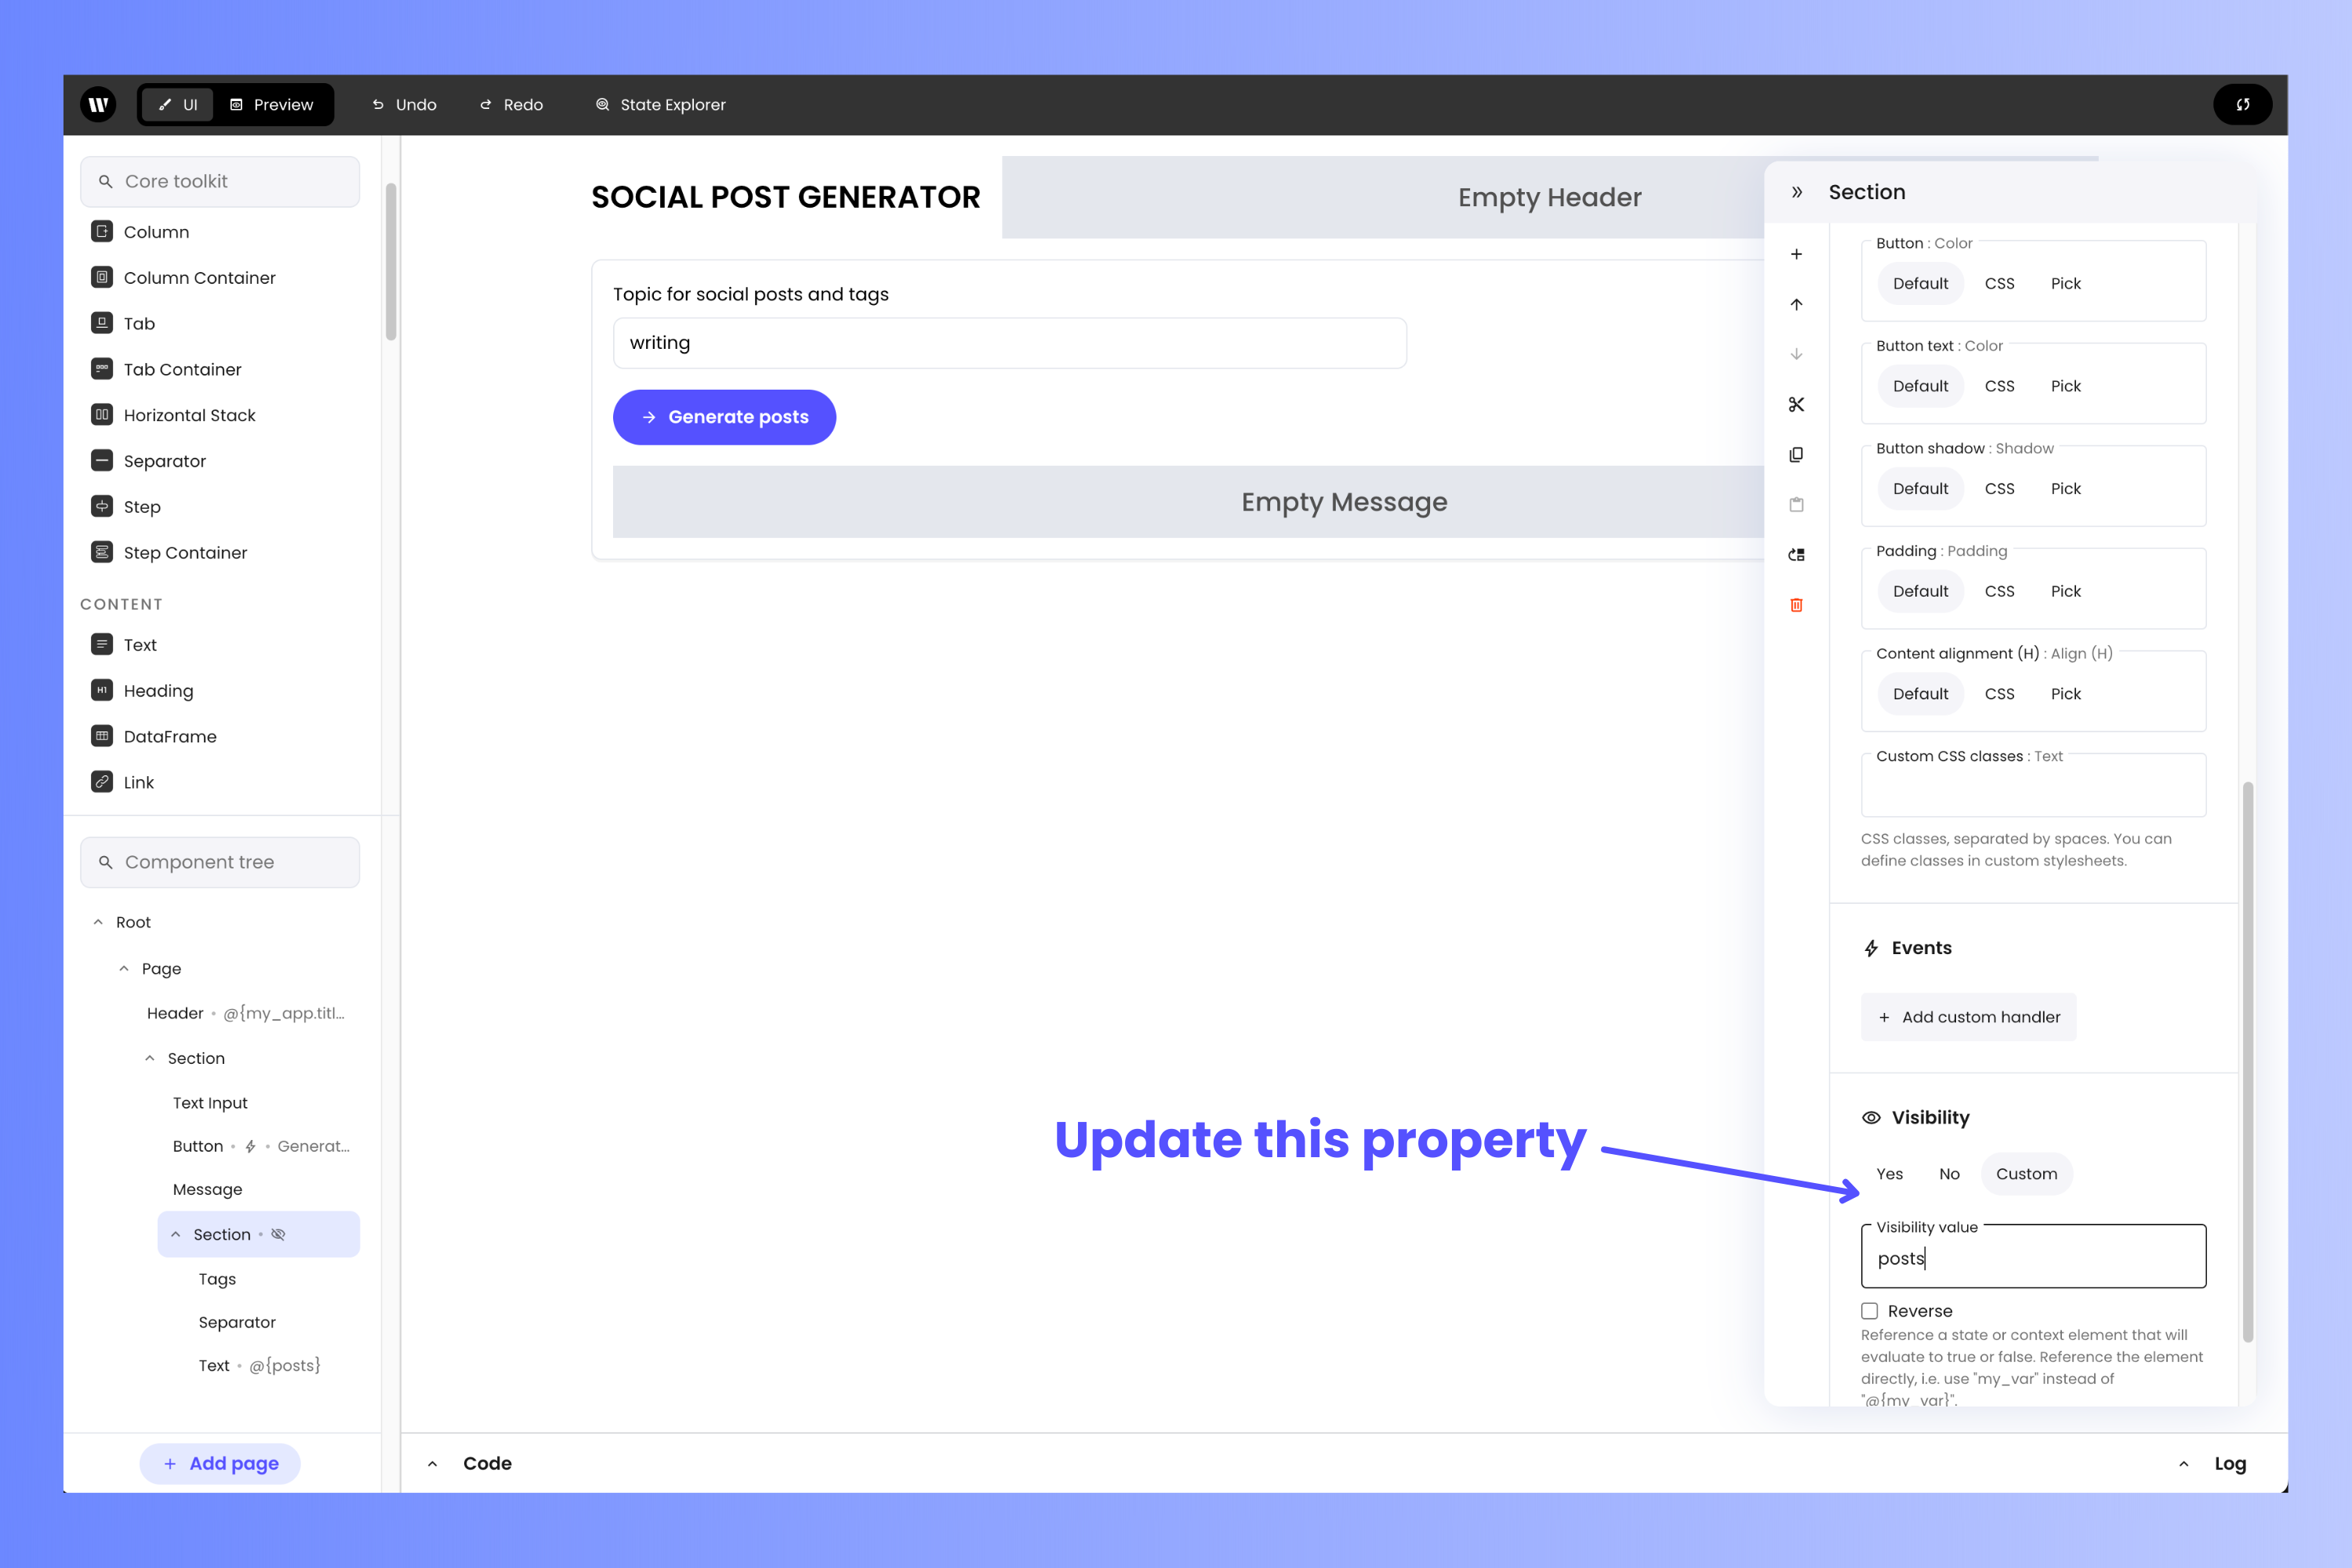
 Select the **Section** component containing the **Tags** and **Text** components. In the **properties** panel:
* Scroll to the **Visibility** property at the bottom.
* Click on the **Custom** button.
* In the **Visibility value** field, set the value to `posts`. This will cause the **Section** to be visible only when the `state` variable's `posts` key has a non-empty value.
Select the **Section** component containing the **Tags** and **Text** components. In the **properties** panel:
* Scroll to the **Visibility** property at the bottom.
* Click on the **Custom** button.
* In the **Visibility value** field, set the value to `posts`. This will cause the **Section** to be visible only when the `state` variable's `posts` key has a non-empty value.
 ## Test the application
You've completed all the steps to make a working social post generator, and you can try using it right now, even while editing the user interface!
Enter a topic into the **Topic for social posts and tags** text field, then click the **Generate Posts** button\* *twice* — the first time will cause the **properties** panel to appear, and the second click will register as a click. You'll know that you've clicked the button when you see the **Message** component display the text “Generating social media posts and tags for you...”
## Test the application
You've completed all the steps to make a working social post generator, and you can try using it right now, even while editing the user interface!
Enter a topic into the **Topic for social posts and tags** text field, then click the **Generate Posts** button\* *twice* — the first time will cause the **properties** panel to appear, and the second click will register as a click. You'll know that you've clicked the button when you see the **Message** component display the text “Generating social media posts and tags for you...”
 ...and soon after that, you should see some results:
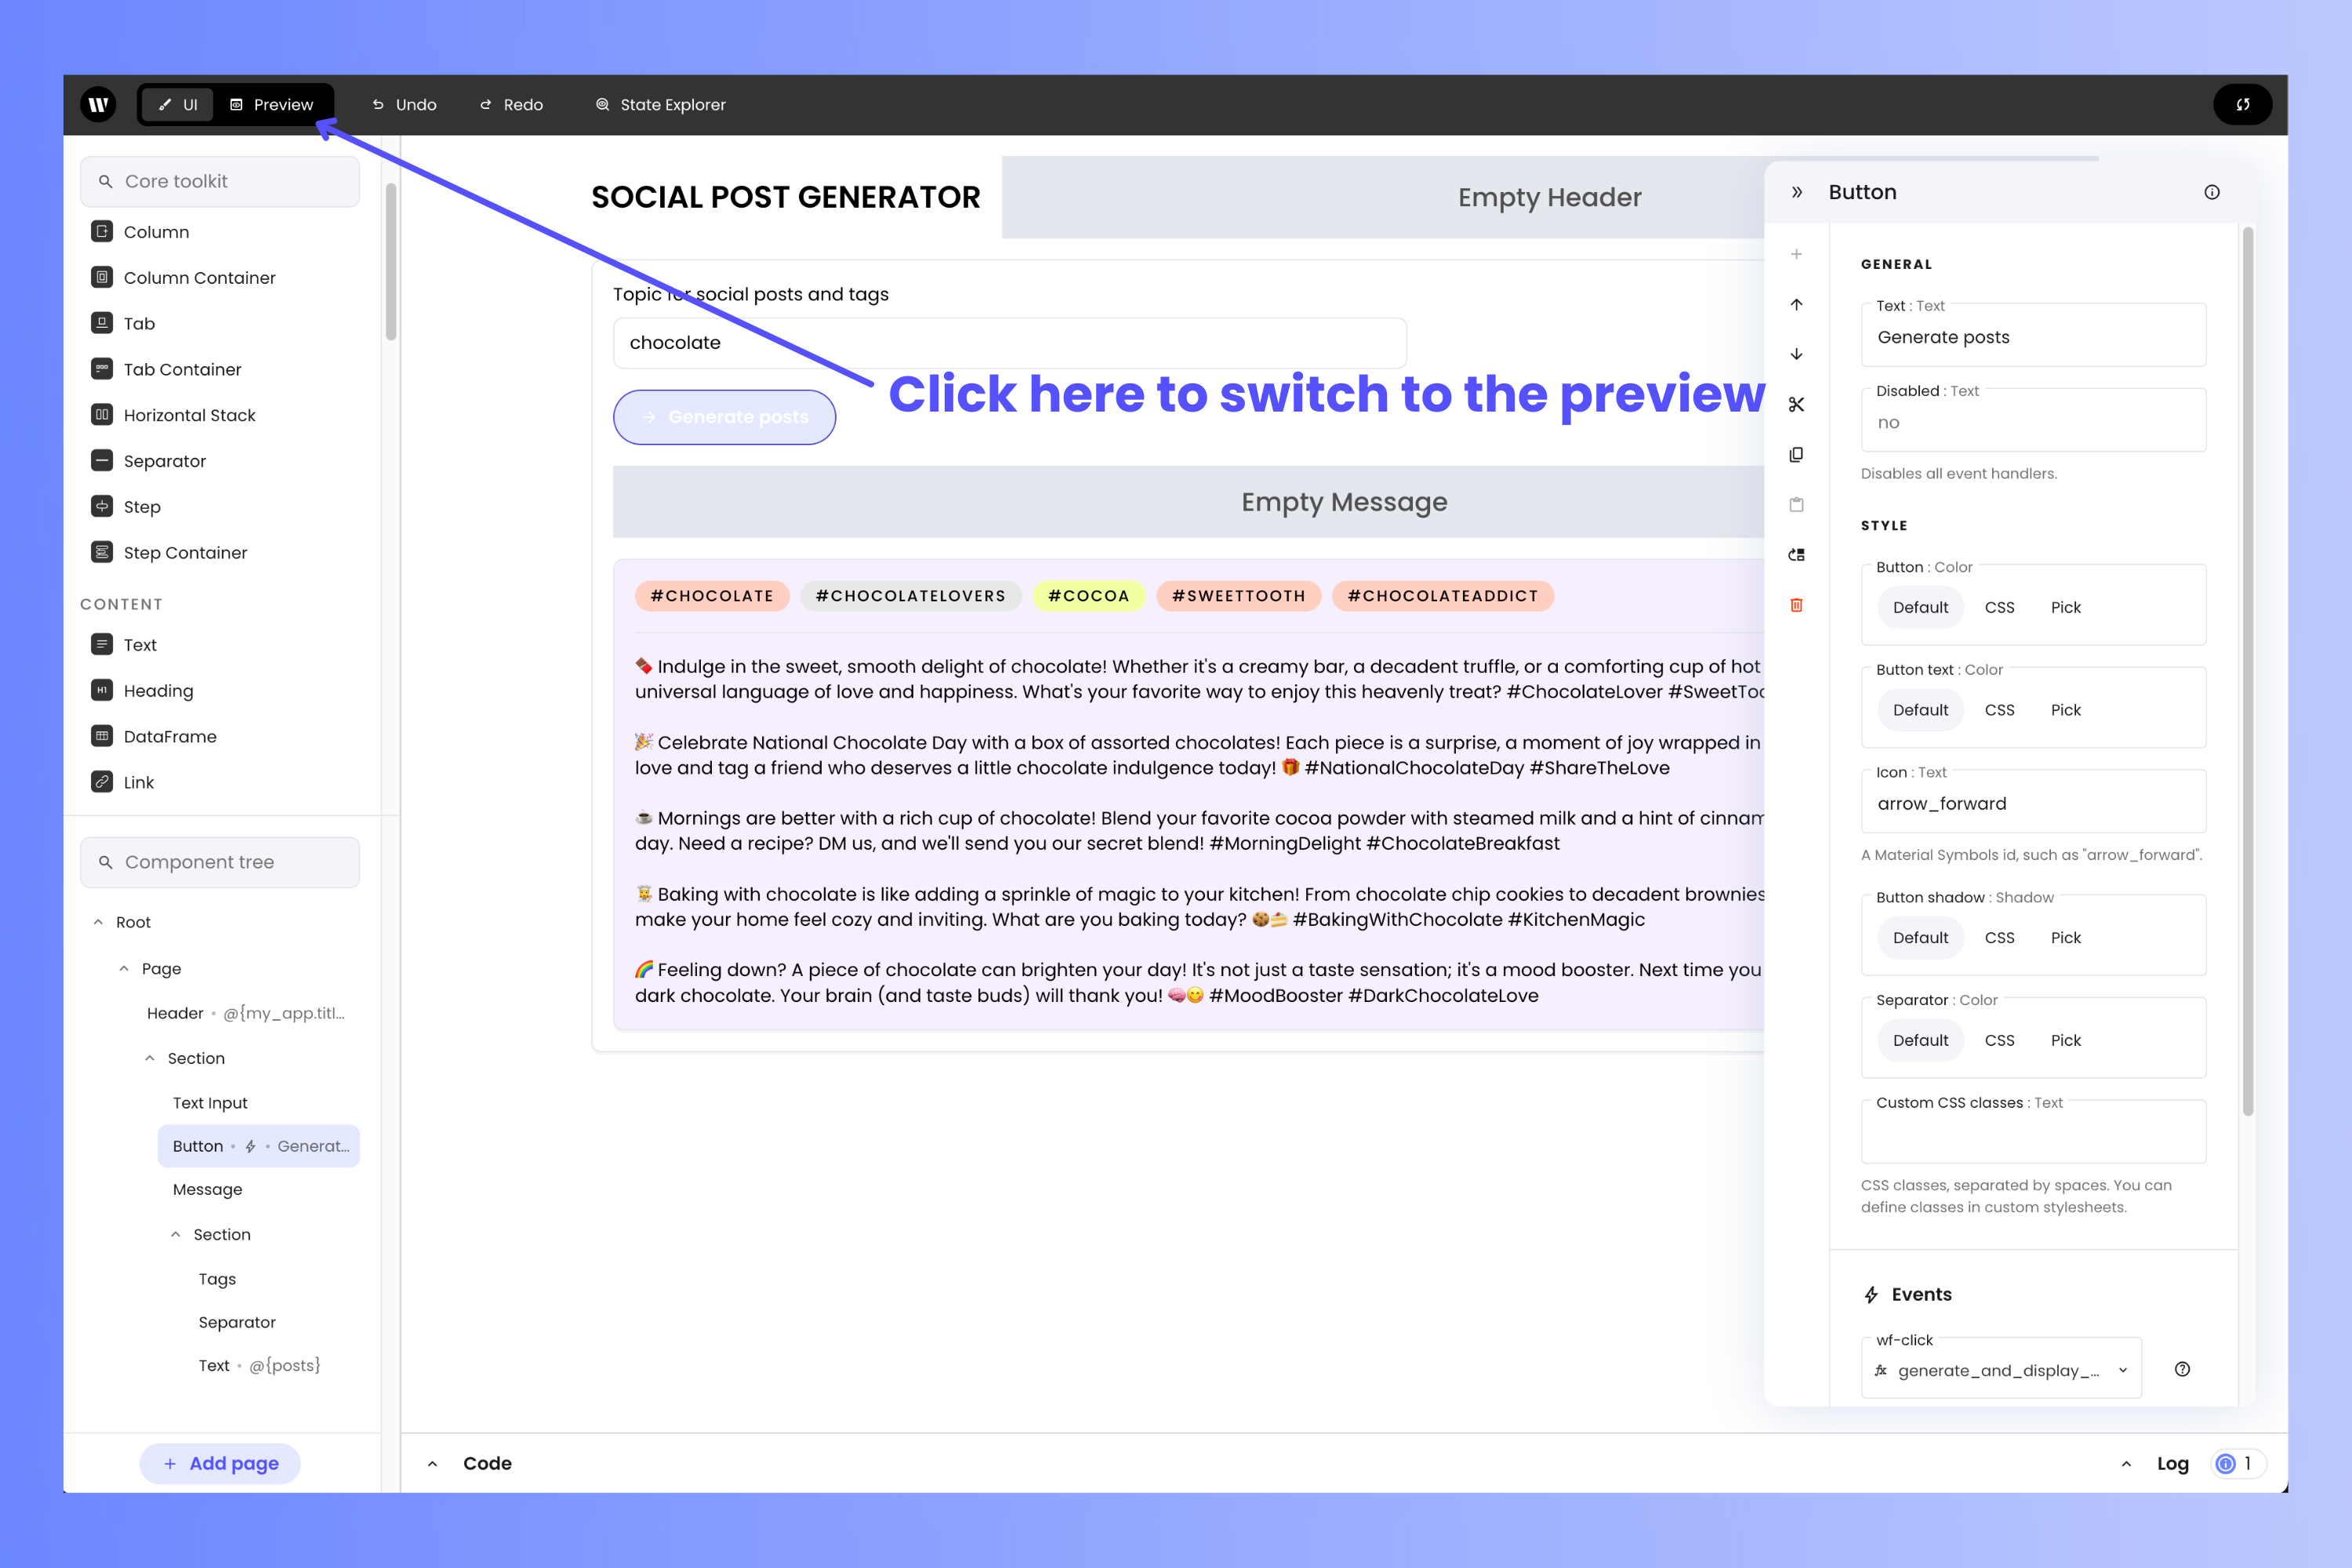
 To get a better sense of what the experience will be like for the user, switch to the preview by changing the edit mode (located near the upper left corner of the page) from *UI* mode to *Preview* mode by selecting the **Preview** option:
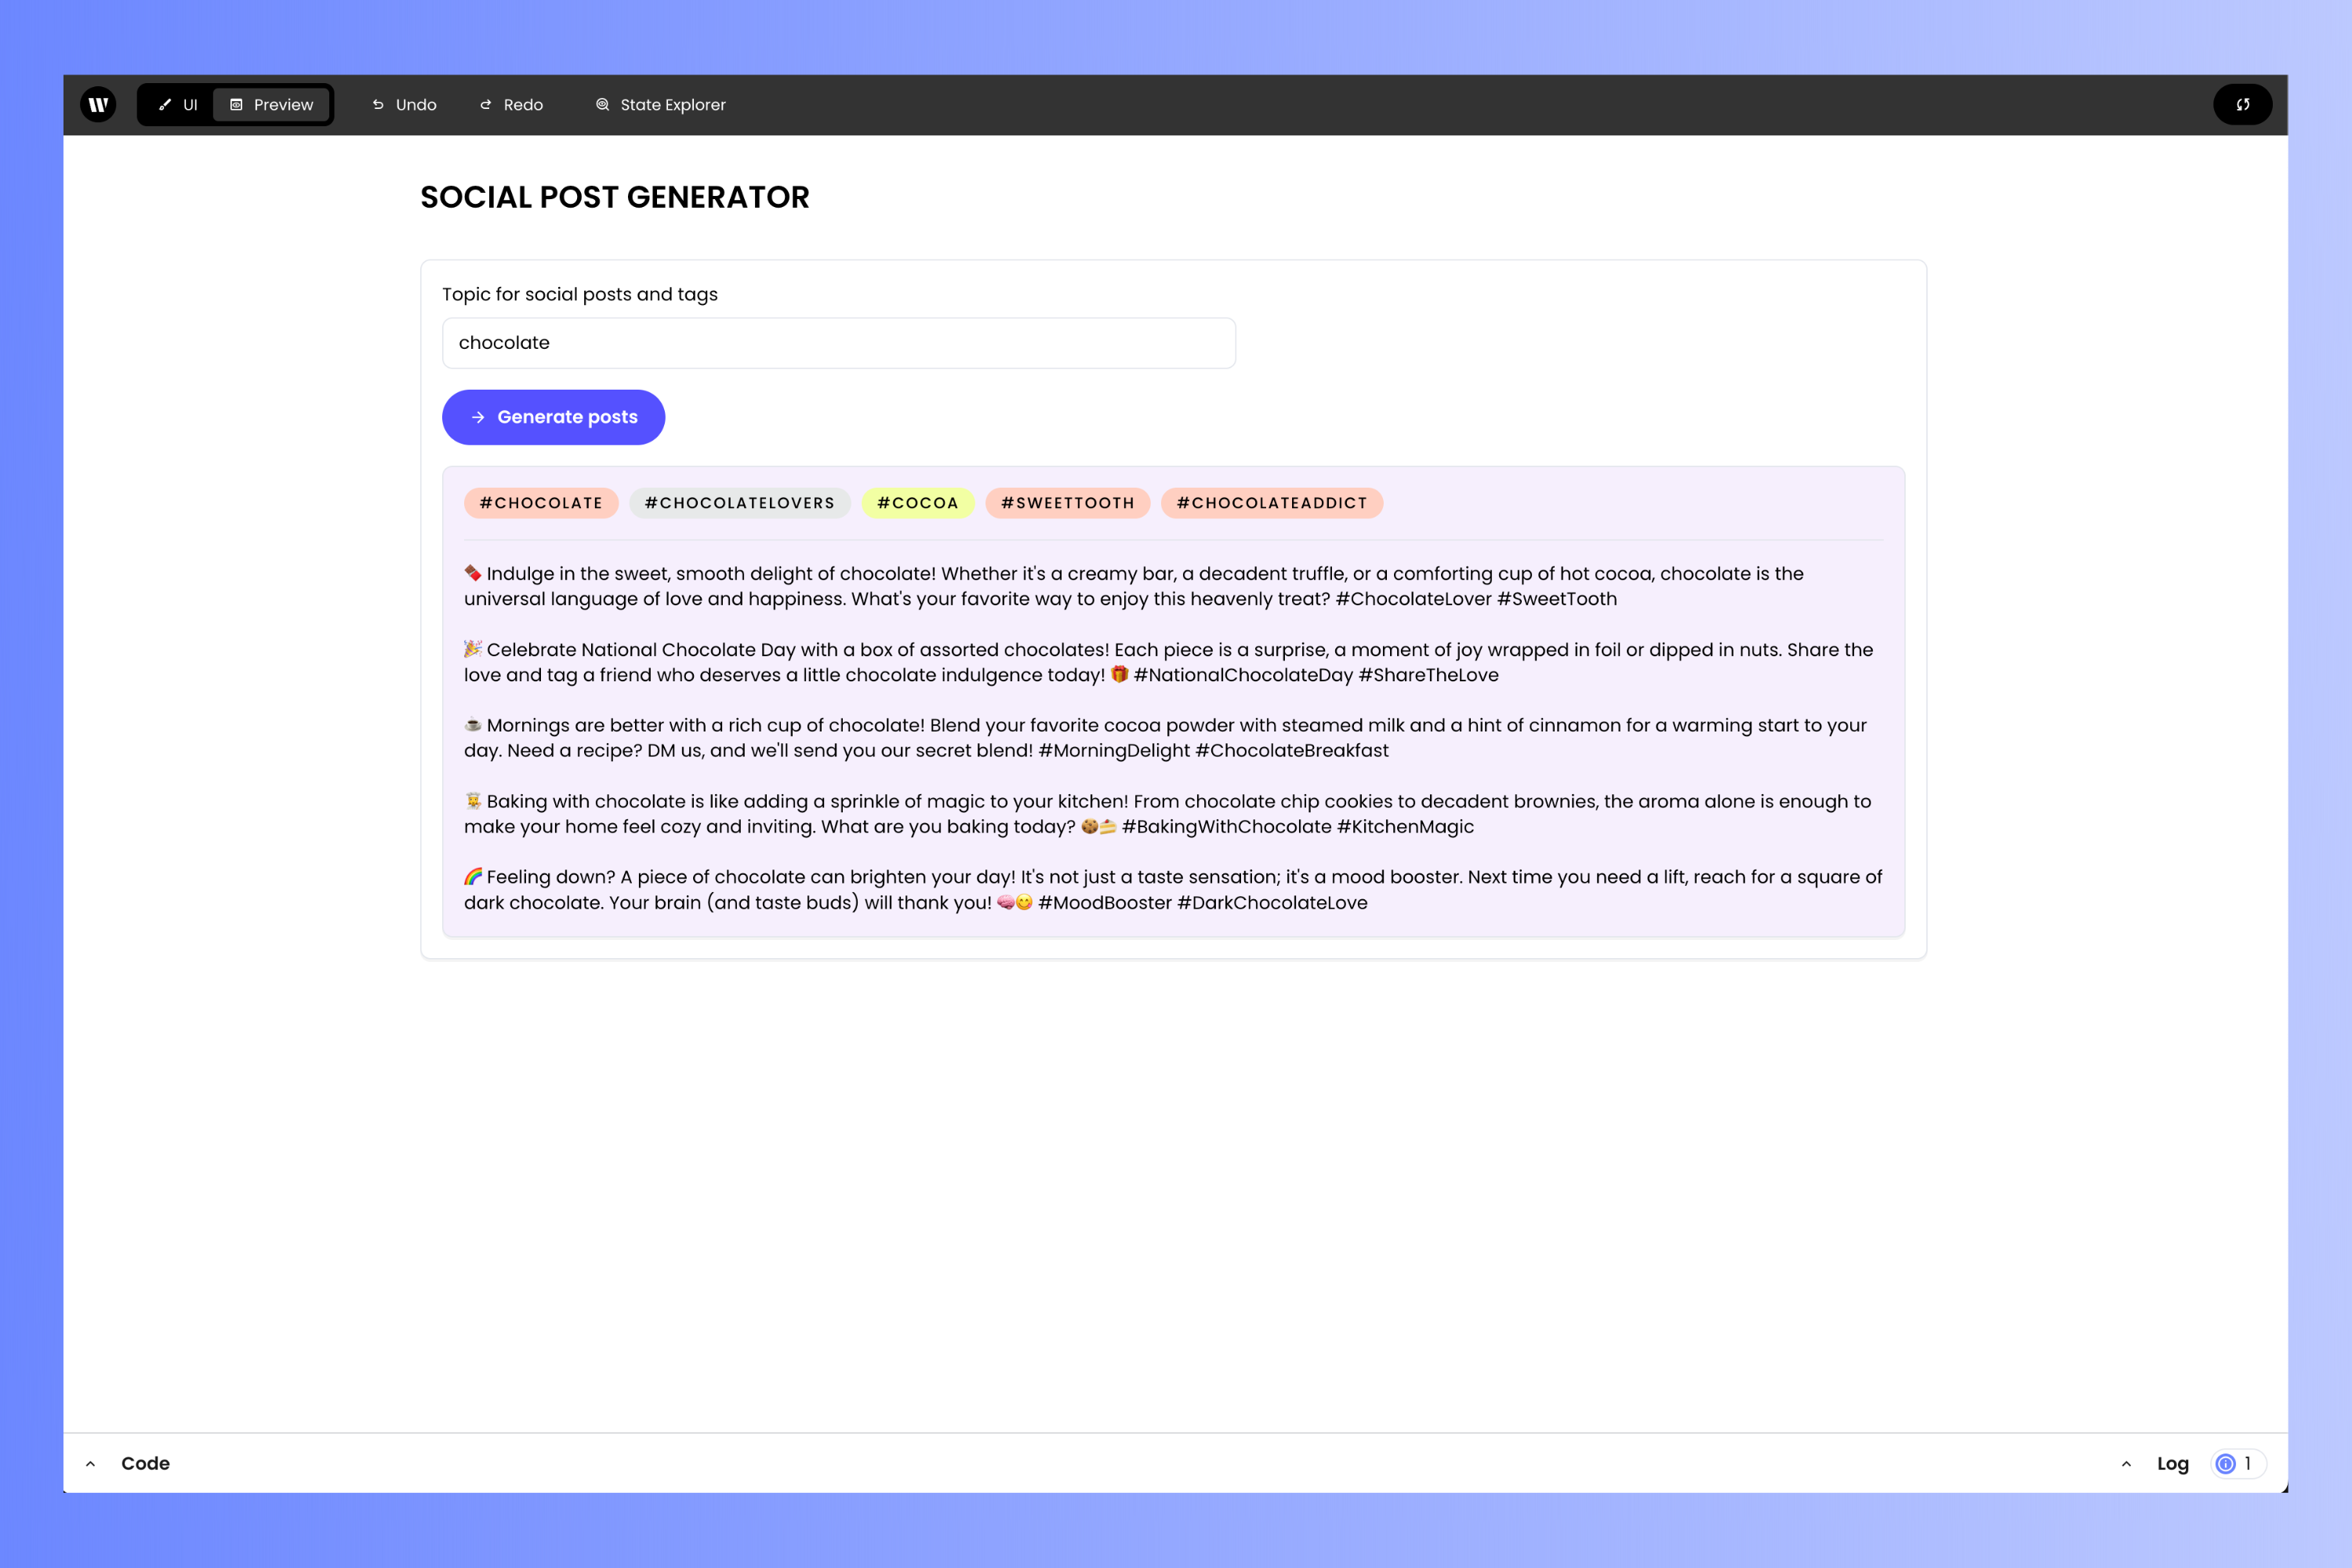
 Here’s what the app looks like in *Preview* mode:
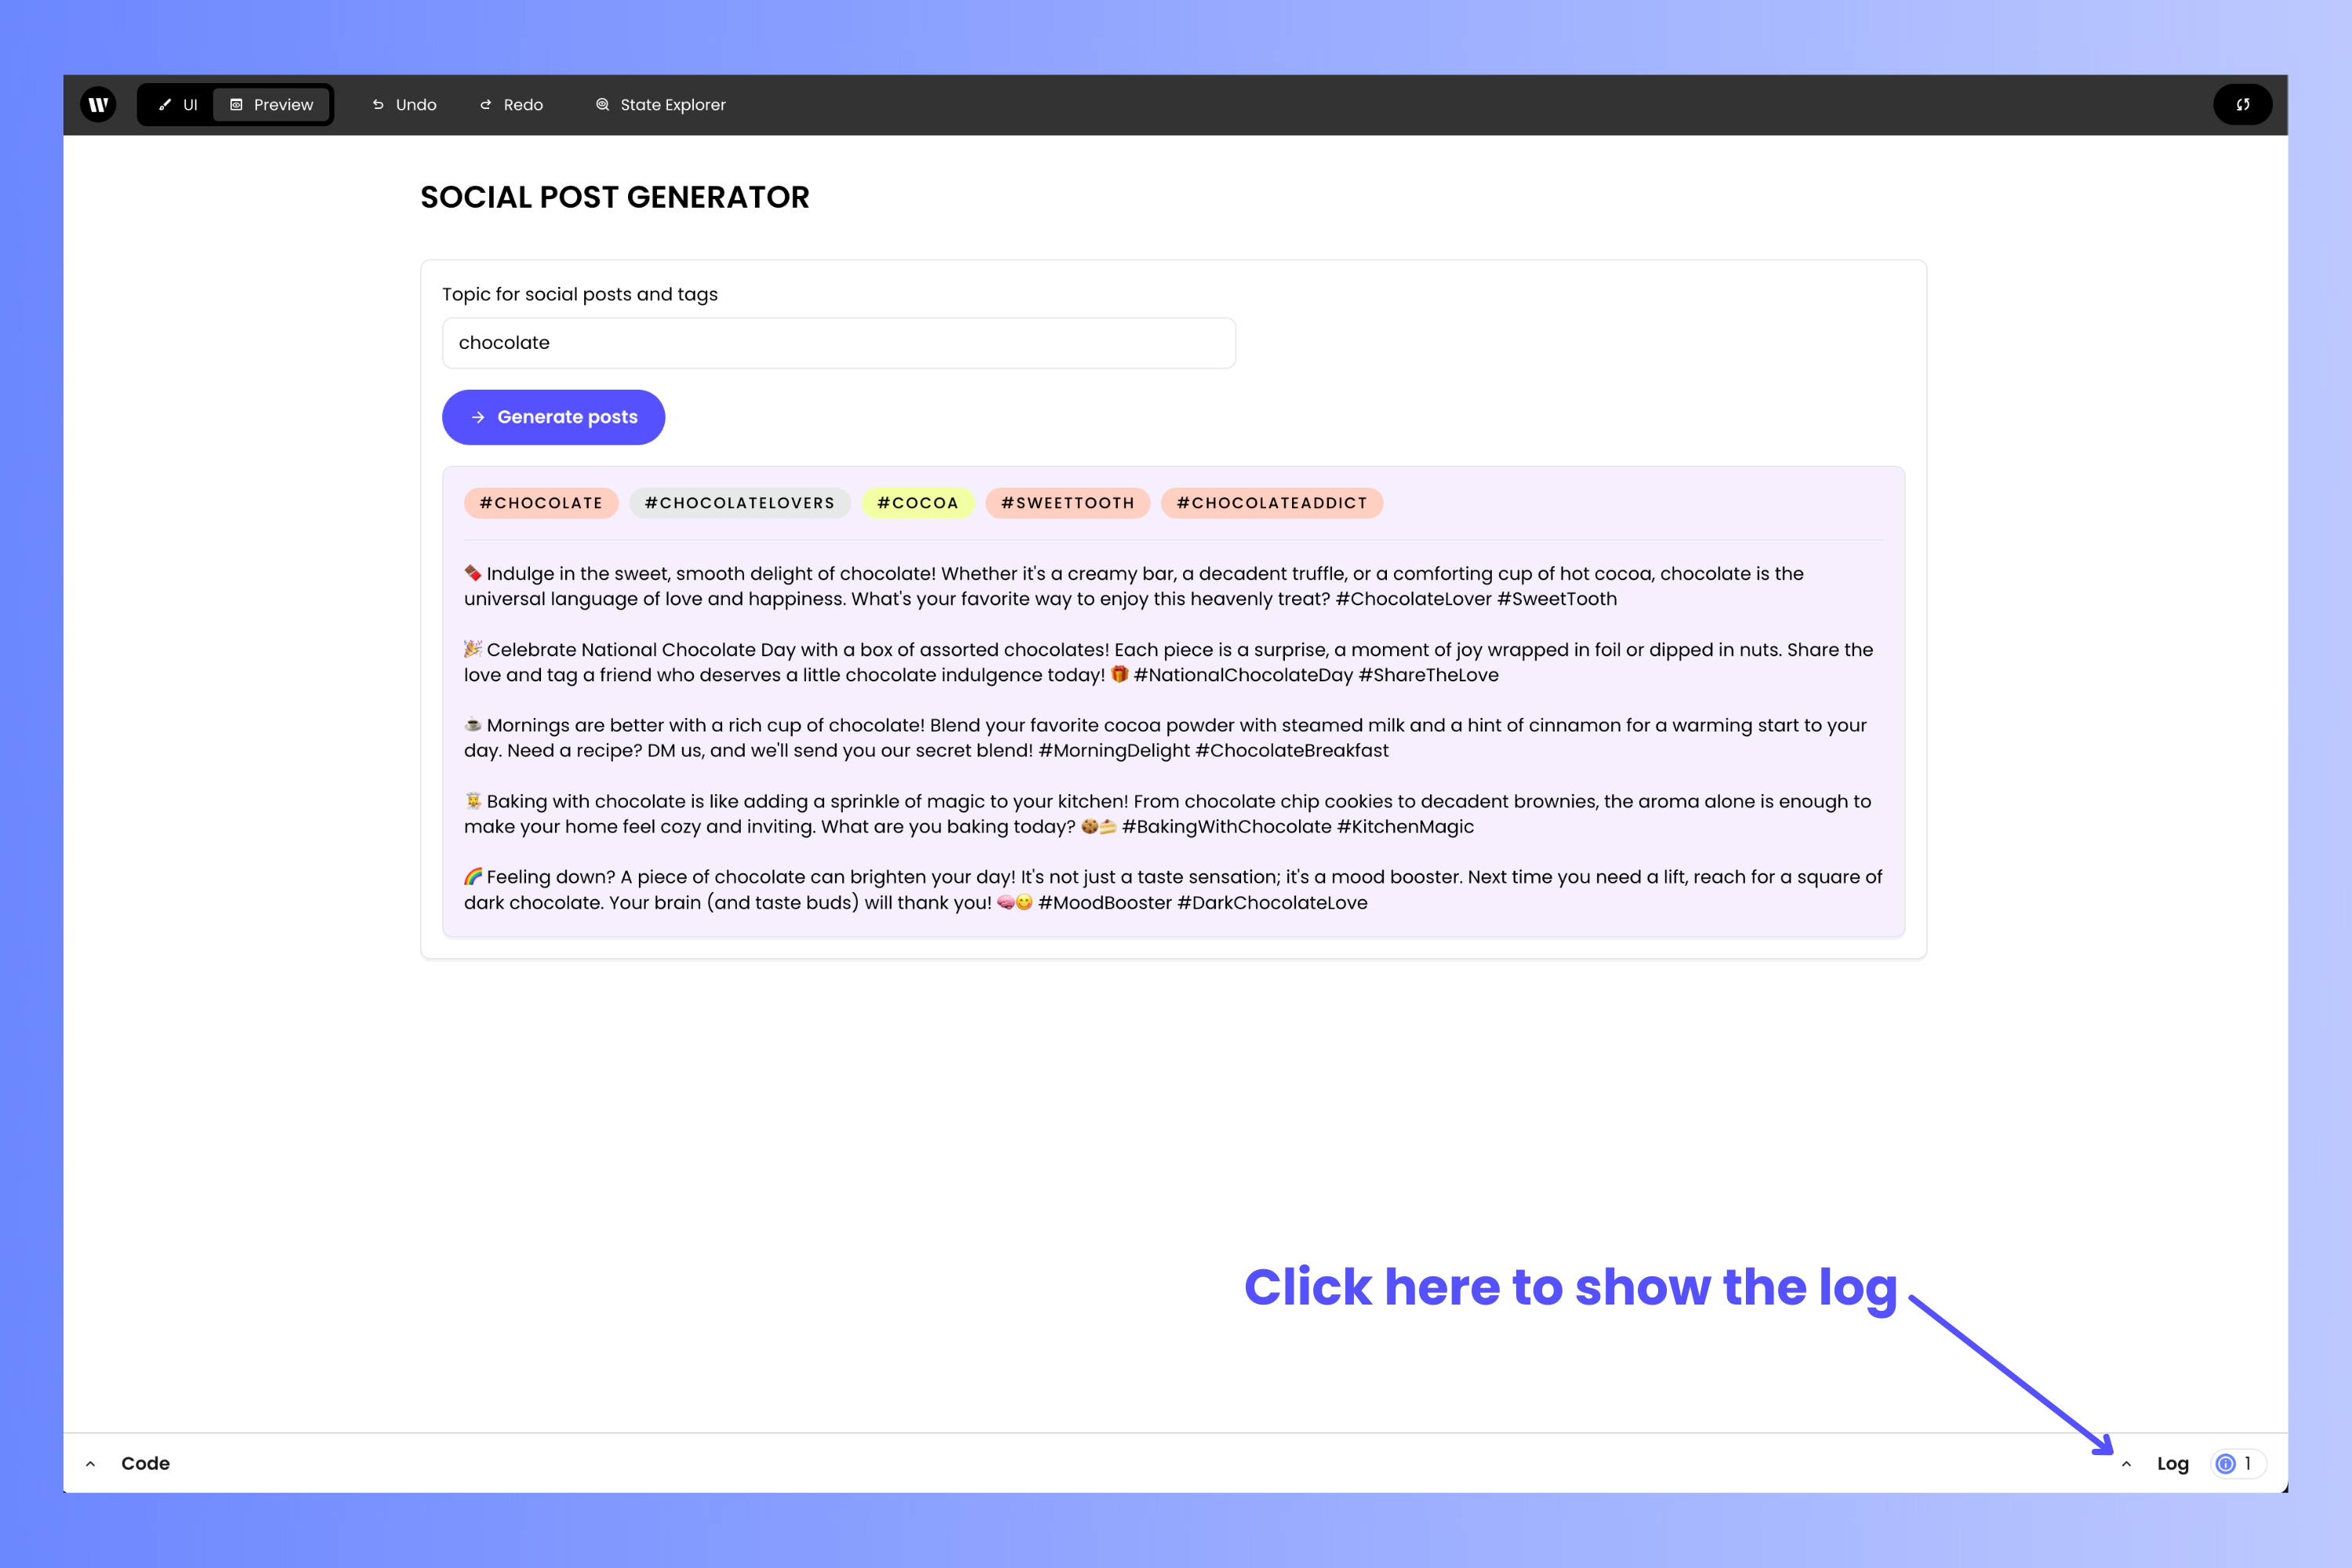
 You can see the output of any `print()` functions and error messages by clicking on the **Log** button located near the upper right corner of the page:
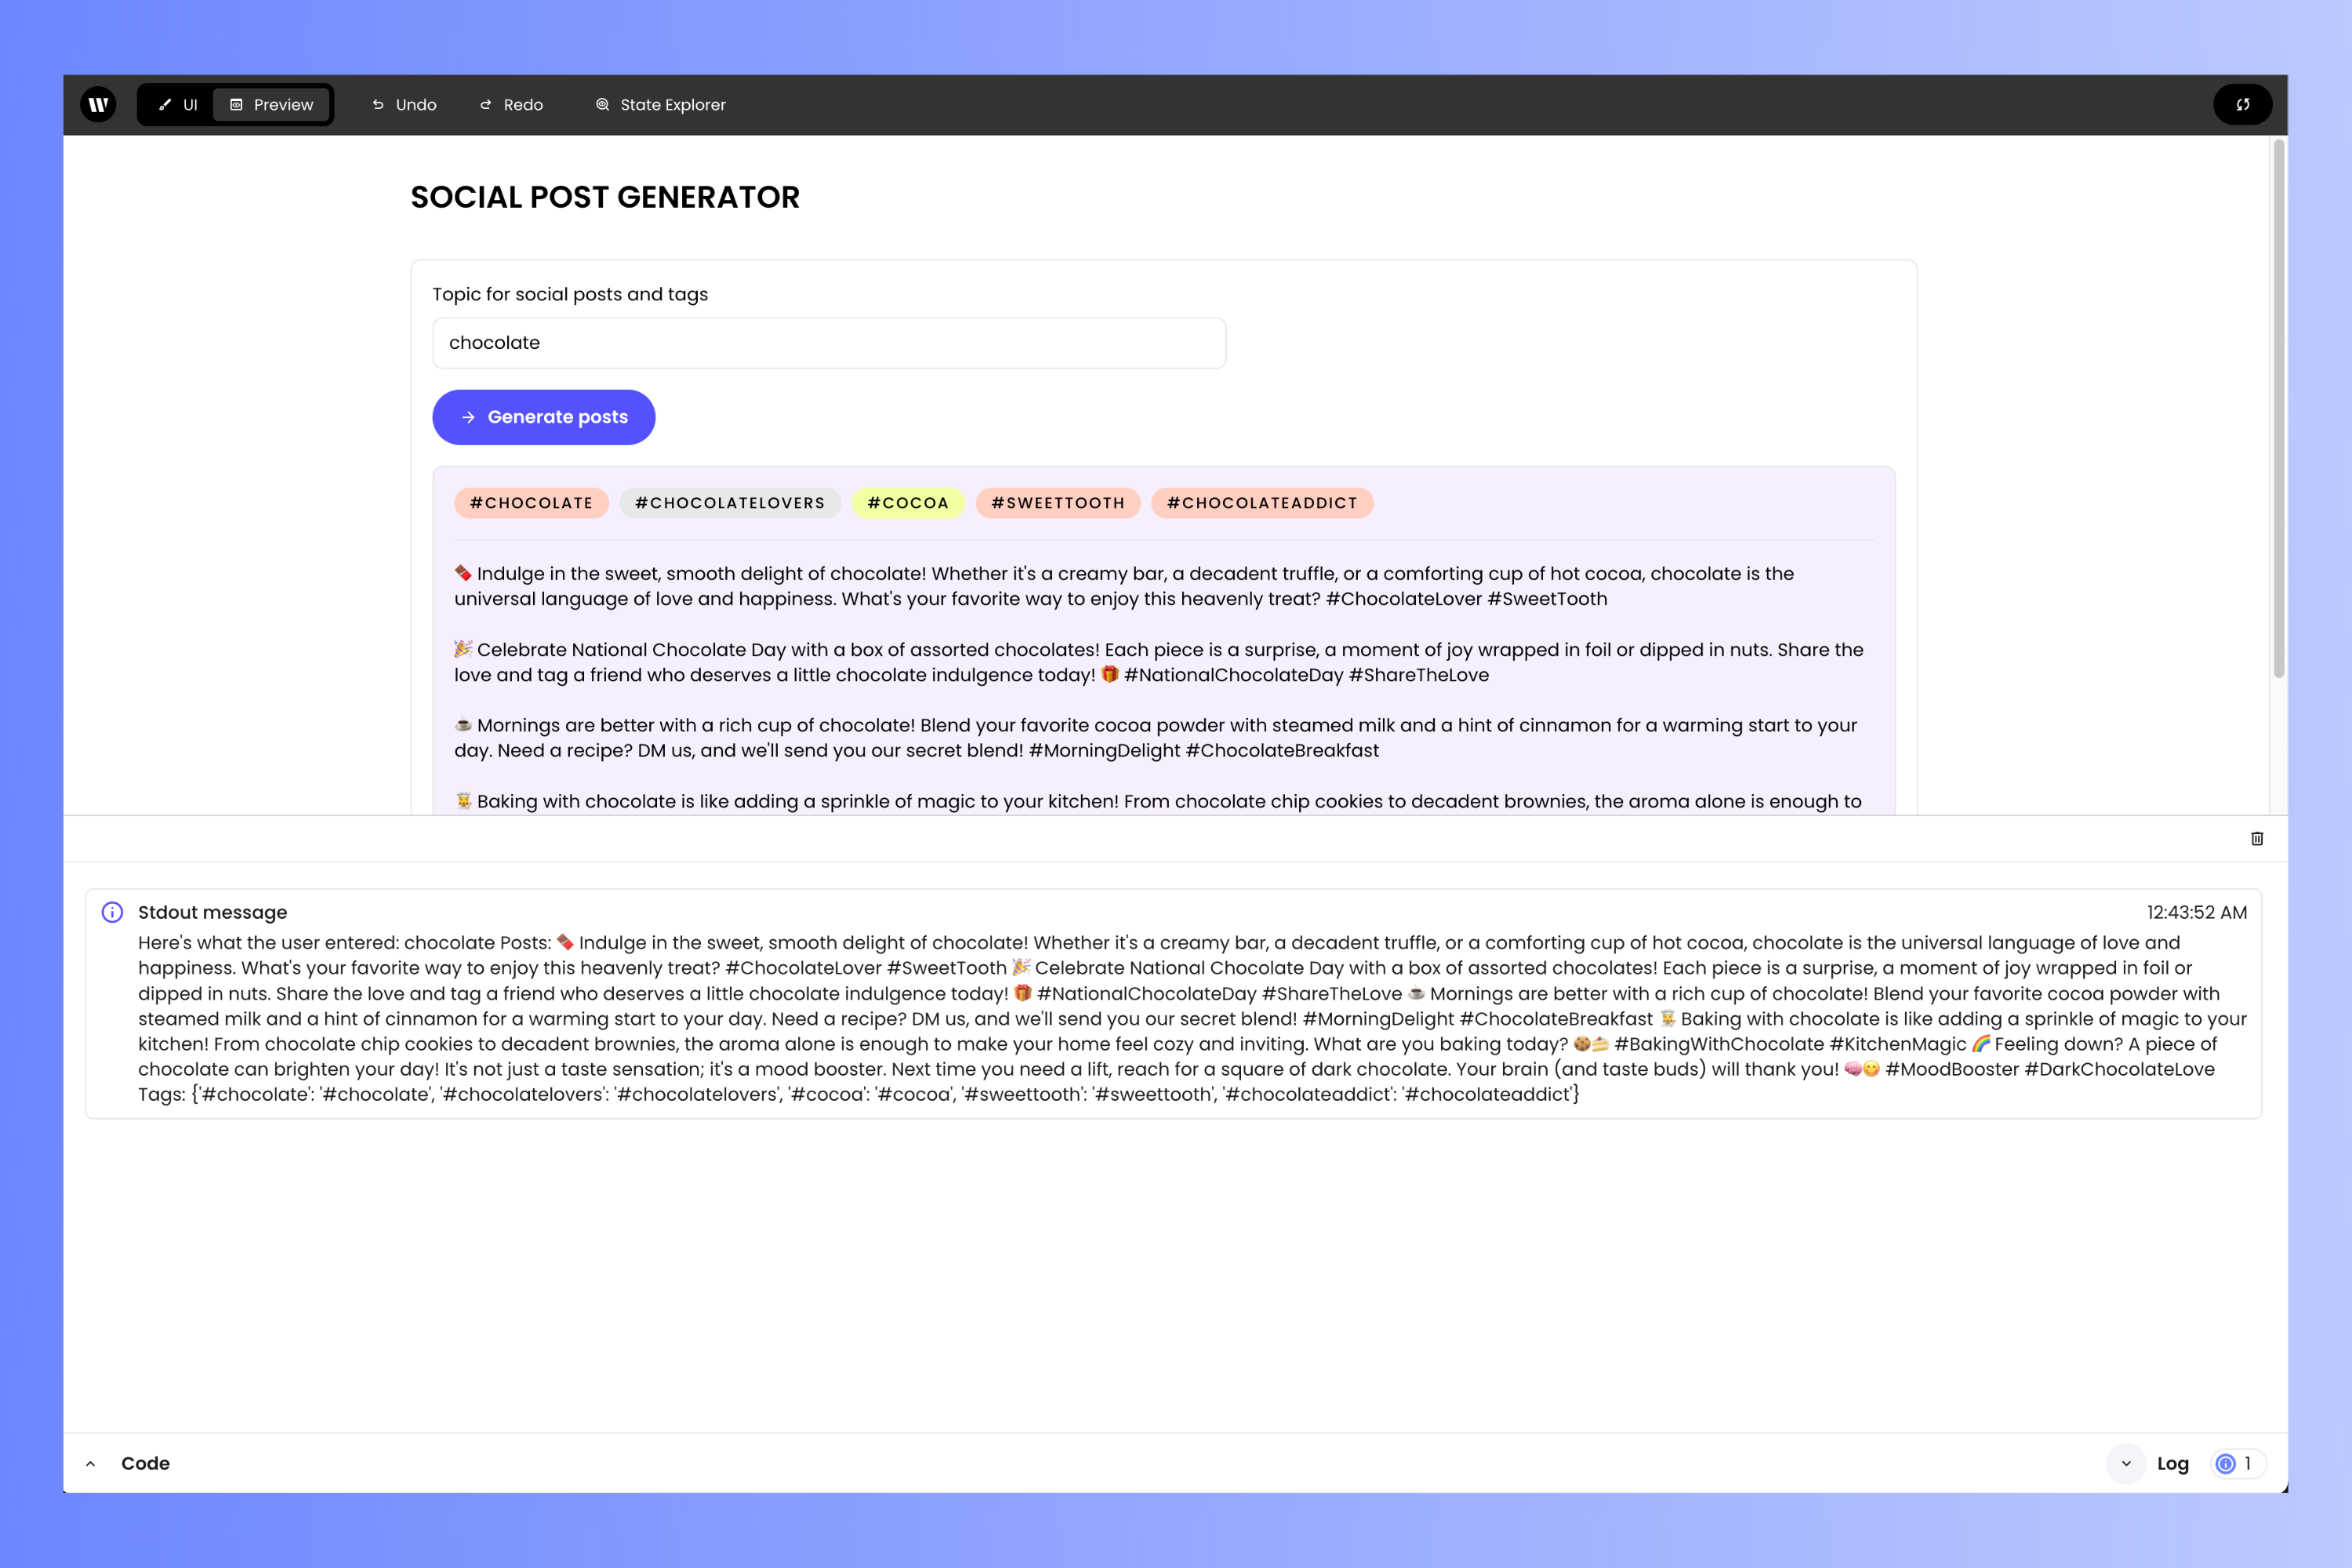
 Here’s what the app looks like when displaying the log:
 It's very helpful to be able to test the application while editing it. As you continue to work with Writer Framework, you'll find yourself alternating between making changes to your application and testing those changes without having to leave the project editor.
## Run the application locally
Once you've tested the application, it's time to run it locally.
Switch back to your terminal application. Stop the editor with ctrl-c, then run the application by entering the following command:
```
writer run social-post-generator
```
Note that the command starts with `writer run` as opposed to `writer edit`. This launches the application as your users will see it, without any of the editing tools. Even though you can preview your applications in the project editor, it's still a good idea to test it by running it on your computer, outside the project editor, before deploying it.
You'll be able to access the application with your browser at the URL that appears on the command line. It should look like this:
The Writer editor, which you launched with `writer edit social-post-generator`, and your application, which you launched with `writer run social-post-generator`, run on the same URL, but on different *ports* (specified by the number after the `:` character at the end of the URL).
## Conclusion
That's it — you've built a functional social post generator using the Writer Framework!
Feel free to modify this project! The Writer platform is flexible enough for you to customize, extend, and evolve your application into something completely different! To find out what else you can do, check out the documentation for [Writer Framework](https://dev.writer.com/framework/introduction) and the [Writer API](https://dev.writer.com/introduction).
It's very helpful to be able to test the application while editing it. As you continue to work with Writer Framework, you'll find yourself alternating between making changes to your application and testing those changes without having to leave the project editor.
## Run the application locally
Once you've tested the application, it's time to run it locally.
Switch back to your terminal application. Stop the editor with ctrl-c, then run the application by entering the following command:
```
writer run social-post-generator
```
Note that the command starts with `writer run` as opposed to `writer edit`. This launches the application as your users will see it, without any of the editing tools. Even though you can preview your applications in the project editor, it's still a good idea to test it by running it on your computer, outside the project editor, before deploying it.
You'll be able to access the application with your browser at the URL that appears on the command line. It should look like this:
The Writer editor, which you launched with `writer edit social-post-generator`, and your application, which you launched with `writer run social-post-generator`, run on the same URL, but on different *ports* (specified by the number after the `:` character at the end of the URL).
## Conclusion
That's it — you've built a functional social post generator using the Writer Framework!
Feel free to modify this project! The Writer platform is flexible enough for you to customize, extend, and evolve your application into something completely different! To find out what else you can do, check out the documentation for [Writer Framework](https://dev.writer.com/framework/introduction) and the [Writer API](https://dev.writer.com/introduction).