> ## Documentation Index
> Fetch the complete documentation index at: https://dev.writer.com/llms.txt
> Use this file to discover all available pages before exploring further.
# Release notes generator
In this tutorial, you'll build a release notes generator using the Writer Framework. This application will help you generate release notes as formatted HTML for software updates based on user-provided data as a CSV file. You can check out the [finished code on GitHub](https://github.com/writer/framework-tutorials/tree/main/release-notes-generator/end) to see what you'll be building.
The application consists of two main parts: the backend, which processes the uploaded CSV file and generates the release notes, and the frontend, which displays the release notes and allows users to download them.
 ## Setting up your project
### Creating a Writer app and getting your API key
From the Home screen, click on **Build an app**.
## Setting up your project
### Creating a Writer app and getting your API key
From the Home screen, click on **Build an app**.
 Select Framework as the app type you want to create, enabling you to generate keys and build your app with the Writer Framework.
 On the next screen, you can edit your Writer application name at the top left. Underneath "Authenticate with an API key," click "Reveal" to view and copy your API key.
### Creating the application
Next, open your terminal and navigate to the directory where you want to create your application directory.
To pass your API key to the Writer Framework, you'll need to set an environment variable called `WRITER_API_KEY`. Here's how you can set this variable in your terminal session:
```sh On macOS/Linux theme={null}
export WRITER_API_KEY=[key]
```
```sh On Windows theme={null}
set WRITER_API_KEY=[key]
```
Run the following command to clone the `framework-tutorials` repo and navigate to the folder containing the starting point for this application.
```
git clone https://github.com/writer/framework-tutorials.git
cd framework-tutorials/release-notes-generator/start
```
To edit your project, run the following commands. This will bring up the console, which displays Framework-wide messages and errors, including logs from the API. By default, the Writer Framework Builder is accessible at `localhost:4005`. If this port is in use, you can specify a different port. Open this address in your browser to view your default application setup.
```bash Standard port theme={null}
writer edit .
```
```bash Custom port theme={null}
writer edit . --port=3007
```
## Introduction to the application setup
The template includes some basic code, UI setup, and files to help you get started.
### Included files
The files `prompts.py` and `html_template.py` contain helper functions for generating prompts for the AI model and formatting the output HTML, respectively.
In the `sample-input` folder, you'll find a sample CSV file that you can use to test the application.
Finally, the `custom.css` file in the `static` folder contains custom CSS styles for the application.
### Dependency imports
In `main.py`, you'll see that the dependencies are already imported at the top:
```python theme={null}
import writer as wf
import writer.ai
import pandas as pd
from prompts import get_release_notes_summary_prompt, get_release_notes_desc_prompt, get_category_prompt
from html_template import format_output
```
These dependencies include the Writer Framework, the Writer AI module, and pandas for data manipulation.
### Initial UI
The template includes a basic UI setup, including a Page component with a Header component. The Header component also includes an Image. If you want to change the logo image, you can replace the `logo_image_path` variable in the state with the path to your desired image in the `static` folder.
## Initializing the application state
First, in `main.py`, set up the initial state for the application. This state will store the application's title, logo image path, file data, metrics, and processing status for each step. You'll also import a custom CSS file to style the application and create a placeholder DataFrame.
Create a placeholder DataFrame on the line above `wf.init_state`:
```python theme={null}
placeholder_data = {
'Description': ['Description 1', 'Description 2', 'Description 3'],
'Label': ['Label 1', 'Label 2', 'Label 3']
}
initial_df = pd.DataFrame(placeholder_data)
```
Update the initial state for the application at the bottom of `main.py`:
```python theme={null}
initial_state = wf.init_state({
"my_app": {"title": "RELEASE NOTES GENERATOR"},
"logo_image_path": 'static/Writer_Logo_black.svg',
"file": {"name": "", "file_path": ""},
"metrics": {"new_features": 0, "caveats": 0, "fixed_issues": 0, "total": 0},
"step1": {
"raw_csv": initial_df,
"completed": "no",
"generate-button-state": "yes",
"processing-message": None,
"styled-table": "
On the next screen, you can edit your Writer application name at the top left. Underneath "Authenticate with an API key," click "Reveal" to view and copy your API key.
### Creating the application
Next, open your terminal and navigate to the directory where you want to create your application directory.
To pass your API key to the Writer Framework, you'll need to set an environment variable called `WRITER_API_KEY`. Here's how you can set this variable in your terminal session:
```sh On macOS/Linux theme={null}
export WRITER_API_KEY=[key]
```
```sh On Windows theme={null}
set WRITER_API_KEY=[key]
```
Run the following command to clone the `framework-tutorials` repo and navigate to the folder containing the starting point for this application.
```
git clone https://github.com/writer/framework-tutorials.git
cd framework-tutorials/release-notes-generator/start
```
To edit your project, run the following commands. This will bring up the console, which displays Framework-wide messages and errors, including logs from the API. By default, the Writer Framework Builder is accessible at `localhost:4005`. If this port is in use, you can specify a different port. Open this address in your browser to view your default application setup.
```bash Standard port theme={null}
writer edit .
```
```bash Custom port theme={null}
writer edit . --port=3007
```
## Introduction to the application setup
The template includes some basic code, UI setup, and files to help you get started.
### Included files
The files `prompts.py` and `html_template.py` contain helper functions for generating prompts for the AI model and formatting the output HTML, respectively.
In the `sample-input` folder, you'll find a sample CSV file that you can use to test the application.
Finally, the `custom.css` file in the `static` folder contains custom CSS styles for the application.
### Dependency imports
In `main.py`, you'll see that the dependencies are already imported at the top:
```python theme={null}
import writer as wf
import writer.ai
import pandas as pd
from prompts import get_release_notes_summary_prompt, get_release_notes_desc_prompt, get_category_prompt
from html_template import format_output
```
These dependencies include the Writer Framework, the Writer AI module, and pandas for data manipulation.
### Initial UI
The template includes a basic UI setup, including a Page component with a Header component. The Header component also includes an Image. If you want to change the logo image, you can replace the `logo_image_path` variable in the state with the path to your desired image in the `static` folder.
## Initializing the application state
First, in `main.py`, set up the initial state for the application. This state will store the application's title, logo image path, file data, metrics, and processing status for each step. You'll also import a custom CSS file to style the application and create a placeholder DataFrame.
Create a placeholder DataFrame on the line above `wf.init_state`:
```python theme={null}
placeholder_data = {
'Description': ['Description 1', 'Description 2', 'Description 3'],
'Label': ['Label 1', 'Label 2', 'Label 3']
}
initial_df = pd.DataFrame(placeholder_data)
```
Update the initial state for the application at the bottom of `main.py`:
```python theme={null}
initial_state = wf.init_state({
"my_app": {"title": "RELEASE NOTES GENERATOR"},
"logo_image_path": 'static/Writer_Logo_black.svg',
"file": {"name": "", "file_path": ""},
"metrics": {"new_features": 0, "caveats": 0, "fixed_issues": 0, "total": 0},
"step1": {
"raw_csv": initial_df,
"completed": "no",
"generate-button-state": "yes",
"processing-message": None,
"styled-table": "csv table
"
},
"step2": {
"release-notes": None,
"completed": "no",
"formatted-release-notes": "notes should go here"
},
})
```
Import the custom CSS file below the initial state setup:
```python theme={null}
initial_state.import_stylesheet(".description, .list, .summary, .category ", "/static/custom.css")
```
## Building the file upload functionality
First, you'll build the file upload feature. Note that `prompts.py`, `html_template.py`, and `custom.css` are provided in the starting point for the application. There is also a sample CSV file in the `sample-input` folder that you can use to test the application.
### Implementing the file upload handler
To handle file uploads, you'll create a function in `main.py` that reads the uploaded CSV file, processes the data, and stores it in the application state.
In `main.py`, create a function to handle file uploads. This function will read the uploaded CSV file, process the data, and store it in the application state.
```python theme={null}
def onchangefile_handler(state, payload):
uploaded_file = payload[0]
name = uploaded_file.get("name")
state["file"]["name"] = name
state["step1"]["processing-message"] = f'+File {name} uploaded successfully.'
state["file"]["file_path"] = f"data/{name}"
file_data = uploaded_file.get("data")
with open(f"data/{name}", "wb") as file_handle:
file_handle.write(file_data)
data = pd.read_csv(state["file"]["file_path"])
df = pd.DataFrame(data)
state["step1"]["raw_csv"] = df
state["step1"]["generate-button-state"] = "no"
```
Define a function to convert the CSV file to a DataFrame:
```python theme={null}
def _raw_csv_to_df(state):
data = pd.read_csv(state["file"]["file_path"])
df = pd.DataFrame(data)
return df
```
### Displaying the uploaded CSV file
Next, you'll display the uploaded CSV file in the application UI.
Add a Step Container component to the Page. This will contain the two steps for the application.
Drag two Step components into the Step Container. Name the first one "Load CSV file" and the second "Release notes".
Click on the the first Step component to select it and bring up the Properties pane. Set "Completed" to `@{step1.completed}`. This state reference will contain either "yes" or "no" based on the completion status of the step.
Within this Step, add a Message component with the message set to `@{step1.processing-message}`. Scroll down to the Visibility section of the settings. Select "Custom" and set the condition to `step1.processing-message`.
Add a Column Container component and add three Column components. For the first column, set the width to 0.5. For the third column, set "Content alignment (H)" to "Left" and "Content alignment (V)" to "Bottom."
In the middle column, place a File Input component labeled "Please upload your CSV file". Set its `wf-file-change` handler to `onchangefile_handler`.
In the third column, add a Button labeled "Generate release notes". Set its "Disabled" property to `@{step1.generate-button-state}` and its "Icon" property to `laps`.
Under the columns, create a Section component and set the title to "Raw CSV".
In this section, add a DataFrame component to display the raw CSV data. Configure its properties to use `@{step1.raw_csv}` as the data source. Toggle "Enable download," "Use Markdown," and "Wrap text" to "yes". Set the Separator color to `#d4b2f7` using the CSS tab.
Your application should now look like this:
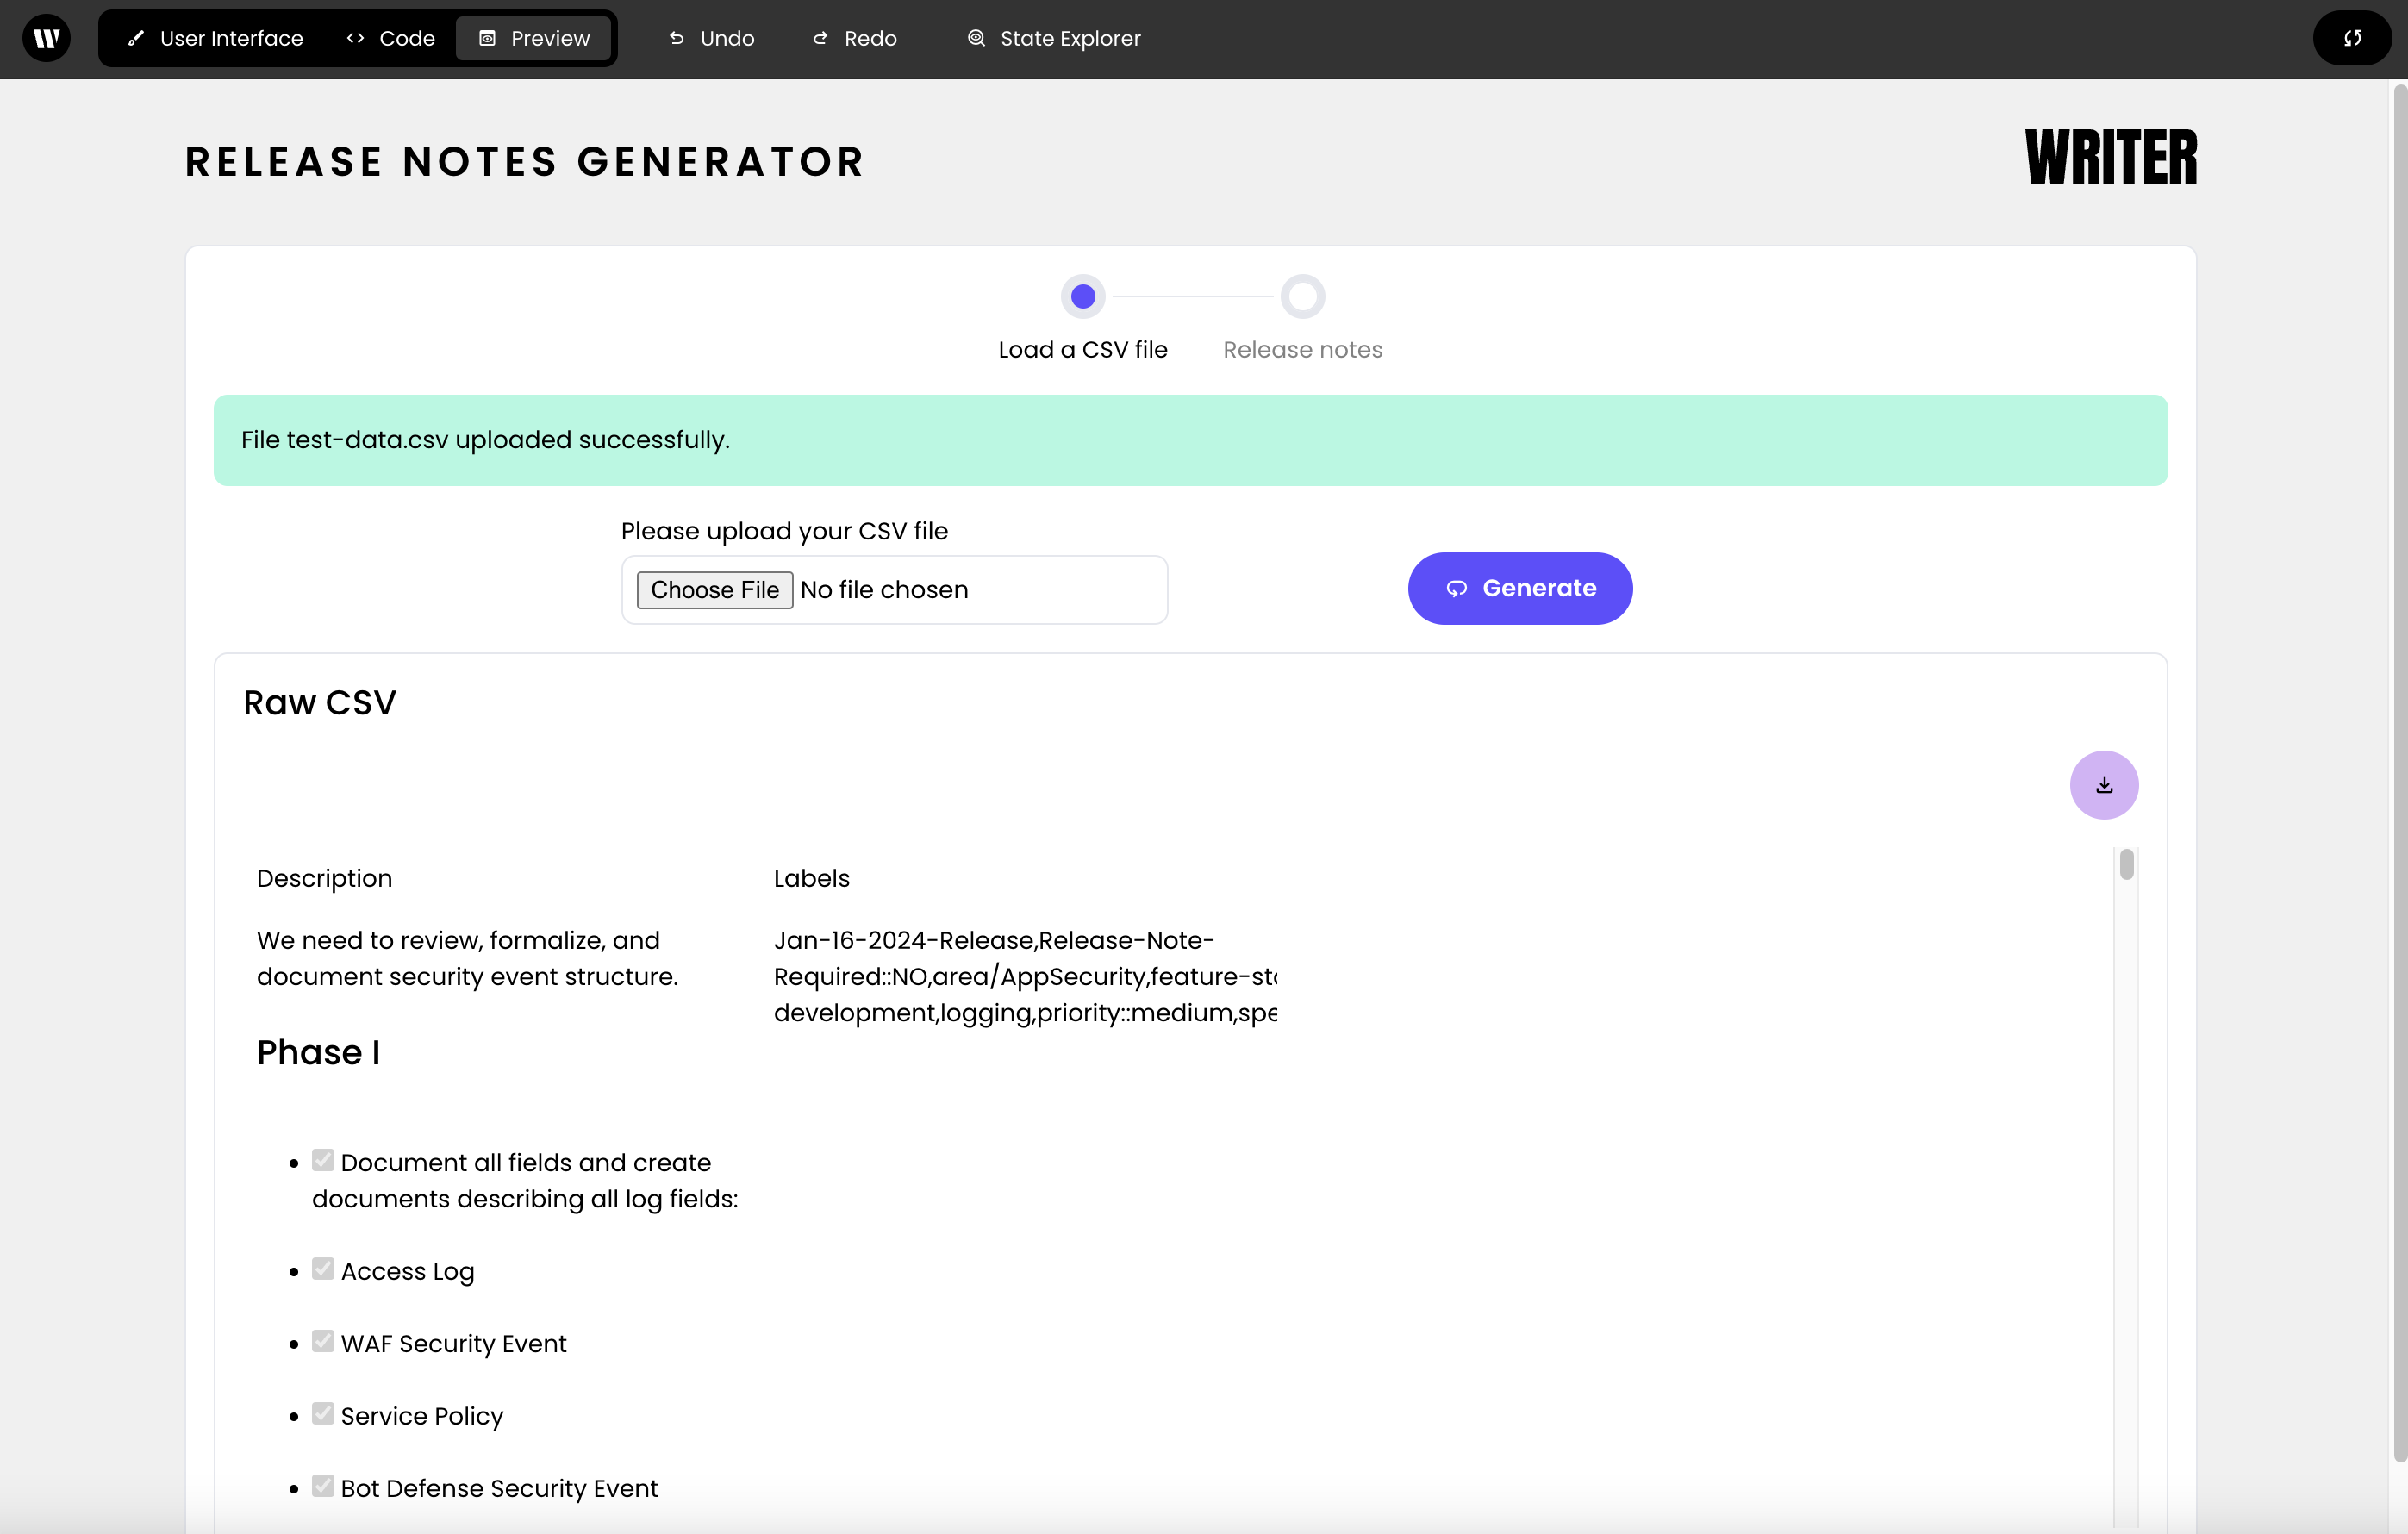
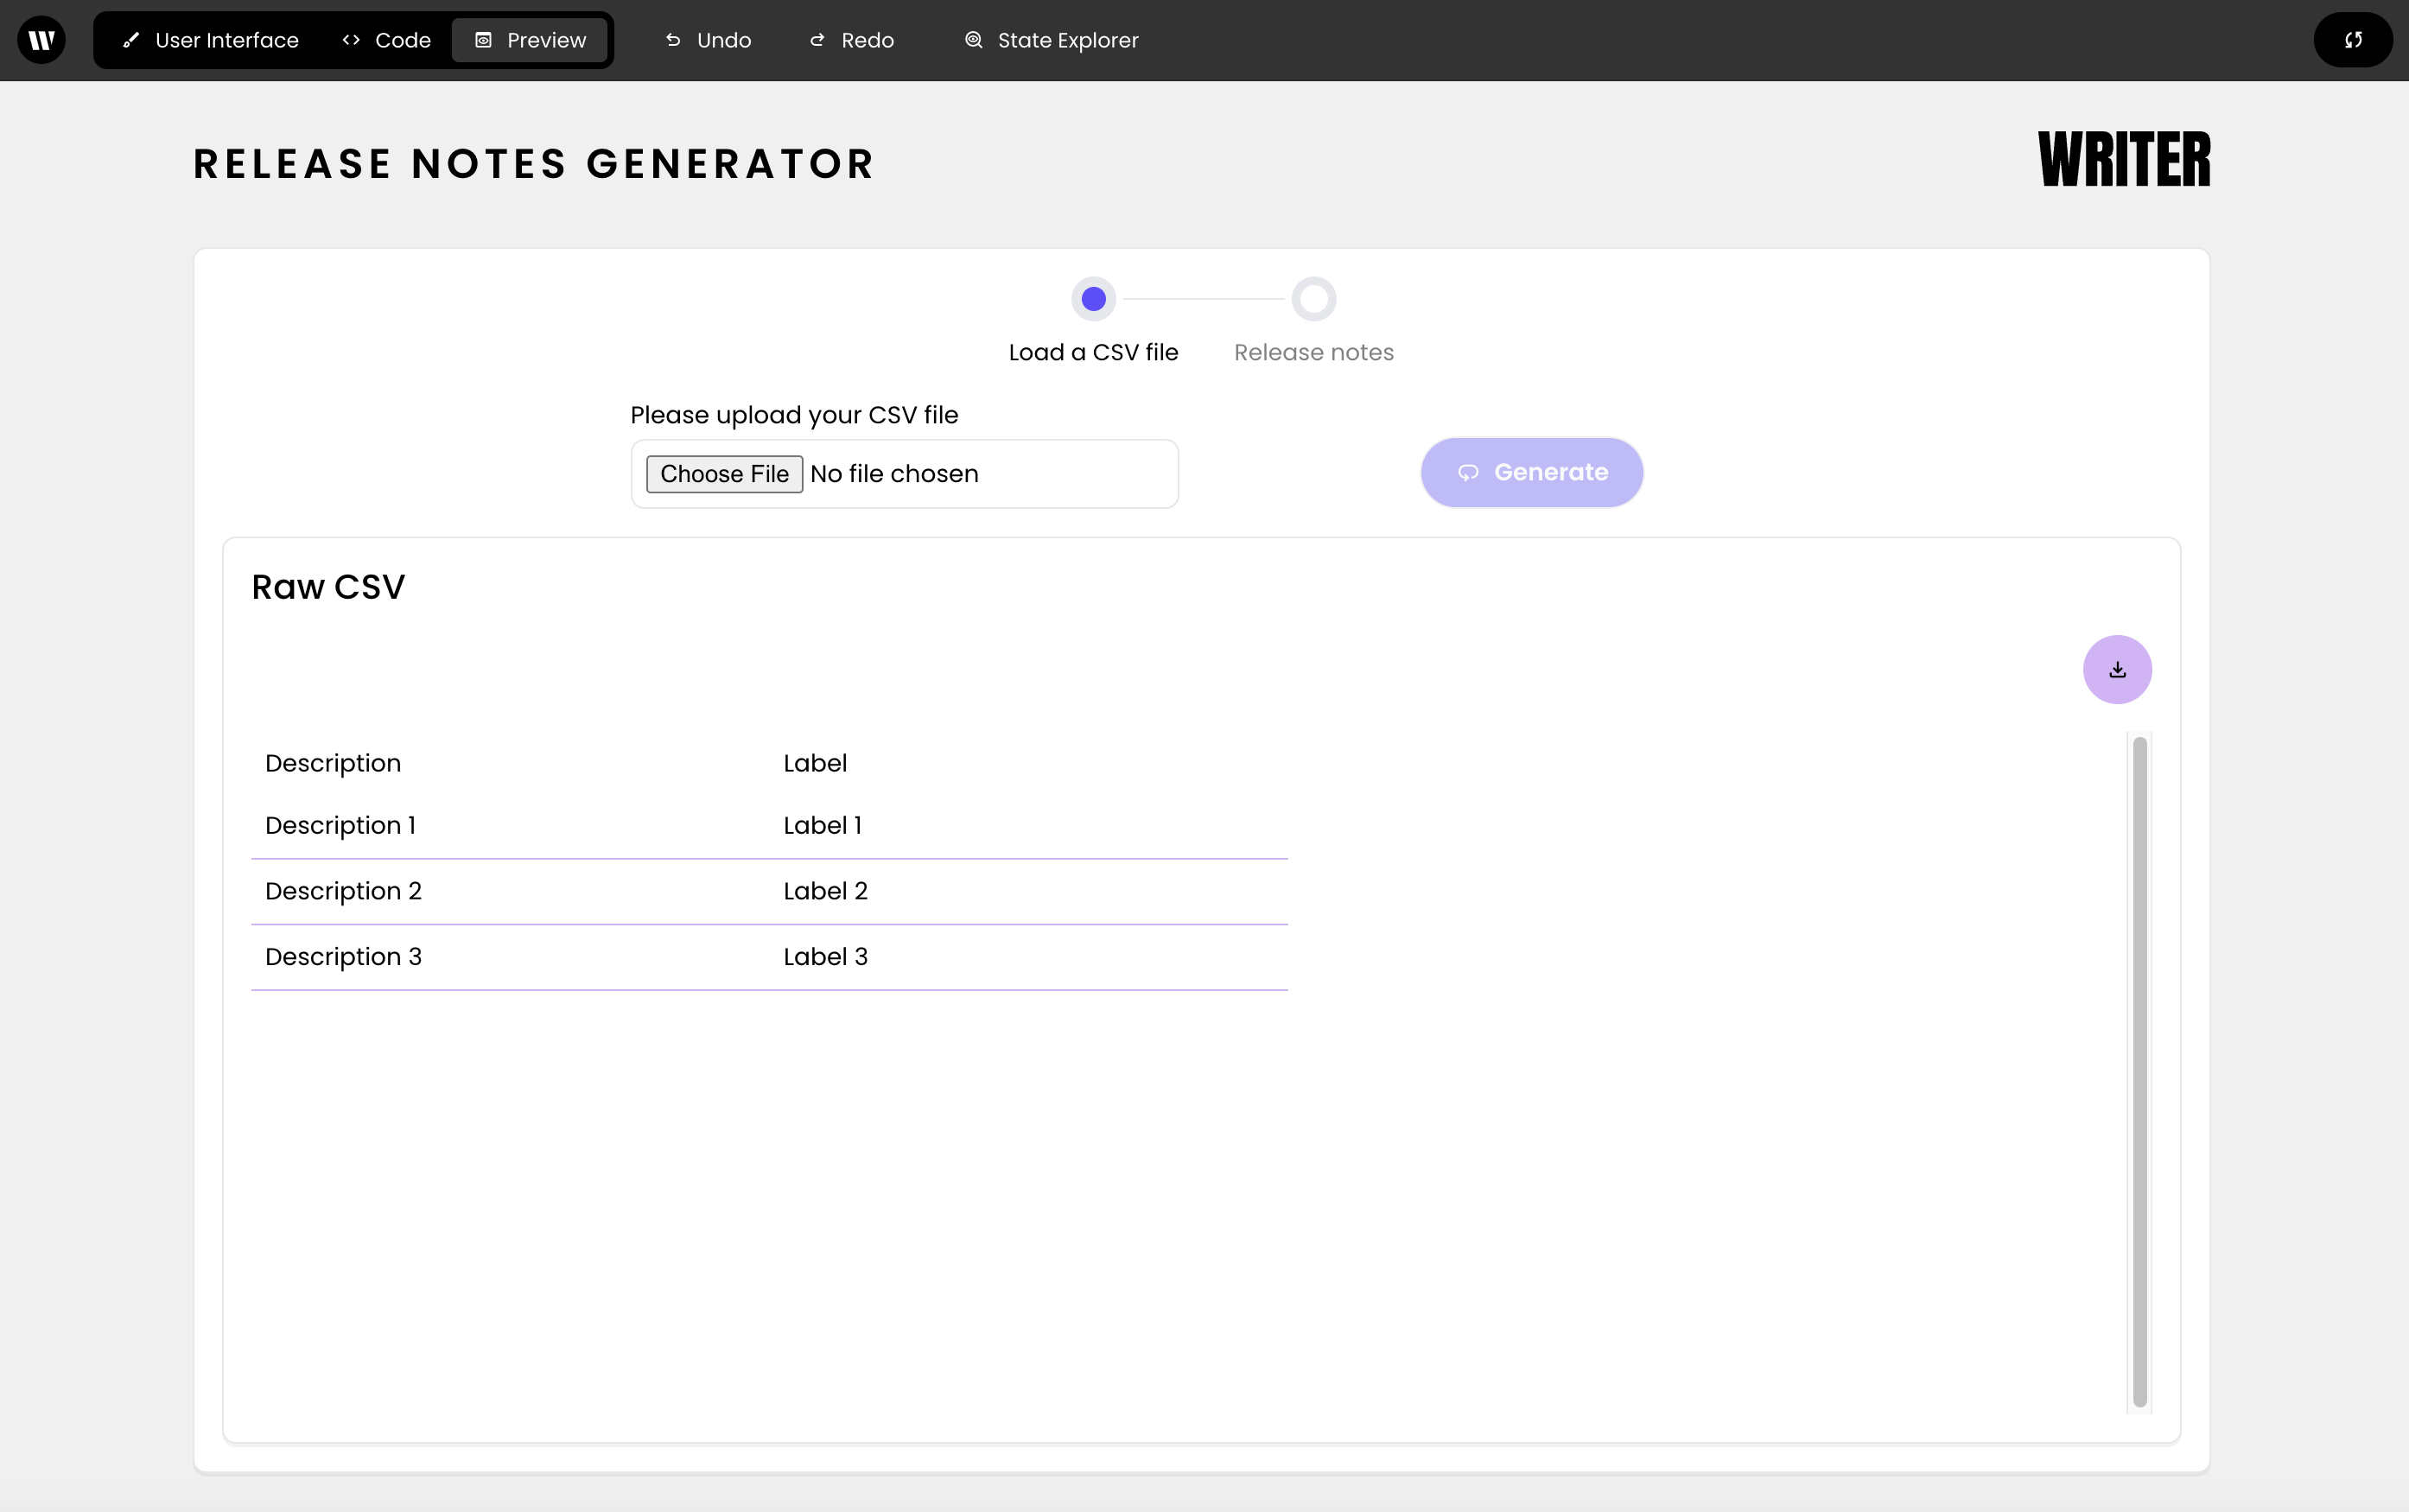 When using the sample data located in `sample-input/test-data.csv`, the Raw CSV section will display the uploaded CSV file:
 ## Generating release notes
Now that you've set up the file upload functionality, you can generate release notes based on the uploaded CSV file.
### Defining text completion functions
Using the prompts provided, define functions to get the category, release notes summary, and release notes description using AI completion. You'll use these functions to process the uploaded CSV file and generate release notes.
Define a function to get the category using AI completion:
```python theme={null}
def _get_category(desc, label):
prompt = get_category_prompt(desc, label)
label = writer.ai.complete(prompt)
return label
```
Define a function to get the release notes summary:
```python theme={null}
def _get_release_notes_summary(label, desc):
prompt = get_release_notes_summary_prompt(label, desc)
formatted_desc = writer.ai.complete(prompt)
return formatted_desc
```
Define a function to get the release notes description:
```python theme={null}
def _get_release_notes_desc(label, desc):
prompt = get_release_notes_desc_prompt(label, desc)
formatted_desc = writer.ai.complete(prompt)
return formatted_desc
```
### Implementing the generate functionality
You'll next implement the ability to process the CSV and generate release notes.
Define a function to generate HTML for the categories:
```python theme={null}
def _create_df_for_category(df,state):
unique_categories = df['Primary-Category']
formatted_output_list = list()
for category in set(unique_categories):
df_category = df[df['Primary-Category']==category]
categories = {" New Feature": "new_features", " Caveat": "caveats", " Fixed Issue": "fixed_issues" }
curr_category = categories[category]
state["metrics"][curr_category]= df_category.shape[0]
formatted_output = format_output(category,df_category)
formatted_output_list.append(formatted_output)
return "".join(formatted_output_list)
```
Define a function to write HTML to a file:
```python theme={null}
def _write_html_to_file(html):
with open("data/output-html.html", "w") as file_handle:
file_handle.write(html)
```
Next, create a function to handle the generate button click. This function will process the uploaded CSV file, generate release notes, and store the formatted output in the application state.
```python theme={null}
def handle_generate_button_click(state):
state["step1"]["generate-button-state"] = "yes"
state["step1"]["processing-message-isVisible"] = True
state["step1"]["processing-message"] = "%Hang tight, preparing to process your file"
notes_counter = 0
df = _raw_csv_to_df(state)
csv_row_count = df.shape[0]
for index, row in df.iterrows():
df.at[index,"Primary-Category"] = _get_category(label=row["Labels"], desc=row["Description"])
df.at[index,"Release-Notes-Summary"] = _get_release_notes_summary(label=row["Labels"], desc=row["Description"])
df.at[index,"Release-Notes-Description"] = _get_release_notes_desc(label=row["Labels"], desc=row["Description"])
notes_counter += 1
state["step1"]["processing-message"] = f'%Processing {notes_counter} of {csv_row_count} Release Notes'
df_temp = df[["Primary-Category","Release-Notes-Summary","Release-Notes-Description"]]
df_sorted = df_temp.sort_values(by='Primary-Category')
state["step2"]["release-notes"] = df_sorted
state["step1"]["completed"] = "yes"
state["step1"]["processing-message"] = ""
html = _create_df_for_category(df_sorted,state)
_write_html_to_file(html)
state["step2"]["formatted-release-notes"] = html
state["metrics"]["total"] = df_sorted.shape[0]
state["step1"]["generate-button-state"] = "no"
```
Finally, click on the "Generate release notes" button in the UI builder and set its `wf-click` handler to `handle_generate_button_click`.
## Displaying the release notes
Now that you've generated the release notes, you can display them in the application UI.
### Implementing helper functions
Define helper functions to handle back button clicks, write HTML to a file and download the HTML file.
Define a function to handle the back button click:
```python theme={null}
def handle_back_button_click(state):
state["step1"]["completed"] = "no"
```
Define a function to handle downloading the HTML file:
```python theme={null}
def handle_file_download(state):
html_data = wf.pack_file("data/output-html.html","text/html")
file_name = "output-html.html"
state.file_download(html_data,file_name)
```
### Building the initial release notes UI
Next, you'll build the UI for the "Release notes" step.
To display the Release notes Step component, you'll need to double-click on it.
Inside of the Step component, add a Separator component.
Below the Separator, add a Column Container component and a single Column component.
In the column, add a Button. Set its text to "Back" and set its `wf-click handler` to `handle_back_button_click`. Set the "Icon" property to `arrow_back`.
### Buiding tabs for Release notes display
Below the Back button, add a Tab Container component and two Tab components. Name them "Formatted release notes" and "Release notes".
#### Formatted release notes tab
In the first tab, you'll display the formatted release notes.
In the first tab, add an HTML Element component. Set the "Element" property `div` and the "Styles" property to the following object:
```
{
"padding": "16px",
"min-height": "64px",
"min-width": "64px",
"border-radius": "8px",
"background": "white",
}
```
Finally, set the "HTML inside" property to `@{step2.formatted-release-notes}`.
Inside thie HTML Element component, create a three-column layout using a Column Container component and three Column components.
In each column, add three Metric components to display new features, caveats, and fixed issues, respectively.
Set the "Name" of these components to a single space to remove the placeholder text: ` `. Then, set the values of these components to `@{metrics.new_features}`, `@{metrics.caveats}`, and `@{metrics.fixed_issues}`. Finally, set the "Note" text to "+New Features", "+Caveats", and "+Fixed Issues" respectively. The "+" sign will display styling that indicates a positive message.
Under the columns, add a Button component. Set its "Text" to "Download HTML" and its "Icon" to `download`. Then, set the `wf-click` handler to `handle_file_download`.
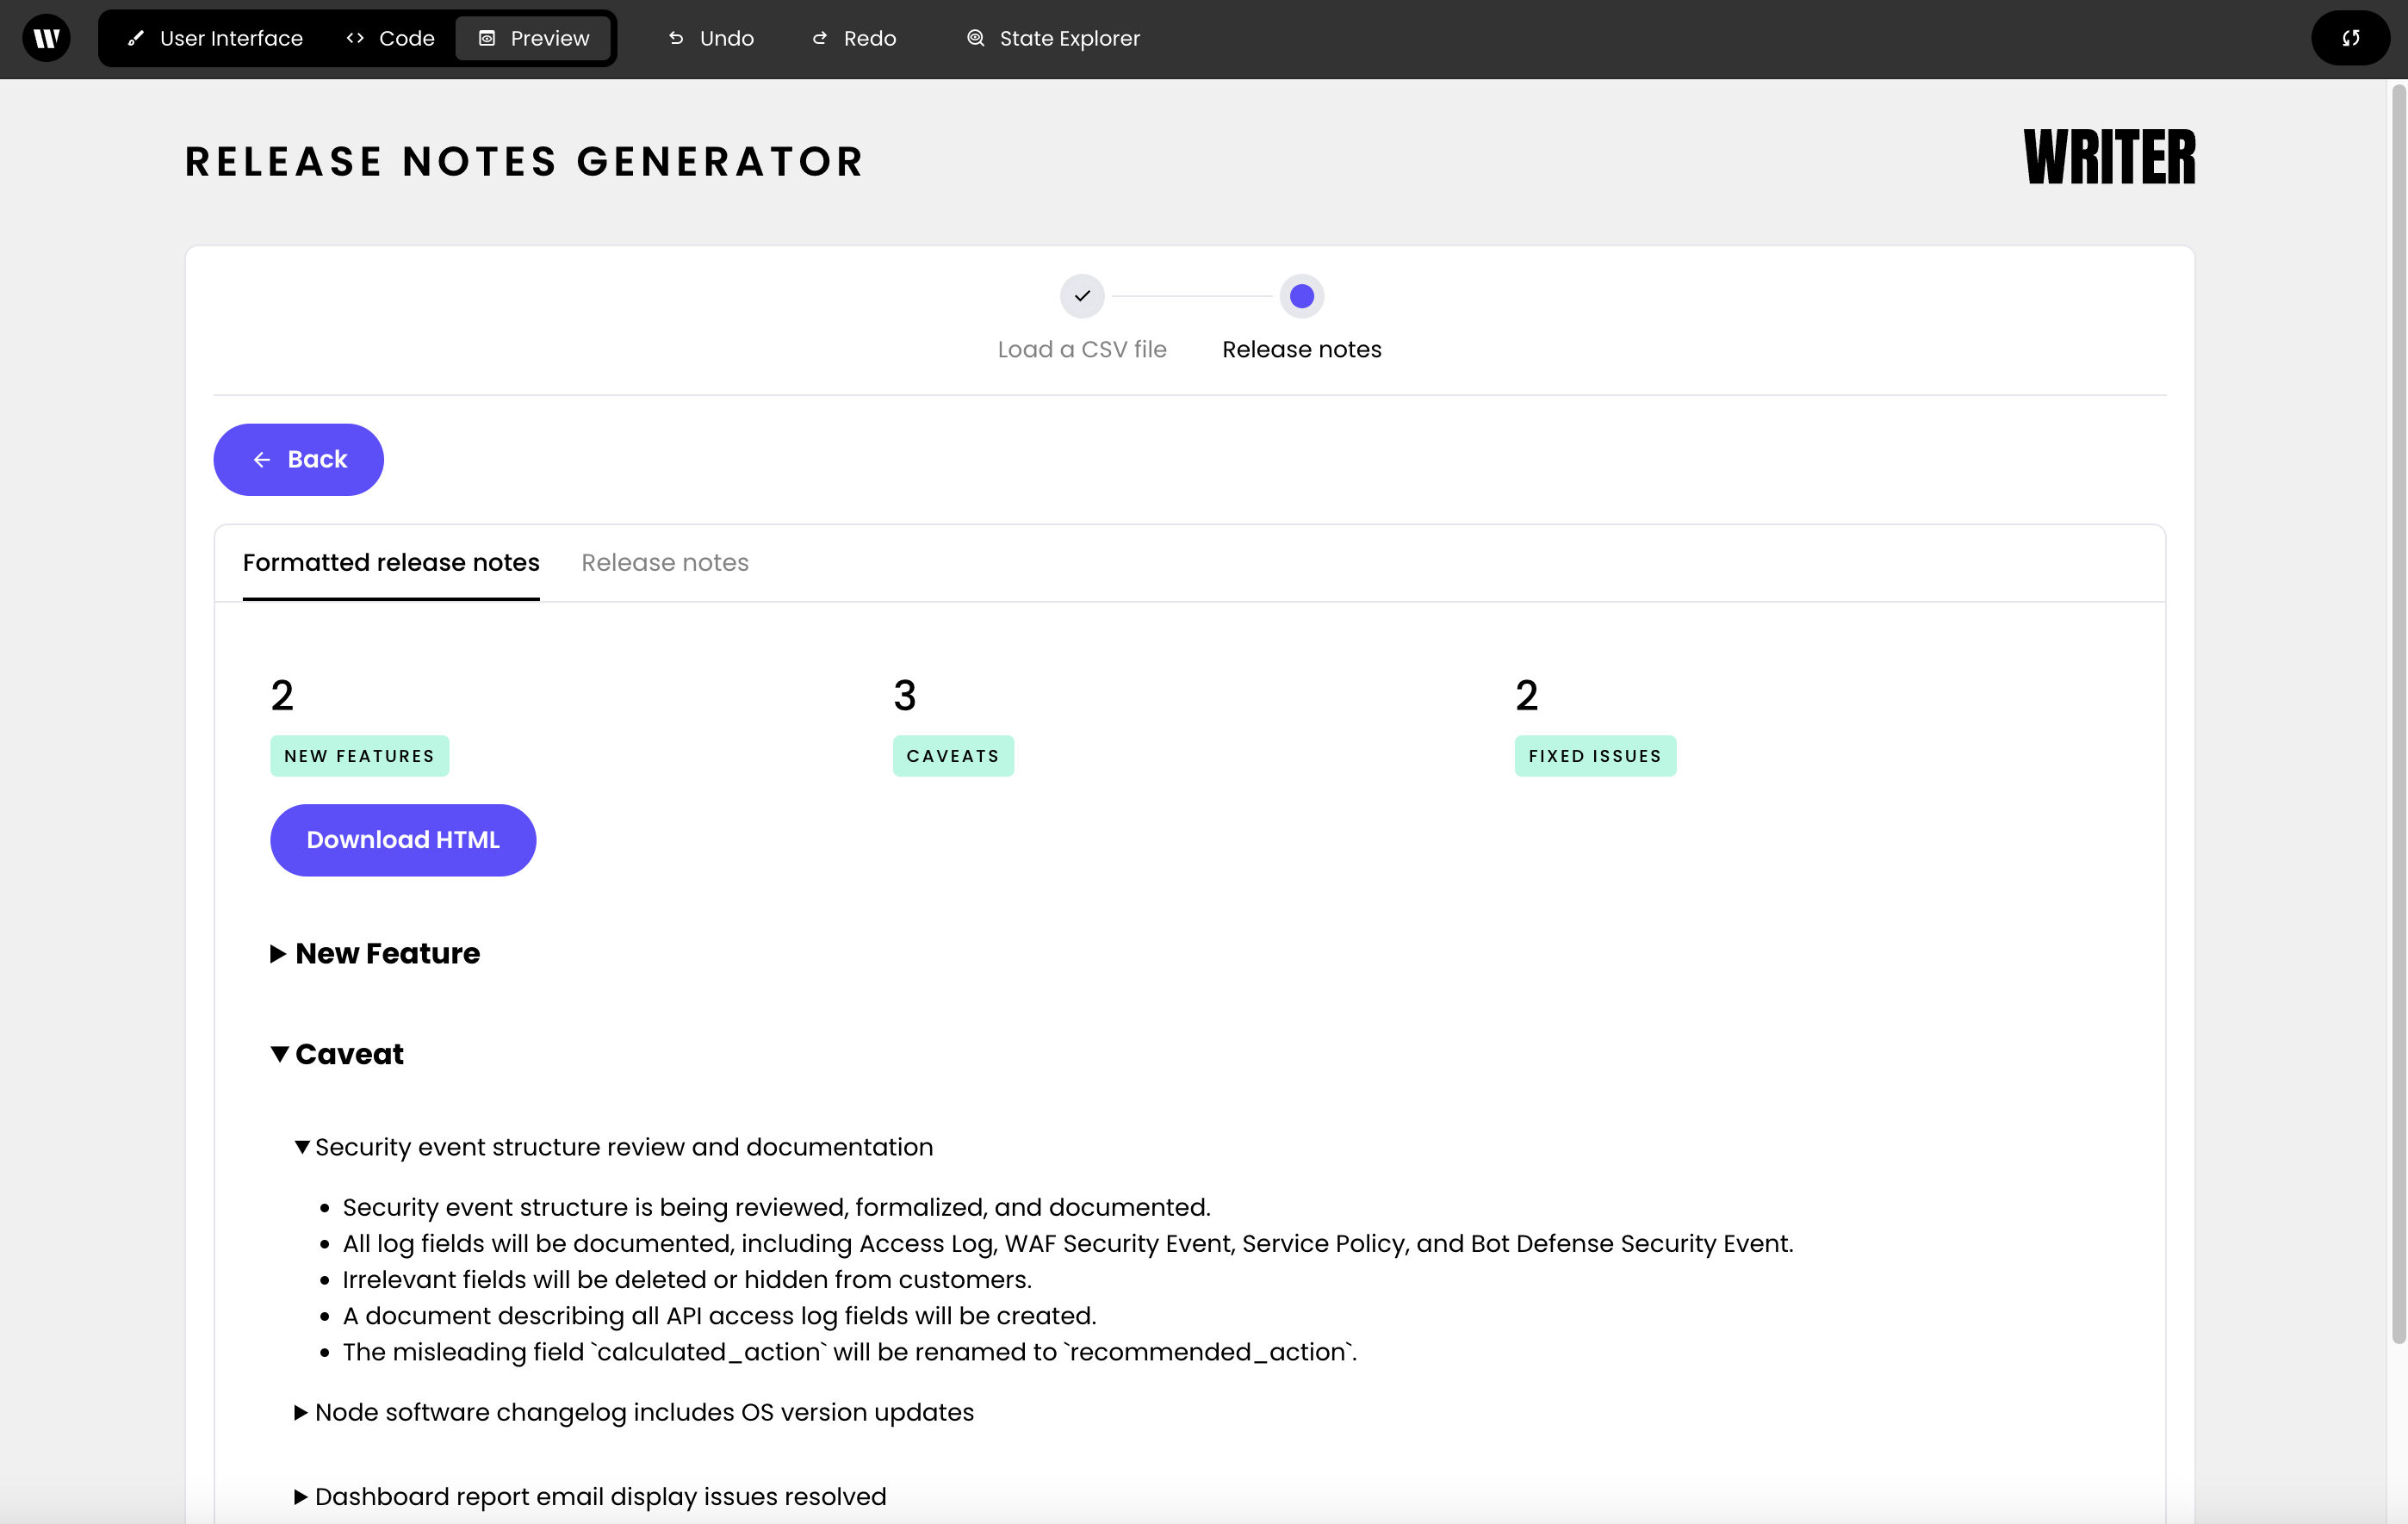
The Formatted release notes tab should look like this when using the sample data:
#### Release notes tab
Finally, you'll add a Dataframe component to the second tab to display the detailed release notes.
In the second tab, start with a Metric component to show the total number of release notes generated. Set the "Name" to "Number of release notes generated" and the "Value" to `@{metrics.total}`. Delete the default value for "Note".
Follow this with a DataFrame component to display the detailed release notes, setting the "Data" property to `@{step2.release-notes}`. Configure it for text wrapping, downloading, and searching capabilities. Set the Separator color to `#d4b2f7`.
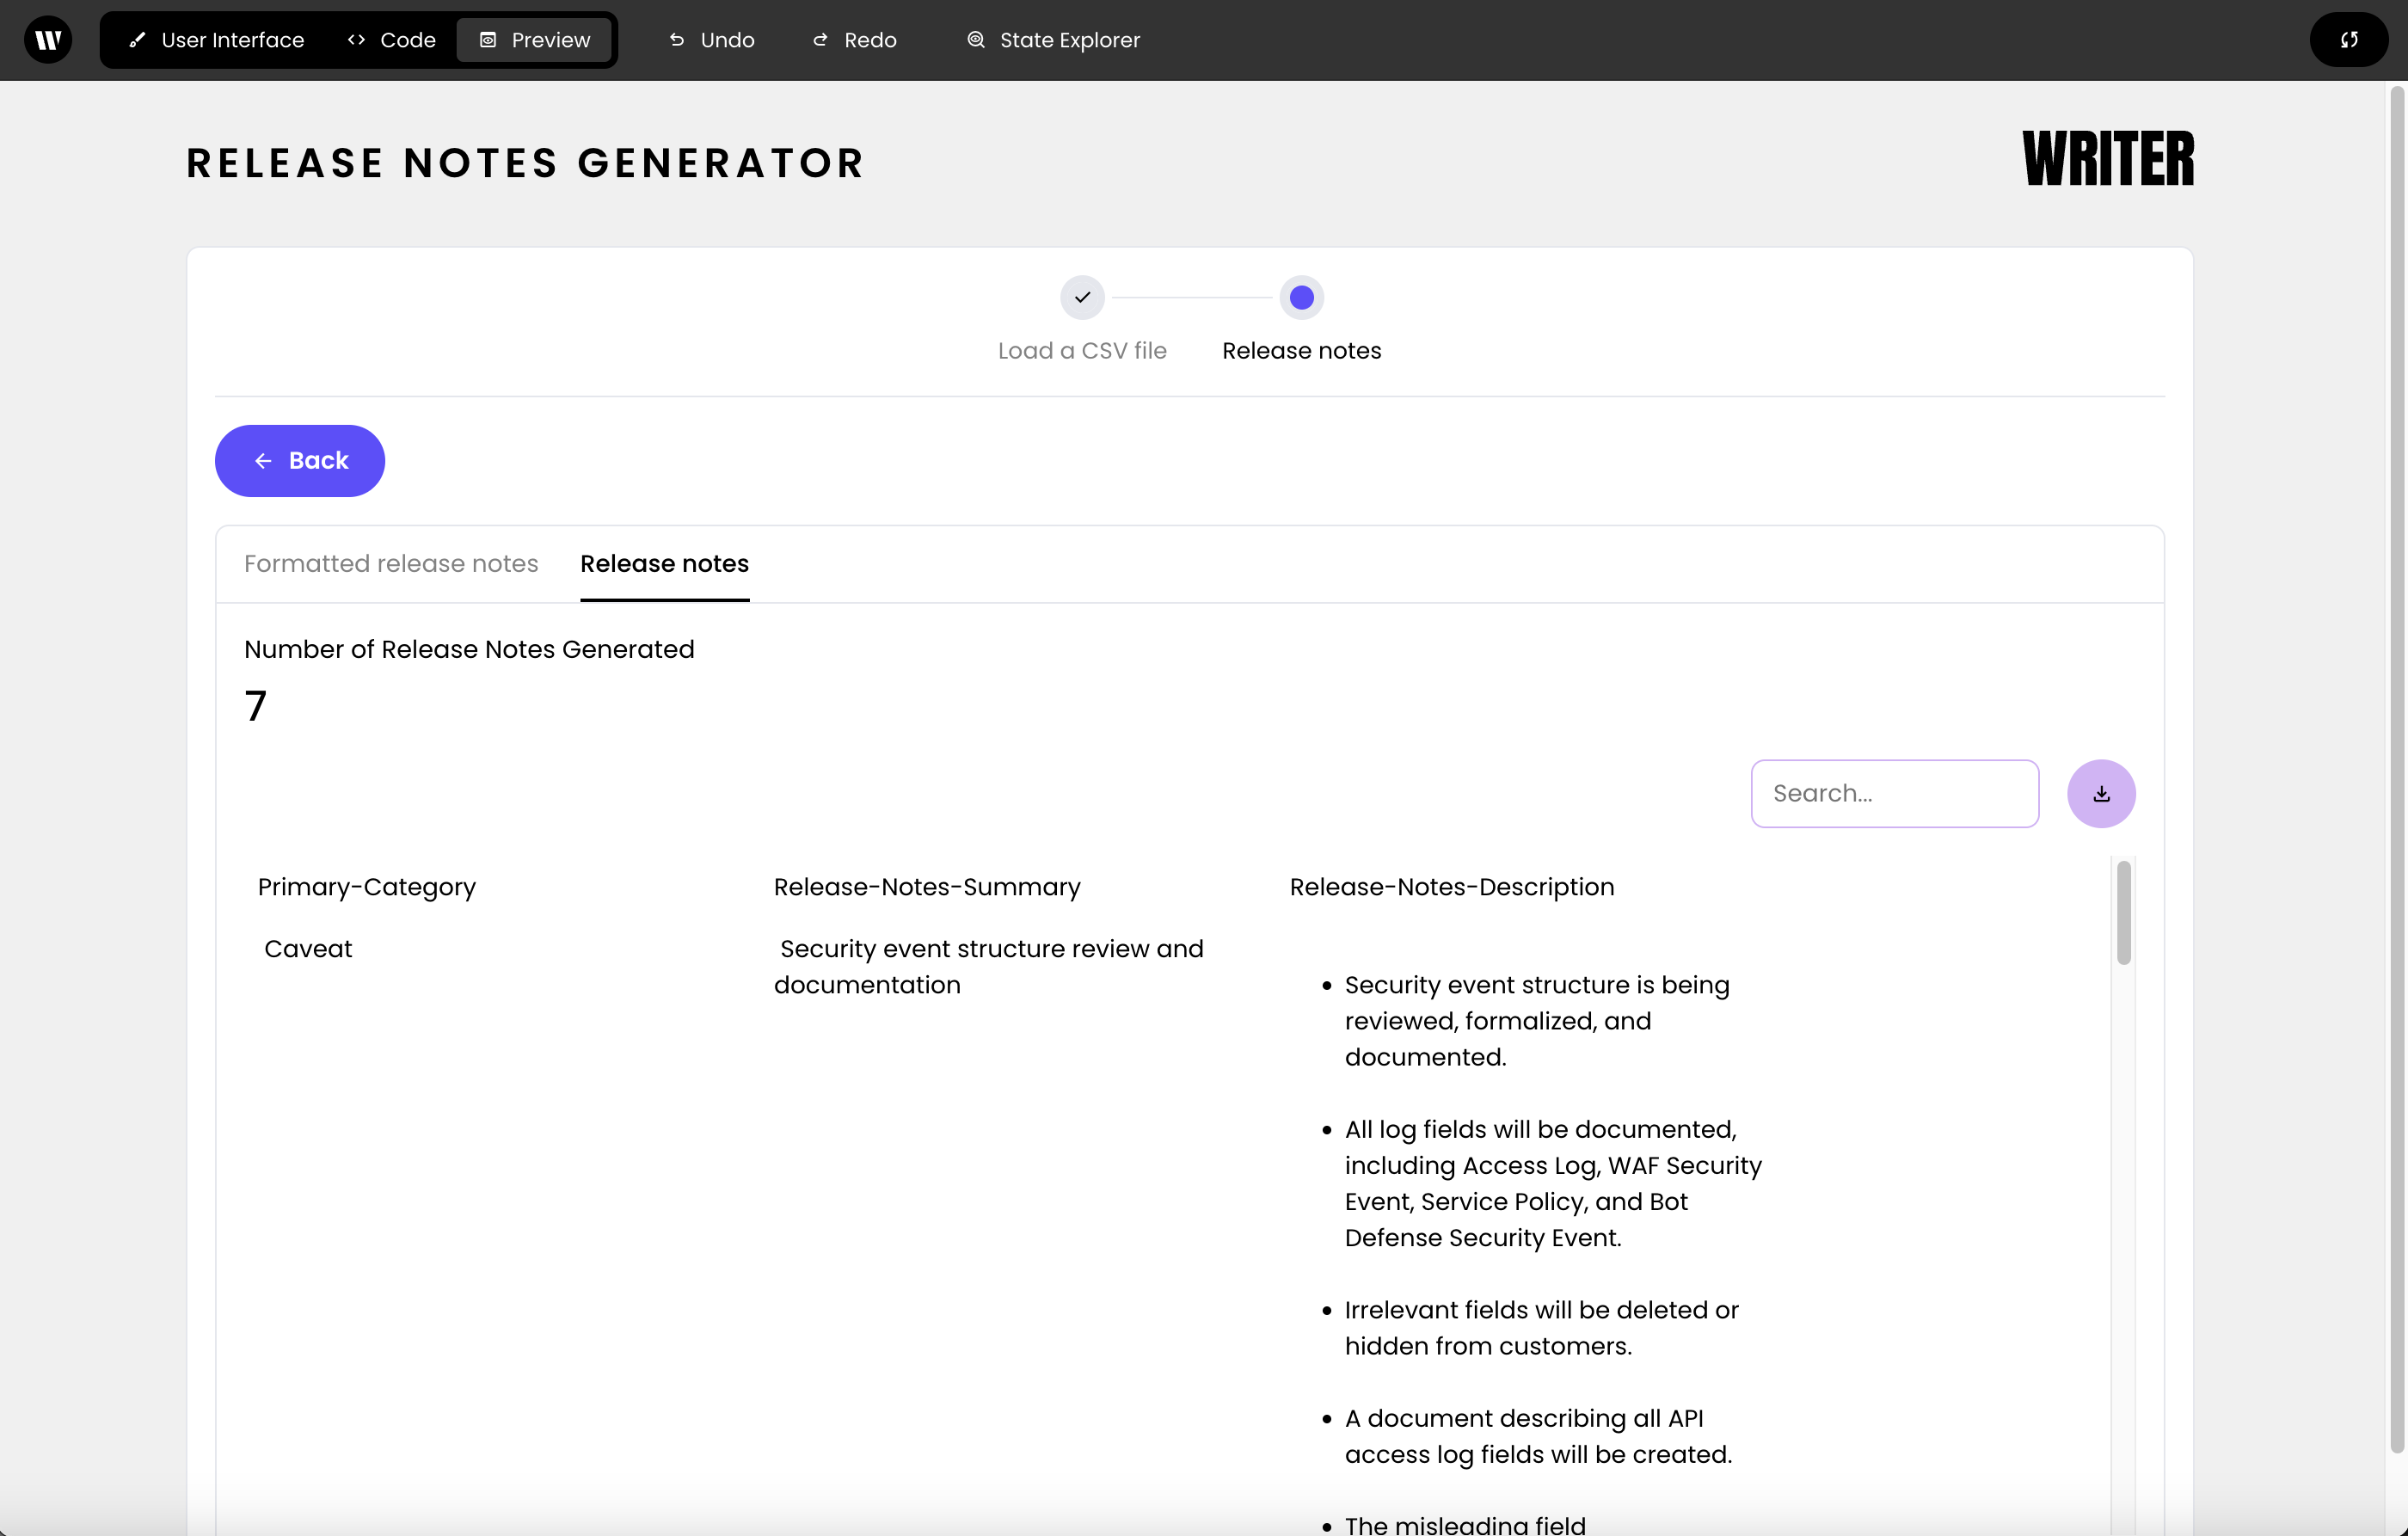
The final Release notes section should look like this:
## Generating release notes
Now that you've set up the file upload functionality, you can generate release notes based on the uploaded CSV file.
### Defining text completion functions
Using the prompts provided, define functions to get the category, release notes summary, and release notes description using AI completion. You'll use these functions to process the uploaded CSV file and generate release notes.
Define a function to get the category using AI completion:
```python theme={null}
def _get_category(desc, label):
prompt = get_category_prompt(desc, label)
label = writer.ai.complete(prompt)
return label
```
Define a function to get the release notes summary:
```python theme={null}
def _get_release_notes_summary(label, desc):
prompt = get_release_notes_summary_prompt(label, desc)
formatted_desc = writer.ai.complete(prompt)
return formatted_desc
```
Define a function to get the release notes description:
```python theme={null}
def _get_release_notes_desc(label, desc):
prompt = get_release_notes_desc_prompt(label, desc)
formatted_desc = writer.ai.complete(prompt)
return formatted_desc
```
### Implementing the generate functionality
You'll next implement the ability to process the CSV and generate release notes.
Define a function to generate HTML for the categories:
```python theme={null}
def _create_df_for_category(df,state):
unique_categories = df['Primary-Category']
formatted_output_list = list()
for category in set(unique_categories):
df_category = df[df['Primary-Category']==category]
categories = {" New Feature": "new_features", " Caveat": "caveats", " Fixed Issue": "fixed_issues" }
curr_category = categories[category]
state["metrics"][curr_category]= df_category.shape[0]
formatted_output = format_output(category,df_category)
formatted_output_list.append(formatted_output)
return "".join(formatted_output_list)
```
Define a function to write HTML to a file:
```python theme={null}
def _write_html_to_file(html):
with open("data/output-html.html", "w") as file_handle:
file_handle.write(html)
```
Next, create a function to handle the generate button click. This function will process the uploaded CSV file, generate release notes, and store the formatted output in the application state.
```python theme={null}
def handle_generate_button_click(state):
state["step1"]["generate-button-state"] = "yes"
state["step1"]["processing-message-isVisible"] = True
state["step1"]["processing-message"] = "%Hang tight, preparing to process your file"
notes_counter = 0
df = _raw_csv_to_df(state)
csv_row_count = df.shape[0]
for index, row in df.iterrows():
df.at[index,"Primary-Category"] = _get_category(label=row["Labels"], desc=row["Description"])
df.at[index,"Release-Notes-Summary"] = _get_release_notes_summary(label=row["Labels"], desc=row["Description"])
df.at[index,"Release-Notes-Description"] = _get_release_notes_desc(label=row["Labels"], desc=row["Description"])
notes_counter += 1
state["step1"]["processing-message"] = f'%Processing {notes_counter} of {csv_row_count} Release Notes'
df_temp = df[["Primary-Category","Release-Notes-Summary","Release-Notes-Description"]]
df_sorted = df_temp.sort_values(by='Primary-Category')
state["step2"]["release-notes"] = df_sorted
state["step1"]["completed"] = "yes"
state["step1"]["processing-message"] = ""
html = _create_df_for_category(df_sorted,state)
_write_html_to_file(html)
state["step2"]["formatted-release-notes"] = html
state["metrics"]["total"] = df_sorted.shape[0]
state["step1"]["generate-button-state"] = "no"
```
Finally, click on the "Generate release notes" button in the UI builder and set its `wf-click` handler to `handle_generate_button_click`.
## Displaying the release notes
Now that you've generated the release notes, you can display them in the application UI.
### Implementing helper functions
Define helper functions to handle back button clicks, write HTML to a file and download the HTML file.
Define a function to handle the back button click:
```python theme={null}
def handle_back_button_click(state):
state["step1"]["completed"] = "no"
```
Define a function to handle downloading the HTML file:
```python theme={null}
def handle_file_download(state):
html_data = wf.pack_file("data/output-html.html","text/html")
file_name = "output-html.html"
state.file_download(html_data,file_name)
```
### Building the initial release notes UI
Next, you'll build the UI for the "Release notes" step.
To display the Release notes Step component, you'll need to double-click on it.
Inside of the Step component, add a Separator component.
Below the Separator, add a Column Container component and a single Column component.
In the column, add a Button. Set its text to "Back" and set its `wf-click handler` to `handle_back_button_click`. Set the "Icon" property to `arrow_back`.
### Buiding tabs for Release notes display
Below the Back button, add a Tab Container component and two Tab components. Name them "Formatted release notes" and "Release notes".
#### Formatted release notes tab
In the first tab, you'll display the formatted release notes.
In the first tab, add an HTML Element component. Set the "Element" property `div` and the "Styles" property to the following object:
```
{
"padding": "16px",
"min-height": "64px",
"min-width": "64px",
"border-radius": "8px",
"background": "white",
}
```
Finally, set the "HTML inside" property to `@{step2.formatted-release-notes}`.
Inside thie HTML Element component, create a three-column layout using a Column Container component and three Column components.
In each column, add three Metric components to display new features, caveats, and fixed issues, respectively.
Set the "Name" of these components to a single space to remove the placeholder text: ` `. Then, set the values of these components to `@{metrics.new_features}`, `@{metrics.caveats}`, and `@{metrics.fixed_issues}`. Finally, set the "Note" text to "+New Features", "+Caveats", and "+Fixed Issues" respectively. The "+" sign will display styling that indicates a positive message.
Under the columns, add a Button component. Set its "Text" to "Download HTML" and its "Icon" to `download`. Then, set the `wf-click` handler to `handle_file_download`.
The Formatted release notes tab should look like this when using the sample data:
#### Release notes tab
Finally, you'll add a Dataframe component to the second tab to display the detailed release notes.
In the second tab, start with a Metric component to show the total number of release notes generated. Set the "Name" to "Number of release notes generated" and the "Value" to `@{metrics.total}`. Delete the default value for "Note".
Follow this with a DataFrame component to display the detailed release notes, setting the "Data" property to `@{step2.release-notes}`. Configure it for text wrapping, downloading, and searching capabilities. Set the Separator color to `#d4b2f7`.
The final Release notes section should look like this:
 You can [see the finished code on GitHub](https://github.com/writer/framework-tutorials/tree/main/release-notes-generator/end) or in `framework-tutorials/release-notes-generator/end` in the `tutorials` repo you cloned at the beginning of the tutorial.
## Conclusion
By following these steps, you've created a complete Release notes generator application using Writer Framework. To learn more, explore the rest of the Writer Framework documentation and the API documentation.
You can [see the finished code on GitHub](https://github.com/writer/framework-tutorials/tree/main/release-notes-generator/end) or in `framework-tutorials/release-notes-generator/end` in the `tutorials` repo you cloned at the beginning of the tutorial.
## Conclusion
By following these steps, you've created a complete Release notes generator application using Writer Framework. To learn more, explore the rest of the Writer Framework documentation and the API documentation.