> ## Documentation Index
> Fetch the complete documentation index at: https://dev.writer.com/llms.txt
> Use this file to discover all available pages before exploring further.
# Sync agents between local and cloud
This guide shows you how to synchronize your agents between local development and Writer Cloud environments. This allows local development offline and cloud development and deployment when you wish to share your agent with your team.
To avoid conflicts, work in one environment at a time, then explicitly sync your changes to the other environment when ready. This ensures your changes are properly tracked and preserved across environments.
## Overview
There are two main synchronization workflows:
1. **Cloud to local**: Start with a cloud agent and bring it to local development
2. **Local to cloud**: Start locally and push to the cloud
Both workflows involve downloading an agent's configuration from one environment and importing it into another.
Before starting, ensure you have:
* A Writer API key. Learn how to [create and manage API keys](/api-reference/api-keys).
* The `writer` package installed. Learn how to [install the Writer Framework package](/agent-builder/local-development#install-the-writer-framework-package).
* If you plan to do both local and cloud development, review [considerations for dual-environment development](#considerations-for-dual-environment-development) to properly handle environment variables and secrets for both local and cloud development.
## Cloud to local workflow
If you've already created an agent in the AI Studio Agent Builder web editor and want to continue development locally:
### Step 1: Export from cloud
From your cloud agent in Agent Builder, click the three dots in the top right corner of your agent and select **Download agent .zip file** to download a `.zip` file containing your agent's configuration.
 The downloaded zip file contains your agent's UI components and blueprints in a hidden folder called `.wf`. If the zip file appears to only contain generic starter files, check for the `.wf` folder which contains the internal configuration files for your agent.
### Step 2: Create local project
Create a new local project with Writer Framework and import the cloud agent by unzipping the export file you downloaded:
```bash theme={null}
# Create a new local project
writer create my-cloud-agent
cd my-cloud-agent
```
### Step 3: Import the cloud agent into your local project
Import the cloud agent by unzipping the export file you downloaded into your local project:
```bash theme={null}
# The export file contains all your agent's configuration from the web editor
unzip your-agent-export.zip
```
If you don't see the import/export agent functionality in your local development environment, make sure you're running the latest version of Writer Framework. Run `pip install --upgrade writer` to get the latest version with all features.
Because the export file contains all your agent's configuration, the terminal asks you to confirm file-by-file whether you'd like to overwrite your local project's files.
Type `A` to replace all files in your local project with the exported agent.
You can also choose the following options:
* `y` to replace an individual file
* `r` to rename an individual file
* `N` to cancel the import and not replace any files
```bash theme={null}
my-agent unzip ~/Downloads/export.zip
Archive: /Users/Downloads/export.zip
inflating: README.md
replace main.py? [y]es, [n]o, [A]ll, [N]one, [r]ename: A
```
### Step 4: Set up environment variables
Set up a `.env` file in your local project directory and add your Writer API key:
```bash theme={null}
# .env
export WRITER_API_KEY="[your_api_key]"
```
Run the following command to activate the environment variables:
```bash theme={null}
source .env
```
### Step 5: Start local development
Start the local development server:
```bash theme={null}
writer edit .
```
Your local environment now contains an exact copy of your cloud agent, and you can continue development locally.
## Local to cloud workflow
To start development locally and then push to the cloud development environment, follow these steps:
### Step 1: Create local project
Start with a local project:
```bash theme={null}
writer create my-local-agent
cd my-local-agent
writer edit .
```
### Step 2: Develop locally
Build your agent locally using the Writer Framework development environment. You have full access to:
* Python code editing
* UI component configuration
* Blueprint design
* Local testing and debugging
### Step 3: Prepare for cloud sync
Before syncing to the cloud, ensure your code handles both Vault and environment variables as described in the [handle environment variables and secrets](#handle-environment-variables-and-secrets) section.
Remove or move your `.env` file before syncing to prevent it from showing in the cloud editor.
### Step 4: Download the local agent's export file
When you're ready to sync your local agent to the cloud, download the local agent's export file from the web editor.
In the visual editor interface, click the three dots in the top right corner of your agent and select **Download agent .zip file** to download a `.zip` file containing your agent's configuration.
If you don't see the import/export agent functionality in your local development environment, make sure you're running the latest version of Writer Framework. Run `pip install --upgrade writer` to get the latest version with all features.
The export file includes all files in your local project, including a hidden `.wf` folder that contains your UI components and blueprints as internal JSON files. Don't include sensitive information in the exported file because it is visible in the cloud editor.
### Step 5: Import the local agent into your cloud project
Open the Agent Builder web editor in AI Studio and click the three dots in the top right corner of your agent. Then select **Import agent .zip file** to upload the local agent's export file.
A modal appears and asks you to confirm that you are overwriting your existing agent.
The downloaded zip file contains your agent's UI components and blueprints in a hidden folder called `.wf`. If the zip file appears to only contain generic starter files, check for the `.wf` folder which contains the internal configuration files for your agent.
### Step 2: Create local project
Create a new local project with Writer Framework and import the cloud agent by unzipping the export file you downloaded:
```bash theme={null}
# Create a new local project
writer create my-cloud-agent
cd my-cloud-agent
```
### Step 3: Import the cloud agent into your local project
Import the cloud agent by unzipping the export file you downloaded into your local project:
```bash theme={null}
# The export file contains all your agent's configuration from the web editor
unzip your-agent-export.zip
```
If you don't see the import/export agent functionality in your local development environment, make sure you're running the latest version of Writer Framework. Run `pip install --upgrade writer` to get the latest version with all features.
Because the export file contains all your agent's configuration, the terminal asks you to confirm file-by-file whether you'd like to overwrite your local project's files.
Type `A` to replace all files in your local project with the exported agent.
You can also choose the following options:
* `y` to replace an individual file
* `r` to rename an individual file
* `N` to cancel the import and not replace any files
```bash theme={null}
my-agent unzip ~/Downloads/export.zip
Archive: /Users/Downloads/export.zip
inflating: README.md
replace main.py? [y]es, [n]o, [A]ll, [N]one, [r]ename: A
```
### Step 4: Set up environment variables
Set up a `.env` file in your local project directory and add your Writer API key:
```bash theme={null}
# .env
export WRITER_API_KEY="[your_api_key]"
```
Run the following command to activate the environment variables:
```bash theme={null}
source .env
```
### Step 5: Start local development
Start the local development server:
```bash theme={null}
writer edit .
```
Your local environment now contains an exact copy of your cloud agent, and you can continue development locally.
## Local to cloud workflow
To start development locally and then push to the cloud development environment, follow these steps:
### Step 1: Create local project
Start with a local project:
```bash theme={null}
writer create my-local-agent
cd my-local-agent
writer edit .
```
### Step 2: Develop locally
Build your agent locally using the Writer Framework development environment. You have full access to:
* Python code editing
* UI component configuration
* Blueprint design
* Local testing and debugging
### Step 3: Prepare for cloud sync
Before syncing to the cloud, ensure your code handles both Vault and environment variables as described in the [handle environment variables and secrets](#handle-environment-variables-and-secrets) section.
Remove or move your `.env` file before syncing to prevent it from showing in the cloud editor.
### Step 4: Download the local agent's export file
When you're ready to sync your local agent to the cloud, download the local agent's export file from the web editor.
In the visual editor interface, click the three dots in the top right corner of your agent and select **Download agent .zip file** to download a `.zip` file containing your agent's configuration.
If you don't see the import/export agent functionality in your local development environment, make sure you're running the latest version of Writer Framework. Run `pip install --upgrade writer` to get the latest version with all features.
The export file includes all files in your local project, including a hidden `.wf` folder that contains your UI components and blueprints as internal JSON files. Don't include sensitive information in the exported file because it is visible in the cloud editor.
### Step 5: Import the local agent into your cloud project
Open the Agent Builder web editor in AI Studio and click the three dots in the top right corner of your agent. Then select **Import agent .zip file** to upload the local agent's export file.
A modal appears and asks you to confirm that you are overwriting your existing agent.
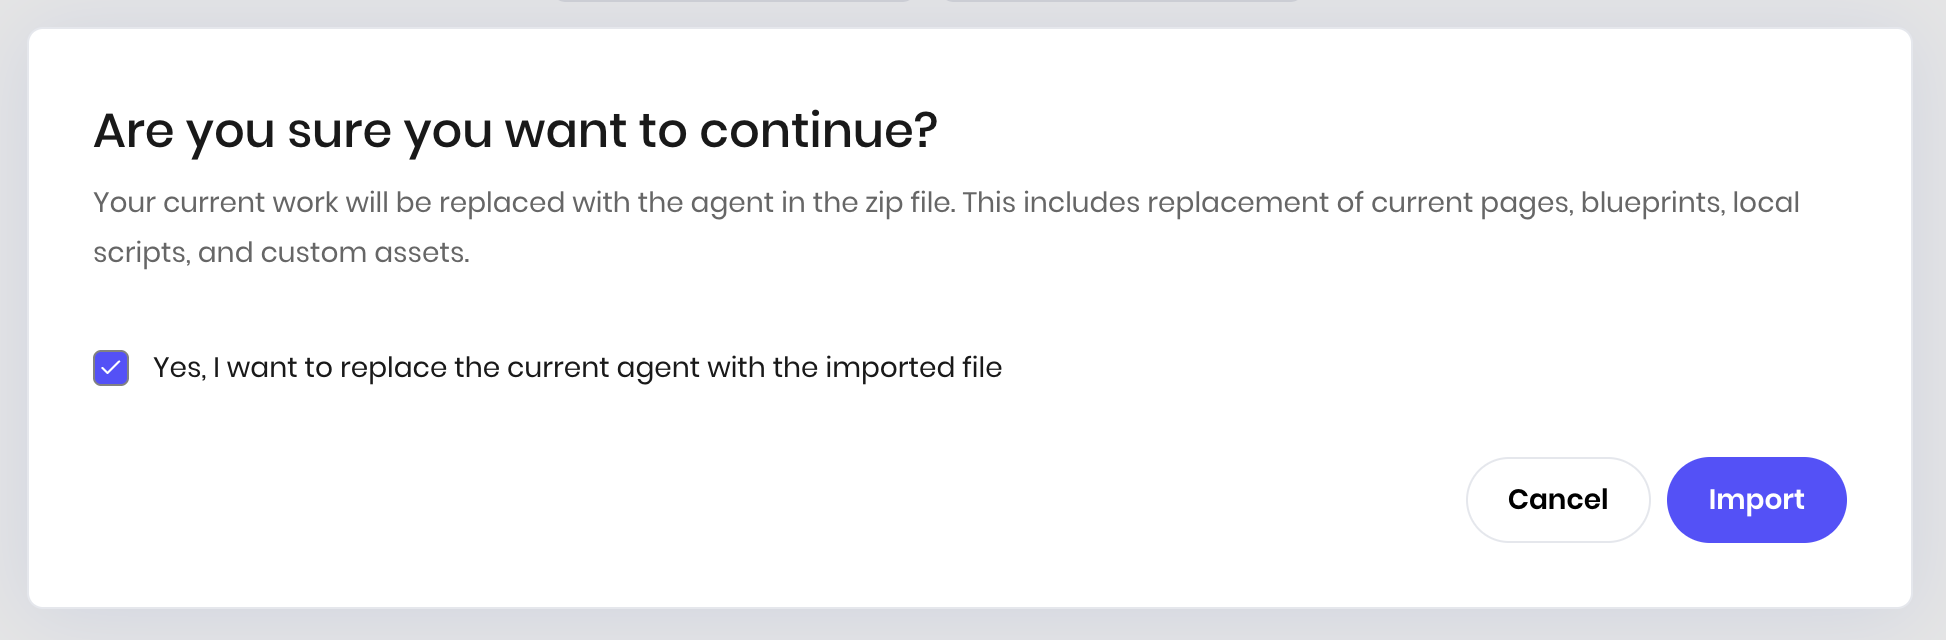 Check the box to acknowledge that you're replacing your existing agent and click **Import** to continue.
## Deploy your agent
After syncing your agent to the cloud, deploy it following the [standard cloud workflow](/agent-builder/quickstart#deploy-the-agent).
From the agent editor interface in Agent Builder, click **Configure deployment** in the top right corner of the Agent Builder interface. You can also access the deployment configuration by going to the [AI Studio homepage](https://app.writer.com/aistudio) and selecting the agent you created.
If the agent isn't deployed, you see a toggle bar that says **Draft**.
Check the box to acknowledge that you're replacing your existing agent and click **Import** to continue.
## Deploy your agent
After syncing your agent to the cloud, deploy it following the [standard cloud workflow](/agent-builder/quickstart#deploy-the-agent).
From the agent editor interface in Agent Builder, click **Configure deployment** in the top right corner of the Agent Builder interface. You can also access the deployment configuration by going to the [AI Studio homepage](https://app.writer.com/aistudio) and selecting the agent you created.
If the agent isn't deployed, you see a toggle bar that says **Draft**.
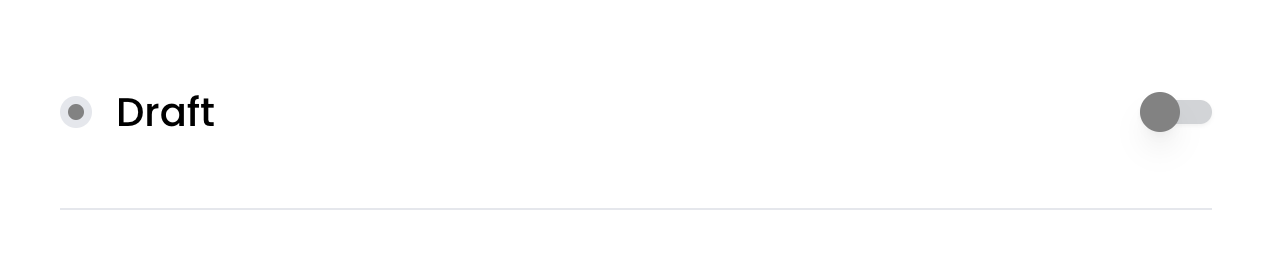 To deploy the agent, toggle the bar. Writer deploys the agent to the Writer cloud, which takes a moment to complete.
When you deploy the agent, the toggle bar shows **Deployed**. It also shows a list of the teams in your organization, which you can use to grant access to the agent. You must select at least one team before you can view the URL for the deployed agent.
## Considerations for dual-environment development
* **Local-only libraries**: If you install Python packages locally that aren't listed in [Python libraries installed in Agent Builder](/agent-builder/python-libraries), your agent won't run in the cloud version of Agent Builder because those packages aren't available there.
* **Environment file visibility**: Your `.env` file is visible in plain text in the cloud editor when you sync your local project. Any file you add to your local project is included in the export file to the cloud. Before syncing, move your `.env` file to a different location or delete it to prevent it from showing in the cloud editor, and add your secrets to Vault.
* **Vault availability**: Vault is only available in the cloud version of Agent Builder. For local development, you must use environment variables. Structure your code to handle both scenarios gracefully.
* **Keep your local Writer Framework package up to date**: When you sync your agent to the cloud, the cloud version of Agent Builder uses the latest version of the Writer Framework package. If you're using a different version of the Writer Framework package in your local project, you might encounter errors when you sync to the cloud. To avoid this, keep your local Writer Framework package up to date by running the following command:
```bash theme={null}
pip install --upgrade writer
```
### Handle environment variables and secrets
The following code shows an example of how to look for secrets in Vault first, then fall back to environment variables:
```python theme={null}
import os
def get_secret(key, default=None):
"""Get a secret from Vault if available, otherwise from environment variables"""
try:
# Try to get from Vault first (cloud environment). The `vault` object is available in Python code blocks and in event handlers.
return vault[key]
except KeyError:
# Fall back to environment variables (local development)
return os.getenv(key, default)
# Usage example
api_key = get_secret("WRITER_API_KEY", "default_key")
database_url = get_secret("DATABASE_URL")
```
## Next steps
* Learn about [local development](/agent-builder/local-development) workflows
* Understand how to [deploy your agent](#deploy-your-agent) from the cloud
* Explore [custom Python code](/agent-builder/python-code) for advanced functionality
To deploy the agent, toggle the bar. Writer deploys the agent to the Writer cloud, which takes a moment to complete.
When you deploy the agent, the toggle bar shows **Deployed**. It also shows a list of the teams in your organization, which you can use to grant access to the agent. You must select at least one team before you can view the URL for the deployed agent.
## Considerations for dual-environment development
* **Local-only libraries**: If you install Python packages locally that aren't listed in [Python libraries installed in Agent Builder](/agent-builder/python-libraries), your agent won't run in the cloud version of Agent Builder because those packages aren't available there.
* **Environment file visibility**: Your `.env` file is visible in plain text in the cloud editor when you sync your local project. Any file you add to your local project is included in the export file to the cloud. Before syncing, move your `.env` file to a different location or delete it to prevent it from showing in the cloud editor, and add your secrets to Vault.
* **Vault availability**: Vault is only available in the cloud version of Agent Builder. For local development, you must use environment variables. Structure your code to handle both scenarios gracefully.
* **Keep your local Writer Framework package up to date**: When you sync your agent to the cloud, the cloud version of Agent Builder uses the latest version of the Writer Framework package. If you're using a different version of the Writer Framework package in your local project, you might encounter errors when you sync to the cloud. To avoid this, keep your local Writer Framework package up to date by running the following command:
```bash theme={null}
pip install --upgrade writer
```
### Handle environment variables and secrets
The following code shows an example of how to look for secrets in Vault first, then fall back to environment variables:
```python theme={null}
import os
def get_secret(key, default=None):
"""Get a secret from Vault if available, otherwise from environment variables"""
try:
# Try to get from Vault first (cloud environment). The `vault` object is available in Python code blocks and in event handlers.
return vault[key]
except KeyError:
# Fall back to environment variables (local development)
return os.getenv(key, default)
# Usage example
api_key = get_secret("WRITER_API_KEY", "default_key")
database_url = get_secret("DATABASE_URL")
```
## Next steps
* Learn about [local development](/agent-builder/local-development) workflows
* Understand how to [deploy your agent](#deploy-your-agent) from the cloud
* Explore [custom Python code](/agent-builder/python-code) for advanced functionality