> ## Documentation Index
> Fetch the complete documentation index at: https://dev.writer.com/llms.txt
> Use this file to discover all available pages before exploring further.
# Agent Builder Quickstart
> Build your first agent in Agent Builder. Create a meeting notes summarizer with a visual interface and blueprint in this step-by-step tutorial.
Agent Builder is in beta. Some features are still in development and are subject to change.
This quickstart walks through building a new agent that summarizes meeting notes in different formats for various stakeholders.
 This quickstart covers how to:
* [Create a new Agent Builder project](#create-a-new-agent-builder-project)
* [Clear the demo agent that's automatically created](#clear-the-demo-agent)
* [Build the agent's UI to accept meeting notes and select a summary format](#build-the-ui)
* [Build the agent's blueprint to summarize the meeting notes and display the result in the UI](#build-the-blueprint)
* [Preview the agent](#preview-the-agent)
* [Deploy the agent](#deploy-the-agent)
If you are unfamiliar with Agent Builder:
* Review the [Agent Builder overview](/agent-builder/overview) to learn more about the different components of an agent.
* Follow the [Demo agent walkthrough](/agent-builder/demo-agent) to see how to modify an existing agent.
## Choose your development approach
This quickstart shows the cloud development workflow. If you prefer to develop locally with your editor of choice, see [Develop agents locally](/agent-builder/local-development) for the local development workflow.
You can follow the same steps here to build and deploy the quickstart agent locally once you've initialized a local project.
## Create a new Agent Builder project
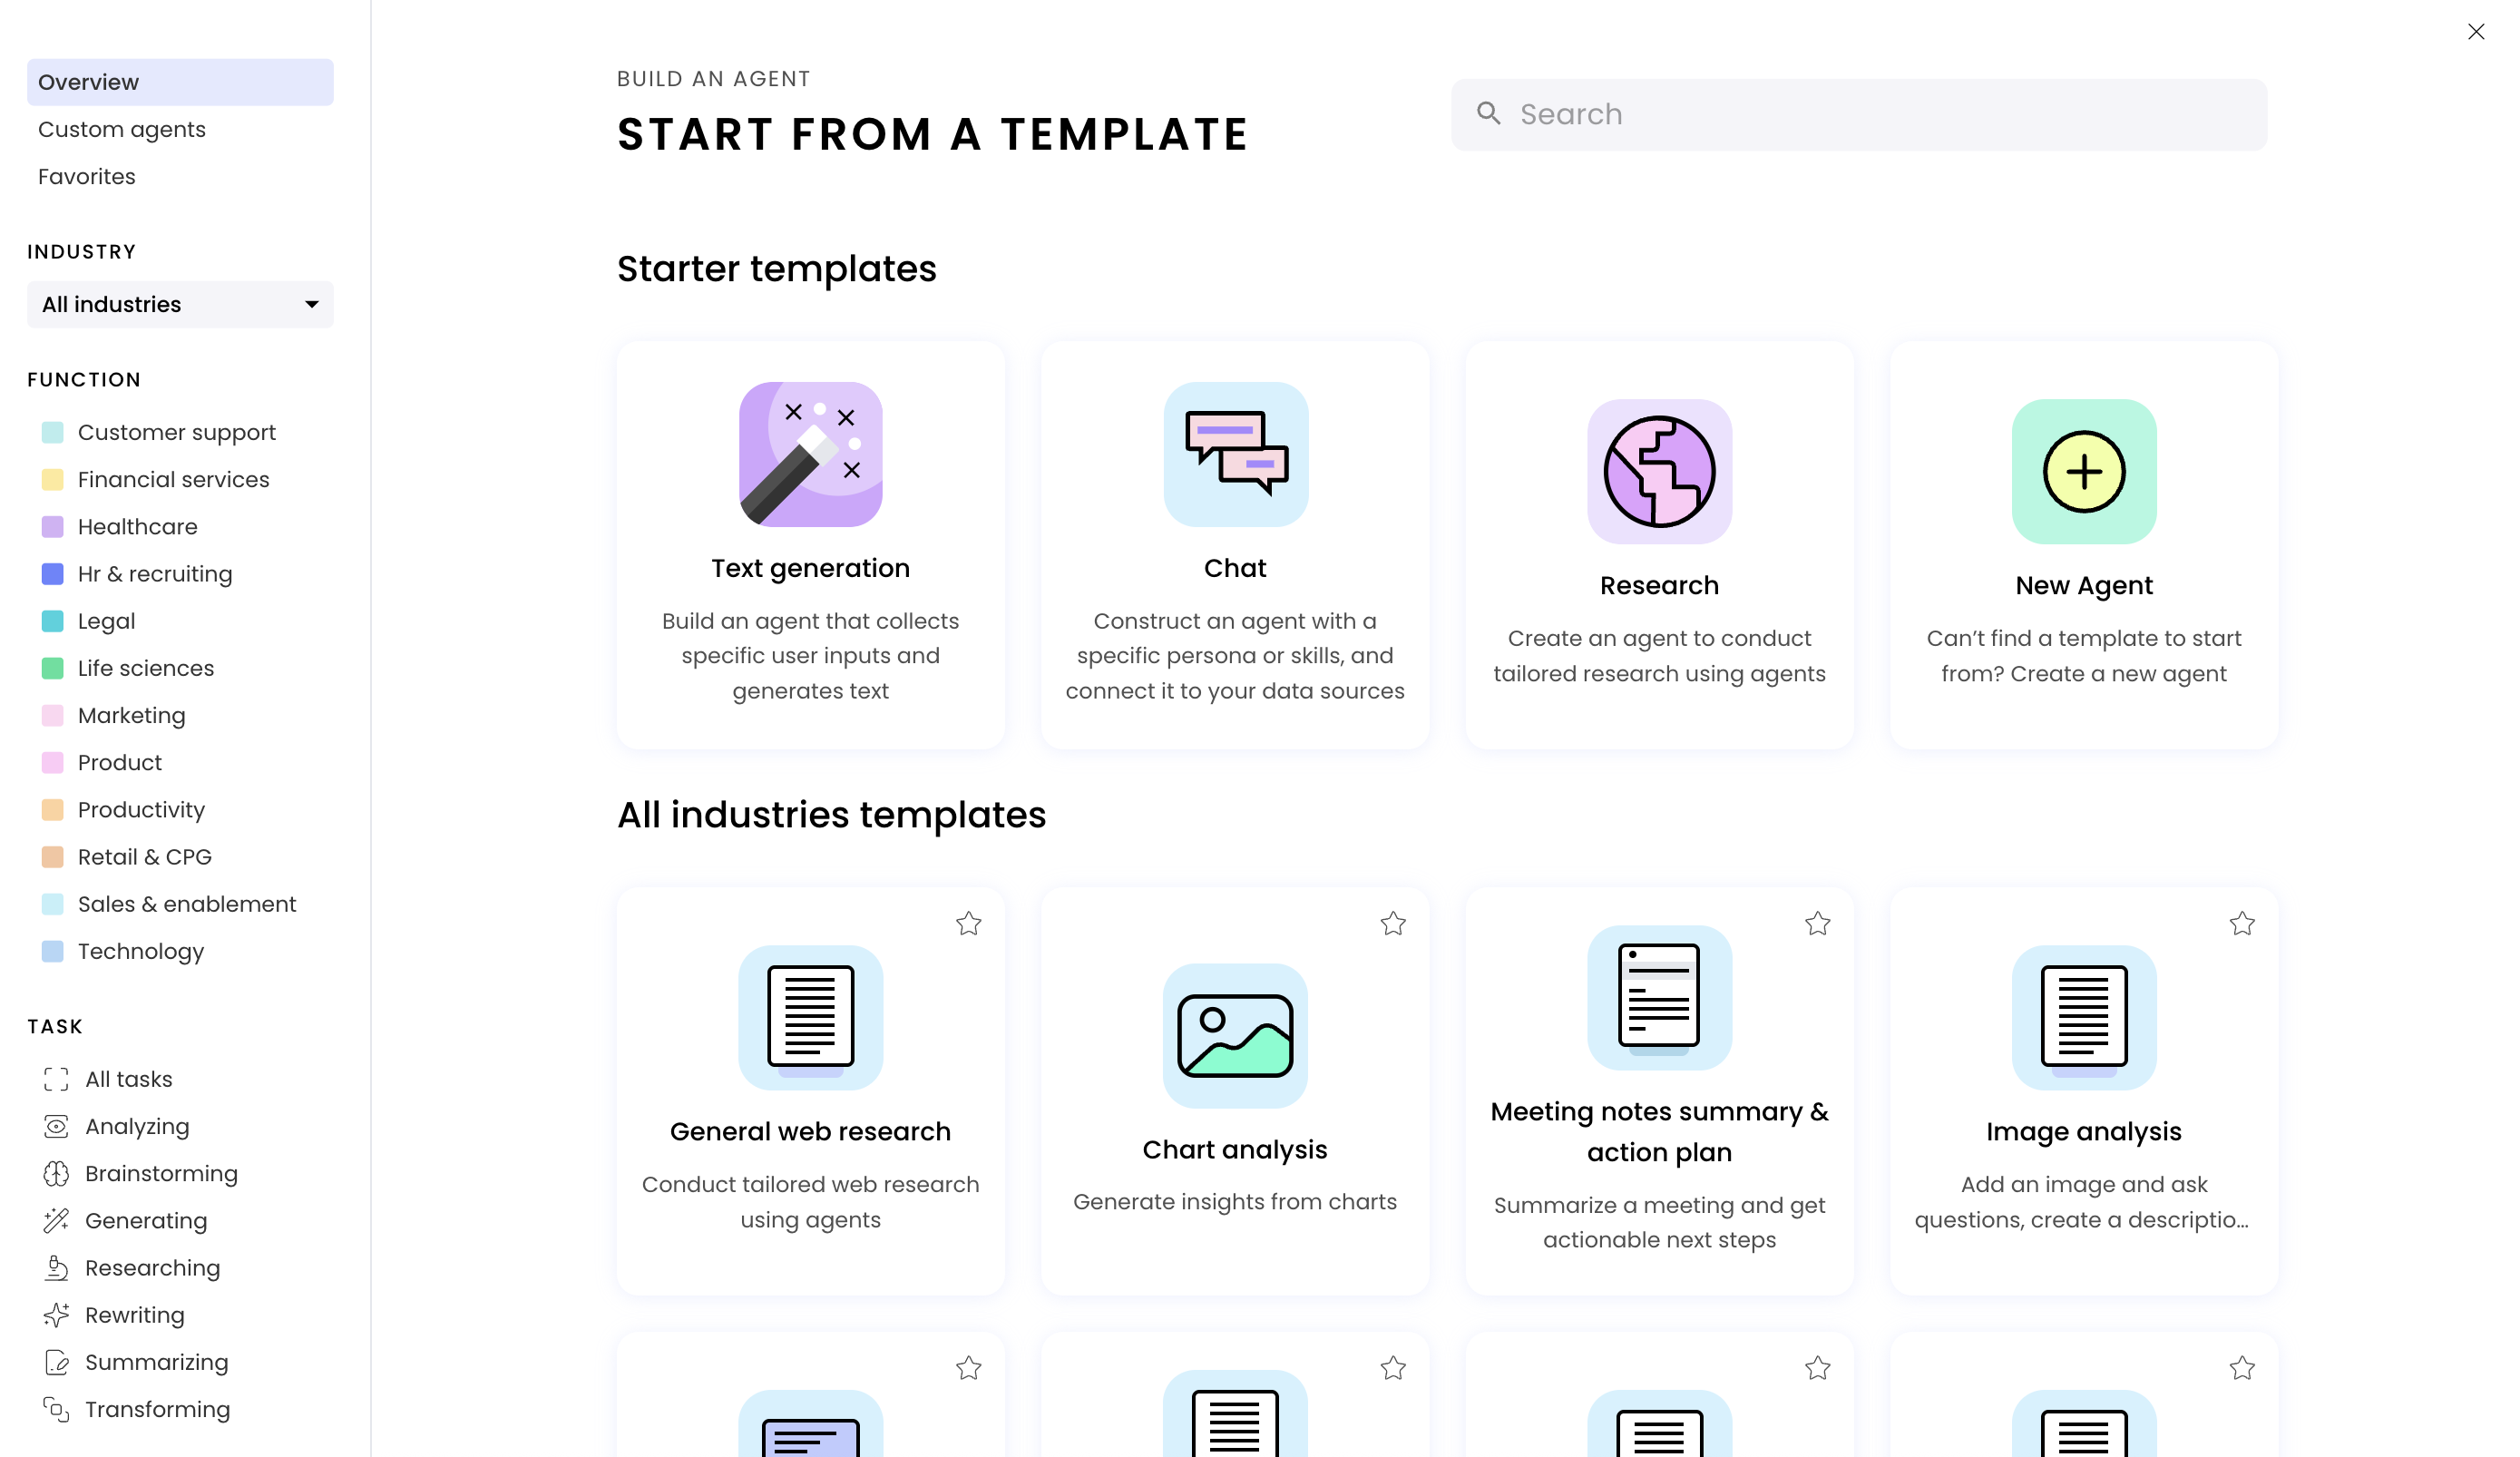
To create an agent with Agent Builder, log in to [AI Studio](https://app.writer.com/aistudio) and follow these steps:
Click the **Build an agent** button in the top right corner of the page.
This quickstart covers how to:
* [Create a new Agent Builder project](#create-a-new-agent-builder-project)
* [Clear the demo agent that's automatically created](#clear-the-demo-agent)
* [Build the agent's UI to accept meeting notes and select a summary format](#build-the-ui)
* [Build the agent's blueprint to summarize the meeting notes and display the result in the UI](#build-the-blueprint)
* [Preview the agent](#preview-the-agent)
* [Deploy the agent](#deploy-the-agent)
If you are unfamiliar with Agent Builder:
* Review the [Agent Builder overview](/agent-builder/overview) to learn more about the different components of an agent.
* Follow the [Demo agent walkthrough](/agent-builder/demo-agent) to see how to modify an existing agent.
## Choose your development approach
This quickstart shows the cloud development workflow. If you prefer to develop locally with your editor of choice, see [Develop agents locally](/agent-builder/local-development) for the local development workflow.
You can follow the same steps here to build and deploy the quickstart agent locally once you've initialized a local project.
## Create a new Agent Builder project
To create an agent with Agent Builder, log in to [AI Studio](https://app.writer.com/aistudio) and follow these steps:
Click the **Build an agent** button in the top right corner of the page.
 In the modal that appears, select **New Agent** to create a new agent from scratch.
For common use cases, prebuilt agent templates are available. These include both general-purpose and industry-specific options, all customizable to your specific requirements.
In the modal that appears, select **New Agent** to create a new agent from scratch.
For common use cases, prebuilt agent templates are available. These include both general-purpose and industry-specific options, all customizable to your specific requirements.
 Once the agent is created, a new tab will open in your browser with the Agent Builder interface.
You can get to the Agent Builder interface any time by going to the [AI Studio homepage](https://app.writer.com/aistudio) and selecting the agent you created.
You'll see the Configure Deployment page when you select the agent. To get to the edit interface, click the **Edit** button in the top right corner.
Once the agent is created, a new tab will open in your browser with the Agent Builder interface.
You can get to the Agent Builder interface any time by going to the [AI Studio homepage](https://app.writer.com/aistudio) and selecting the agent you created.
You'll see the Configure Deployment page when you select the agent. To get to the edit interface, click the **Edit** button in the top right corner.
 ## Clear the demo agent
When you create a new Agent Builder project, a demo agent is automatically created for you. You can remove the demo agent's components and blueprints to start building your own agent.
### Clear the UI
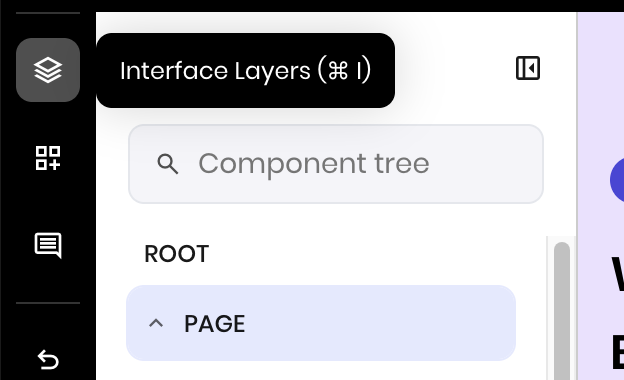
Navigate to the **Interface** view. Then select the **Interface Layers** section in the left sidebar.
Click the top **Page** component from the UI component tree.
## Clear the demo agent
When you create a new Agent Builder project, a demo agent is automatically created for you. You can remove the demo agent's components and blueprints to start building your own agent.
### Clear the UI
Navigate to the **Interface** view. Then select the **Interface Layers** section in the left sidebar.
Click the top **Page** component from the UI component tree.
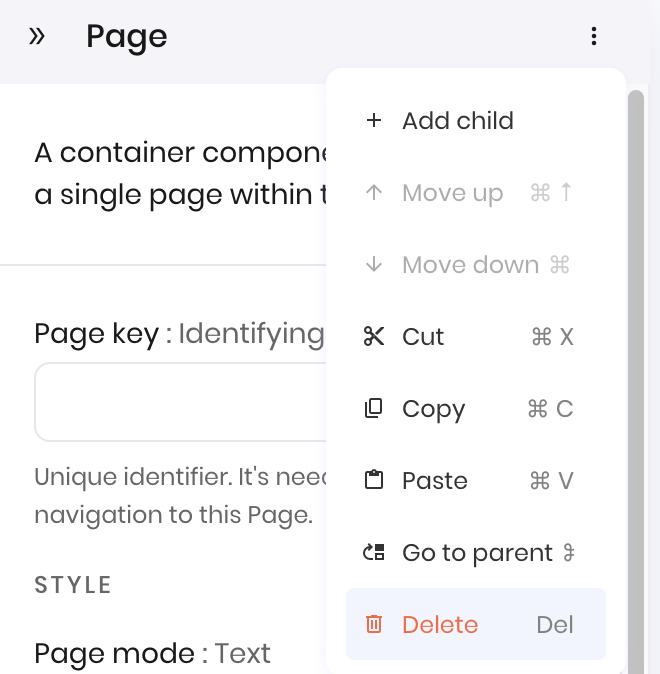
 Then click the three vertical dots on the Page's settings menu to find the **Delete** option.
 Your Component Tree should now contain a single **Root** component.
Click **Add page** at the bottom of the component tree to create a new blank page.
Your Component Tree should now contain a single **Root** component.
Click **Add page** at the bottom of the component tree to create a new blank page.
 ### Clear the blueprint
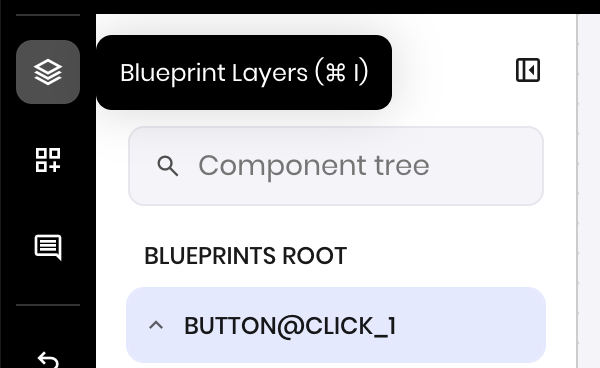
Navigate to the **Blueprints** view. Then select the **Blueprints Layers** section in the left sidebar.
Click the first component under **Blueprints Root**. Here, the component is a blueprint called `BUTTON@CLICK_1`.
### Clear the blueprint
Navigate to the **Blueprints** view. Then select the **Blueprints Layers** section in the left sidebar.
Click the first component under **Blueprints Root**. Here, the component is a blueprint called `BUTTON@CLICK_1`.
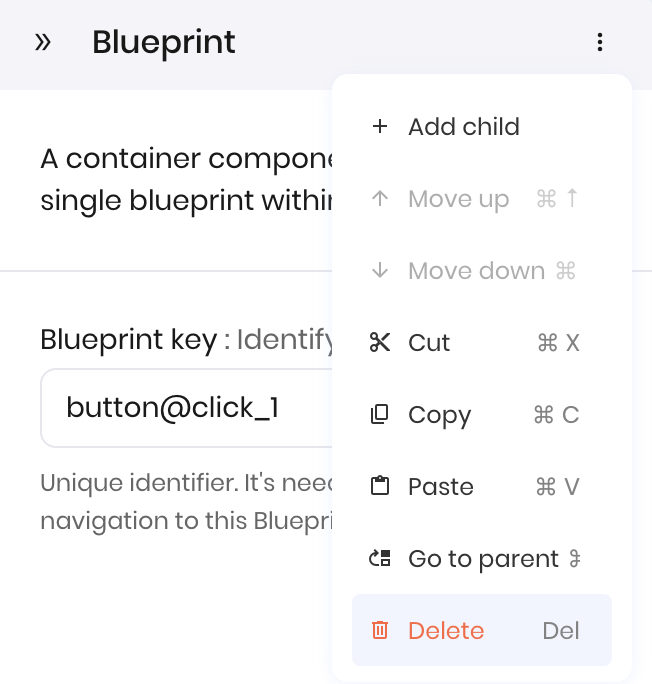
 Then click the three vertical dots on the blueprint's settings menu to find the **Delete** option.
 Your blueprint's component tree should now be empty.
Click **Add blueprint** at the bottom of the component tree to create a new blank blueprint.
Your blueprint's component tree should now be empty.
Click **Add blueprint** at the bottom of the component tree to create a new blank blueprint.
 ## Build the UI
Now that you have an empty page, build the UI for the new agent. This agent has the following components:
* A **Text area** for users to paste their meeting notes
* A **Select input** for users to select the summary format they want
* A **Button** to start the summarization process
* A **Message** component to display a loading message while summarization is in progress
* A **Text** component to display the summary
Navigate to the **Interface** view to build the UI.
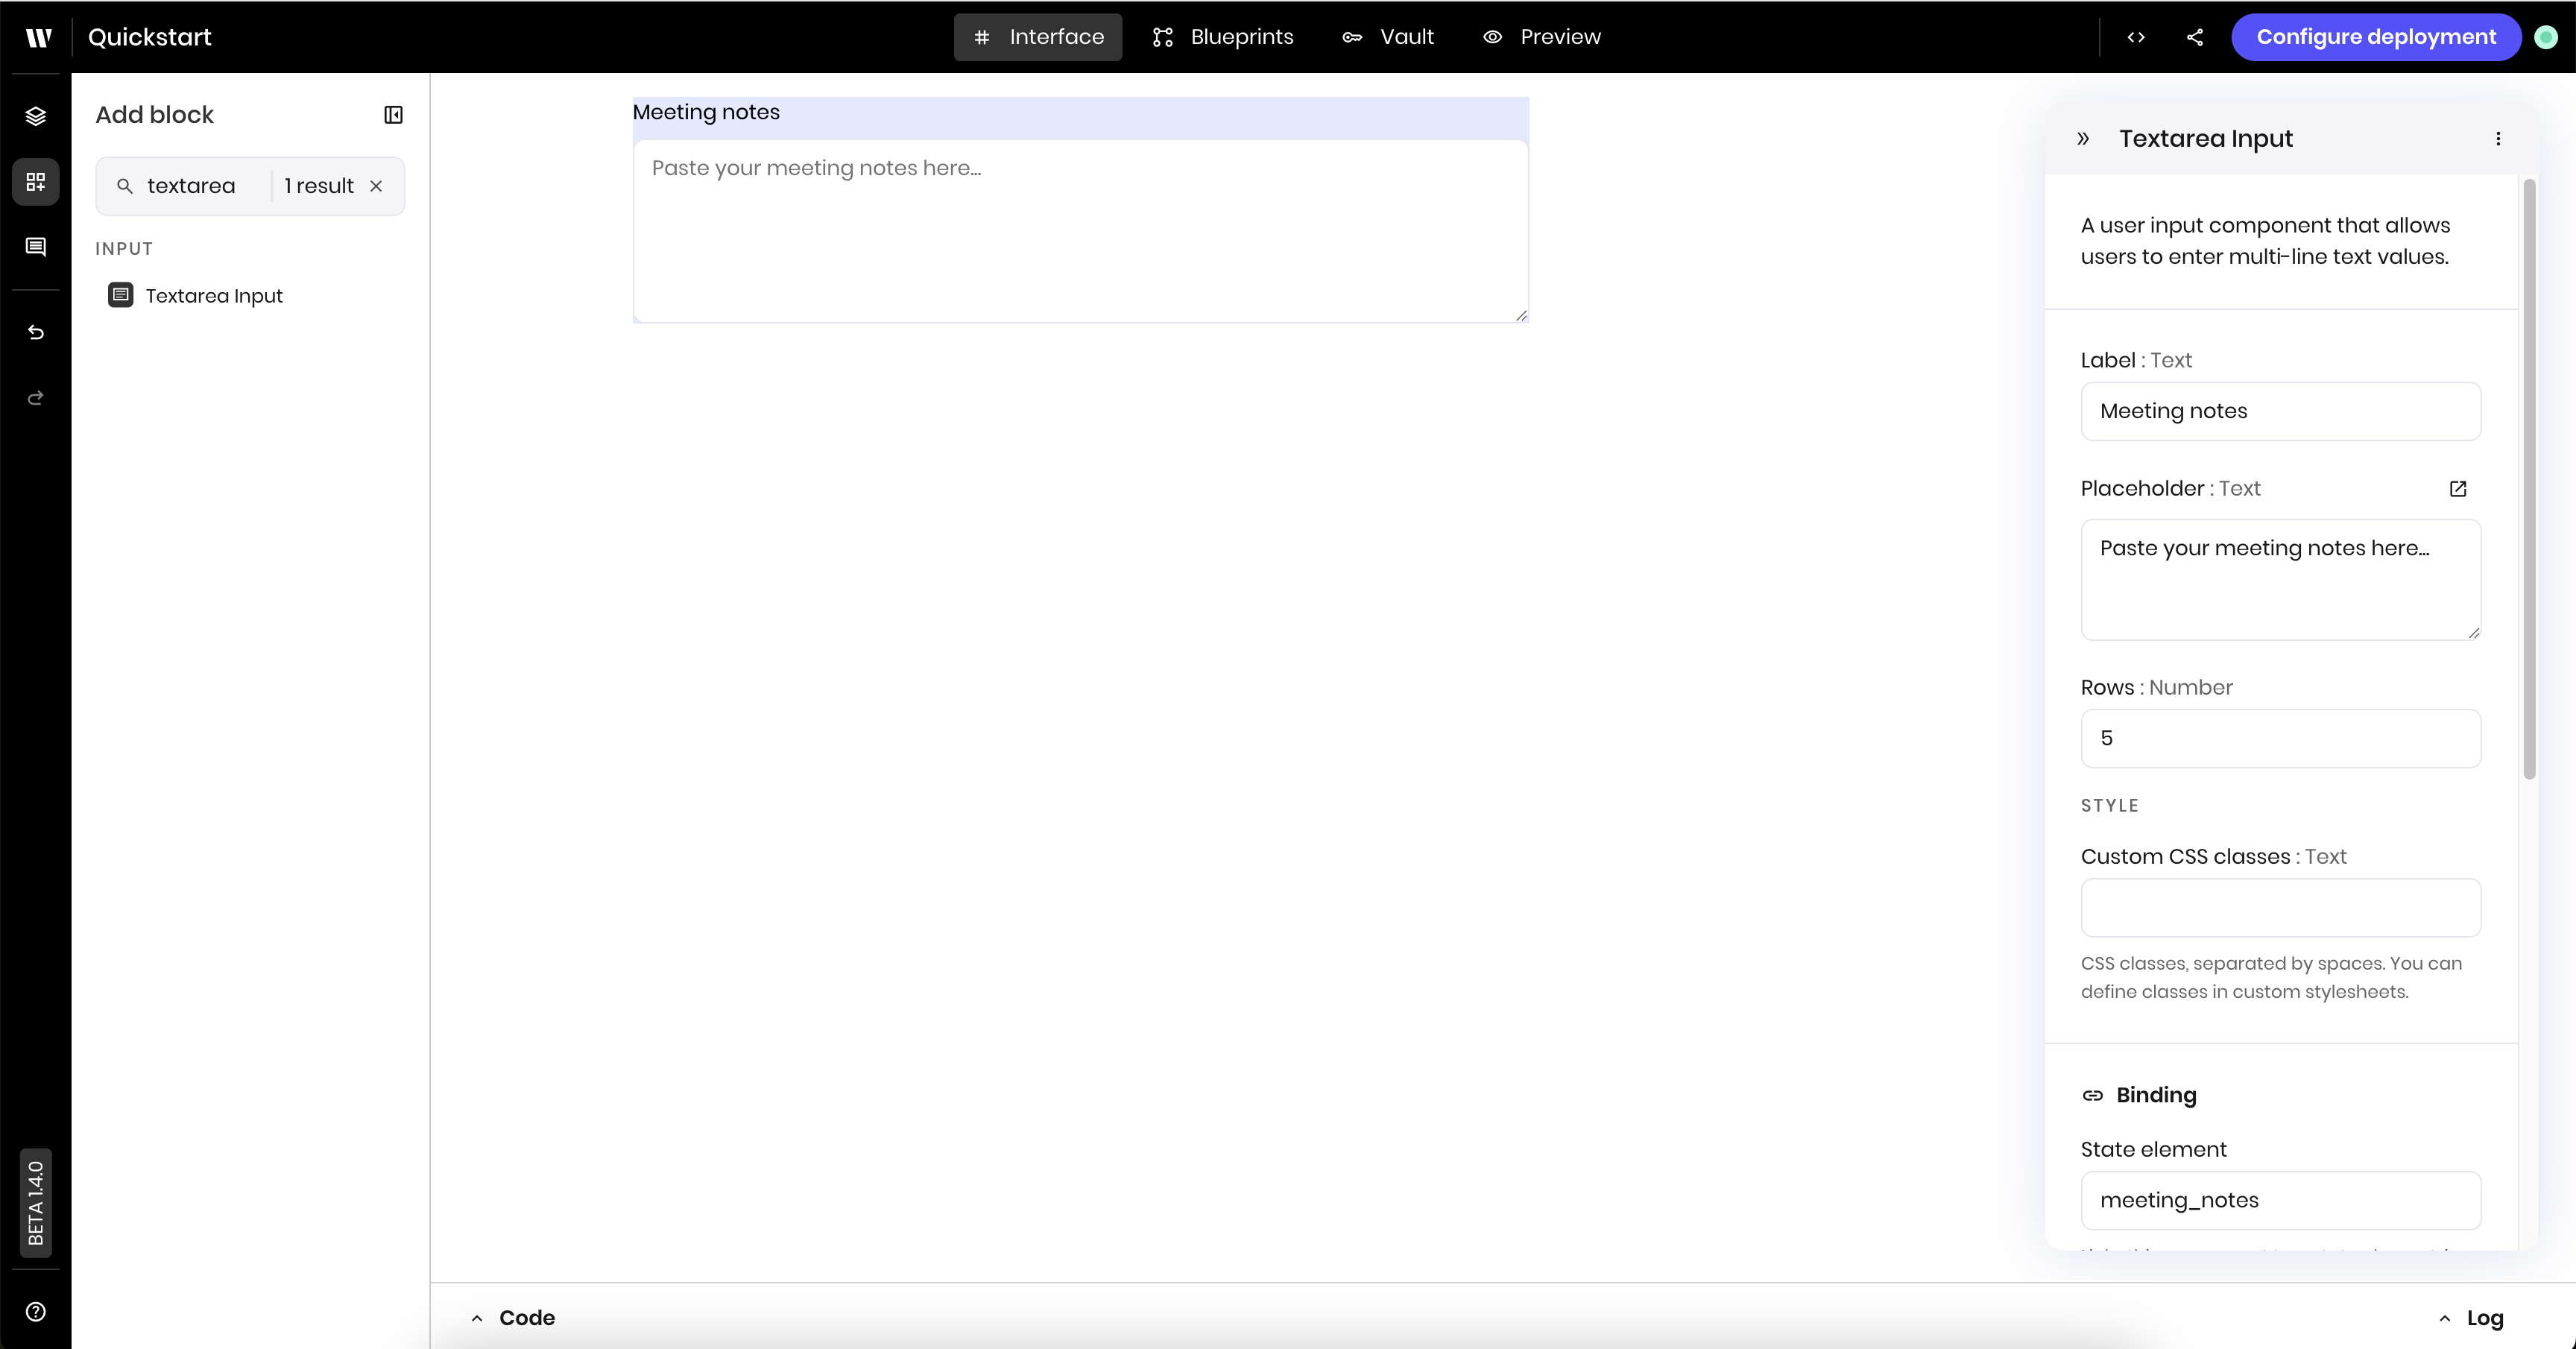
### Add the Text area Input
The [**Text area Input** component](/components/textareainput) is where users can paste their meeting notes.
Make sure you are in the **Interface** view. Then open the **Add block** section in the left sidebar and search for the **Text area Input** component in the component library.
Click and drag the **Text area Input** component onto the canvas.
Click the **Text area Input** component you just added to edit its settings. Update the following settings:
* **Label**: `Meeting notes`
* **Placeholder**: `Paste your meeting notes here.`
* **Link variable** under **Binding**: `meeting_notes`. This allows the blueprint to access the meeting notes content whenever the user updates it.
The "link variable" is stored in the agent's state. The state is a set of variables that both the blueprint and the UI can access and update. You can learn more about the agent's state in [Agent state](/agent-builder/state).
## Build the UI
Now that you have an empty page, build the UI for the new agent. This agent has the following components:
* A **Text area** for users to paste their meeting notes
* A **Select input** for users to select the summary format they want
* A **Button** to start the summarization process
* A **Message** component to display a loading message while summarization is in progress
* A **Text** component to display the summary
Navigate to the **Interface** view to build the UI.
### Add the Text area Input
The [**Text area Input** component](/components/textareainput) is where users can paste their meeting notes.
Make sure you are in the **Interface** view. Then open the **Add block** section in the left sidebar and search for the **Text area Input** component in the component library.
Click and drag the **Text area Input** component onto the canvas.
Click the **Text area Input** component you just added to edit its settings. Update the following settings:
* **Label**: `Meeting notes`
* **Placeholder**: `Paste your meeting notes here.`
* **Link variable** under **Binding**: `meeting_notes`. This allows the blueprint to access the meeting notes content whenever the user updates it.
The "link variable" is stored in the agent's state. The state is a set of variables that both the blueprint and the UI can access and update. You can learn more about the agent's state in [Agent state](/agent-builder/state).
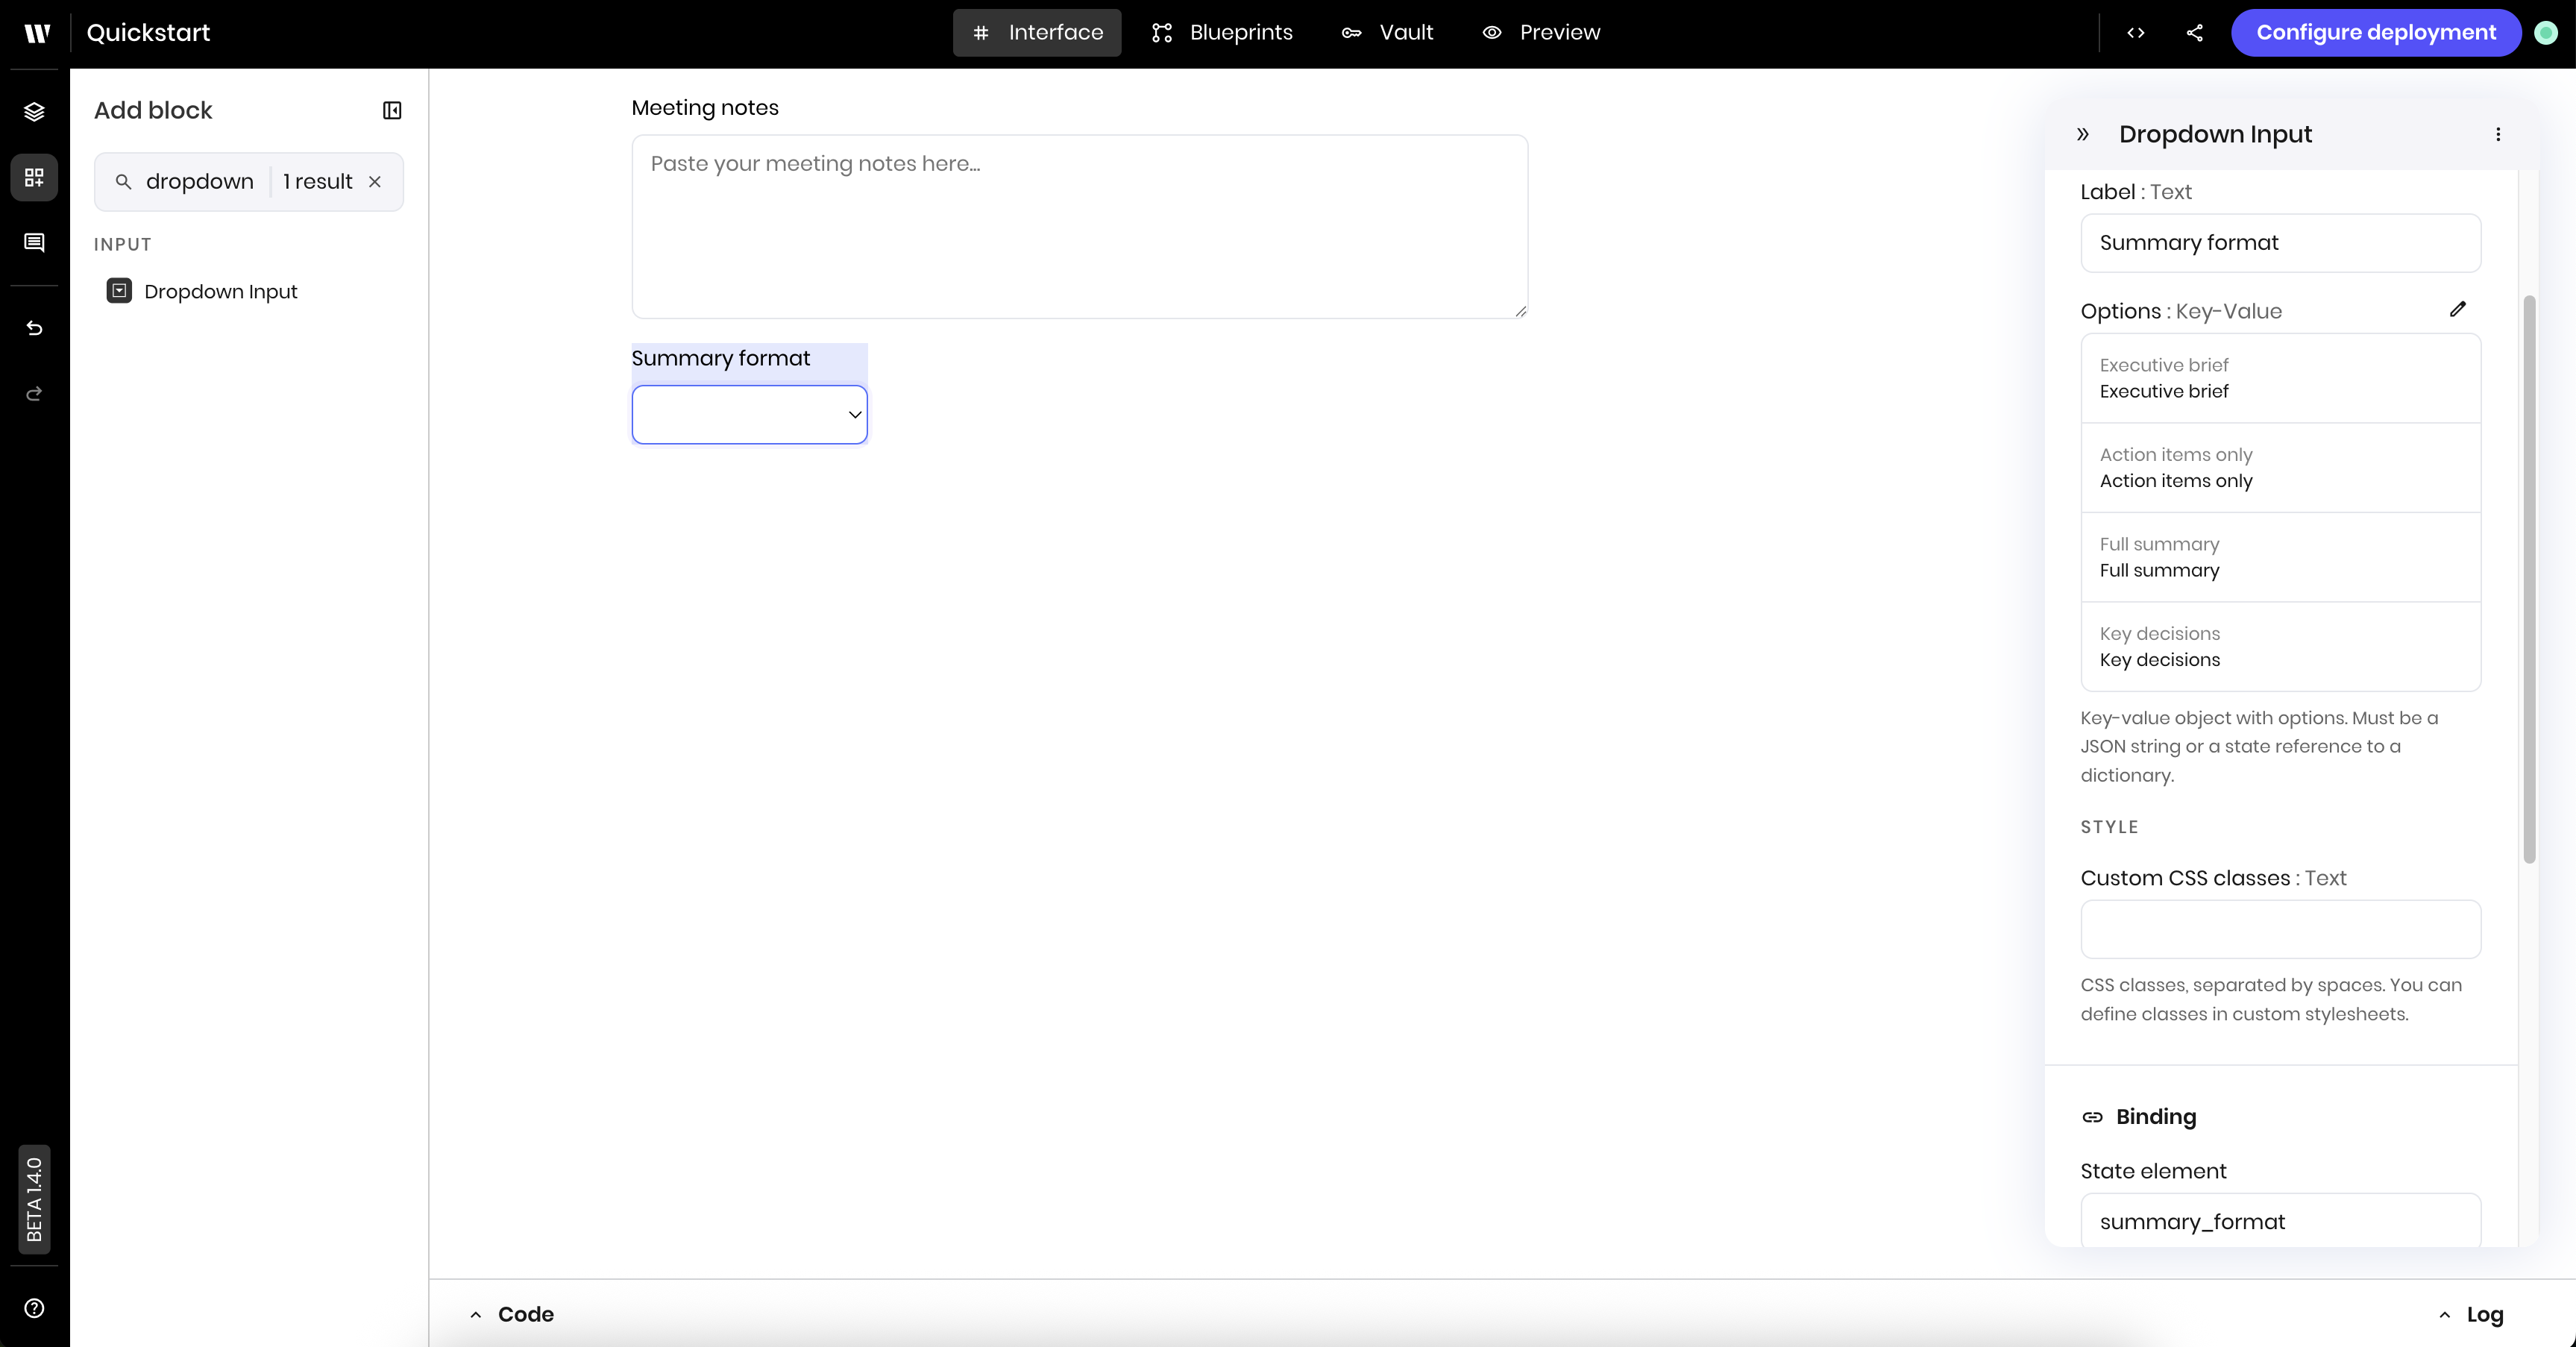
 ### Add the select input
The [**Select input** component](/components/selectinput) is where users can choose what type of summary they want via a dropdown.
Search for the **Select input** component in the component library on the left side of the page.
Click and drag the **Select input** component onto the canvas.
Click the **Select input** component you just added to edit its settings. Update the following settings:
* **Label**: `Summary format`
* **Options**: Add the options you want to display in the dropdown. For this example, add the following options, with the key and the value both set to the option name.
* `Executive brief`
* `Action items only`
* `Full summary`
* `Key decisions`
* **Link variable** under **Binding**: `summary_format`. This allows the blueprint to access the selected format whenever the user changes it.
### Add the select input
The [**Select input** component](/components/selectinput) is where users can choose what type of summary they want via a dropdown.
Search for the **Select input** component in the component library on the left side of the page.
Click and drag the **Select input** component onto the canvas.
Click the **Select input** component you just added to edit its settings. Update the following settings:
* **Label**: `Summary format`
* **Options**: Add the options you want to display in the dropdown. For this example, add the following options, with the key and the value both set to the option name.
* `Executive brief`
* `Action items only`
* `Full summary`
* `Key decisions`
* **Link variable** under **Binding**: `summary_format`. This allows the blueprint to access the selected format whenever the user changes it.
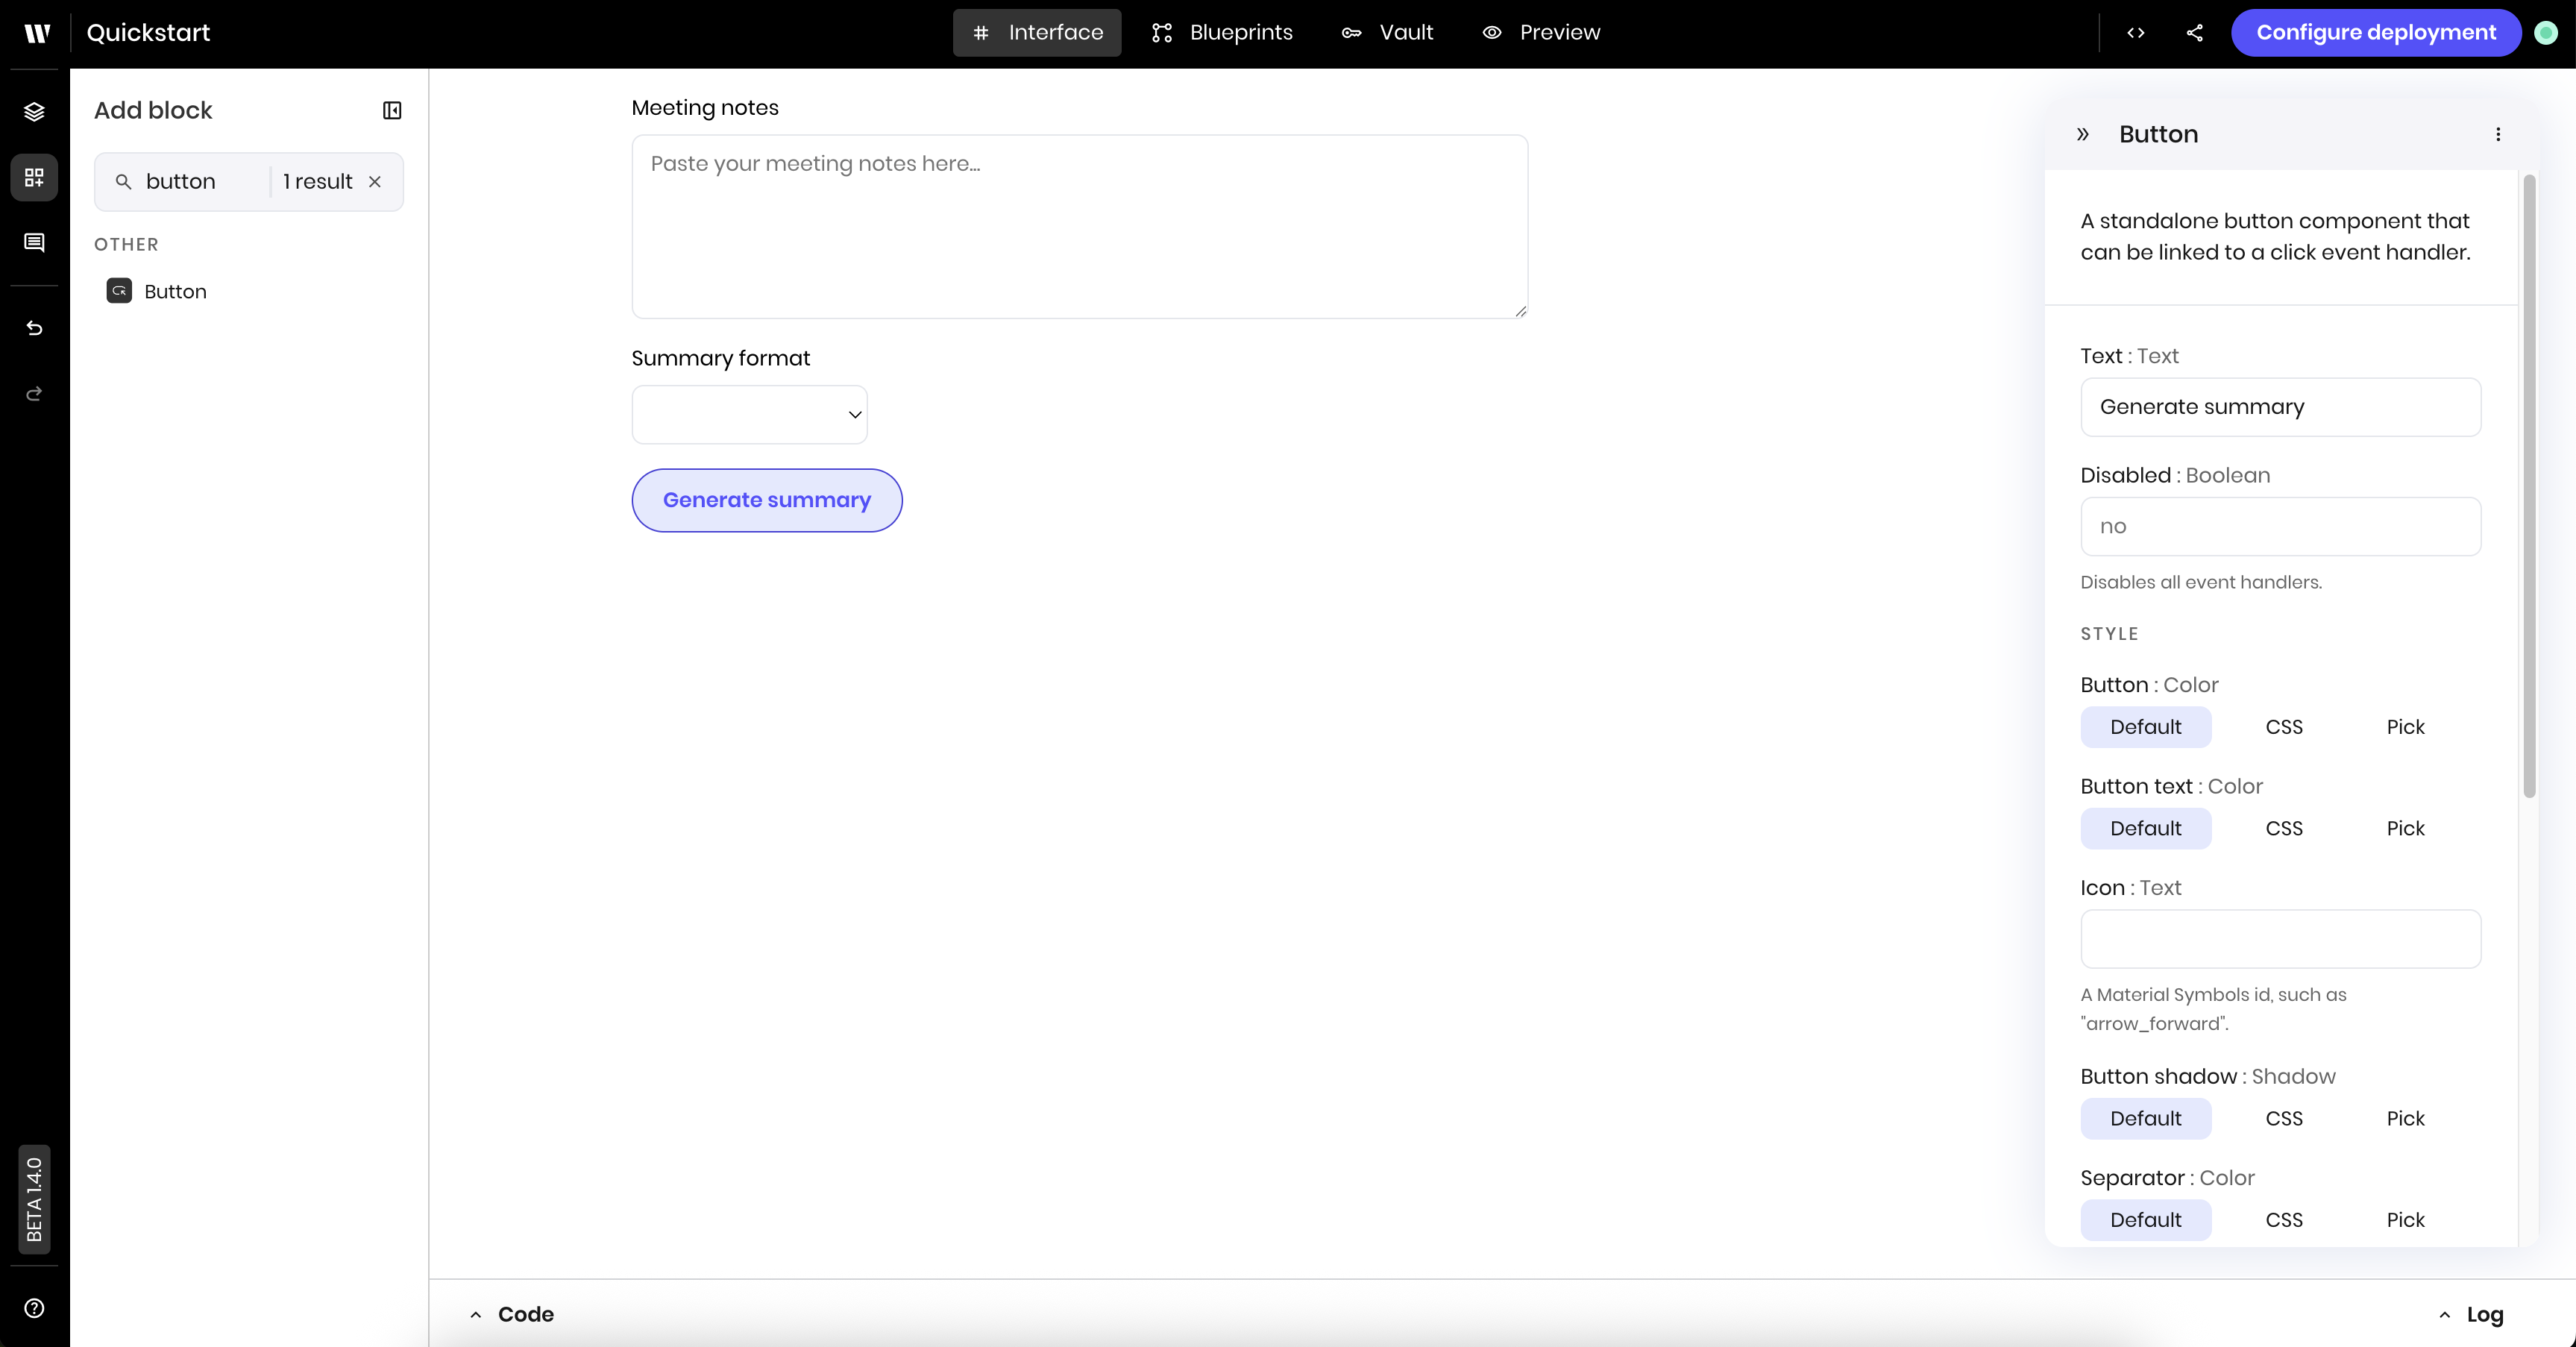
 ### Add the summarize button
Next, add a [**Button** component](/components/button) to the UI. In a later step, you'll connect this button to the blueprint that triggers the summarization process.
Search for the **Button** component in the block library on the left side of the page. Then click and drag the **Button** component onto the canvas.
Click the **Button** component you just added to open its settings. Update the following settings:
* **Text**: `Generate summary`
### Add the summarize button
Next, add a [**Button** component](/components/button) to the UI. In a later step, you'll connect this button to the blueprint that triggers the summarization process.
Search for the **Button** component in the block library on the left side of the page. Then click and drag the **Button** component onto the canvas.
Click the **Button** component you just added to open its settings. Update the following settings:
* **Text**: `Generate summary`
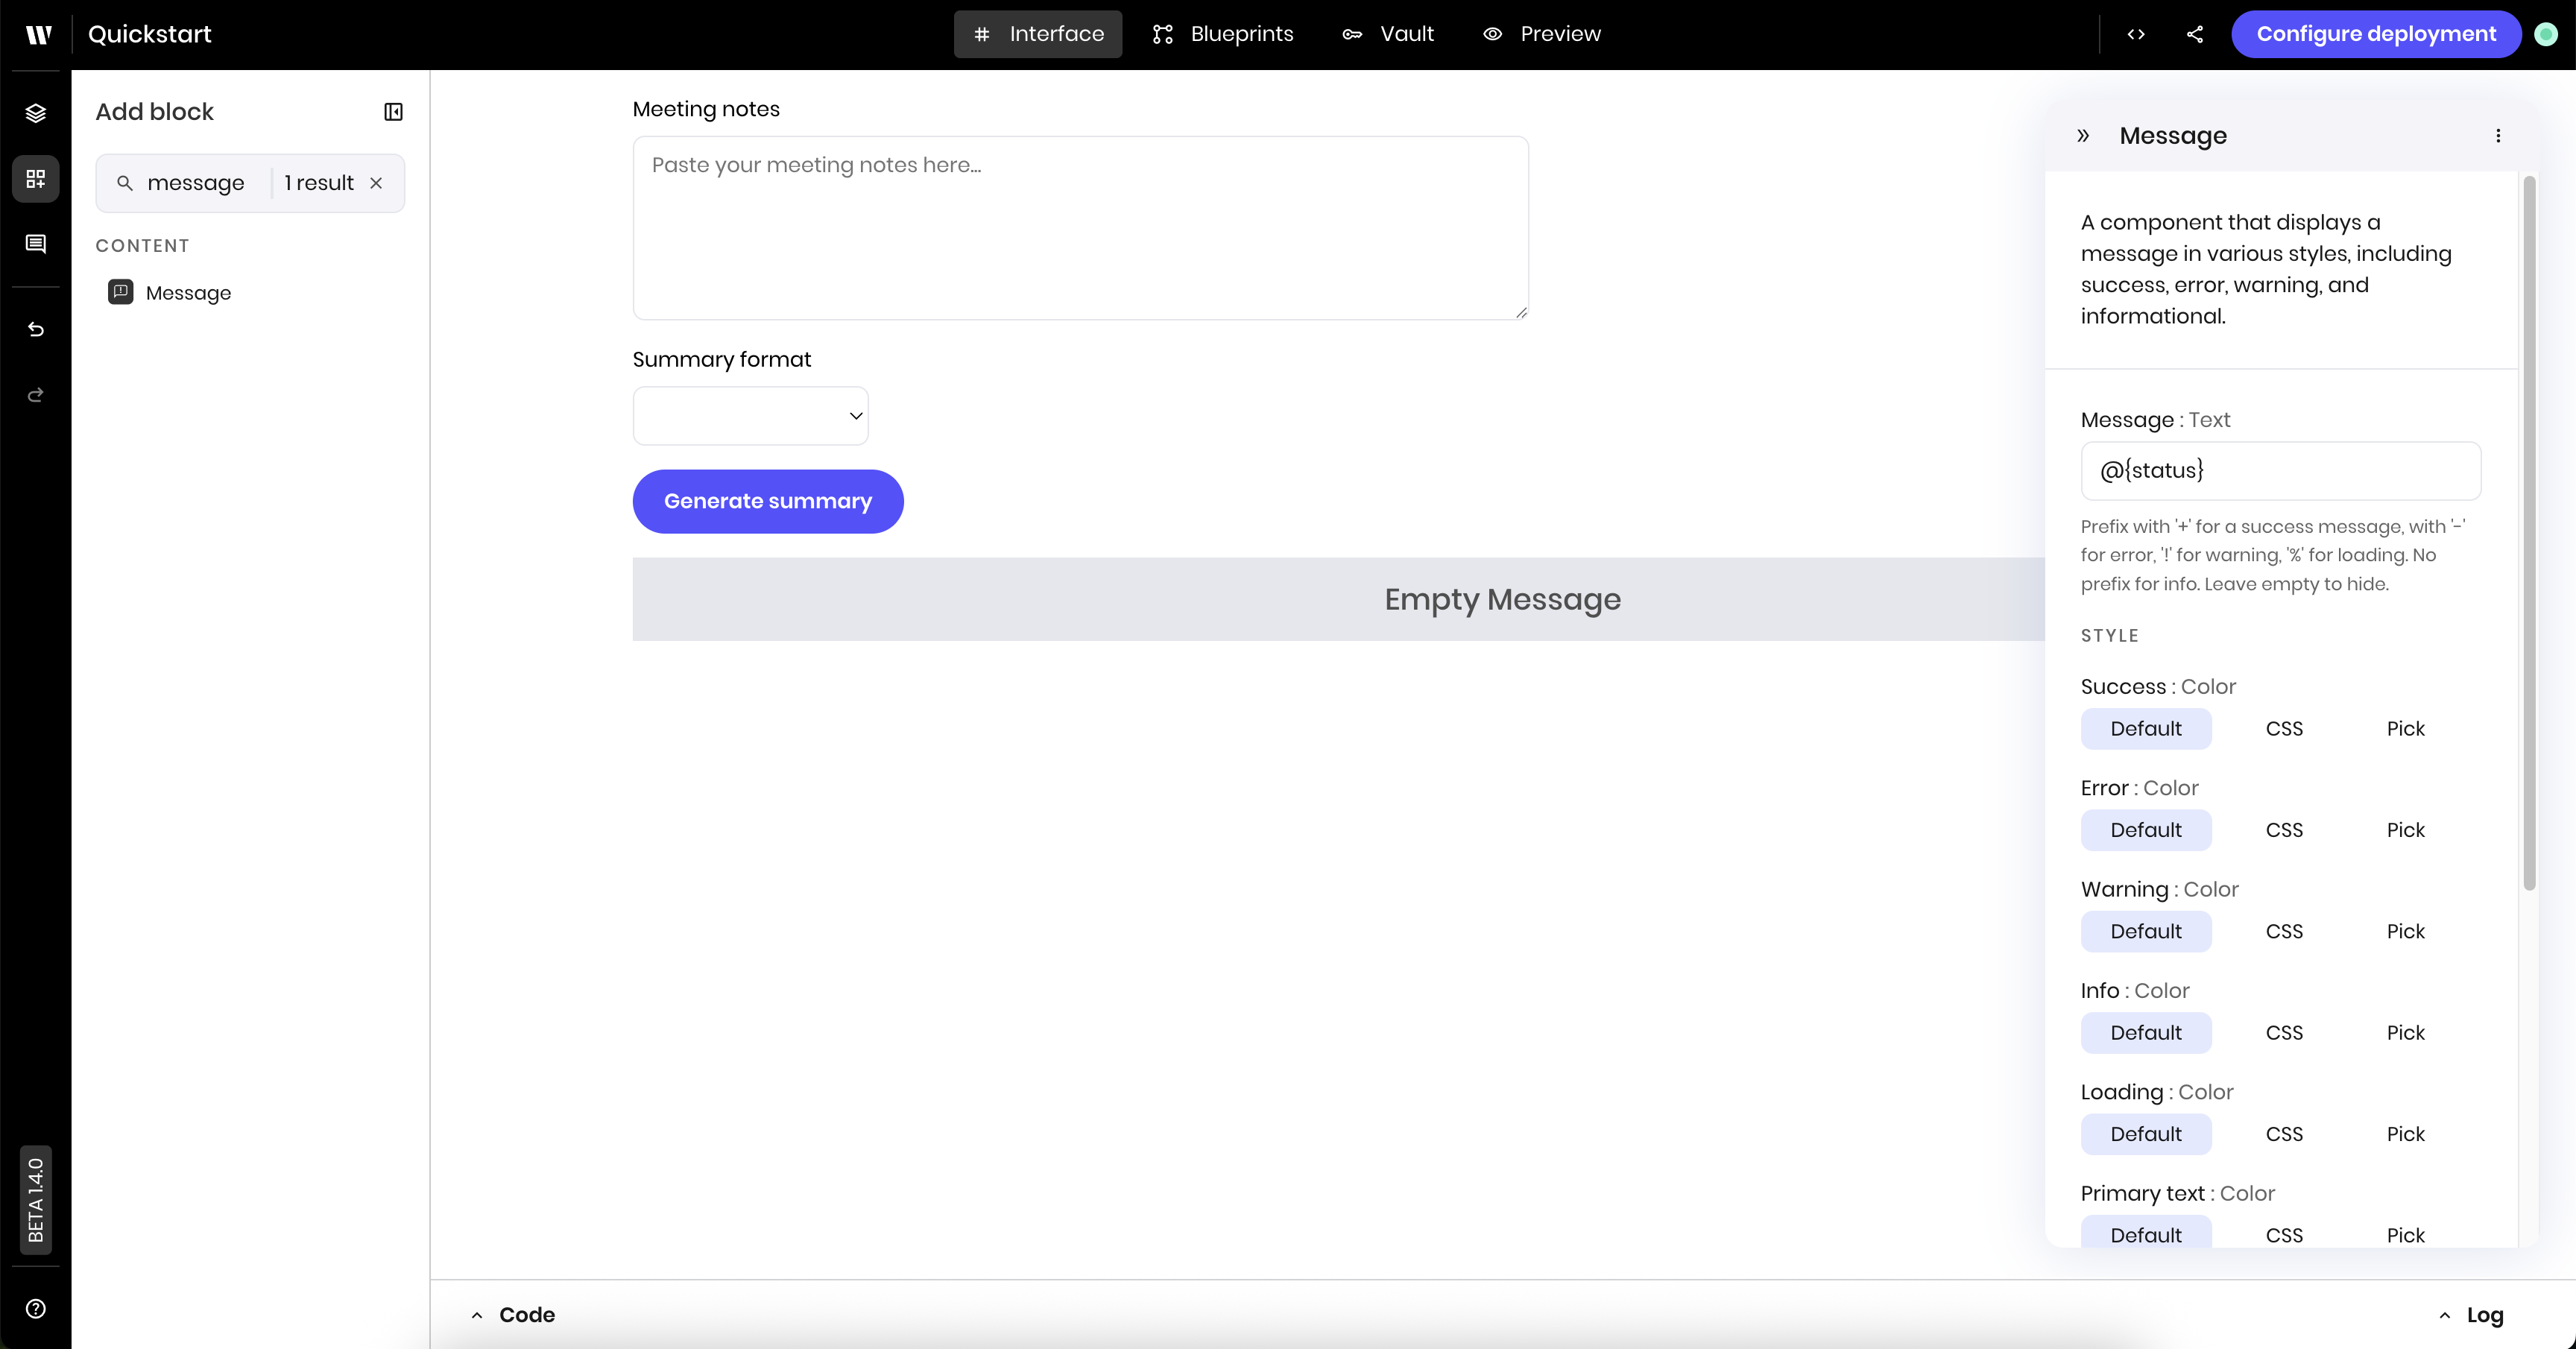
 ### Add the progress message component
The [**Message** component](/components/message) displays messages to users. Here, you use it to display a loading message while summarization is in progress.
Search for the **Message** component in the block library. Then click and drag the **Message** component onto the canvas.
Click the **Message** component you just added to edit its settings. Update the following settings:
* **Message**: `@{status}`. This reads from the `status` state variable, which the blueprint will set to indicate the progress of the summarization.
### Add the progress message component
The [**Message** component](/components/message) displays messages to users. Here, you use it to display a loading message while summarization is in progress.
Search for the **Message** component in the block library. Then click and drag the **Message** component onto the canvas.
Click the **Message** component you just added to edit its settings. Update the following settings:
* **Message**: `@{status}`. This reads from the `status` state variable, which the blueprint will set to indicate the progress of the summarization.
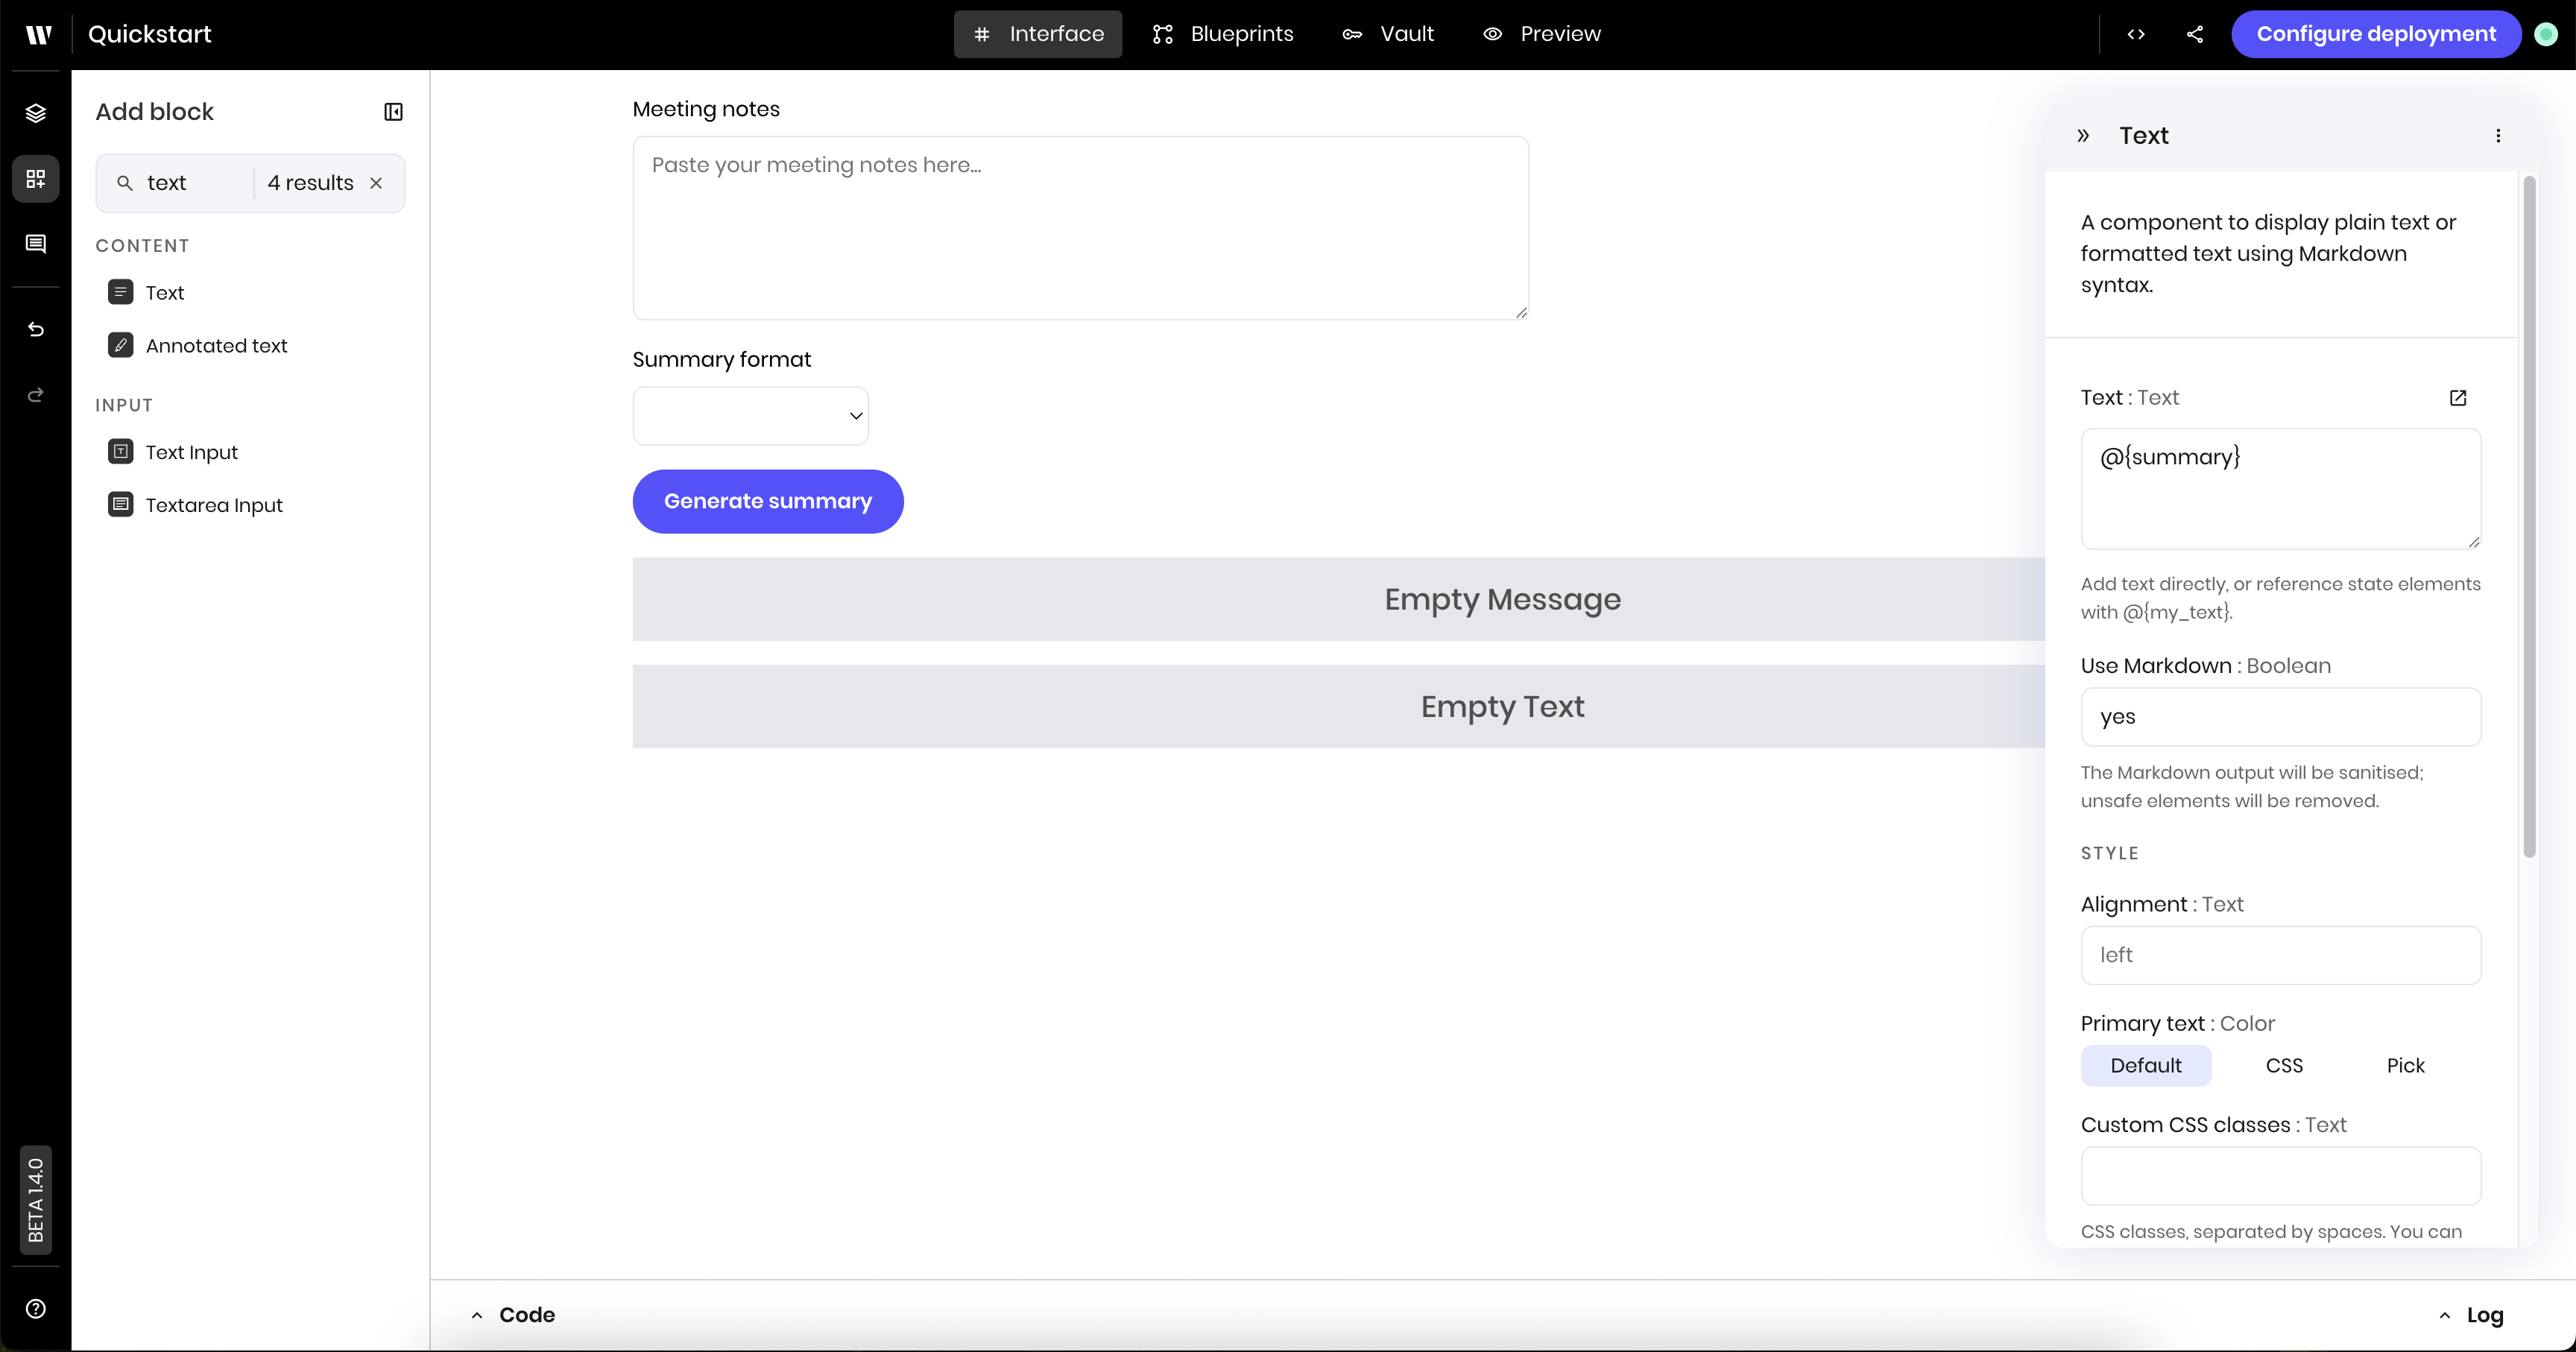
 ### Add the summary text component
The [**Text** component](/components/text) is where the blueprint displays the meeting summary when it's complete.
Search for the **Text** component in the block library on the left side of the page. Then click and drag the **Text** component onto the canvas.
There are multiple components with the name **Text** in them. Make sure you select the **Text** component under the **Content** section of the component library.
Click the **Text** component you just added to edit its settings. Update the following settings:
* **Text**: `@{summary}`. This displays the value of the `summary` state variable, which the blueprint sets to the meeting summary.
* **Use Markdown**: Select **Yes**. This allows you to use markdown formatting in the text.
### Add the summary text component
The [**Text** component](/components/text) is where the blueprint displays the meeting summary when it's complete.
Search for the **Text** component in the block library on the left side of the page. Then click and drag the **Text** component onto the canvas.
There are multiple components with the name **Text** in them. Make sure you select the **Text** component under the **Content** section of the component library.
Click the **Text** component you just added to edit its settings. Update the following settings:
* **Text**: `@{summary}`. This displays the value of the `summary` state variable, which the blueprint sets to the meeting summary.
* **Use Markdown**: Select **Yes**. This allows you to use markdown formatting in the text.
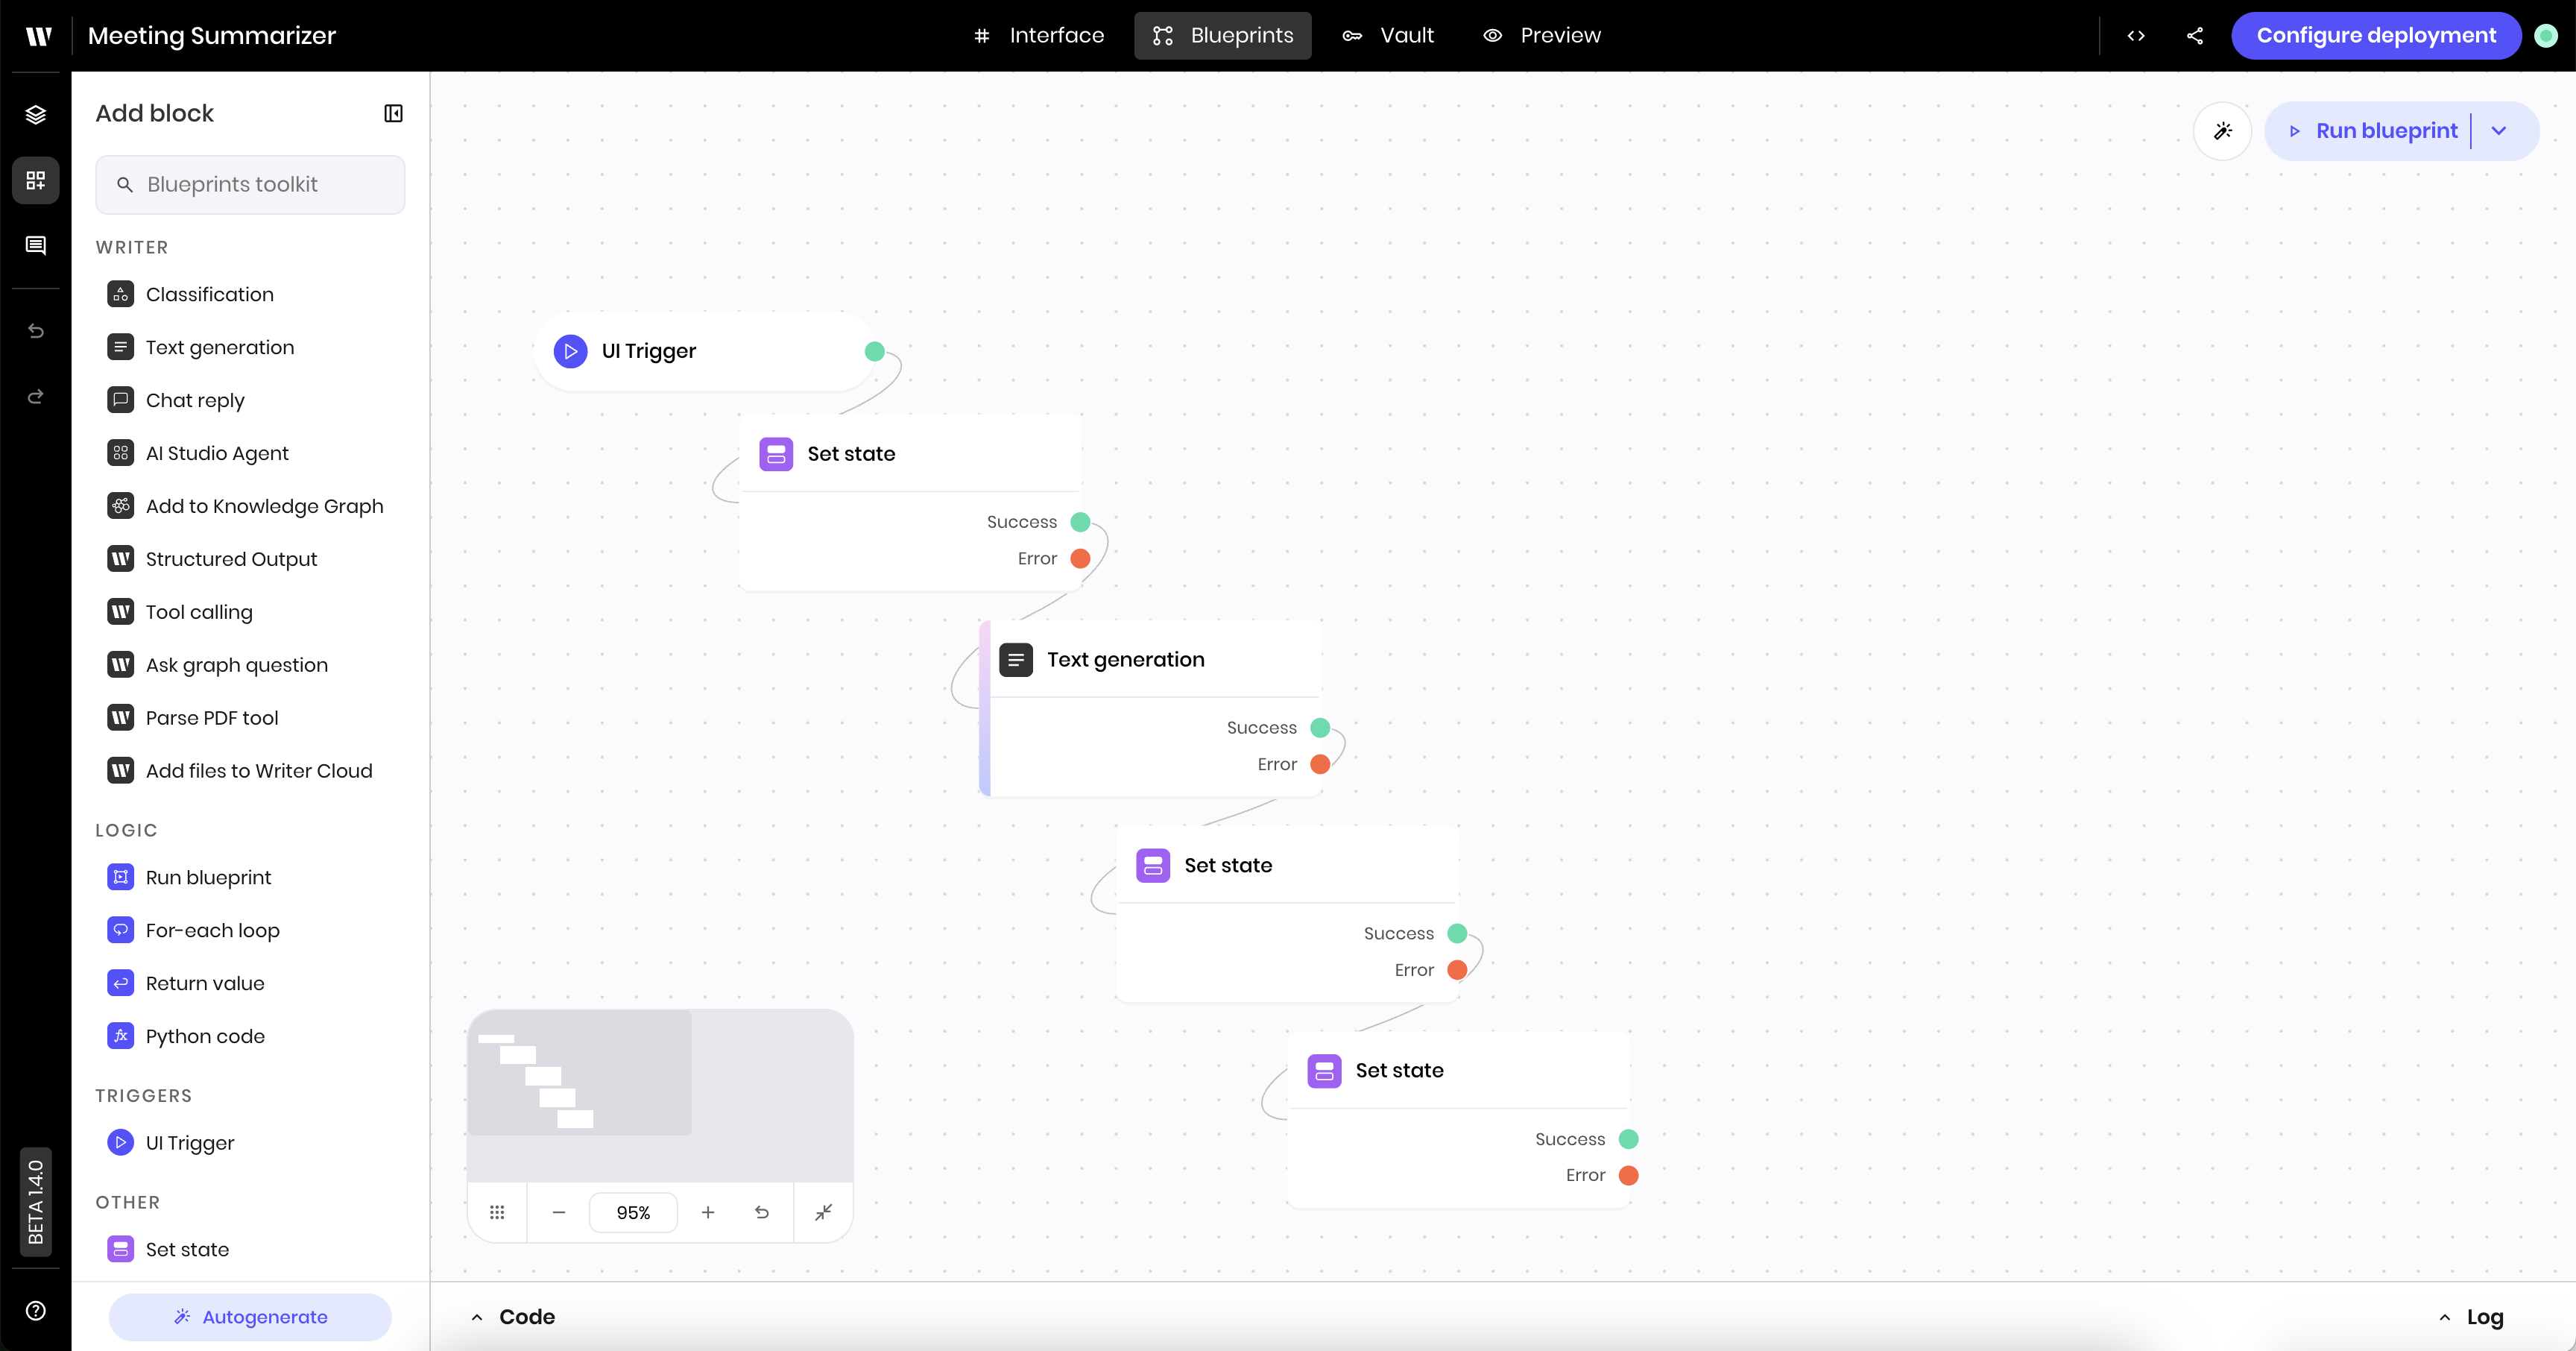
 ## Build the blueprint
With the UI built, you can now build the blueprint for the new agent.
The blueprint has the following logic:
1. The **UI trigger** block triggers the blueprint when the user clicks the **Generate summary** button in the UI.
2. The **Set state** block sets the `status` state variable to `Summarizing` so that the `Message` component in the UI can display it.
3. The **Text generation** block generates a summary of the meeting notes based on the selected format.
4. The **Set state** block sets the `summary` state variable to the generated summary so that the `Text` component in the UI can display it.
5. The **Set state** block sets the `status` state variable back to an empty string to clear the loading message from the UI.
Navigate to the **Blueprints** view to build the blueprint.
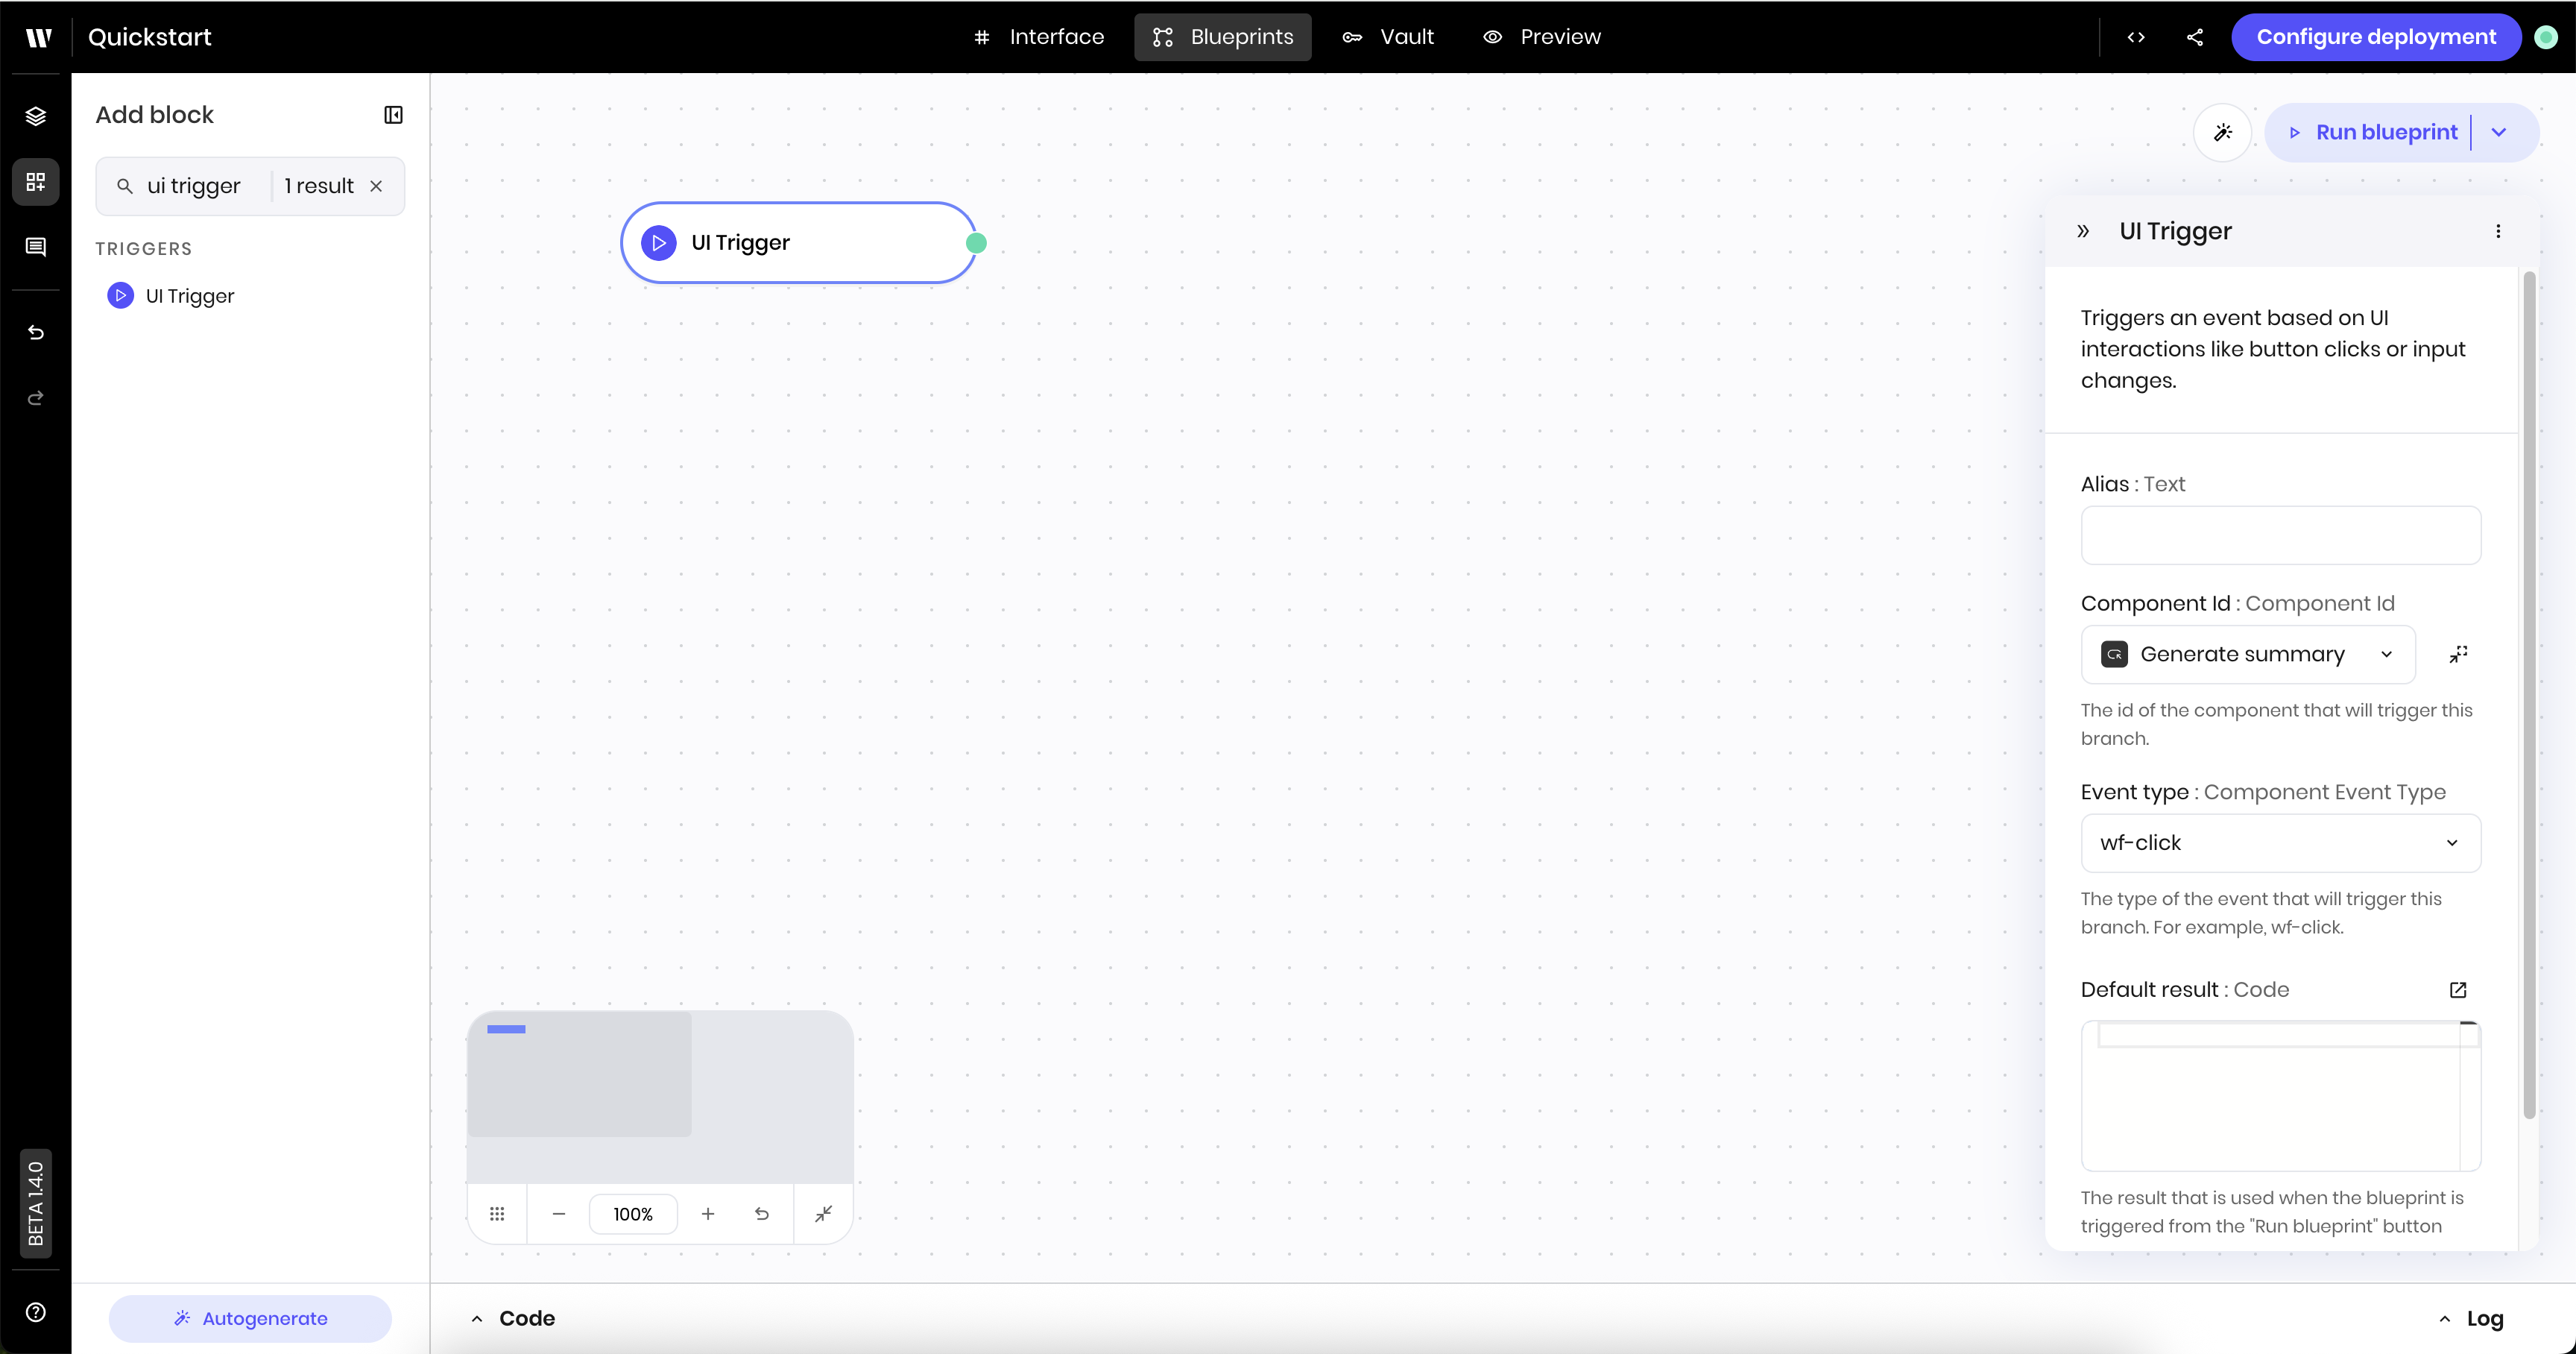
### Add the UI trigger
The [**UI trigger** block](/blueprints/uitrigger) triggers the blueprint when the user clicks the **Generate summary** button in the UI.
Make sure you are in the **Blueprints** view. Then open the **Add block** section in the left sidebar and search for the **UI trigger** block in the blueprints toolkit.
Click and drag the **UI trigger** block onto the canvas.
Click the **UI trigger** block you just added to edit its settings. Update the following settings:
* **Component ID**: Select the button component (it should show as `Generate summary`)
* **Event type**: `wf-click`. This triggers the blueprint when the user clicks the **Generate summary** button in the UI.
## Build the blueprint
With the UI built, you can now build the blueprint for the new agent.
The blueprint has the following logic:
1. The **UI trigger** block triggers the blueprint when the user clicks the **Generate summary** button in the UI.
2. The **Set state** block sets the `status` state variable to `Summarizing` so that the `Message` component in the UI can display it.
3. The **Text generation** block generates a summary of the meeting notes based on the selected format.
4. The **Set state** block sets the `summary` state variable to the generated summary so that the `Text` component in the UI can display it.
5. The **Set state** block sets the `status` state variable back to an empty string to clear the loading message from the UI.
Navigate to the **Blueprints** view to build the blueprint.
### Add the UI trigger
The [**UI trigger** block](/blueprints/uitrigger) triggers the blueprint when the user clicks the **Generate summary** button in the UI.
Make sure you are in the **Blueprints** view. Then open the **Add block** section in the left sidebar and search for the **UI trigger** block in the blueprints toolkit.
Click and drag the **UI trigger** block onto the canvas.
Click the **UI trigger** block you just added to edit its settings. Update the following settings:
* **Component ID**: Select the button component (it should show as `Generate summary`)
* **Event type**: `wf-click`. This triggers the blueprint when the user clicks the **Generate summary** button in the UI.
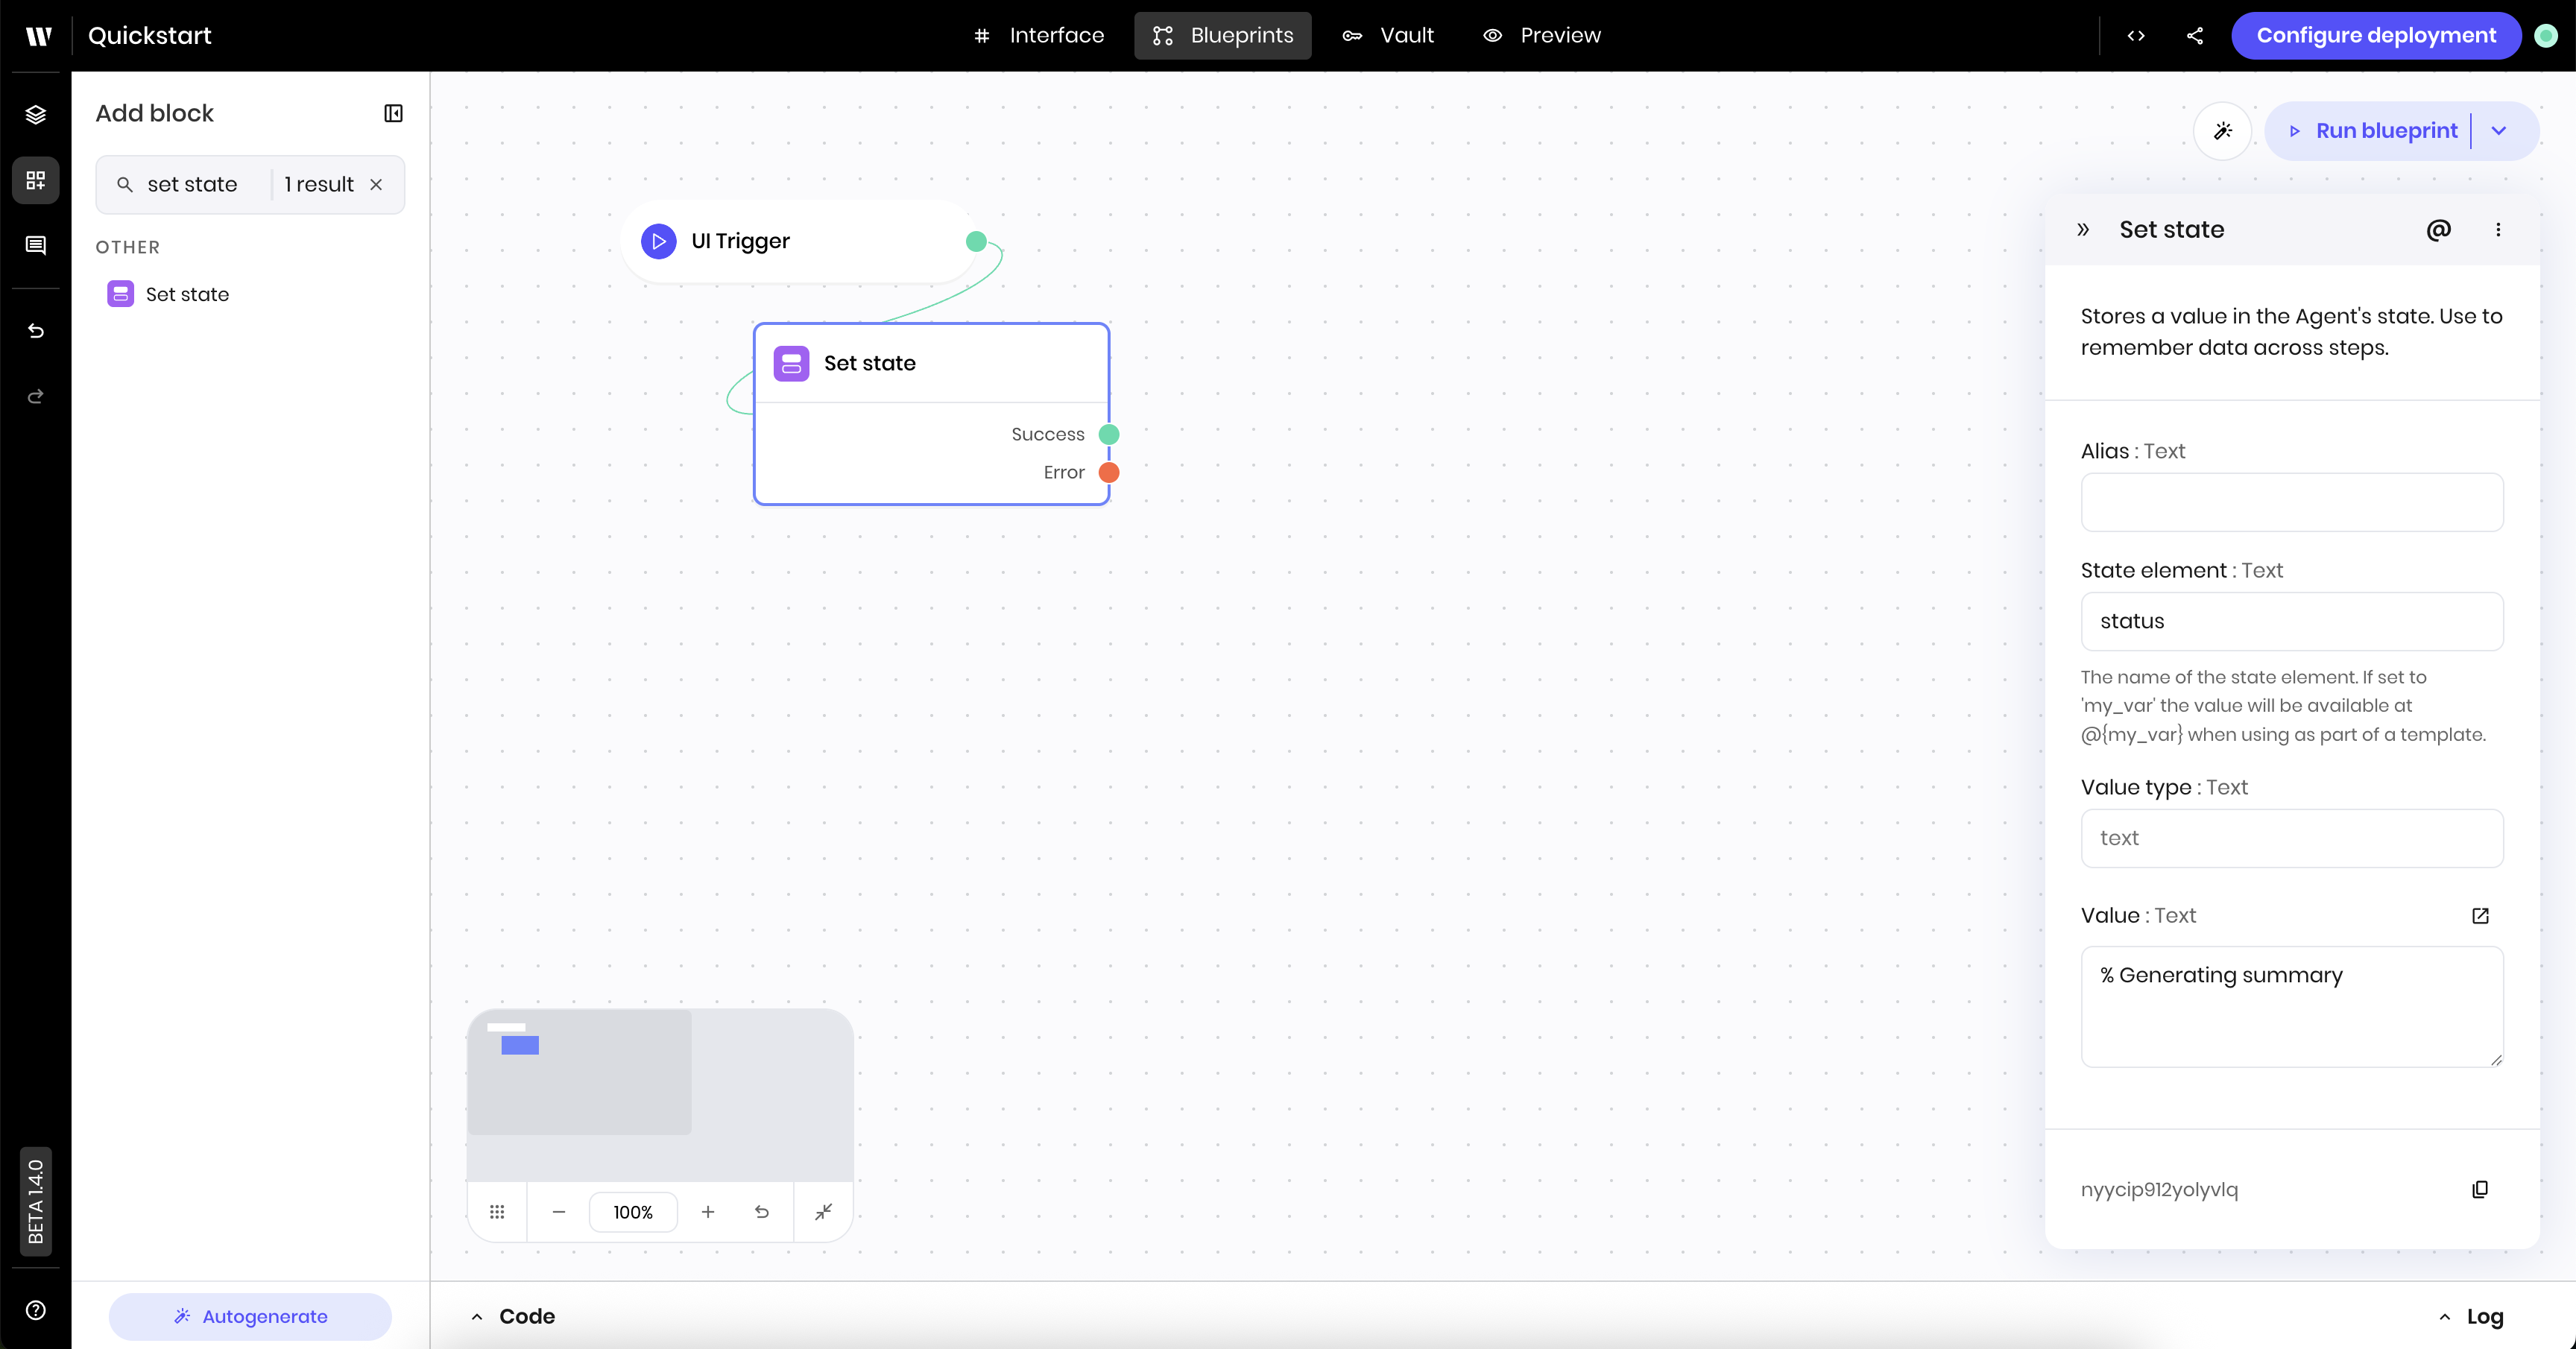
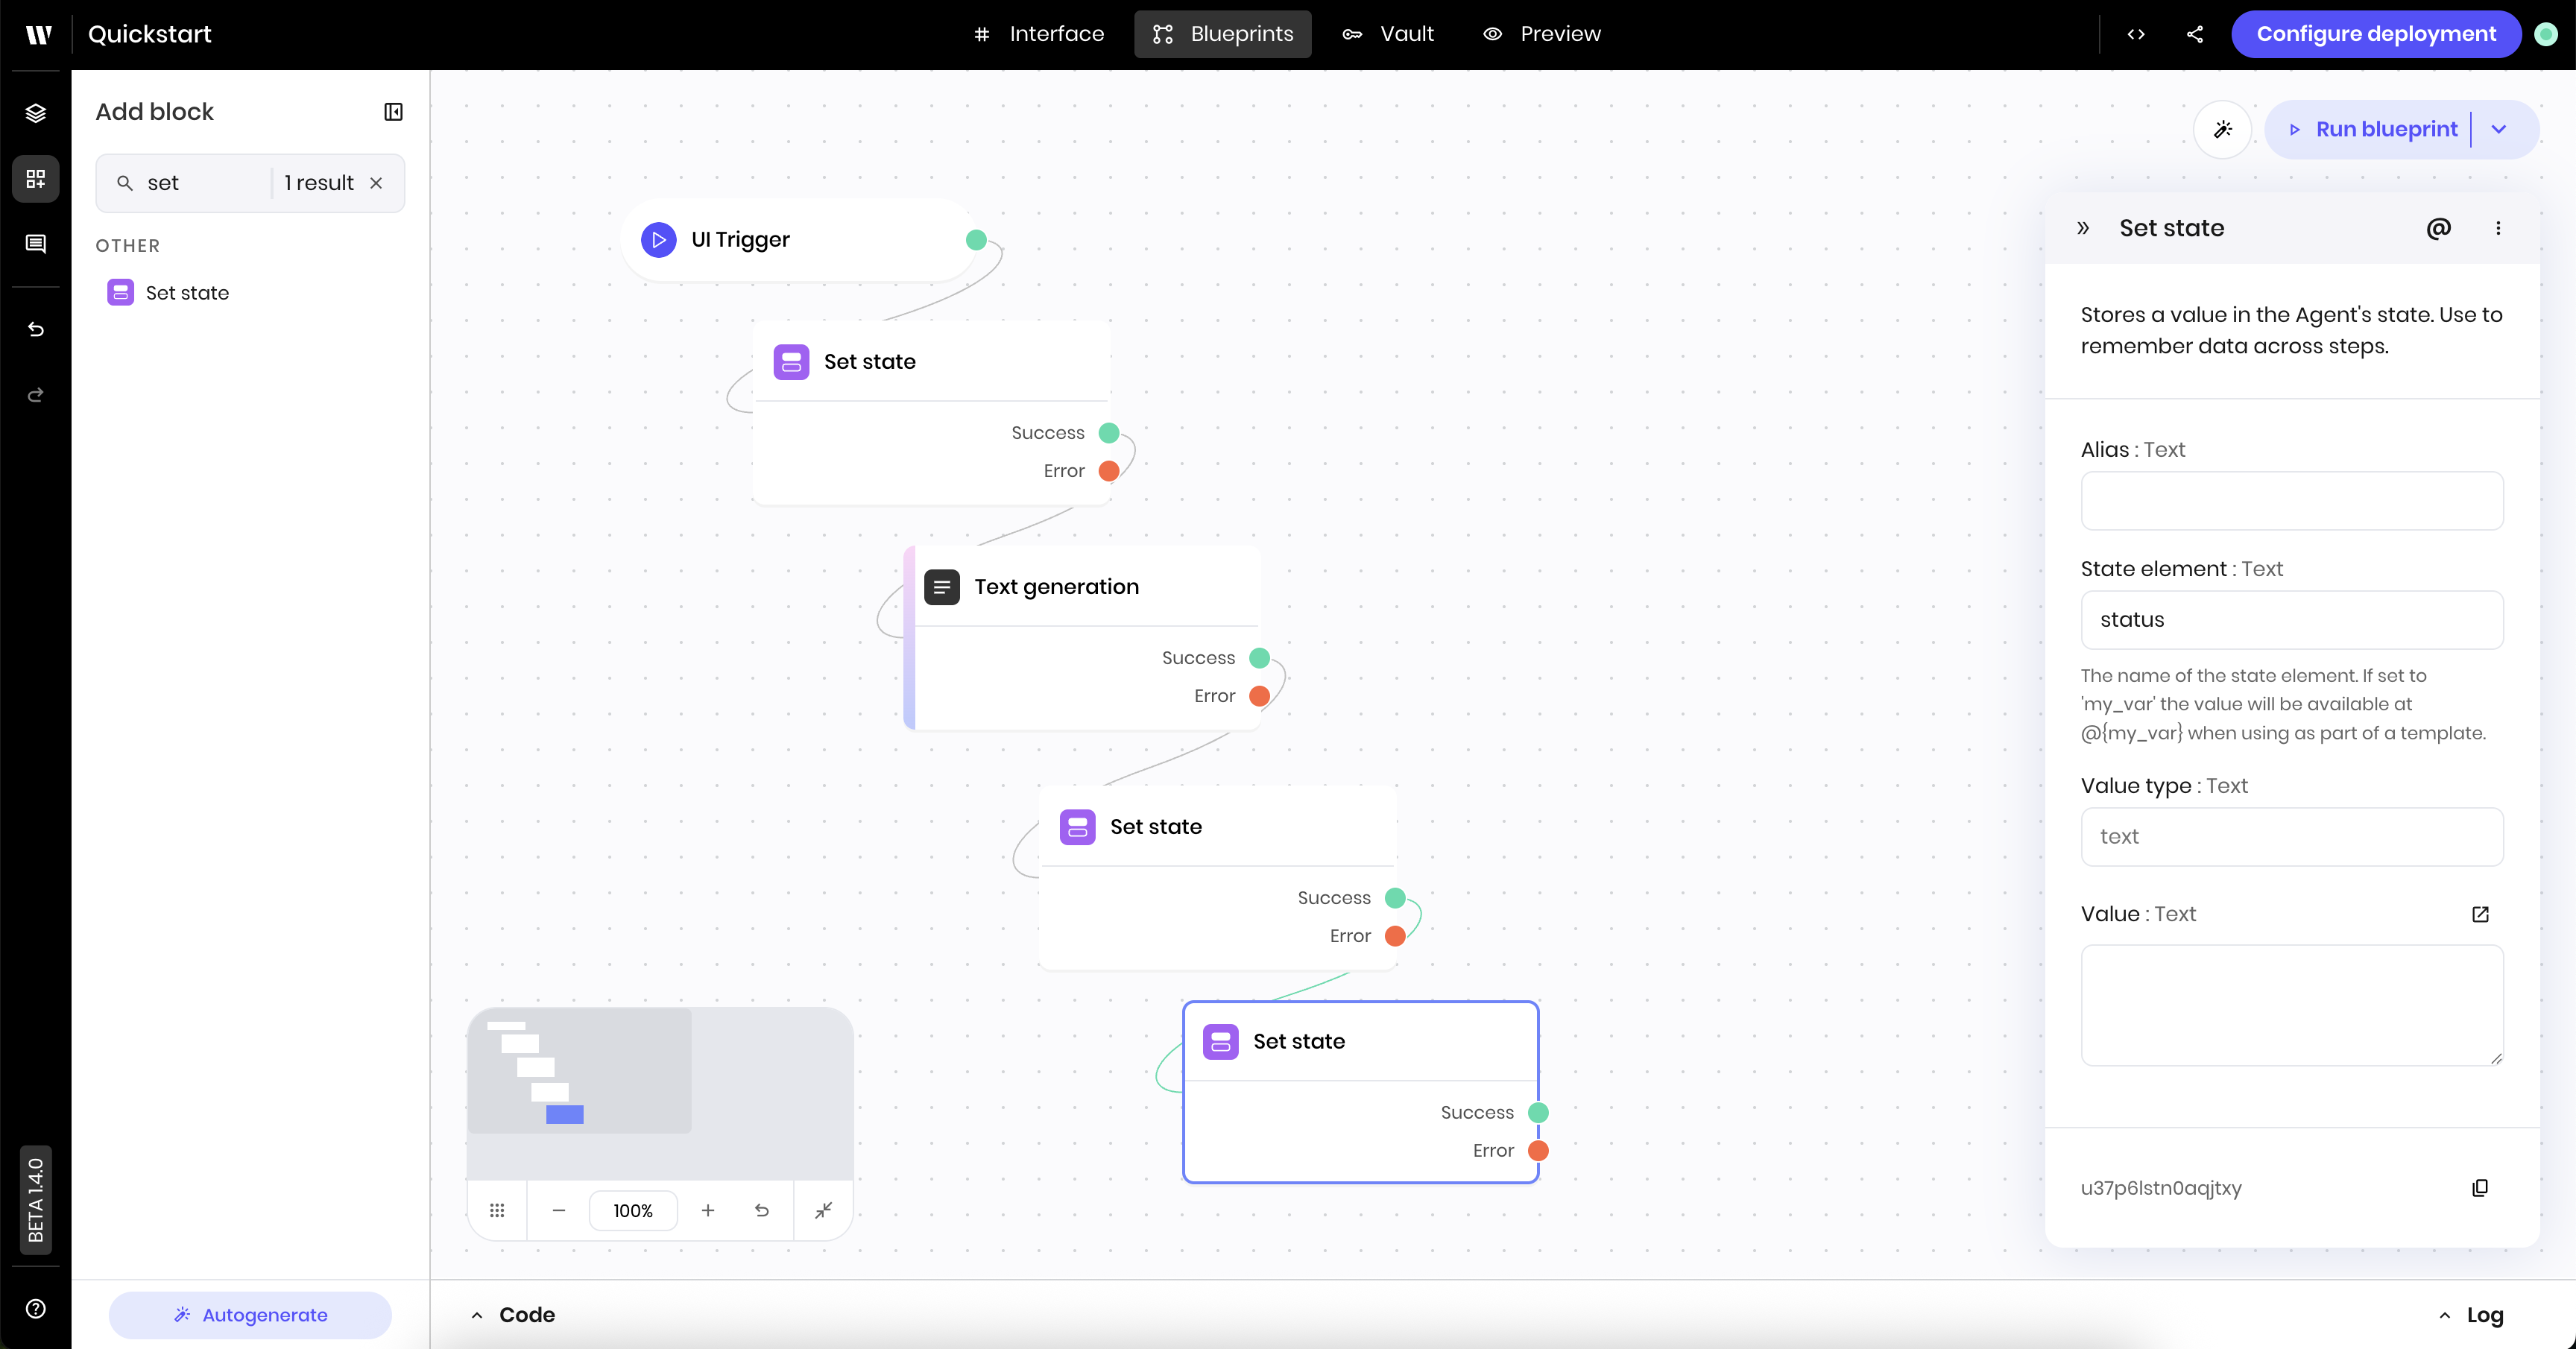
 ### Add the set state block for the progress message
The [**Set state** block](/blueprints/setstate) sets the `status` state variable to `Summarizing` so that the `Message` component in the UI can display it.
Search for the **Set state** block. Then click and drag the **Set state** block onto the canvas.
Connect the **Set state** block to the **UI trigger** block by dragging a line from the green dot on the **UI trigger** block to the **Set state** block. This tells the blueprint to execute the **Set state** block after the UI Trigger completes.
Click the **Set state** block you just added to edit its settings. Update the following settings:
* **Link variable**: `status`
* **Value**: `% Generating summary`. The `%` symbol indicates that the message should display a dynamic loading symbol.
The **Message** component in the UI displays the loading message when this block is executed.
### Add the set state block for the progress message
The [**Set state** block](/blueprints/setstate) sets the `status` state variable to `Summarizing` so that the `Message` component in the UI can display it.
Search for the **Set state** block. Then click and drag the **Set state** block onto the canvas.
Connect the **Set state** block to the **UI trigger** block by dragging a line from the green dot on the **UI trigger** block to the **Set state** block. This tells the blueprint to execute the **Set state** block after the UI Trigger completes.
Click the **Set state** block you just added to edit its settings. Update the following settings:
* **Link variable**: `status`
* **Value**: `% Generating summary`. The `%` symbol indicates that the message should display a dynamic loading symbol.
The **Message** component in the UI displays the loading message when this block is executed.
 At this point, you can preview the agent to see the new behavior. When you click the **Generate summary** button, the `Message` component displays the loading message that you set in the **Set state** block.
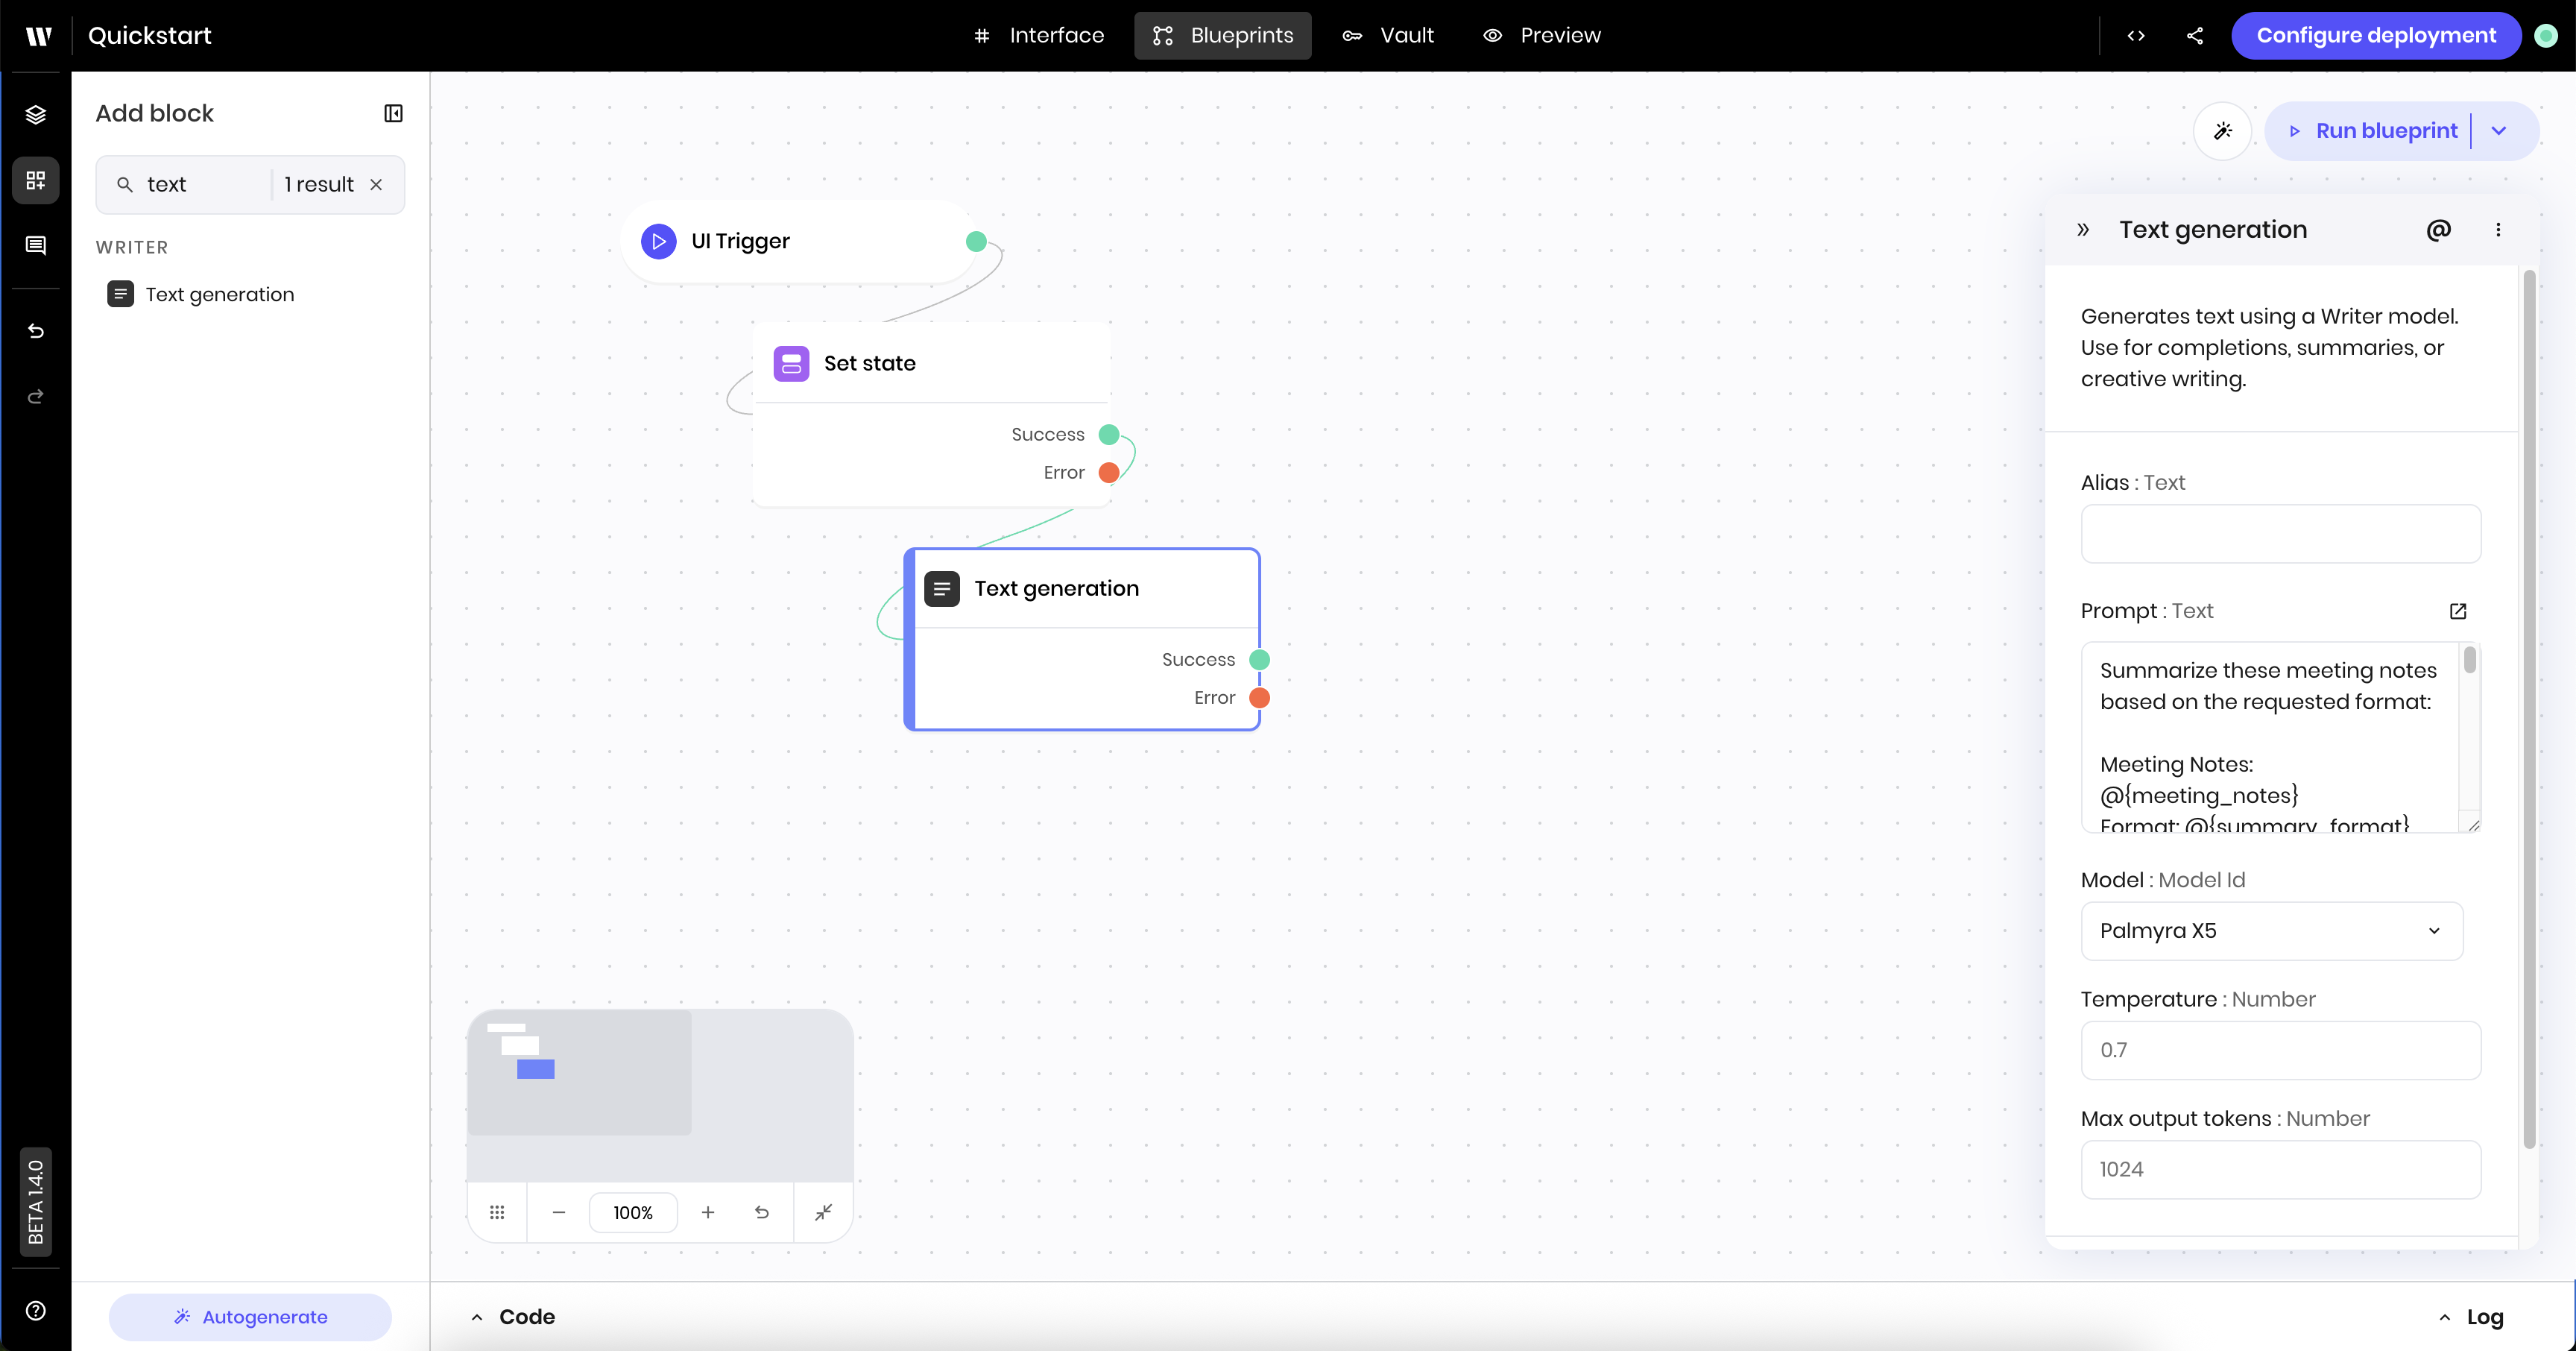
 ### Add the text generation block
The [**Text generation** block](/blueprints/textgeneration) generates a summary of the meeting notes based on the selected format using Palmyra LLMs.
Search for the **Text generation** block in the block library. Then click and drag the **Text generation** block onto the canvas.
Connect the previous **Set state** block to this **Text generation** block. Drag a line from the green dot on the **Set state** block to the **Text generation** block. This tells the blueprint to execute the **Text generation** block after the **Set state** block completes successfully.
Click the **Text generation** block you just added to edit its settings. Update the following settings:
* **Prompt**: Enter the following prompt. This prompt references the `meeting_notes` and `summary_format` state variables, which you set up in the UI. It instructs the agent to summarize the meeting notes and defines the different formats.
```
Summarize these meeting notes based on the requested format:
Meeting Notes: @{meeting_notes}
Format: @{summary_format}
Guidelines for each format:
- Executive brief: Create a concise 2-3 sentence overview focusing on high-level outcomes and decisions for leadership
- Action items only: List only the specific action items, who is responsible, and deadlines
- Full summary: Provide a comprehensive summary including discussion points, decisions, action items, and next steps
- Key decisions: Focus specifically on decisions made during the meeting and their implications
Format the output appropriately for the selected format type.
```
### Add the text generation block
The [**Text generation** block](/blueprints/textgeneration) generates a summary of the meeting notes based on the selected format using Palmyra LLMs.
Search for the **Text generation** block in the block library. Then click and drag the **Text generation** block onto the canvas.
Connect the previous **Set state** block to this **Text generation** block. Drag a line from the green dot on the **Set state** block to the **Text generation** block. This tells the blueprint to execute the **Text generation** block after the **Set state** block completes successfully.
Click the **Text generation** block you just added to edit its settings. Update the following settings:
* **Prompt**: Enter the following prompt. This prompt references the `meeting_notes` and `summary_format` state variables, which you set up in the UI. It instructs the agent to summarize the meeting notes and defines the different formats.
```
Summarize these meeting notes based on the requested format:
Meeting Notes: @{meeting_notes}
Format: @{summary_format}
Guidelines for each format:
- Executive brief: Create a concise 2-3 sentence overview focusing on high-level outcomes and decisions for leadership
- Action items only: List only the specific action items, who is responsible, and deadlines
- Full summary: Provide a comprehensive summary including discussion points, decisions, action items, and next steps
- Key decisions: Focus specifically on decisions made during the meeting and their implications
Format the output appropriately for the selected format type.
```
 ### Add the set state block for the summary result
This [**Set state** block](/blueprints/setstate) sets the `summary` state variable to the generated summary so that the Text component in the UI can display it.
Search for the **Set state** block in the block library. Then click and drag the **Set state** block onto the canvas.
Connect the new **Set state** block to the **Text generation** block. Drag a line from the green dot on the **Text generation** block to the new **Set state** block. This tells the blueprint to execute the new block after the **Text generation** block completes successfully.
Click the **Set state** block you just added to edit its settings. Update the following settings:
* **Link variable**: `summary`
* **Value**: `@{result}`. The `result` environment variable is the output of the previous **Text generation** block.
The `@{result}` syntax is how you reference the output of previous blocks. Learn more about what data and variables are available to reference in [Using data from previous blocks](/agent-builder/execution-environment).
### Add the set state block for the summary result
This [**Set state** block](/blueprints/setstate) sets the `summary` state variable to the generated summary so that the Text component in the UI can display it.
Search for the **Set state** block in the block library. Then click and drag the **Set state** block onto the canvas.
Connect the new **Set state** block to the **Text generation** block. Drag a line from the green dot on the **Text generation** block to the new **Set state** block. This tells the blueprint to execute the new block after the **Text generation** block completes successfully.
Click the **Set state** block you just added to edit its settings. Update the following settings:
* **Link variable**: `summary`
* **Value**: `@{result}`. The `result` environment variable is the output of the previous **Text generation** block.
The `@{result}` syntax is how you reference the output of previous blocks. Learn more about what data and variables are available to reference in [Using data from previous blocks](/agent-builder/execution-environment).
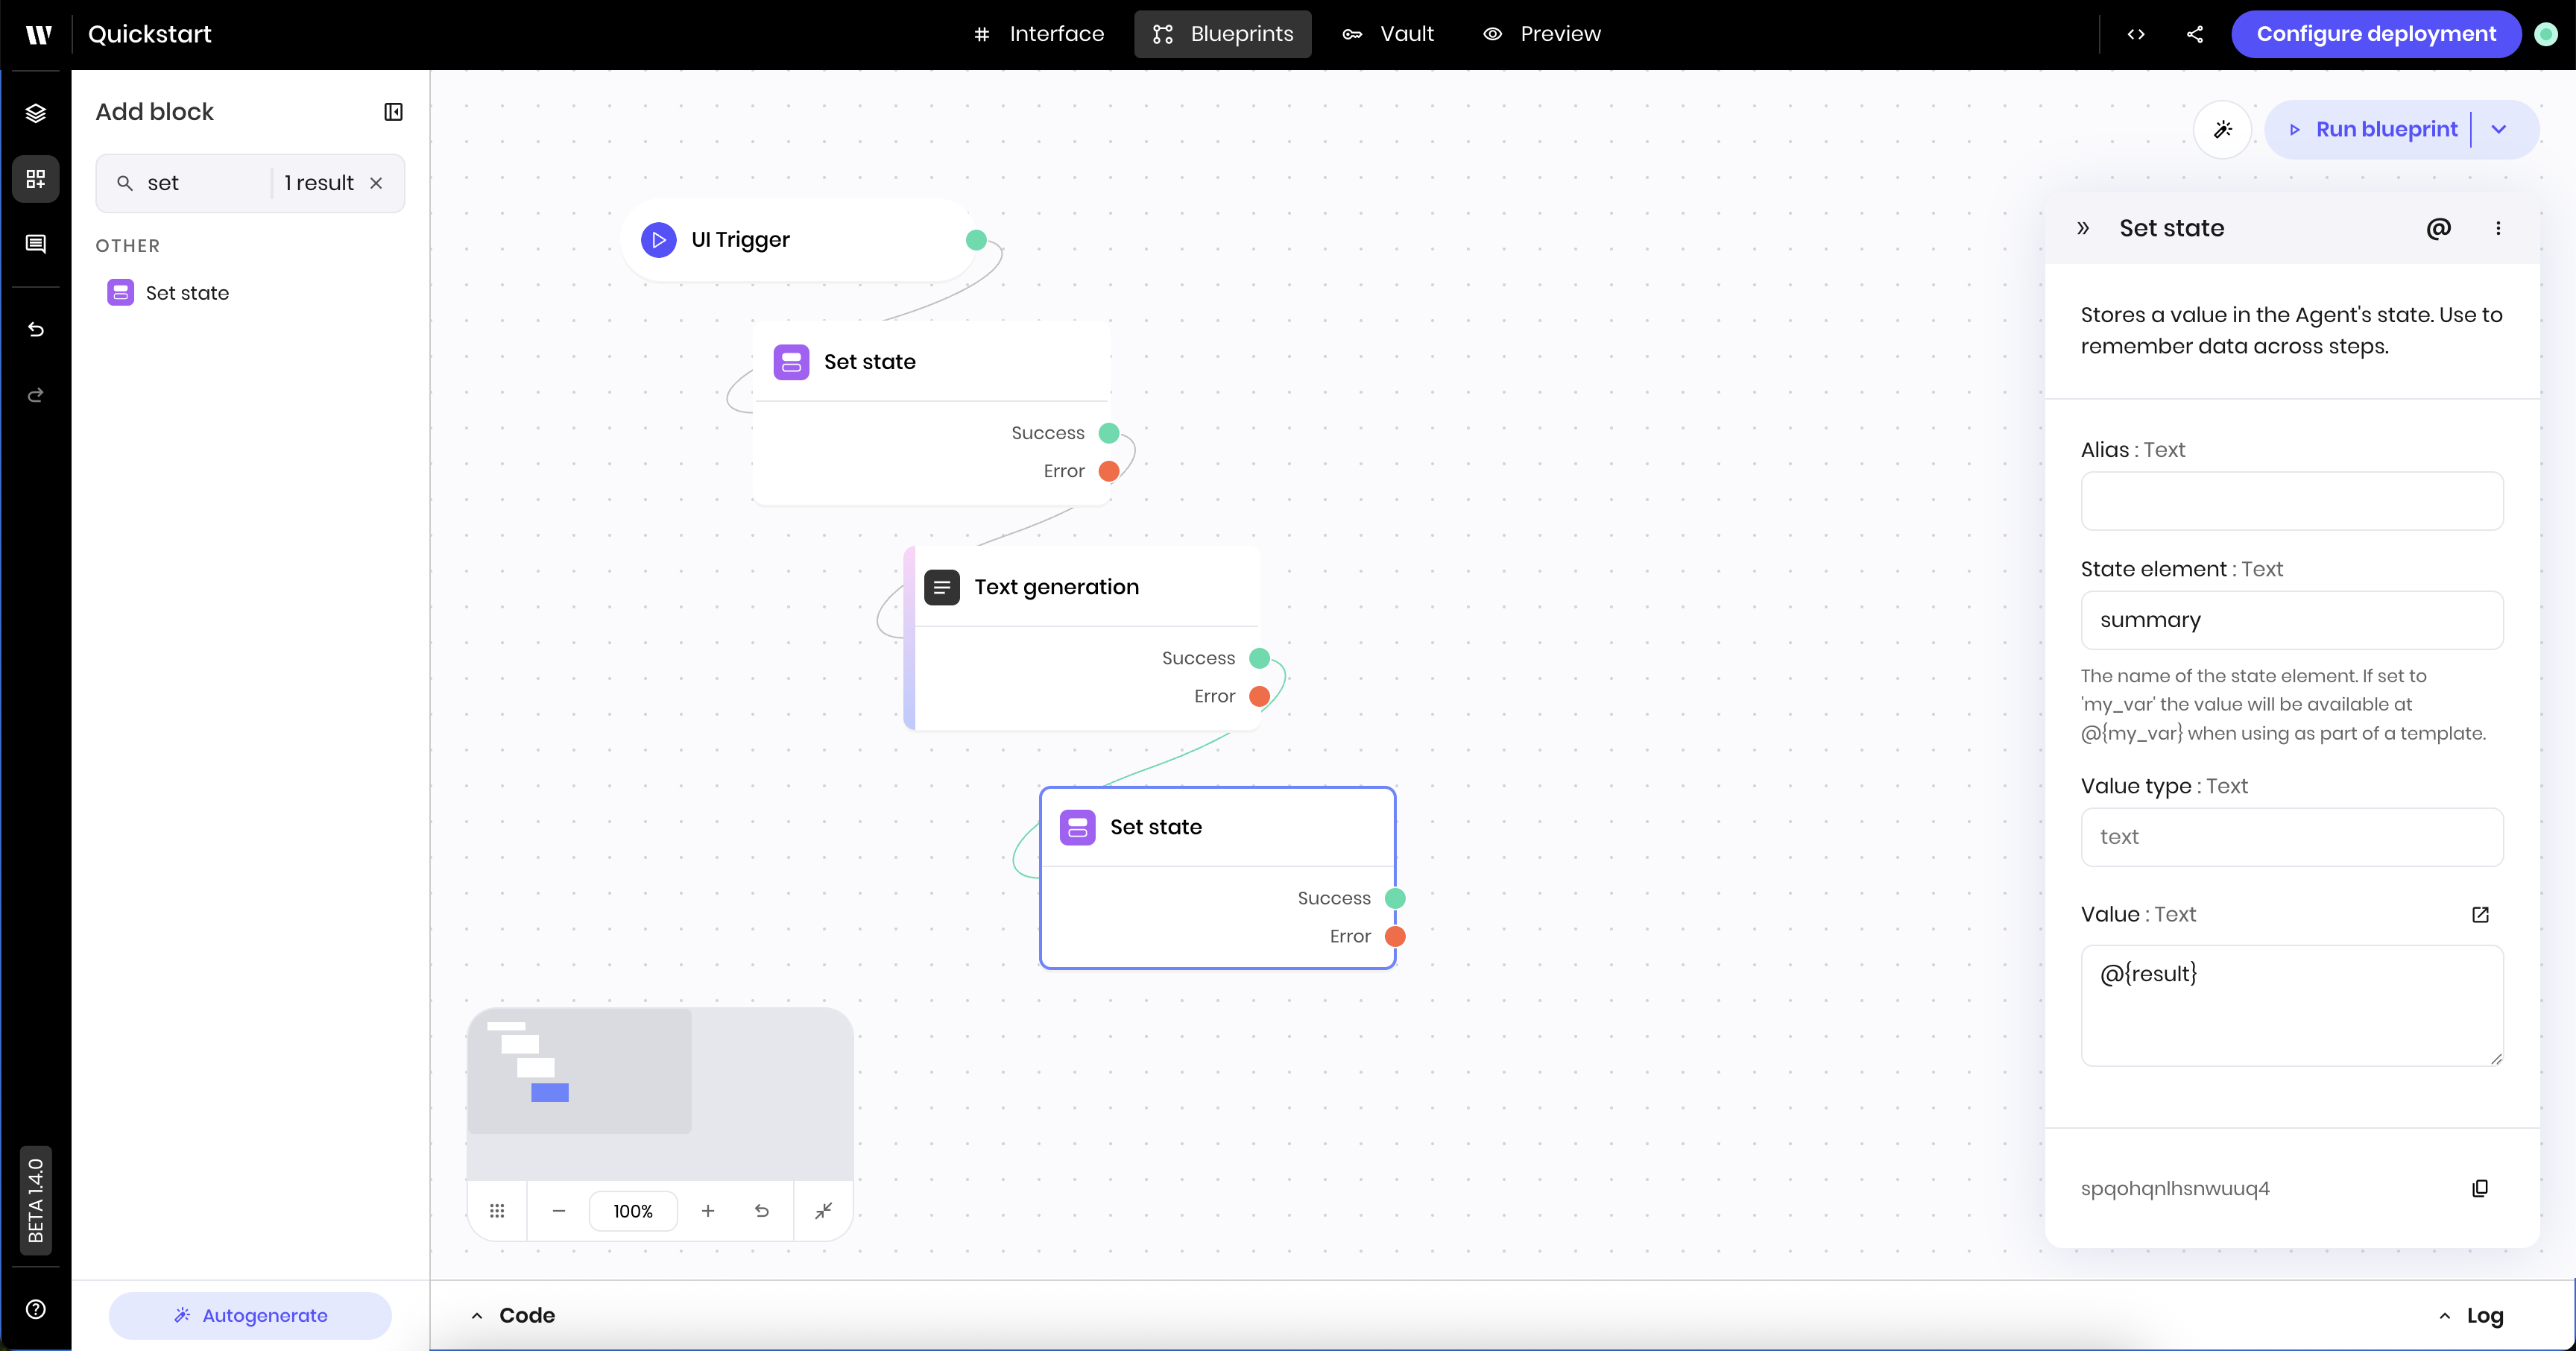 ### Add the set state block to clear the status message
This [**Set state** block](/blueprints/setstate) clears the `status` state variable to remove the status message from the UI.
Search for the **Set state** block in the block library. Then click and drag the **Set state** block onto the canvas.
Connect the new **Set state** block to the previous **Set state** block. Drag a line from the green dot on the previous **Set state** block to the new **Set state** block. This tells the blueprint to execute the new block after the previous block completes successfully.
Click the **Set state** block you just added to edit its settings. Update the following settings:
* **Link variable**: `status`
* **Value**: Leave the **Value** blank. This clears the `status` state variable.
### Add the set state block to clear the status message
This [**Set state** block](/blueprints/setstate) clears the `status` state variable to remove the status message from the UI.
Search for the **Set state** block in the block library. Then click and drag the **Set state** block onto the canvas.
Connect the new **Set state** block to the previous **Set state** block. Drag a line from the green dot on the previous **Set state** block to the new **Set state** block. This tells the blueprint to execute the new block after the previous block completes successfully.
Click the **Set state** block you just added to edit its settings. Update the following settings:
* **Link variable**: `status`
* **Value**: Leave the **Value** blank. This clears the `status` state variable.
 ### Data connection patterns
Notice how the blueprint connects blocks and passes data using variables:
* `@{meeting_notes}` and `@{summary_format}`: the blueprint blocks read from UI inputs via state
* `@{result}`: the blueprint blocks read the output from the Text generation block
* `@{summary}`: the blueprint blocks write the summary to the state, which the UI displays
* `@{status}`: the blueprint blocks set progress messages that the UI displays
This pattern of using `@{variable_name}` is how all Agent Builder components communicate.
## Preview the agent
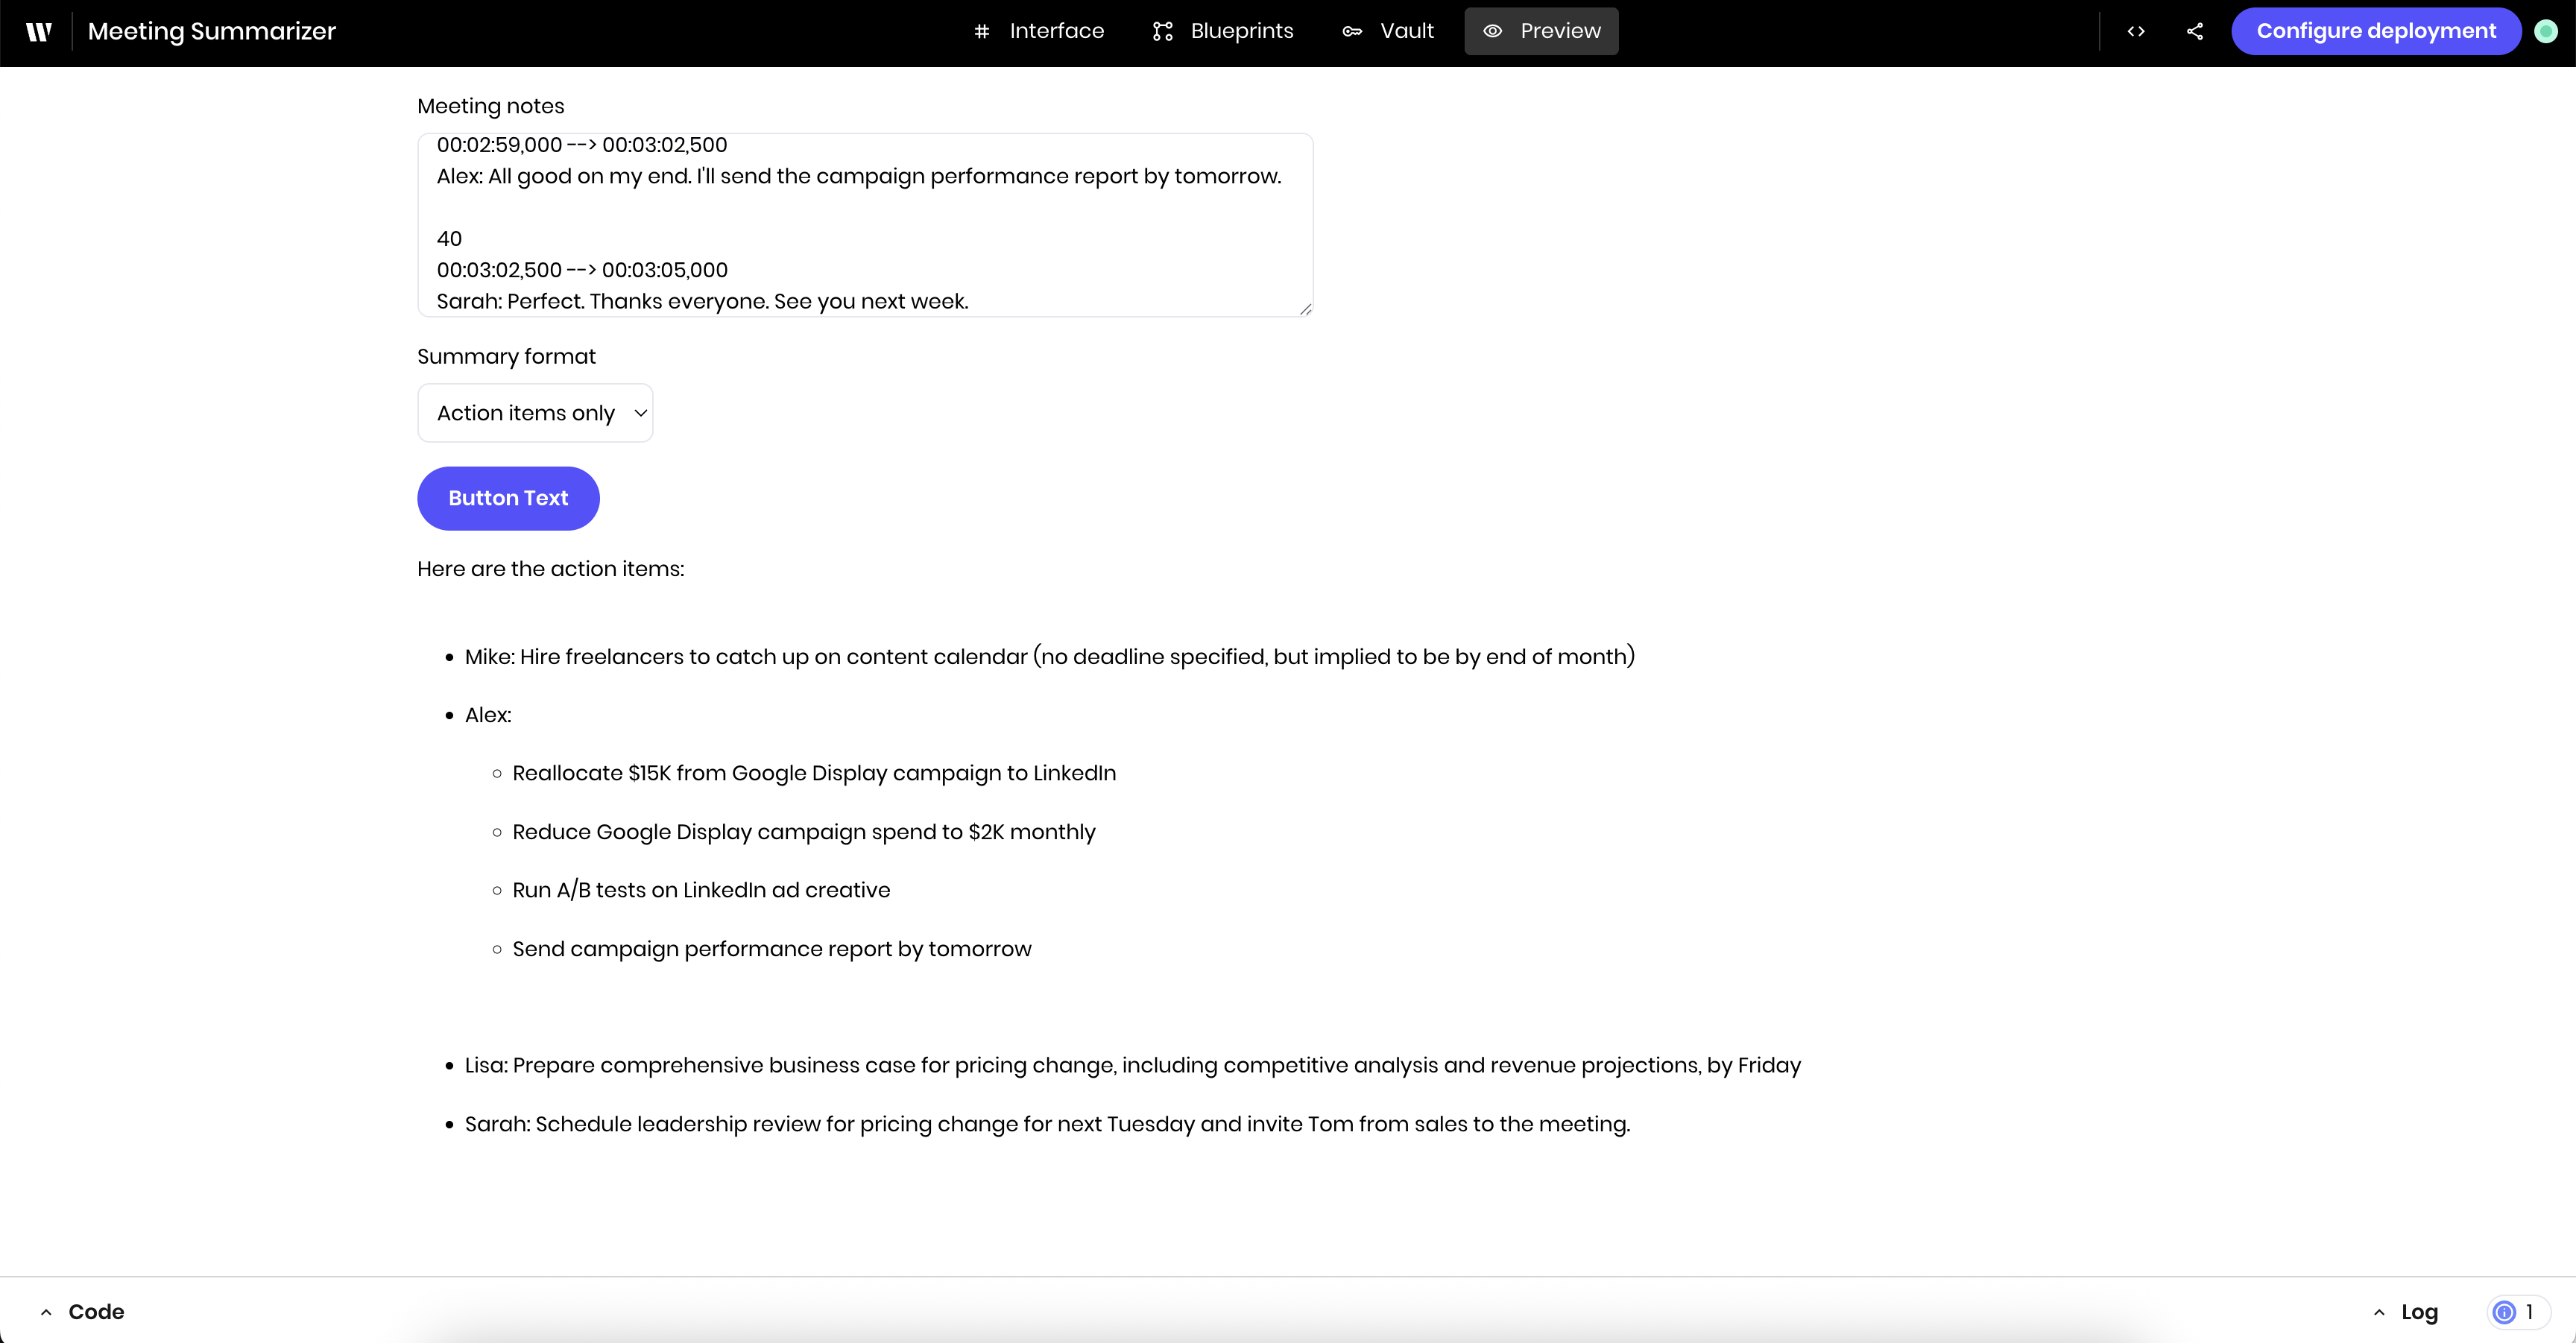
You've now built the UI and blueprint for the new agent. Go to the **Preview** view to test the agent.
Paste meeting notes into the **Meeting notes** text area and select a summary format from the **Summary format** select input. Then click the **Generate summary** button to see the agent create a summary in your selected format.
Here's a sample transcript that you can use to test if you don't have your own meeting notes:
```text theme={null}
1
00:00:00,000 --> 00:00:03,500
Sarah: Alright everyone, let's start with our Q1 campaign performance.
2
00:00:03,500 --> 00:00:07,000
Sarah: Mike, how are we tracking on the content calendar?
3
00:00:07,000 --> 00:00:12,500
Mike: We're slightly behind on blog posts - only published 8 out of 12 planned for January.
4
00:00:12,500 --> 00:00:18,000
Mike: The SEO-focused pieces are taking longer than expected because we're doing more keyword research.
5
00:00:18,000 --> 00:00:22,500
Mike: The good news is organic traffic is up 18% month-over-month.
6
00:00:22,500 --> 00:00:28,000
Mike: I think we can catch up by end of month if we get approval for two freelance writers at $150 per article.
7
00:00:28,000 --> 00:00:32,500
Sarah: Approved. That's within our content budget. Alex, what's the budget looking like for paid campaigns?
8
00:00:32,500 --> 00:00:37,000
Alex: We've spent 60% of Q1 budget already, but conversion rates are 23% higher than last quarter.
9
00:00:37,000 --> 00:00:42,500
Alex: The LinkedIn campaign is performing especially well for enterprise leads.
10
00:00:42,500 --> 00:00:47,000
Alex: We're seeing a 4.2% CTR compared to 2.8% industry average.
11
00:00:47,000 --> 00:00:53,500
Alex: I'd like to shift $15K from the underperforming Google Display campaign to LinkedIn and maybe test some YouTube ads.
12
00:00:53,500 --> 00:00:57,000
Sarah: Let's do the LinkedIn shift but hold off on YouTube until we see February numbers.
13
00:00:57,000 --> 00:01:02,500
Sarah: We need to be more conservative with spend until we understand the pricing impact.
14
00:01:02,500 --> 00:01:06,000
Sarah: Lisa, any updates on the product launch messaging?
15
00:01:06,000 --> 00:01:10,500
Lisa: The beta feedback is mostly positive. Users love the new dashboard interface and automation features.
16
00:01:10,500 --> 00:01:16,000
Lisa: Main concern is pricing - 40% of beta users said our current model is too high for small businesses.
17
00:01:16,000 --> 00:01:20,500
Lisa: They're comparing us to competitors who start at $39/month.
18
00:01:20,500 --> 00:01:25,000
Lisa: I recommend we create a basic tier at $29/month instead of starting at $79.
19
00:01:25,000 --> 00:01:30,500
Lisa: All marketing materials are ready but we'll need to update pricing pages, sales decks, and comparison charts.
20
00:01:30,500 --> 00:01:35,000
Sarah: That's a significant pricing change that could impact our revenue projections by 30-40%.
21
00:01:35,000 --> 00:01:39,500
Sarah: I need to discuss with leadership before we commit.
22
00:01:39,500 --> 00:01:45,000
Sarah: Can you prepare a comprehensive business case by Friday? Include competitive analysis and revenue projections.
23
00:01:45,000 --> 00:01:49,500
Lisa: Absolutely. I'll also coordinate with the sales team to get their input on customer feedback.
24
00:01:49,500 --> 00:01:53,000
Mike: Quick question - should we hold off on publishing the pricing comparison blog post?
25
00:01:53,000 --> 00:01:57,500
Sarah: Good catch. Yes, hold that one back. Focus on the feature-focused content instead.
26
00:01:57,500 --> 00:02:02,000
Alex: Should we pause the Google Display campaign completely or just reduce spend?
27
00:02:02,000 --> 00:02:07,500
Alex: It's eating budget but only generating 12 leads per month at $89 cost per lead.
28
00:02:07,500 --> 00:02:12,000
Sarah: Reduce to minimum viable spend for now - maybe $2K monthly.
29
00:02:12,000 --> 00:02:17,500
Sarah: We might be able to optimize it later once we have more conversion data.
30
00:02:17,500 --> 00:02:22,000
Alex: Got it. I'll also run some A/B tests on our LinkedIn ad creative while we're scaling that up.
31
00:02:22,000 --> 00:02:26,500
Sarah: Let me summarize our action items: Mike to hire freelancers and catch up on content calendar.
32
00:02:26,500 --> 00:02:31,000
Sarah: Alex to reallocate $15K from Display to LinkedIn and reduce Display to $2K monthly.
33
00:02:31,000 --> 00:02:36,500
Sarah: Lisa to prepare pricing analysis by Friday. I'll schedule leadership review for next Tuesday.
34
00:02:36,500 --> 00:02:40,000
Lisa: Should I invite sales leadership to that pricing review?
35
00:02:40,000 --> 00:02:44,500
Sarah: Yes, definitely include Tom from sales. His team will need to adjust their pitch if we change pricing.
36
00:02:44,500 --> 00:02:49,000
Mike: If pricing changes, how much time do we need to update all marketing materials?
37
00:02:49,000 --> 00:02:54,500
Lisa: About two weeks if we prioritize the sales decks and website first. The brochures can follow.
38
00:02:54,500 --> 00:02:59,000
Sarah: That might push our launch timeline back slightly, but better to get pricing right.
39
00:02:59,000 --> 00:03:02,500
Alex: All good on my end. I'll send the campaign performance report by tomorrow.
40
00:03:02,500 --> 00:03:05,000
Sarah: Perfect. Thanks everyone. See you next week.
```
Try different summary formats with the same meeting notes to see how the output changes based on your selection. You can also experiment with leaving the summary format blank to see how the agent handles it.
If you encounter any issues, refer to the [Troubleshooting](/agent-builder/troubleshooting) guide for debugging information.
## Deploy the agent
When you're ready to deploy the agent, click **Configure deployment** in the top right corner of the Agent Builder interface. You can also access the deployment configuration by going to the [AI Studio homepage](https://app.writer.com/aistudio) and selecting the agent you created.
If the agent isn't deployed, you see a toggle bar that says **Draft**.
### Data connection patterns
Notice how the blueprint connects blocks and passes data using variables:
* `@{meeting_notes}` and `@{summary_format}`: the blueprint blocks read from UI inputs via state
* `@{result}`: the blueprint blocks read the output from the Text generation block
* `@{summary}`: the blueprint blocks write the summary to the state, which the UI displays
* `@{status}`: the blueprint blocks set progress messages that the UI displays
This pattern of using `@{variable_name}` is how all Agent Builder components communicate.
## Preview the agent
You've now built the UI and blueprint for the new agent. Go to the **Preview** view to test the agent.
Paste meeting notes into the **Meeting notes** text area and select a summary format from the **Summary format** select input. Then click the **Generate summary** button to see the agent create a summary in your selected format.
Here's a sample transcript that you can use to test if you don't have your own meeting notes:
```text theme={null}
1
00:00:00,000 --> 00:00:03,500
Sarah: Alright everyone, let's start with our Q1 campaign performance.
2
00:00:03,500 --> 00:00:07,000
Sarah: Mike, how are we tracking on the content calendar?
3
00:00:07,000 --> 00:00:12,500
Mike: We're slightly behind on blog posts - only published 8 out of 12 planned for January.
4
00:00:12,500 --> 00:00:18,000
Mike: The SEO-focused pieces are taking longer than expected because we're doing more keyword research.
5
00:00:18,000 --> 00:00:22,500
Mike: The good news is organic traffic is up 18% month-over-month.
6
00:00:22,500 --> 00:00:28,000
Mike: I think we can catch up by end of month if we get approval for two freelance writers at $150 per article.
7
00:00:28,000 --> 00:00:32,500
Sarah: Approved. That's within our content budget. Alex, what's the budget looking like for paid campaigns?
8
00:00:32,500 --> 00:00:37,000
Alex: We've spent 60% of Q1 budget already, but conversion rates are 23% higher than last quarter.
9
00:00:37,000 --> 00:00:42,500
Alex: The LinkedIn campaign is performing especially well for enterprise leads.
10
00:00:42,500 --> 00:00:47,000
Alex: We're seeing a 4.2% CTR compared to 2.8% industry average.
11
00:00:47,000 --> 00:00:53,500
Alex: I'd like to shift $15K from the underperforming Google Display campaign to LinkedIn and maybe test some YouTube ads.
12
00:00:53,500 --> 00:00:57,000
Sarah: Let's do the LinkedIn shift but hold off on YouTube until we see February numbers.
13
00:00:57,000 --> 00:01:02,500
Sarah: We need to be more conservative with spend until we understand the pricing impact.
14
00:01:02,500 --> 00:01:06,000
Sarah: Lisa, any updates on the product launch messaging?
15
00:01:06,000 --> 00:01:10,500
Lisa: The beta feedback is mostly positive. Users love the new dashboard interface and automation features.
16
00:01:10,500 --> 00:01:16,000
Lisa: Main concern is pricing - 40% of beta users said our current model is too high for small businesses.
17
00:01:16,000 --> 00:01:20,500
Lisa: They're comparing us to competitors who start at $39/month.
18
00:01:20,500 --> 00:01:25,000
Lisa: I recommend we create a basic tier at $29/month instead of starting at $79.
19
00:01:25,000 --> 00:01:30,500
Lisa: All marketing materials are ready but we'll need to update pricing pages, sales decks, and comparison charts.
20
00:01:30,500 --> 00:01:35,000
Sarah: That's a significant pricing change that could impact our revenue projections by 30-40%.
21
00:01:35,000 --> 00:01:39,500
Sarah: I need to discuss with leadership before we commit.
22
00:01:39,500 --> 00:01:45,000
Sarah: Can you prepare a comprehensive business case by Friday? Include competitive analysis and revenue projections.
23
00:01:45,000 --> 00:01:49,500
Lisa: Absolutely. I'll also coordinate with the sales team to get their input on customer feedback.
24
00:01:49,500 --> 00:01:53,000
Mike: Quick question - should we hold off on publishing the pricing comparison blog post?
25
00:01:53,000 --> 00:01:57,500
Sarah: Good catch. Yes, hold that one back. Focus on the feature-focused content instead.
26
00:01:57,500 --> 00:02:02,000
Alex: Should we pause the Google Display campaign completely or just reduce spend?
27
00:02:02,000 --> 00:02:07,500
Alex: It's eating budget but only generating 12 leads per month at $89 cost per lead.
28
00:02:07,500 --> 00:02:12,000
Sarah: Reduce to minimum viable spend for now - maybe $2K monthly.
29
00:02:12,000 --> 00:02:17,500
Sarah: We might be able to optimize it later once we have more conversion data.
30
00:02:17,500 --> 00:02:22,000
Alex: Got it. I'll also run some A/B tests on our LinkedIn ad creative while we're scaling that up.
31
00:02:22,000 --> 00:02:26,500
Sarah: Let me summarize our action items: Mike to hire freelancers and catch up on content calendar.
32
00:02:26,500 --> 00:02:31,000
Sarah: Alex to reallocate $15K from Display to LinkedIn and reduce Display to $2K monthly.
33
00:02:31,000 --> 00:02:36,500
Sarah: Lisa to prepare pricing analysis by Friday. I'll schedule leadership review for next Tuesday.
34
00:02:36,500 --> 00:02:40,000
Lisa: Should I invite sales leadership to that pricing review?
35
00:02:40,000 --> 00:02:44,500
Sarah: Yes, definitely include Tom from sales. His team will need to adjust their pitch if we change pricing.
36
00:02:44,500 --> 00:02:49,000
Mike: If pricing changes, how much time do we need to update all marketing materials?
37
00:02:49,000 --> 00:02:54,500
Lisa: About two weeks if we prioritize the sales decks and website first. The brochures can follow.
38
00:02:54,500 --> 00:02:59,000
Sarah: That might push our launch timeline back slightly, but better to get pricing right.
39
00:02:59,000 --> 00:03:02,500
Alex: All good on my end. I'll send the campaign performance report by tomorrow.
40
00:03:02,500 --> 00:03:05,000
Sarah: Perfect. Thanks everyone. See you next week.
```
Try different summary formats with the same meeting notes to see how the output changes based on your selection. You can also experiment with leaving the summary format blank to see how the agent handles it.
If you encounter any issues, refer to the [Troubleshooting](/agent-builder/troubleshooting) guide for debugging information.
## Deploy the agent
When you're ready to deploy the agent, click **Configure deployment** in the top right corner of the Agent Builder interface. You can also access the deployment configuration by going to the [AI Studio homepage](https://app.writer.com/aistudio) and selecting the agent you created.
If the agent isn't deployed, you see a toggle bar that says **Draft**.
 To deploy the agent, toggle the bar. Writer deploys the agent to the Writer cloud, which takes a moment to complete.
When the deployment is complete, the toggle bar shows **Deployed**. It also shows a list of the teams in your organization, which you can use to grant access to the agent. You must select at least one team before you can view the URL for the deployed agent.
To deploy the agent, toggle the bar. Writer deploys the agent to the Writer cloud, which takes a moment to complete.
When the deployment is complete, the toggle bar shows **Deployed**. It also shows a list of the teams in your organization, which you can use to grant access to the agent. You must select at least one team before you can view the URL for the deployed agent.
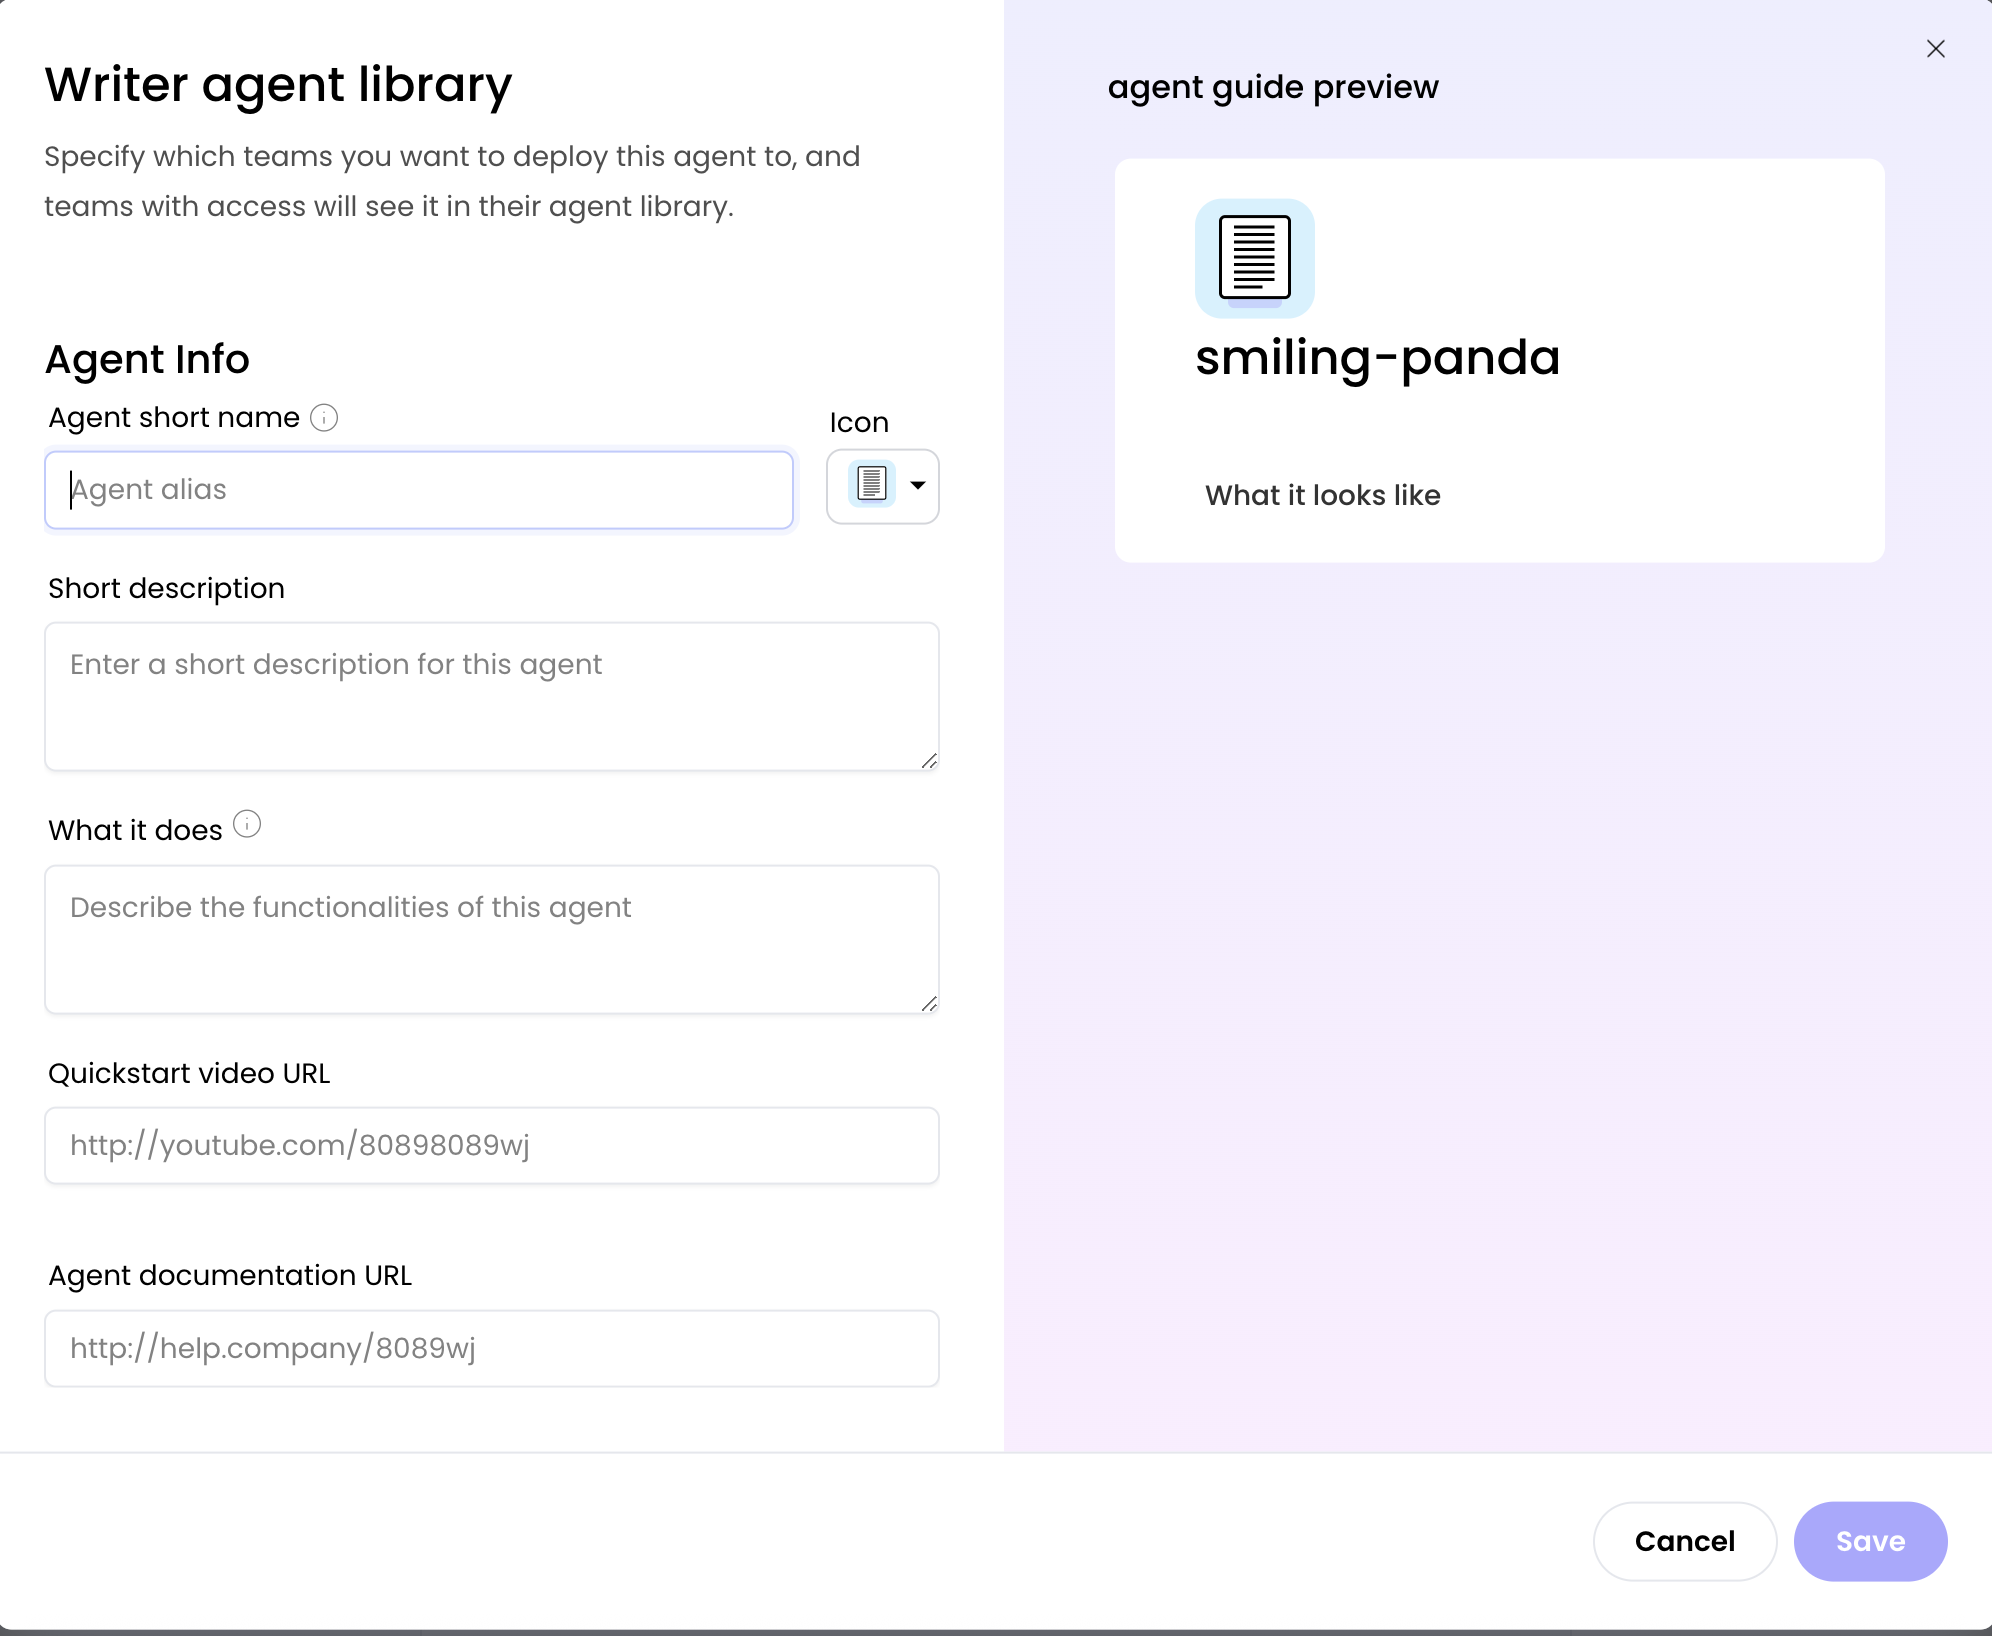
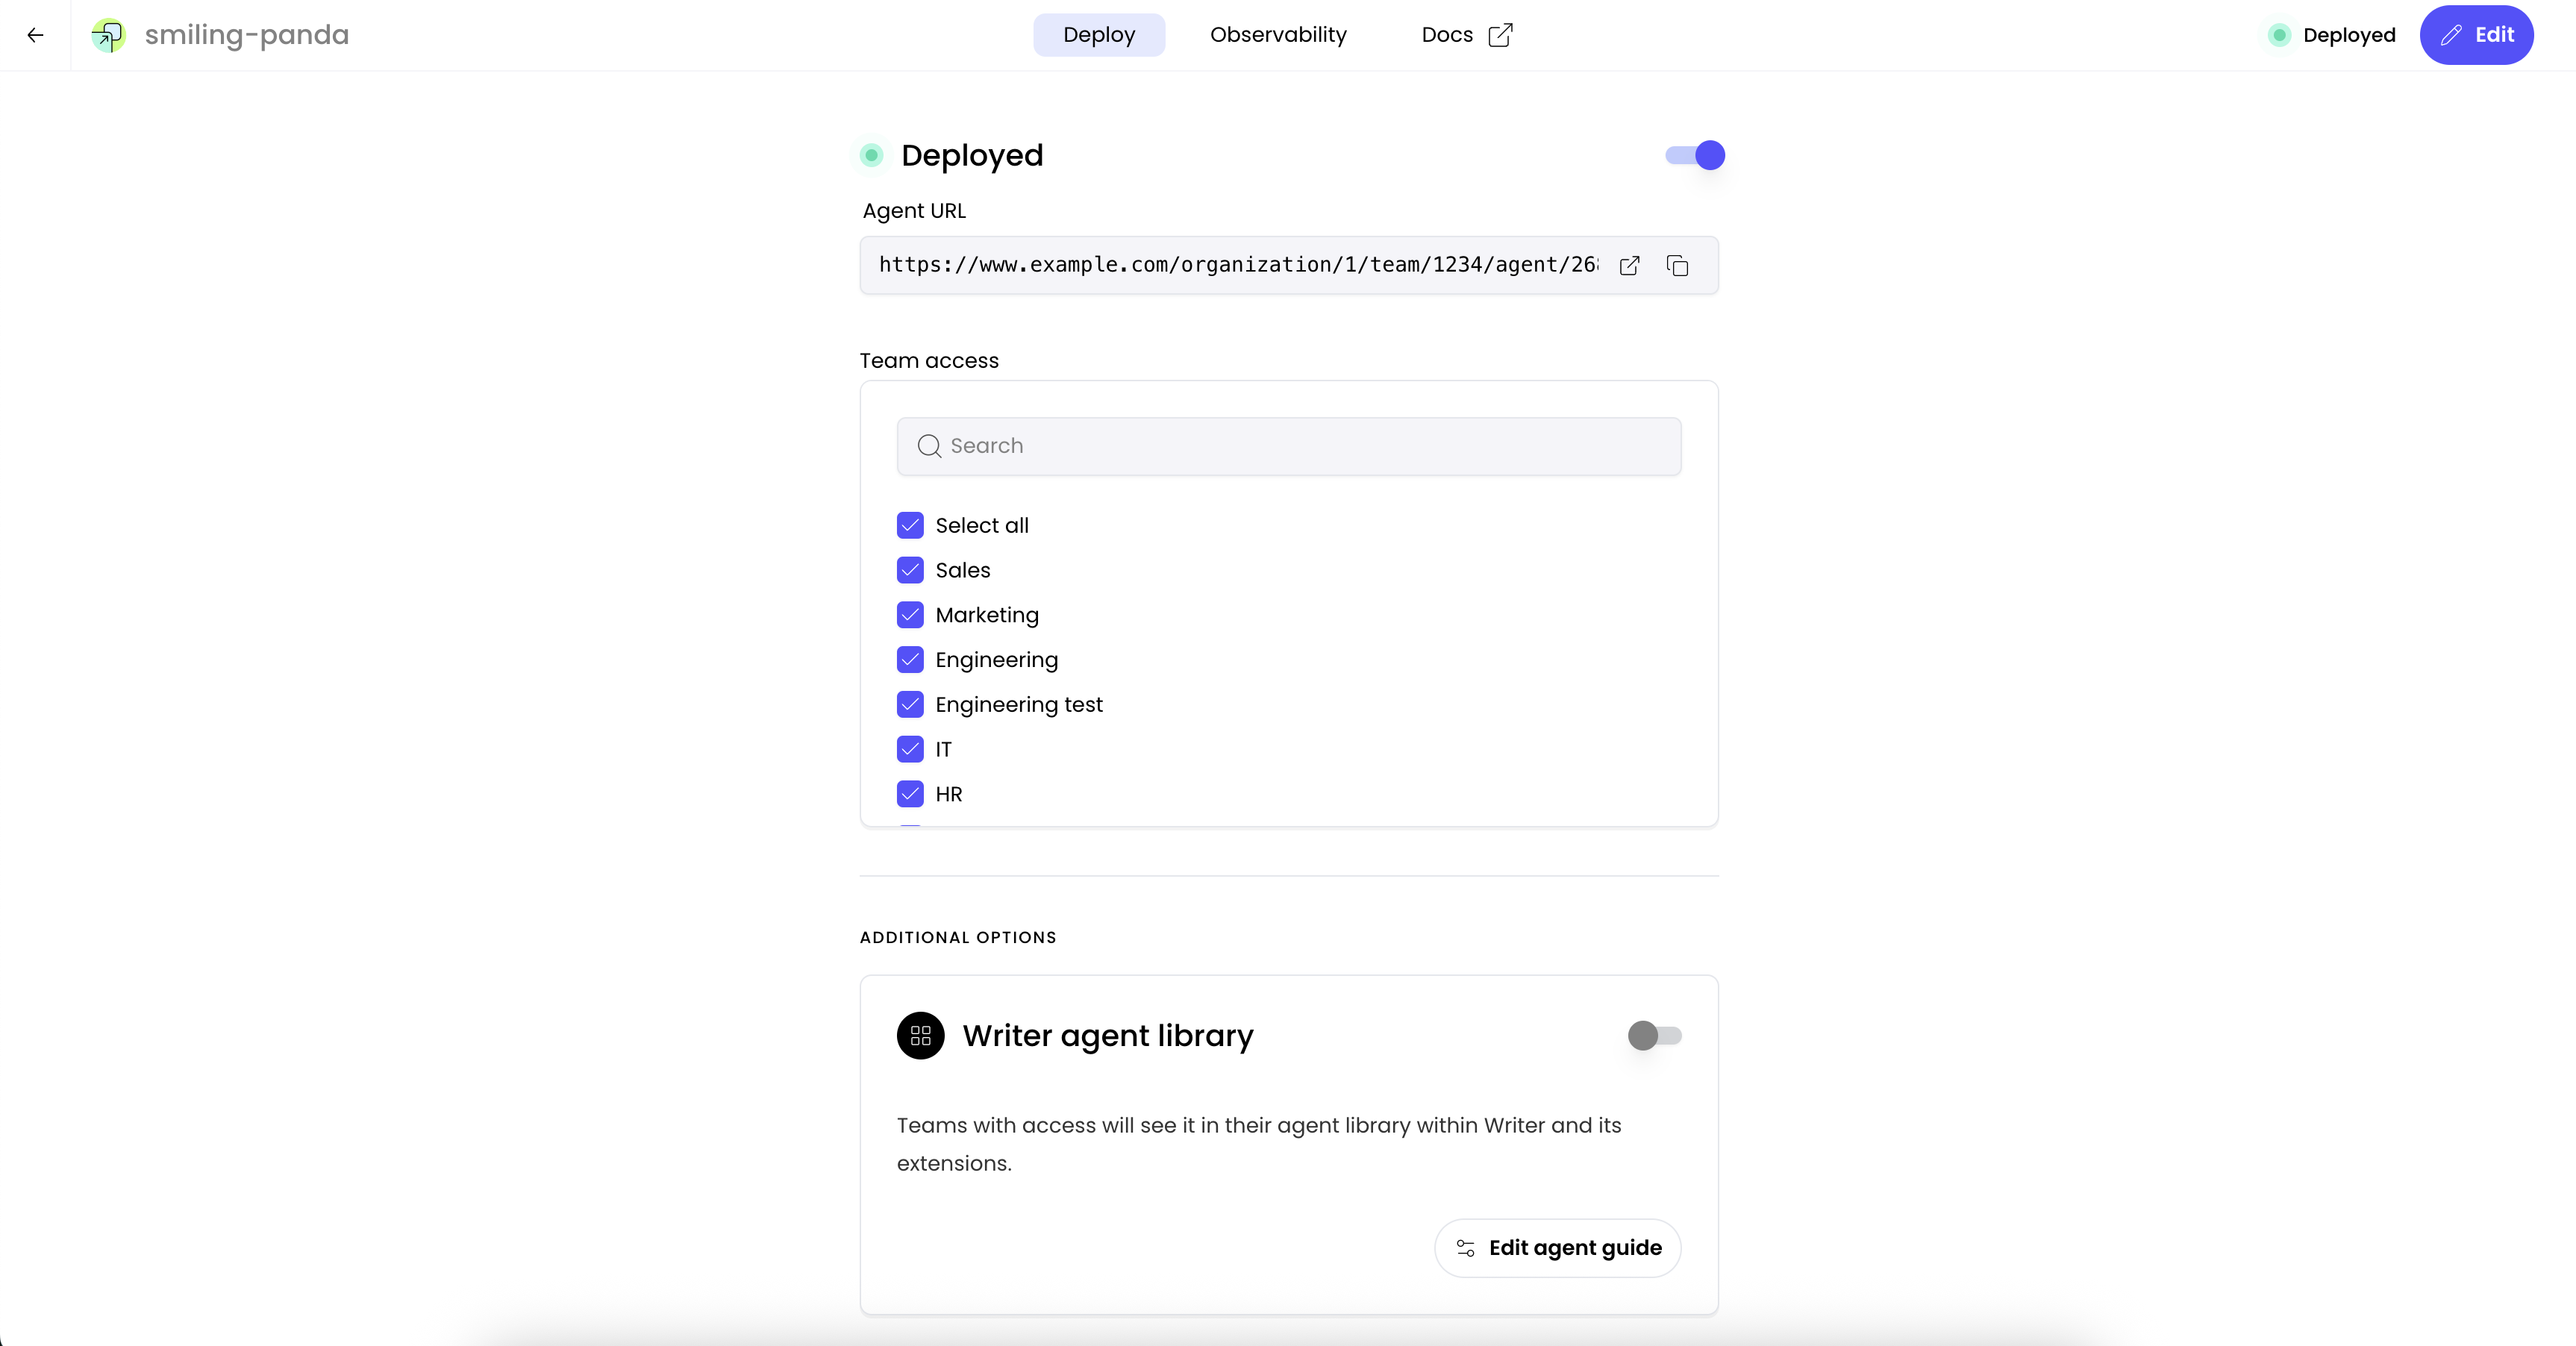 You can also choose to deploy the agent to the Writer Agent Library for the teams you've granted access to. These teams can see the agent you've created in the main [Ask Writer app](https://app.writer.com).
To help teams find the agent, select **Edit the agent guide**, where you can add a description and other information to help teams use the agent.
You can also choose to deploy the agent to the Writer Agent Library for the teams you've granted access to. These teams can see the agent you've created in the main [Ask Writer app](https://app.writer.com).
To help teams find the agent, select **Edit the agent guide**, where you can add a description and other information to help teams use the agent.
 ## Agentic enhancements
This tutorial shows outcome-driven design in action: you define what kind of summary you want, and the agent adapts. To make this agent even more versatile, consider adding:
* [Send summaries to Slack](/agent-builder/invoice-processing): Automatically post to relevant channels
* [HTTP request blocks](/blueprints/httprequest) and [tool calling](/agent-builder/tool-calling) to integrate with third party APIs to perform actions like:
* **Emailing participants**: Send summaries via your email API such as SendGrid or Mailgun
* **Calendar integrations**: Schedule follow-up meetings and block time for tasks
* **CRM updates**: Log meeting outcomes in your customer database
* **Task automation**: Create Jira tickets or Asana tasks for each action item
These integrations transform a summarizer into a true meeting assistant that takes action on your behalf.
## Next steps
* Learn how to [add file inputs and parse PDFs](/agent-builder/summarize-pdfs)
* Learn how to [style the agent's UI](/agent-builder/component-styles)
* Learn how to [send messages to Slack](/agent-builder/invoice-processing)
* Add [tool calling for intelligent integrations with external tools](/agent-builder/tool-calling)
## Agentic enhancements
This tutorial shows outcome-driven design in action: you define what kind of summary you want, and the agent adapts. To make this agent even more versatile, consider adding:
* [Send summaries to Slack](/agent-builder/invoice-processing): Automatically post to relevant channels
* [HTTP request blocks](/blueprints/httprequest) and [tool calling](/agent-builder/tool-calling) to integrate with third party APIs to perform actions like:
* **Emailing participants**: Send summaries via your email API such as SendGrid or Mailgun
* **Calendar integrations**: Schedule follow-up meetings and block time for tasks
* **CRM updates**: Log meeting outcomes in your customer database
* **Task automation**: Create Jira tickets or Asana tasks for each action item
These integrations transform a summarizer into a true meeting assistant that takes action on your behalf.
## Next steps
* Learn how to [add file inputs and parse PDFs](/agent-builder/summarize-pdfs)
* Learn how to [style the agent's UI](/agent-builder/component-styles)
* Learn how to [send messages to Slack](/agent-builder/invoice-processing)
* Add [tool calling for intelligent integrations with external tools](/agent-builder/tool-calling)