> ## Documentation Index
> Fetch the complete documentation index at: https://dev.writer.com/llms.txt
> Use this file to discover all available pages before exploring further.
# Add styling to the agent UI
You can style an agent's interface in two ways:
1. [Using component configuration menus](#component-configuration-menu) to adjust styling such as colors, backgrounds, shadows, and text alignment.
2. [Using CSS](#style-agent-builder-components-with-css) to target specific components, apply more advanced styling not available in the configuration menu, and create reusable styles across multiple components.
The configuration menu provides a convenient interface for common styling needs, while CSS gives you complete control over the agent's appearance.
## Component configuration menu
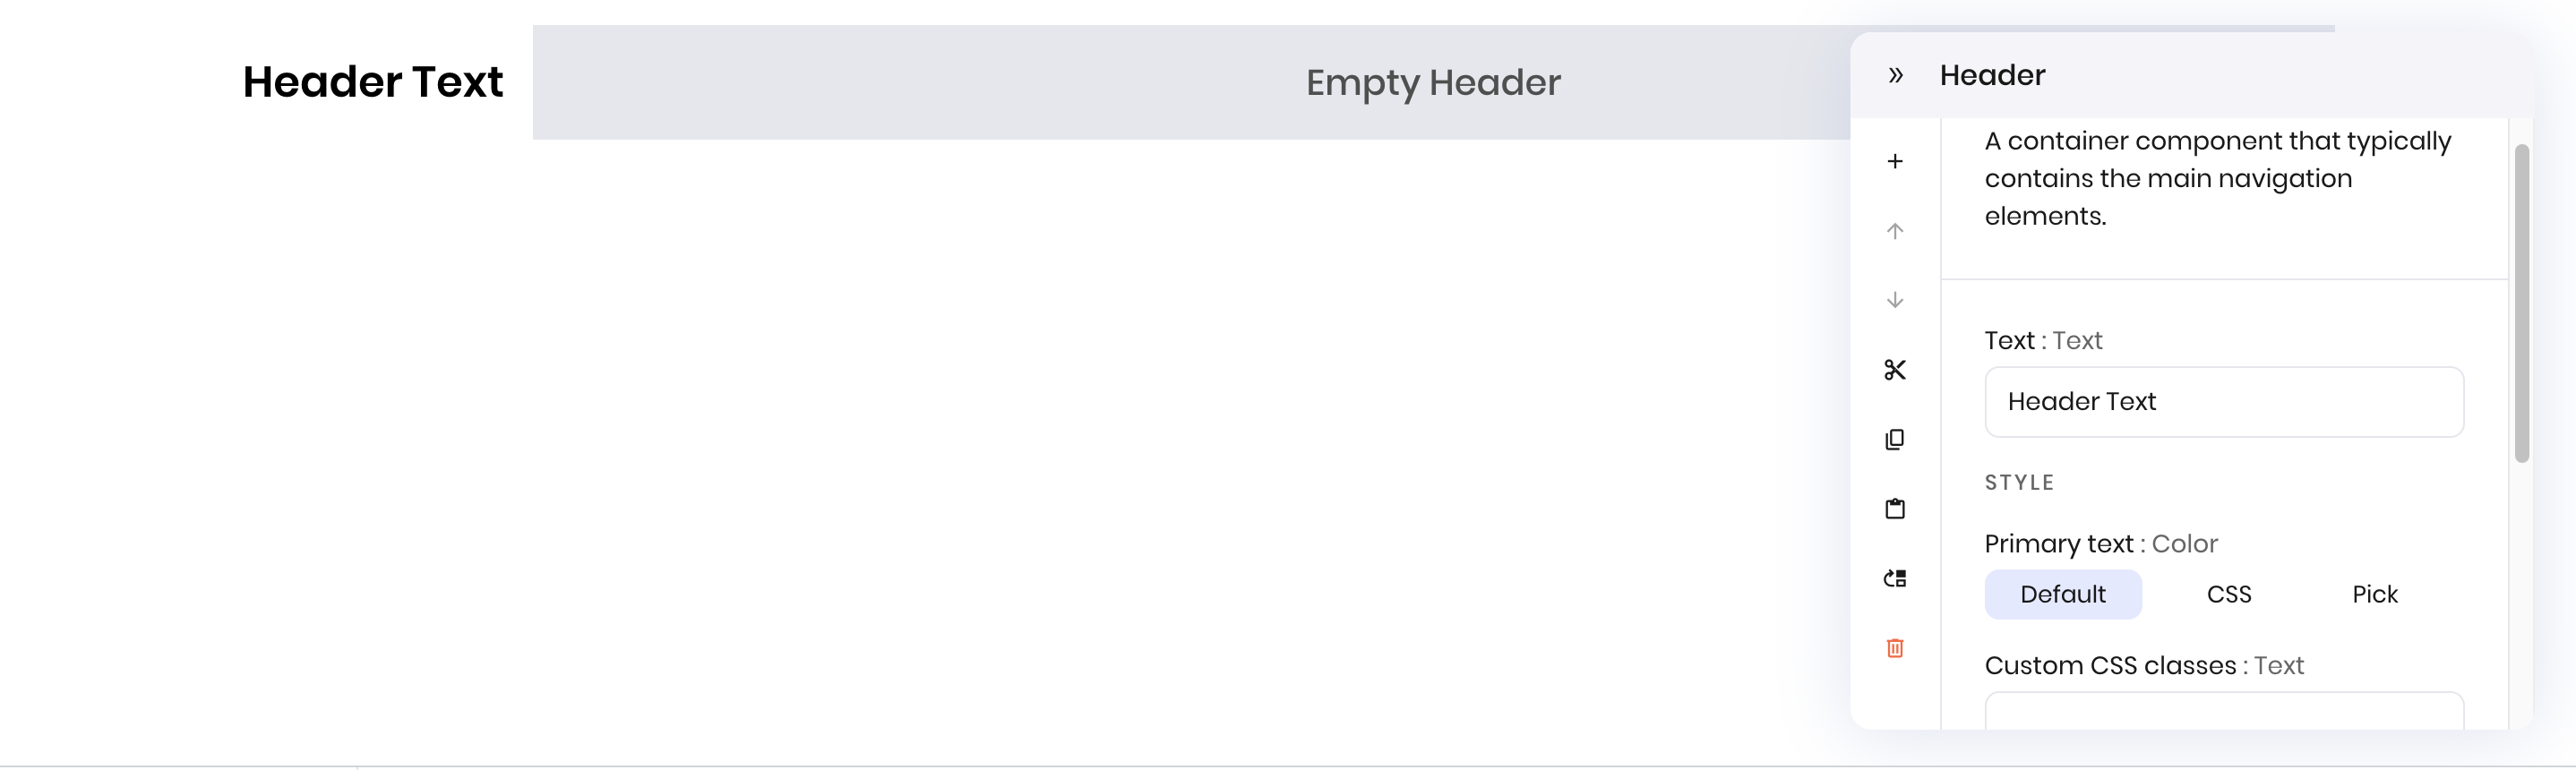
The component's configuration menu provides an interface for common styling needs such as colors, backgrounds, and text alignment. Each interface component has a different set of configurable attributes, which you can access via the configuration menu.
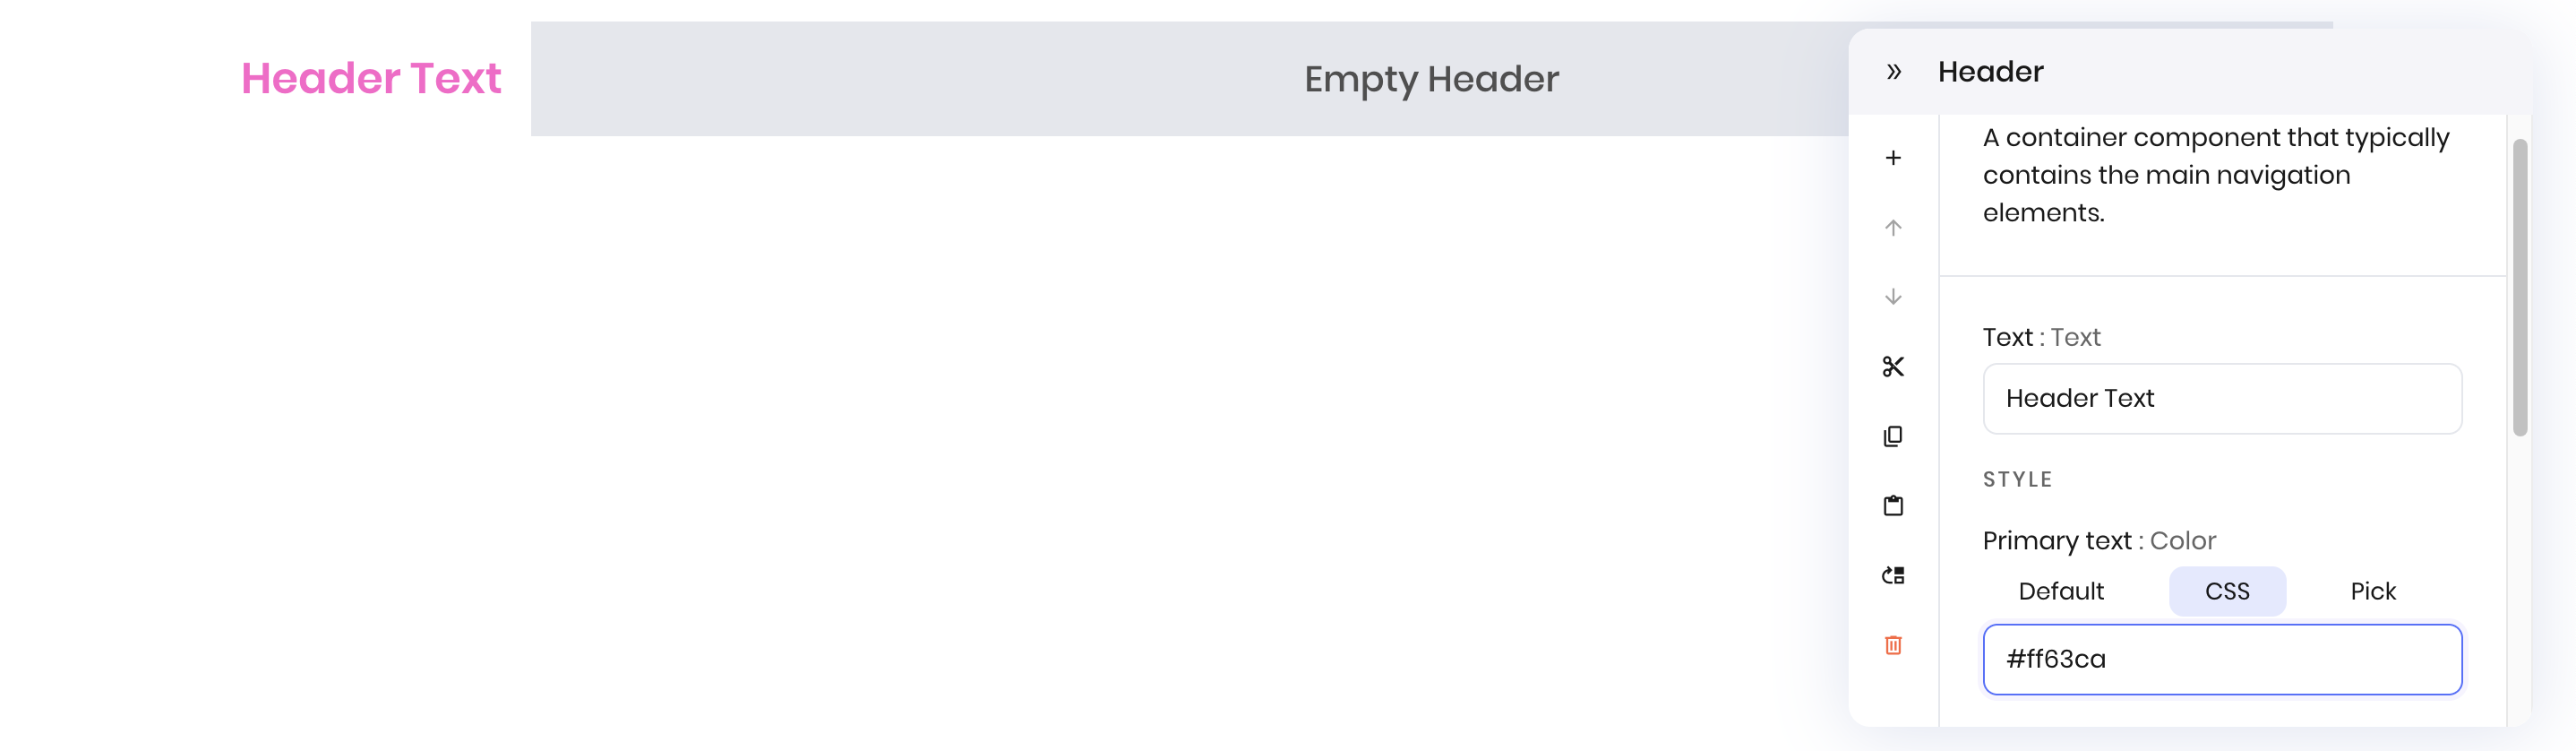
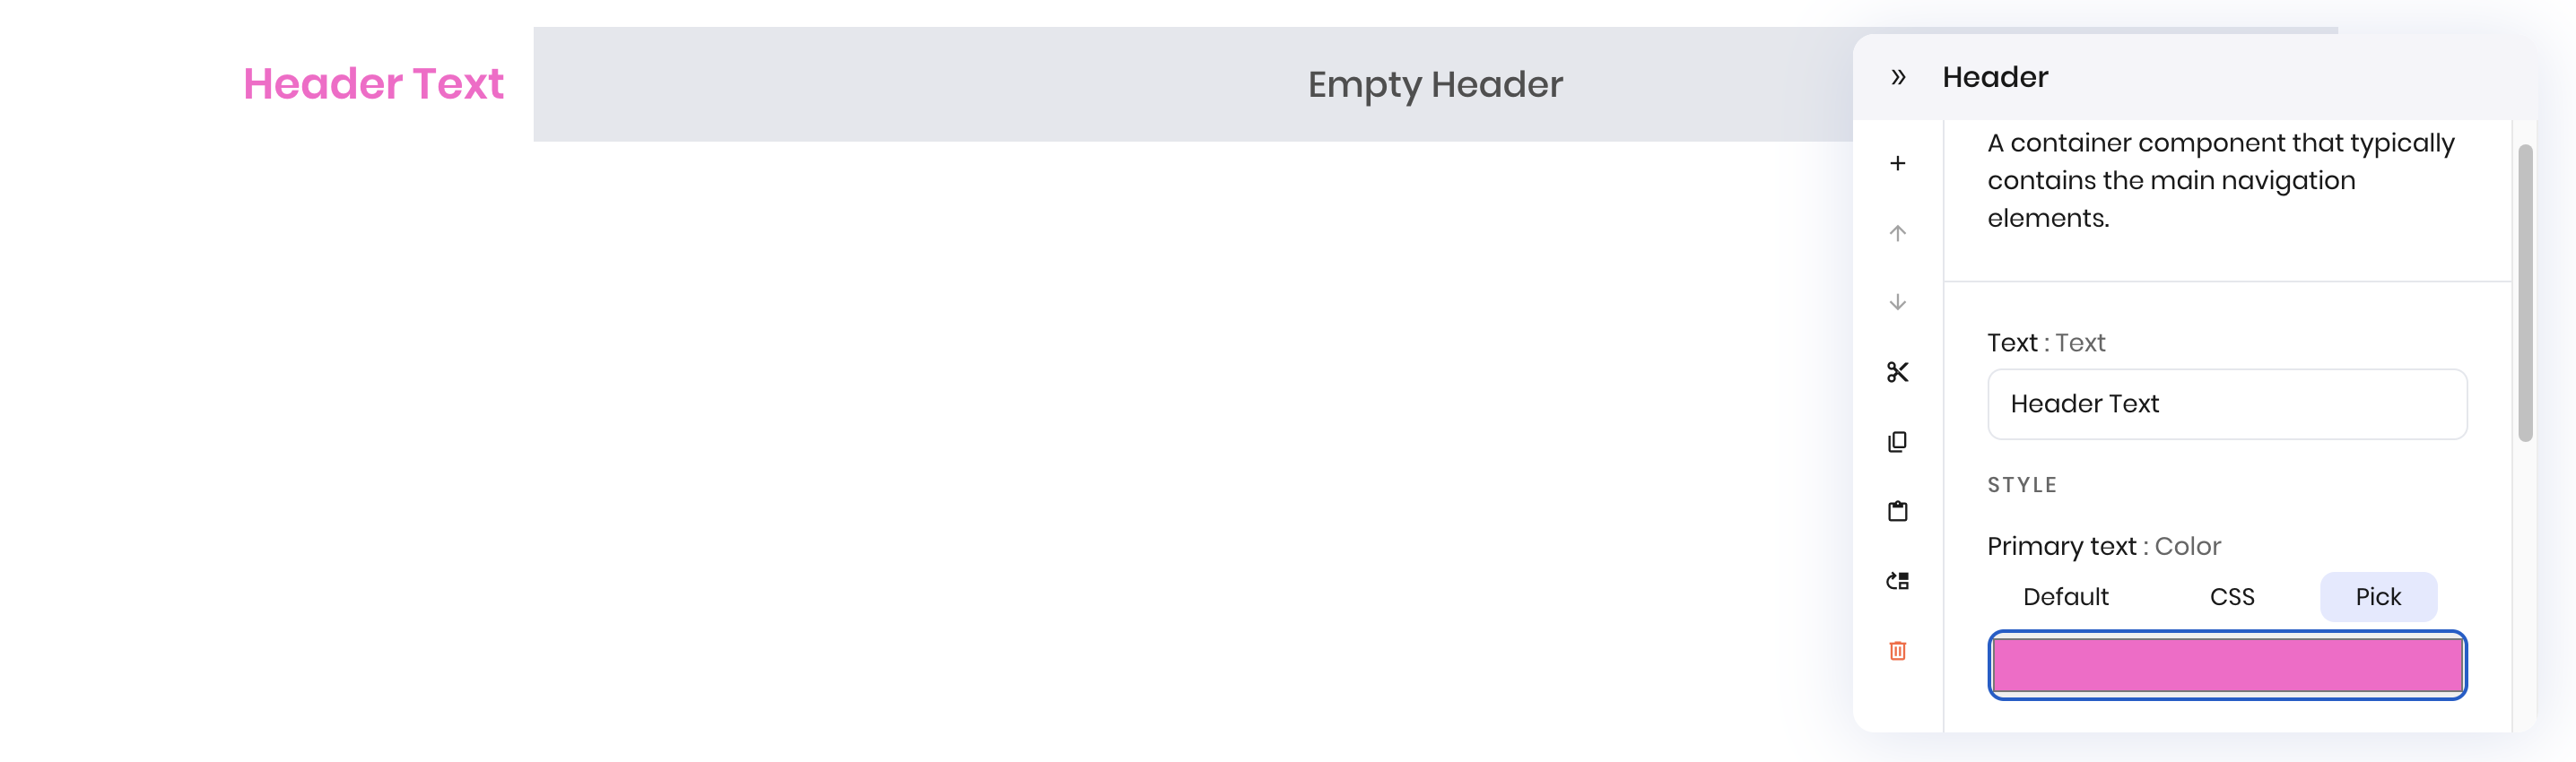
There are three styling options for each configurable attribute:
* **Default**: the default styling for the attribute.
* **CSS**: provide a CSS rule to apply to the attribute. For example, if the attribute is font color, you can set a CSS value such as `red`, a hex code, or an RGB value to apply to the attribute.
* **Pick**: define a value from a visual picker. For example, you can select a color from a color picker or control a shadow from a set of slider controls.
Revert to the default styling for the attribute.
 Provide a CSS rule to apply to the attribute.
For example, if the attribute is font color, you can set a [CSS value](https://www.w3schools.com/cssref/css_colors.php) such as `red`, a hex code, or an RGB value to apply to the attribute.
For shadow attributes, you can remove a component's shadow with `none` or update the shadow with [`box-shadow` CSS rules](https://www.w3schools.com/cssref/css3_pr_box-shadow.php).
Provide a CSS rule to apply to the attribute.
For example, if the attribute is font color, you can set a [CSS value](https://www.w3schools.com/cssref/css_colors.php) such as `red`, a hex code, or an RGB value to apply to the attribute.
For shadow attributes, you can remove a component's shadow with `none` or update the shadow with [`box-shadow` CSS rules](https://www.w3schools.com/cssref/css3_pr_box-shadow.php).
 Define a value from a visual picker. For example, you can select a color from a color picker.
 ## Add a CSS stylesheet
To add more specific and detailed styling for your agent's UI, you can add CSS stylesheets.
To style your agent's UI with CSS, follow these steps:
1. Add a CSS file to your project via the **Code** tab
2. Load the stylesheet into the agent's state
3. Apply CSS classes to components via the component's configuration menu
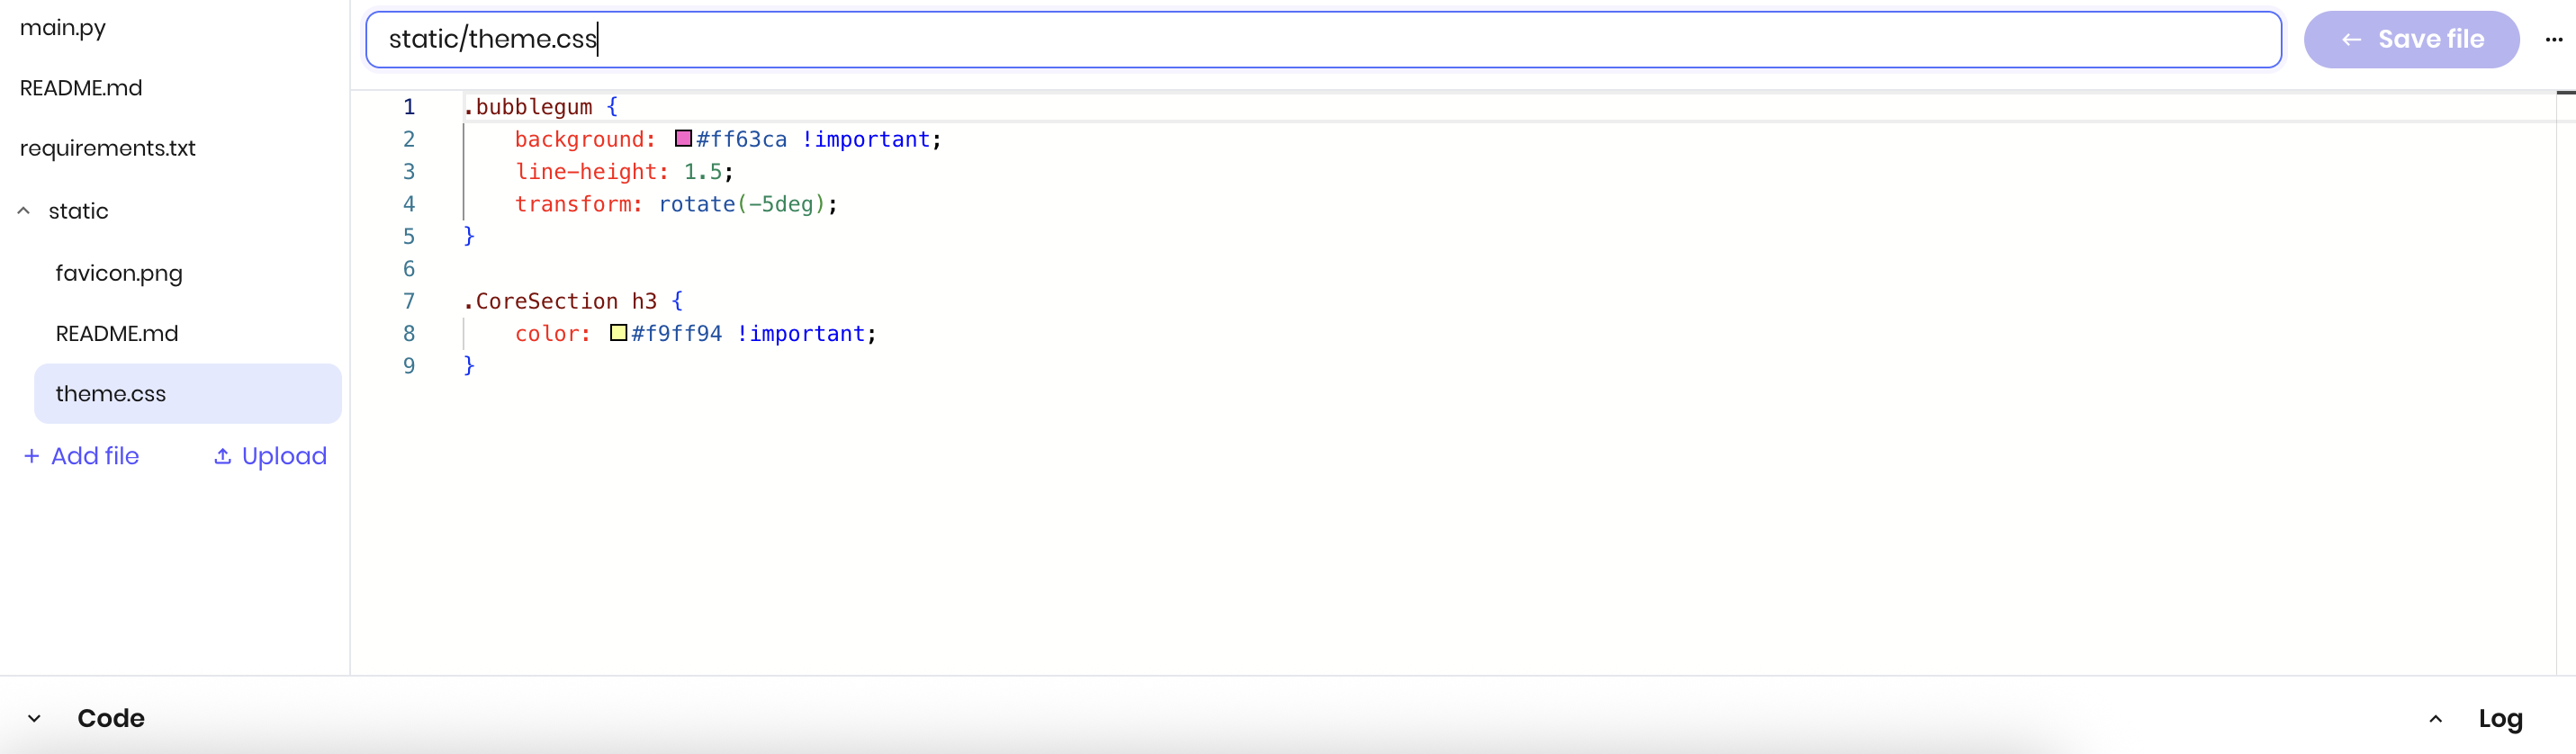
The example below creates a `bubblegum` class to make a pink, rotated component and makes the header font color for `CoreSection h3` elements yellow.
Create a new `.css` file in your project or upload an existing one via the **Code** tab.
This example creates a new file named `theme.css` in the `static` directory with the following content:
```css theme={null}
.bubblegum {
background: #ff63ca !important;
line-height: 1.5;
transform: rotate(-5deg);
}
.CoreSection h3 {
color: #f9ff94 !important;
}
```
## Add a CSS stylesheet
To add more specific and detailed styling for your agent's UI, you can add CSS stylesheets.
To style your agent's UI with CSS, follow these steps:
1. Add a CSS file to your project via the **Code** tab
2. Load the stylesheet into the agent's state
3. Apply CSS classes to components via the component's configuration menu
The example below creates a `bubblegum` class to make a pink, rotated component and makes the header font color for `CoreSection h3` elements yellow.
Create a new `.css` file in your project or upload an existing one via the **Code** tab.
This example creates a new file named `theme.css` in the `static` directory with the following content:
```css theme={null}
.bubblegum {
background: #ff63ca !important;
line-height: 1.5;
transform: rotate(-5deg);
}
.CoreSection h3 {
color: #f9ff94 !important;
}
```
 See [Style Agent Builder components with CSS](#style-agent-builder-components-with-css) for more information about specifically styling Agent Builder components.
To move a file into a directory such as `static`, prepend the directory name to the beginning of the filename. For example, `static/theme.css`.
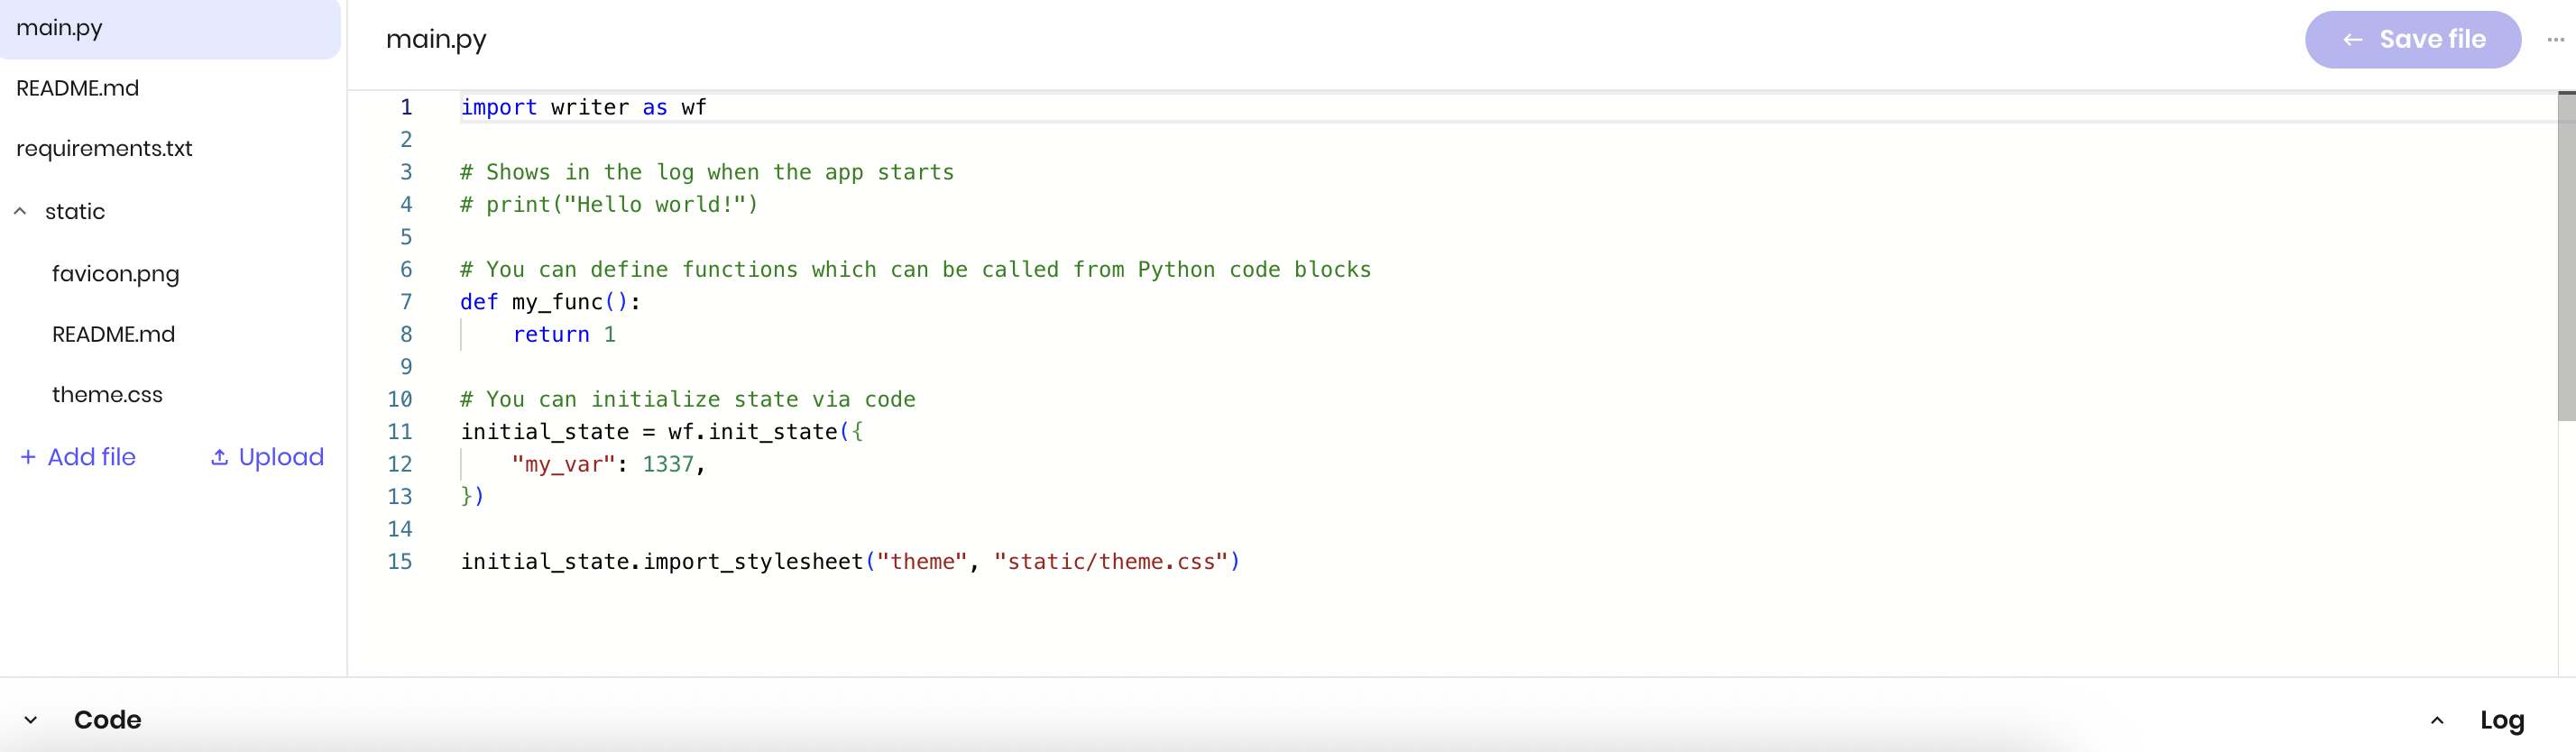
To load the stylesheet when the agent starts, import the CSS file using the state's `import_stylesheet` method in `main.py`. The code below imports the stylesheet named `theme` from the `static` directory.
```python theme={null}
initial_state.import_stylesheet("theme", "static/theme.css")
```
See [Style Agent Builder components with CSS](#style-agent-builder-components-with-css) for more information about specifically styling Agent Builder components.
To move a file into a directory such as `static`, prepend the directory name to the beginning of the filename. For example, `static/theme.css`.
To load the stylesheet when the agent starts, import the CSS file using the state's `import_stylesheet` method in `main.py`. The code below imports the stylesheet named `theme` from the `static` directory.
```python theme={null}
initial_state.import_stylesheet("theme", "static/theme.css")
```
 The first argument is the name you want to give to the stylesheet, which you can reference if there are multiple stylesheets. The second argument is the path to the CSS file.
You can also import stylesheets during runtime by calling the `import_stylesheet` method from the `state` object. See [Switch stylesheets during runtime](#switch-stylesheets-during-runtime) for more information.
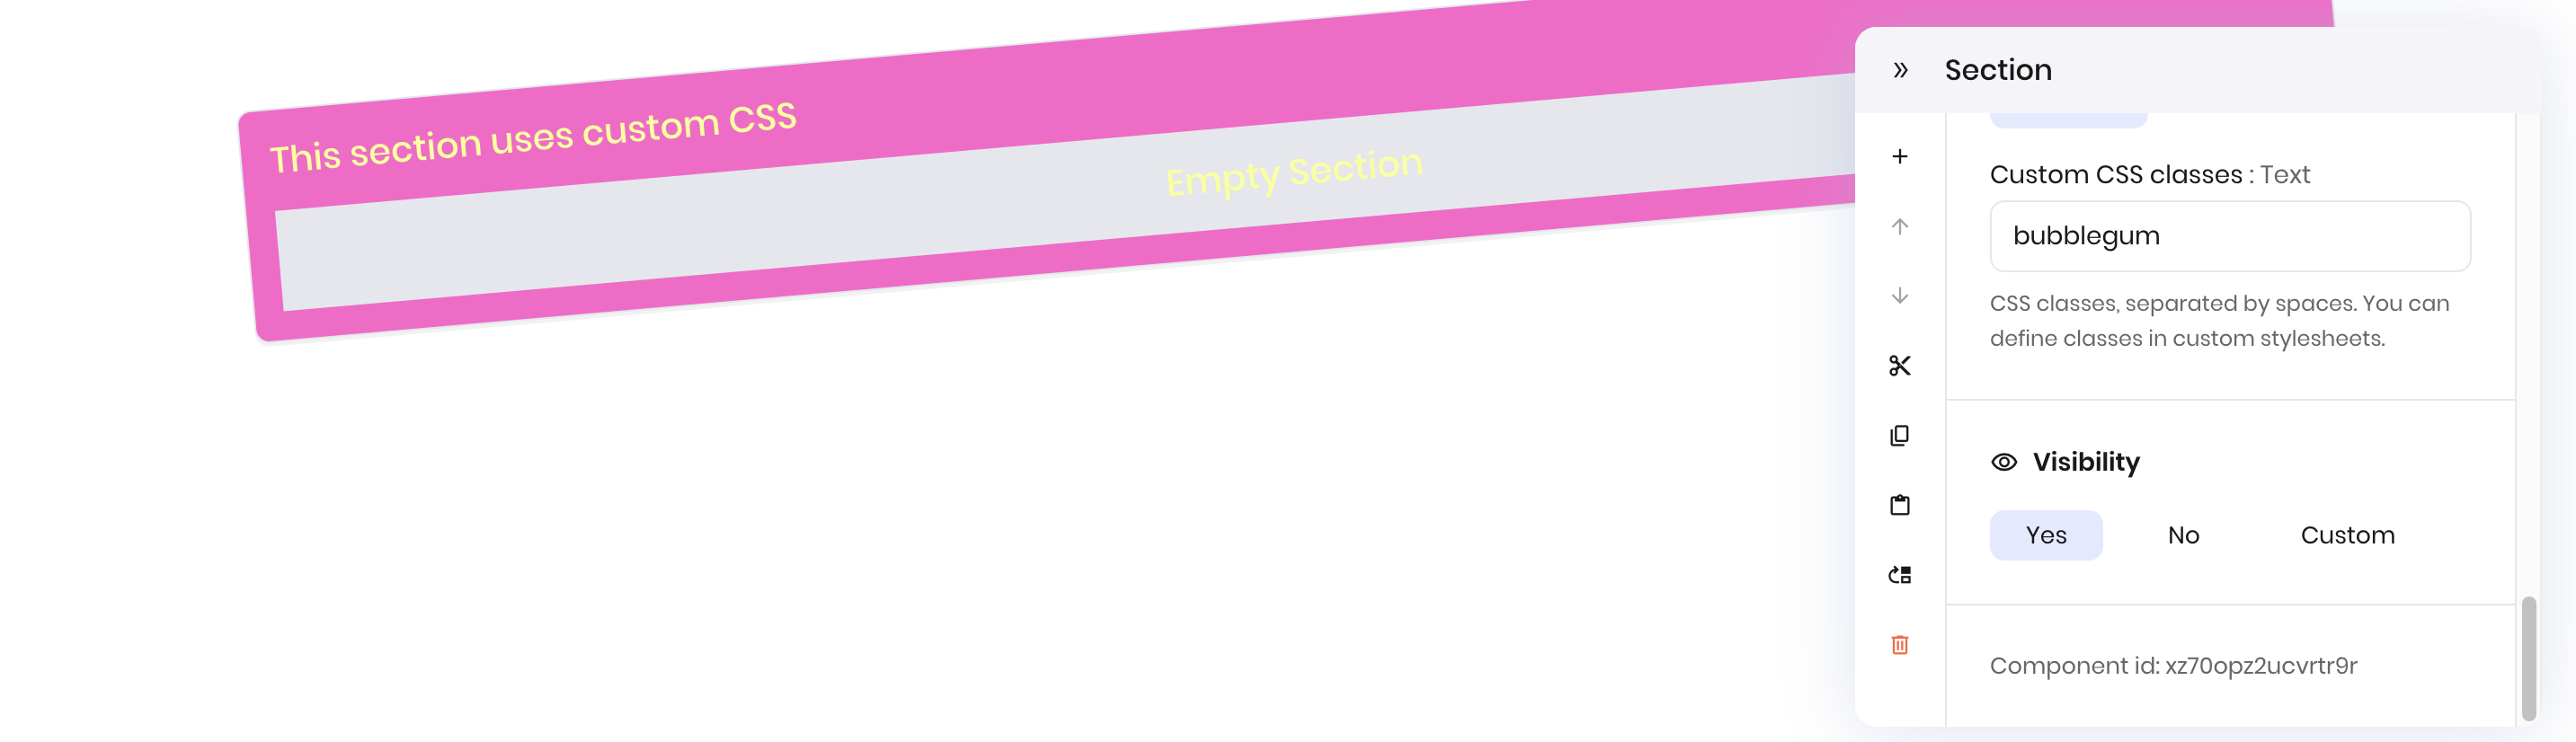
In the component's configuration menu, add a CSS class to the component under **Custom CSS classes**. Separate multiple classes with a space.
This example adds the `bubblegum` class to a `Section` component so that the component's background is pink and rotated 5 degrees. The `CoreSection h3` styling applies to the header for any `Section` components, making the header text yellow.
The first argument is the name you want to give to the stylesheet, which you can reference if there are multiple stylesheets. The second argument is the path to the CSS file.
You can also import stylesheets during runtime by calling the `import_stylesheet` method from the `state` object. See [Switch stylesheets during runtime](#switch-stylesheets-during-runtime) for more information.
In the component's configuration menu, add a CSS class to the component under **Custom CSS classes**. Separate multiple classes with a space.
This example adds the `bubblegum` class to a `Section` component so that the component's background is pink and rotated 5 degrees. The `CoreSection h3` styling applies to the header for any `Section` components, making the header text yellow.
 **CSS changes may not appear immediately due to browser caching.** When you modify a CSS file and refresh the page, you may experience a delay before the changes apply. This is expected behavior caused by browser caching.
To see your CSS changes immediately during development, append a version querystring to your stylesheet path. This works because browsers cache CSS files based on their URL. By changing the querystring parameter, you force the browser to treat it as a new file and download a fresh copy. Increment the version number each time you update the CSS file to see changes immediately:
```python theme={null}
initial_state.import_stylesheet("theme", "static/theme.css?v=1")
# After making changes, update to:
initial_state.import_stylesheet("theme", "static/theme.css?v=2")
```
### Style Agent Builder components with CSS
Agent Builder components each have a class name starting with `Core` that you can use when defining CSS rules.
For example, the `Text` component has the class name `CoreText`. You can use this class name to style all `Text` components with the following CSS rule:
```css theme={null}
.CoreText {
color: red !important;
}
```
The `!important` flag is essential when targeting attributes that are configurable via the component's configuration menu, such as text and background colors. Without the `!important` flag, the styles you define in CSS will be overridden by the component's configuration menu styling, because the configuration menu styling is of higher specificity.
### Switch stylesheets during runtime
You can switch stylesheets during runtime by calling the `import_stylesheet` method. To replace the current stylesheet with a new one, use the same stylesheet name but a different path to a new stylesheet.
The example below switches the stylesheet named `theme` to a different file when the `handle_cyberpunk` or `handle_minimalist` functions are called.
```python theme={null}
def handle_cyberpunk(state):
state.import_stylesheet("theme", "static/cyberpunk_theme.css")
def handle_minimalist(state):
state.import_stylesheet("theme", "static/minimalist_theme.css")
```
**CSS changes may not appear immediately due to browser caching.** When you modify a CSS file and refresh the page, you may experience a delay before the changes apply. This is expected behavior caused by browser caching.
To see your CSS changes immediately during development, append a version querystring to your stylesheet path. This works because browsers cache CSS files based on their URL. By changing the querystring parameter, you force the browser to treat it as a new file and download a fresh copy. Increment the version number each time you update the CSS file to see changes immediately:
```python theme={null}
initial_state.import_stylesheet("theme", "static/theme.css?v=1")
# After making changes, update to:
initial_state.import_stylesheet("theme", "static/theme.css?v=2")
```
### Style Agent Builder components with CSS
Agent Builder components each have a class name starting with `Core` that you can use when defining CSS rules.
For example, the `Text` component has the class name `CoreText`. You can use this class name to style all `Text` components with the following CSS rule:
```css theme={null}
.CoreText {
color: red !important;
}
```
The `!important` flag is essential when targeting attributes that are configurable via the component's configuration menu, such as text and background colors. Without the `!important` flag, the styles you define in CSS will be overridden by the component's configuration menu styling, because the configuration menu styling is of higher specificity.
### Switch stylesheets during runtime
You can switch stylesheets during runtime by calling the `import_stylesheet` method. To replace the current stylesheet with a new one, use the same stylesheet name but a different path to a new stylesheet.
The example below switches the stylesheet named `theme` to a different file when the `handle_cyberpunk` or `handle_minimalist` functions are called.
```python theme={null}
def handle_cyberpunk(state):
state.import_stylesheet("theme", "static/cyberpunk_theme.css")
def handle_minimalist(state):
state.import_stylesheet("theme", "static/minimalist_theme.css")
```